M2 Connecting Power and Devices
Connecting to Power
-
 DC Power (Power Outlet)
 -
 USB-C Power Bank


DC Power (Power Outlet)
- Connect the power cord to the power adapter.
- Connect the power adapter to the DC IN jack at the rear of the projector.
- Connect the power cord plug to a power outlet. When connected, the status LED will turn red.
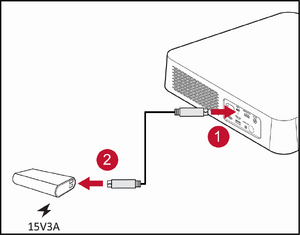
USB-C Power Bank
- Connect one end of the USB Type-C cable to the USB-C port of the projector.
- Connect the other end of the USB Type-C cable to the power bank.
- NOTE: The power bank should be 45W (15V/3A) at least, and support Power Delivery (PD) protocol output.
Connecting to External Devices
-
 HDMI Connection
 -
 USB Connection


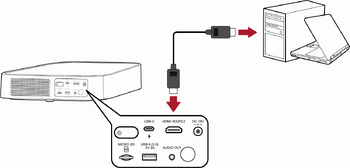
HDMI Connection
Connect one end of an HDMI cable to the HDMI port of your video device. Then connect the other end of the cable to the HDMI port (it supports HDCP 2.0/HDMI 2.2) of your projector.
- NOTE: iPhone/iPad users will need to use an additional adapter.
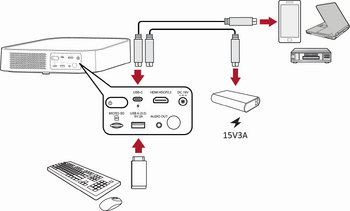
USB Connection
USB-C Connection
Connect one end of a USB Type-C cable to the USB-C port of your device. Then connect the other end of the cable to the USB-C port of your projector.
- NOTE:
- Ensure your USB Type-C device can support video transmission.
- The M2 can also use a USB-C connected power bank to turn on the system. However, the brightness level will be limited to 50% and 30% when the Light Source Level is set as Full or Eco respectively.
USB Type-A Connection
Connect one end of a USB Type-A cable to the USB-A port of your device (if applicable). Then connect the other end of the cable to the USB A port of your projector.
Additionally, you can connect a keyboard, a mouse, dongles, storage devices, etc. to the projector’s USB-A port.
vRemote App
Please see vRemote App
Wireless Screen Mirroring
Please see Wireless Screen Mirroring
Connecting to Audio
Bluetooth Speaker
The projector is equipped with Bluetooth that allows the user to connect the projector to their Bluetooth device wirelessly for audio playback, e.g. Bluetooth speaker.
- NOTE: The M2 projector doesn’t support audio streaming from your mobile device.
-
 Step 1 - Bluetooth Device Search
 -
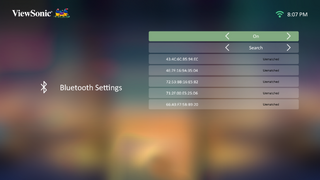 Step 2 - Turn On
 -
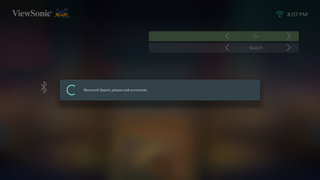 Step 3 - Search for nearby devices


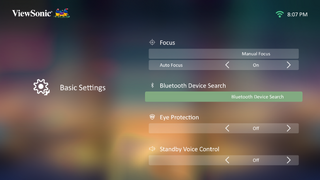
To connect and pair your device:
- Press the Bluetooth button on the remote control, or go to: Setting > Basic Settings > Bluetooth Device Search.
- Ensure that Bluetooth Device Search is On and use the Left and Right directional buttons on the remote control to adjust if needed.
- Once On, the projector will search for nearby Bluetooth devices. Select your device from the list and press OK on the remote control.
Connecting to Networks
Wi-Fi Connection
With the included Wi-Fi dongle, you can easily connect to wireless internet networks.
-
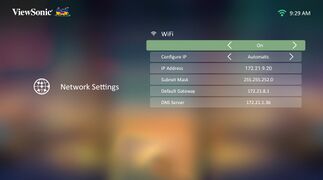 Step 3 - Turn On Wi-Fi
 -
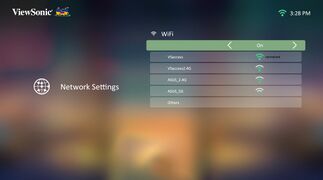 Step 4 - Select Network
 -
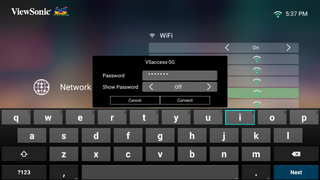 Step 5 - Enter credentials


To connect to a Wi-Fi network:
- Insert the Wi-Fi dongle into the projector’s Wi-Fi dongle socket.
- Go to: Home > Setting > Network Settings > Wi-Fi
- Press Left or Right on the remote control to select On.
- Available Wi-Fi networks will then be displayed. Select one of the available Wi-Fi networks.
- If you connect to a secure Wi-Fi network, you must enter the password when prompted.
Custom SSID
- Ensure the Wi-Fi dongle is plugged into the projector’s Wi-Fi dongle socket.
- Go to: Home > Setting > Network Settings > Wi-Fi
- Press Left or Right on the remote control to select On.
- From the available Wi-Fi networks list select Others and press OK on the remote control.
- Enter the SSID and select the security level.
- Enter the password when prompted.
-
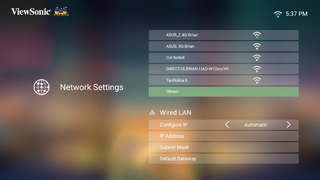 Step 4 - Select Others
 -
 Step 5 - Enter SSID
 -
 Step 6 - Enter Password


