XG272-2K-OLED On-Screen Display Menu Options
From ViewSonic Documentation
Game Modes
- Press
 or move the Joy Key
  /
/  /
/  /
/  to open the On-Screen Display (OSD) Menu.
 - Move the Joy Key or to select Modes. Then move the Joy Key to enter the Modes menu.
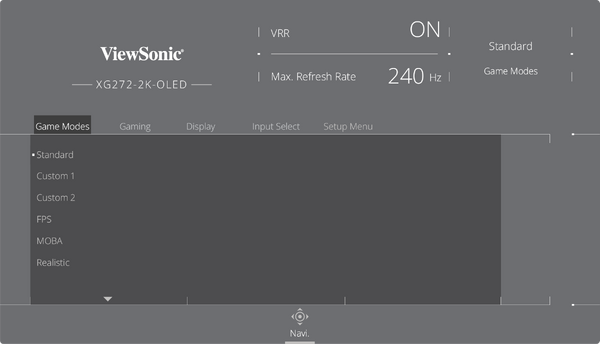
- Move the Joy Key or to select the setting. Then press the Joy Key to confirm the selection.

| Menu Option | Description |
|---|---|
| Standard | For general use. |
| Custom 1/2 | Two customizable settings to match individual preferences. |
| FPS | For First-Person Shooter games. |
| MOBA | For Multiplayer Online Battle Arena games. |
| Realistic | For true-to-life color representation. |
| Vibrant | For bright and saturated colors. |
| Console | For color accuracy for console use. |
Gaming
- Press or move the Joy Key / / / to open the On-Screen Display (OSD) Menu.
- Move the Joy Key or to select Gaming. Then move the Joy Key to enter the Gaming menu.
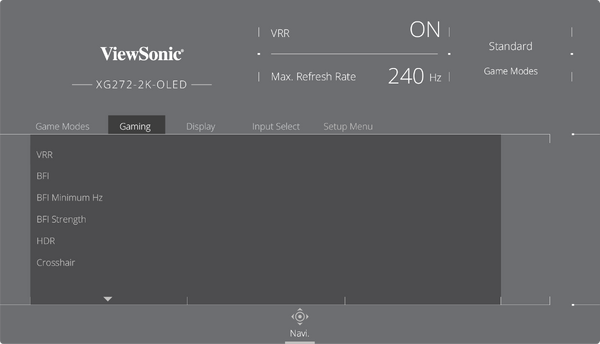
- Move the Joy Key or to select the setting. Then press the Joy Key to confirm the selection.
Option Description DisplayHDR Passes AMD FreeSync Premium Pro certification and VESA DisplayHDR 1400 certification. CinematicHDR HDR setting for movies. GameplayHDR HDR setting for gaming. - Note:
- When DisplayHDR is enabled, you cannot adjust the brightness. The brightness depends on the HDR content.
- You can adjust the brightness on CinematicHDR and GameplayHDR.
- When you use HDR, please make sure the Windows HDR is turned on and the content also supports HDR.

| Menu Option | Description |
|---|---|
| Variable Refresh Rate (VRR) | Eliminates screen stutter and tearing. |
| BFI | Black Frame Insertion (BFI), when turned on, reduces the persistent blur that can appear behind fast-moving objects on screen. |
| BFI Minimum Hz | Sets the minimum refresh rate for BFI. |
| BFI Strength | Sets the BFI strength, adjusting the black frame length. |
| HDR | Reduces the overall contrast of a given scene so that detail in the highlights and shadows can be seen. |
| Crosshair | Aims more clearly and quickly during FPS games with the on-screen Crosshair overlay. For more, see Crosshair. |
| Gaming RGB | Controls the RGB lighting on the monitor. When turned on, or after being reset, the default Breathing mode will be activated. |
Display
- Press or move the Joy Key / / / to open the On-Screen Display (OSD) Menu.
- Move the Joy Key or to select Display. Then move the Joy Key to enter the Display menu.
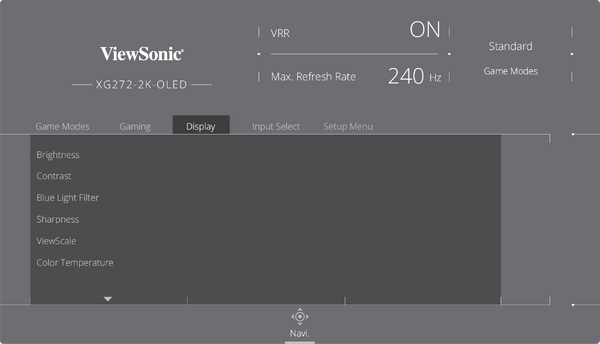
- Move the Joy Key or to select the menu option. Then move the Joy Key to confirm the selection.
- Move the Joy Key or to select the setting. Then move the Joy Key to confirm the selection (if applicable).
Note: Some sub-menu options may have another sub-menu. To enter the respective sub-menu, move the Joy Key.
Option Description Auto Automatically recognizes the input signal’s color space. RGB Mode Sets the input signal color format as RGB. YUV Sets the input signal color as YUV. - Auto: Automatically recognizes the color format and black and white levels.
- RGB: The input signal color is RGB.
- YUV: The input signal color is YUV.

| Menu Option | Description |
|---|---|
| Brightness | Adjusts background black levels of the screen image. |
| Contrast | Adjusts the difference between lightest and darkest parts of the picture and change the amount of black and white in the image. |
| Blue Light Filter | Blocks high-energy blue light for a more comfortable viewing experience. |
| Sharpness | Adjusts the on-screen's image quality. |
| ViewScale | Adjusts the display size of the image. |
| Color Temperature | Sets the color temperature.
|
| Color Adjust | Color Space Allows users to choose which color space they would like to use for color output. |
Input Select

ViewMode
| Menu Option | Description |
|---|---|
| Standard | Select this option for general use. |
| Movie | Select this option for watching movies. |
| Web | Select this option for surfing the web. |
| Text | Select this option for text-based tasks. |
| MAC | Select this option when connecting to Mac computers. |
| Mono | Select this option for monochrome. |
Audio Adjust
| Menu Option | Description |
|---|---|
| Volume | Adjust the volume level. |
| Mute | Enable to disable the sound. |
Setup Menu
| Menu Option | Description |
|---|---|
| Language | Select an available language for the OSD Menu. |
| Information | Display the monitor information. |
| Quick Access | Select which options to have present in the Quick Access Menu. |
| Crosshair | Aim more clearly and quickly during FPS games with the on-screen overlay. |
| Elite RGB | This setting controls the RGB lighting on the back of the monitor and under the bezel in order to enhance your RGB experience. When switched on, or after being reset, the default ‘Rainbow Wave’ will activate. |
| Resolution Notice | Enable this option to allow the system to inform users that the current viewing resolution is not the correct native resolution. |
| Boot Up Screen | Toggle the start screen On or Off. |
| OSD Timeout | In addition, the RGB lights are also synced with several key partners. Downloading their software will give you the power to manipulate your RGB capabilities even further. |
| OSD Background | If you would like to leverage partnered software see the advanced setup below. |
| Multi-Picture | Off Disable this function. PBP Left-Right
PIP
|
| Power Indicator | Set the Power Indicator On or Off. If the setting is set to On, the power indicator lights blue when the device is turned on. |
| Auto Power Off | Enable this option to allow the monitor to automatically turn off after a certain amount of time. |
| Sleep | Set the amount of idle time before the monitor enters Sleep mode. |
| ECO Mode | Choose between various modes, based on power consumption.
|
| Type C: USB 3.2 | Select USB Type C with USB 2.0 or USB 3.2.
|
| DDC/CI | Enable this option to allow the monitor control via the graphics card. |
| DSC | Display Stream Compression technology supports compressing and decompressing each frame on the fly, with no loss in image quality.
|
| HDMI 2.0 | Enable/Disable HDMI 2.0 support.
|
| DisplayPort 1.2 | Enable/Disable DisplayPort 1.2 support. |
| Standby Charger | When activated, the USB will continue to supply power even when the monitor is in standby mode. |
| Rename | Rename the personalized custom profile. |
| Memory Recall | Resets all settings to their default values. |