X100-4K+ Operation
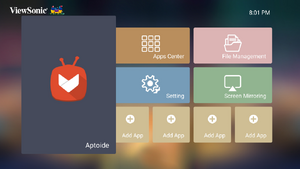
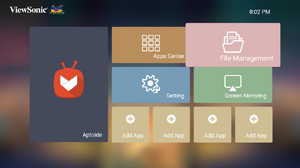
Home Screen
The Home Screen is displayed every time you start the projector. To navigate the Home Screen, simply use the directional buttons on the remote control. You can return to the main Home Screen at any time by pressing the Home button on the remote control, regardless of what page you are on.

Aptoide
The projector is pre-loaded with the Aptoide store, which allows users to download and install different Apps.
-
 Step 1 - Select Aptoide
 -
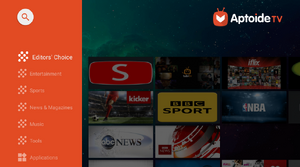 Step 2 - Navigate the store


- Select: Home > Aptoide.
- Use the directional buttons to navigate the menu options. When you find your preferred App, press the OK button to install it.
- NOTE: Users can install third-party Apps by .apk file in File Management. However, some third-party Apps may have compatibility issues. Additionally, some Apps may be Region-Specific and/or require a keyboard and mouse.
Apps Center
View, launch, and uninstall Apps.
-
 Step 1 - Select Apps Center
 -
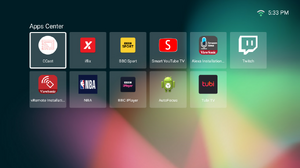 Step 2 - Launch the App


- To view your Apps, select: Home > Apps Center.
- Use the directional buttons to select the desired App. Then press OK on the remote control to launch the App.
- NOTE: Press the Home button on the remote control to return to the Home Screen at anytime.
To Uninstall Apps
- Open the Apps Center by selecting: Home > Apps Center.
- Use the directional buttons to select the desired App.
- Press and hold OK on the remote control for three (3) seconds.
- Select OK to uninstall the App.
- NOTE: Press the Home button on the remote control to return to the Home Screen at anytime.
How to Access Netflix
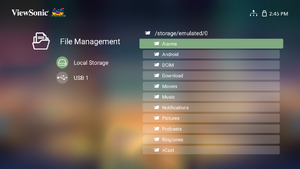
File Management
Easily manage files and folders.
-
 Step 1 - Select File Management
 -
 Step 2 - Navigate the files


- Select: Home > File Management.
- Select a device on the source list: USB, Local Storage, MicroSD, etc. Use the directional buttons to select the desired file. Then press OK on the remote control to open the selected file.
- Press the Return button to go to a previous a level.
- NOTE: Press the Home button on the remote control to return to the Home Screen at anytime.
How to Edit a File

- While in File Management, press and hold the OK button for three (3) seconds.
- A check box will appear at the front of each file. Use the directional buttons and press OK to select one or more files.
- By pressing the Right button, Copy, Paste, Cut, Delete, Select All, and Return boxes will be available for use.
- Select your desired action and press OK to execute.
- If you are Copying or Cutting, select your destination folder to complete the process.
How to Use Control Bar Buttons
The Control Bar buttons will appear on screen if a video, music, or photo file are selected to be opened.

Tips for using USB
When using USB for reading and/or storage please keep in mind the following:
- Some USB storage devices may not be compatible.
- If you use an USB extension cable, the USB device may not recognize the USB.
- Only use USB storage devices formatted with Windows FAT32 or NTFS file system.
- Larger files will need extra time to load.
- Data on USB storage devices may be damaged or lost. Back up important files.
Supported File Formats
- Supported Office formats:

- Supported Multimedia formats:

Video - File Management
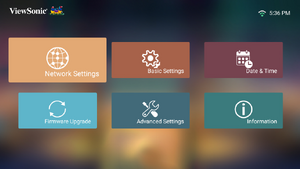
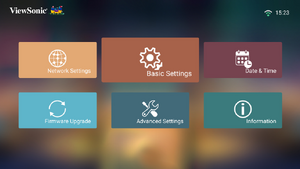
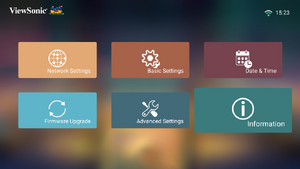
Setting
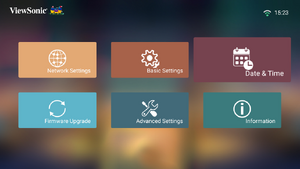
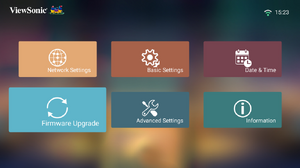
Under Setting you can adjust Network, Basic, and Advanced Settings, Date & Time, Firmware Update, and view Information.
Network Settings
-
 Step 1 - Select Network Settings

- Select: Home > Setting > Network Settings.
- Choose from one of the available options: Wi-Fi or Wired LAN.
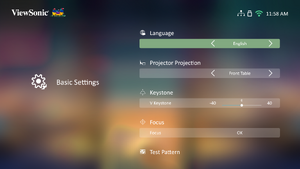
Basic Settings
-
 Step 1 - Select Basic Settings
 -
 Step 2 - Choose an option


- Select: Home > Setting > Basic Settings.
- Use the Up and Down buttons to select the desired option and press OK. Then use the Left and Right buttons to make adjustments or selections.
- To return to a previous menu press the Return button.
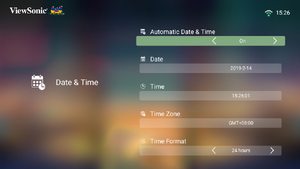
Date & Time
Adjust Date, Time, Time Zone, and Time Format.
- NOTE: The time is displayed in the top-right corner after connecting to the Internet.
-
 Step 1 - Select Date & Time
 -
 Step 2 - Choose an option


- Select: Home > Setting > Date & Time.
- Use the Up and Down buttons to select the desired option and press OK. Then use the Left and Right buttons to make adjustments or selections.
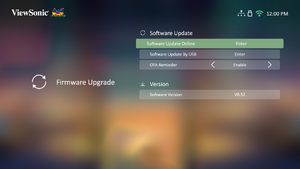
Firmware Upgrade
Users can update the firmware by internet or USB, and check the version number.
- NOTE: Do not unplug the power cord, USB, or disconnect from the Internet during the upgrading process.
-
 Step 1 - Select Firmware Upgrade
 -
 Step 2 - Choose an option


- Before entering the Firmware Upgrade menu, ensure the projector is connected to the Internet.
- To enter the menu, select: Home > Setting > Firmware Upgrade.
Firmware Update Online
- Go to: Home > Setting > Firmware Upgrade > Software Update Online.
- Select Enter by pressing OK on the remote control.
- The system will check the ViewSonic website (OTA) and display a dialog message if there is new Firmware.
- After selecting Yes, a progress bar will appear as the update process begins.
- After reaching 100% the projector will restart. The whole process will take about 10 minutes.
- After updating the Firmware, it will take a few minutes to restart the projector.
Firmware Update by USB
- NOTE: NTFS format, read only.
- Download the latest version from the ViewSonic website and copy the file to a USB device.
- Plug the USB into the projector, then go to: Home > Setting > Firmware Upgrade > Software Update By USB.
- Select Enter by pressing OK on the remote control.
- The system will detect the Firmware version and display the above dialog message.
- After selecting Yes, a progress bar will appear as the update process begins.
- After reaching 100% the projector will restart. The whole process will take about 10 minutes.
- After updating the Firmware, it will take a few minutes to restart the projector.
Advanced Settings
-
 Step 1 - Select Advanced Settings
 -
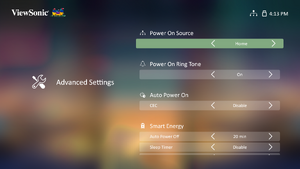 Step 2 - Choose an option


- Select: Home > Setting > Advanced Settings.
- Use the Up and Down buttons to select the desired option and press OK. Then use the Left and Right buttons to make adjustments or selections.
- To return to a previous menu press the Return button.
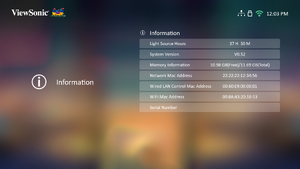
Information
- NOTE: Press the Home button on the remote control to return to the Home Screen at anytime.
-
 Step 1 - Select Information
 -
 Step 2 - View the information


- Select: Home > Setting > Information.
- View system status and information.
Screen Mirroring
Please see Wireless Screen Mirroring
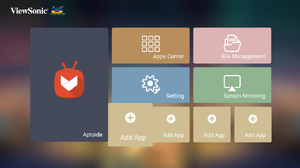
Adding Apps
Add your favorite Apps to the Home Screen.
-
 Step 1 - Select Add App
 -
 Step 2 - Navigate the Apps


- From the Home Screen, select Add App and then press OK on the remote control.
- Use the directional buttons to select the desired App and press OK.
- Now your favorite App will appear on the Home Screen.
Delete Apps from the Home Screen
- From the Home Screen, select the App you want to delete and press and hold OK for three (3) seconds.
- The message, “Do you want to Delete this application from My Favorites?” will appear.
- Select Yes, and press OK to delete the App.
Controlling the Projector through a LAN Environment
The projector supports Crestron® software. With the correct settings in the LAN Control Settings menu, you can manage the projector from a computer using a web browser when the computer and projector are properly connected to the same local area network.

Configuring the LAN Control Settings
If you are in an Automatic IP environment:
- Take a RJ45 cable and connect one end to the RJ45 Control port of the projector, and the other end to your network.
- Go to: Setting > Network Settings > Wired LAN Control.
- Select Configure IP and ensure it is set to Automatic.
- Wait for 15-20 seconds, then re-enter LAN Settings. Now, the projector’s IP Address, Subnet Mask, Default Gateway, and DNS Server settings will be displayed.
- Make note of the IP Address displayed in the Projector IP Address row.
- NOTE:
- If the Projector IP Address still does not appear, contact your network administrator.
- If the RJ45 cables are not properly connected, the Projector IP Address, Subnet Mask, Default Gateway, and DNS Server will display 0.0.0.0. Ensure the cables are properly connected and try the above steps again.
- If you need to connect to the projector in its Standby Mode, set Standby LAN Control to On in the Network Settings menu.
If you are in a Manual Static IP environment:
- Take a RJ45 cable and connect one end to the RJ45 Control port of the projector, and the other end to your network.
- Go to: Setting > Network Settings > Wired LAN Control.
- Highlight LAN Settings and select Manual IP.
- Contact your ITS administrator for information on the Projector IP Address, Subnet Mask, Default Gateway, and DNS Server.
- Using the directional buttons, select the item you want to modify, and press Left/Right to enter the value.
- To save, select Apply and press Enter.
- NOTE: If the RJ45 cables are not properly connected, the Projector IP Address, Subnet Mask, Default Gateway, and DNS Server will display 0.0.0.0. Ensure the cables are properly connected and try the above steps again.
Controlling the Projector through a Web Browser
Once you have the correct IP Address for the projector and the projector is On or in Standby Mode, you can use any computer that is on the same local area network to control the projector.
- NOTE:
- If you are using Microsoft Internet Explorer, make sure it is version 7.0 or higher.
- The screenshots are for reference only, and may differ from the actual design.
- Please pay attention to the limitation of input length (including space and other punctuation keys) in the list below:
| Category Item | Input Length | Maximum Number of Characters | |
|---|---|---|---|
| Network Settings | Network | DHCP/Manual | (N/A) |
| IP Address | XXX.XXX.XXX.XXX | ||
| Subnet Mask | XXX.XXX.XXX.XXX | ||
| Gateway | XXX.XXX.XXX.XXX | ||
| DNS Server | XXX.XXX.XXX.XXX | ||
| Password | Administrator | (N/A) | |
| New Password | 4 | ||
| Confirm Password | 4 | ||
| SNMP | SysLocation | 22 | |
| SysName | 22 | ||
| SysContact | 22 | ||
| Email Alert | Email Setting | To | 40 |
| Cc | 40 | ||
| Subject | 40 | ||
| From | 40 | ||
| SMPT Setting | Server | 30 | |
| User Name | 21 | ||
| Password | 14 | ||
| Email Alert | Alert Condition | Fan Error | (N/A) |
| Light Source Error | (N/A) | ||
| Over Temperature | (N/A) | ||
| Submit | (N/A) | ||
| Issue Test Mail | (N/A) | ||
- Enter the address of the projector in the address bar of your browser and press Enter.
- The main page of the Network Control will load:
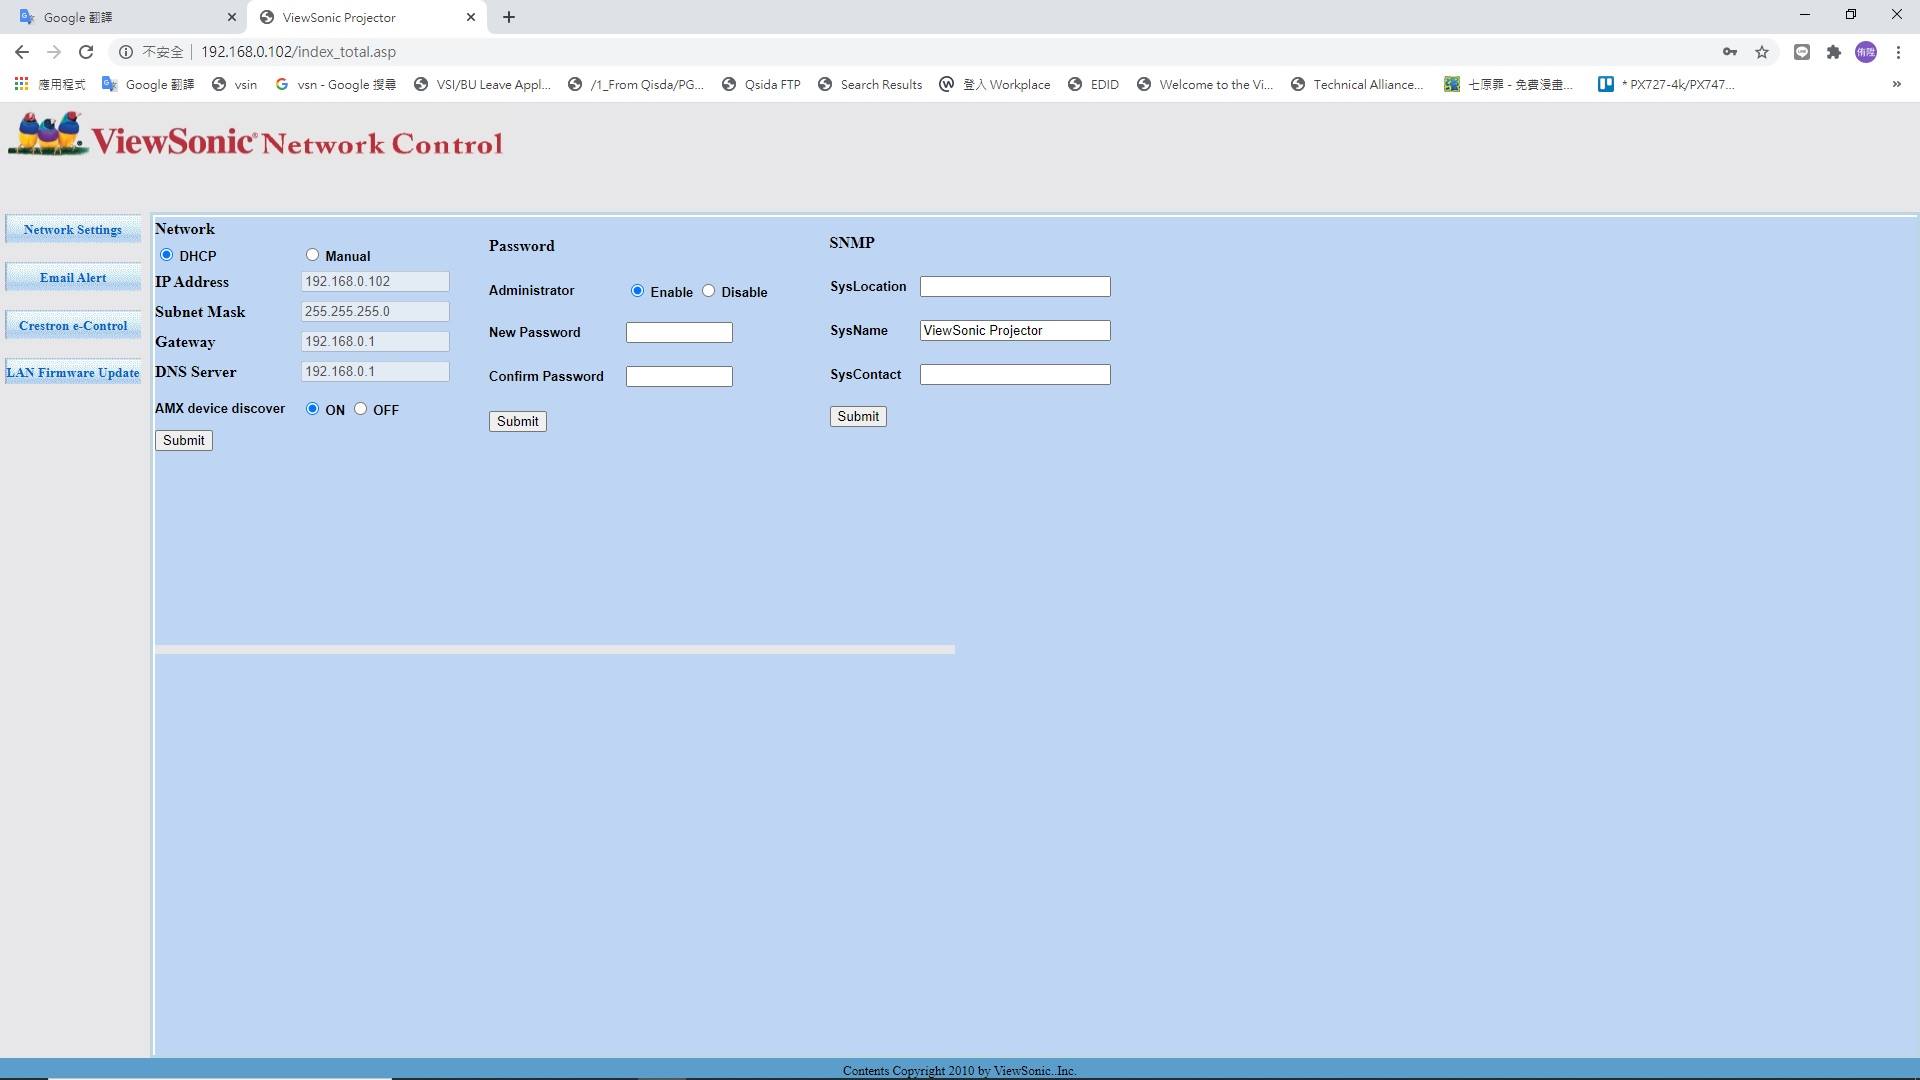
- NOTE: Accessing the Network Settings, Email Alert page, or Projector/LAN Firmware update page requires the Administrator’s password. The default password is 0000.
- This page allows you to make adjustments to the SNMP settings.
- If your projector is connected to a network which supports Simple Mail Transfer Protocol (SMTP), you can configure it to alert you via email on significant events.
- The Crestron (e-Control)® page displays the Crestron e-Control user interface.


About Crestron e-Control®
The Crestron e-Control® page provides a variety of virtual keys to control the projector or adjust the projected pictures.

- These buttons function the same as the ones on the OSD Menus or remote control.
- To switch between input signals, click on the desired signal.
- NOTE:
- The source list varies according to the connections available on the projector.
- When you use the projector control panel or remote control to change the OSD Menu settings, it make take a while for the web browser to synchronize these changes with the projector.
- NOTE:
The Tools page allows you to manage the projector, configure the LAN control settings, and secure access to remote network operations on the projector.

- This section is only used with the Crestron Control System. Please contact Crestron or refer to its user manual for setup information.
- Name the projector, keep track of its location, and the person in charge of it.
- Adjust the LAN Control Settings.
- Once set, access to the remote network operation on the projector will be password protected.
- Once set, access to the Tools page will be password protected.
- NOTE:
- To prevent errors, only input the English alphabet and digits on the Tools page.
- After making the adjustments, press the Send button and the data will be saved for the projector.
- NOTE:
- Press Exit to go back to the Remote Network Operation page.
Please pay attention to the limitation of input length (including space and other punctuation keys) in the list below:
| Category Item | Input Length | Maximum Number of Characters |
|---|---|---|
| Crestron Control | IP Address | 16 |
| IP ID | 4 | |
| Port | 5 | |
| Projector | Projector Name | 22 |
| Comment | 32 | |
| Assigned To | 22 | |
| Network Configuration | DHCP (Enabled) | (N/A) |
| IP Address | 16 | |
| Subnet Mask | 16 | |
| Default Gateway | 16 | |
| DNS Server | 16 | |
| User Password | Enabled | (N/A) |
| New Password | 15 | |
| Confirm | 15 | |
| Admin Password | Enabled | (N/A) |
| New Password | 15 | |
| Confirm | 15 |
The Info page displays the information and status of the projector. For more information, visit: http://www.crestron.com.