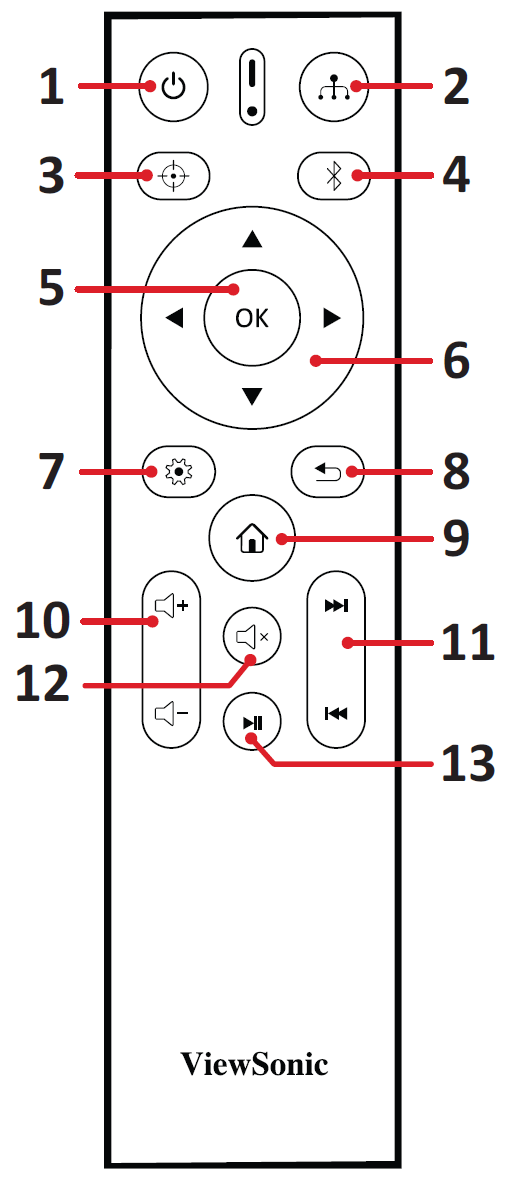
M10 Remote Control
Overview
| Number | Button | Description |
|---|---|---|
| 1 | Power | Turns the projector on or off. |
| 2 | Source | Displays the input source selection menu. |
| 3 | Focus | Automatically focus the image. To manually adjust, press and hold the Focus button on the remote control for three seconds. |
| 4 | Bluetooth | Displays the Bluetooth setting menu. |
| 5 | OK | Confirms the selection. |
| 6 | Up/Down/Left/Right | Navigate and select menu items and make adjustments. |
| 7 | Setting | Displays the Setting menu. |
| 8 | Return | Returns to the previous screen. |
| 9 | Home | Access the Home screen. |
| 10 | Volume | Increase or decrease the volume level. |
| 11 | Next/Previous | Move to next/previous. |
| 12 | Mute | Mute or unmure the sound. |
| 13 | Play/Pause | Play or pause content. |
Effective Range
To ensure proper function of the remote control follow the steps below:
- The remote control must be held at an angle within 30° perpendicular to the projector’s IR remote control sensor(s).
- The distance between the remote control and the sensor(s) should not exceed 8 m (26 ft.)
Replacing the Batteries
- Remove the battery cover from the bottom of the remote control by pressing the finger grip and sliding it across.
- Remove any existing batteries (if necessary) and install two AAA batteries observing the battery polarities as indicated in the base of the battery compartment. Positive (+) goes to positive and negative (-) goes to negative.
- Replace the battery cover by aligning it with the base and pushing it back into position.
- NOTE:
- Avoid leaving the remote control and batteries in excessive heat or a humid environment.
- Replace only with the same or equivalent type recommended by the battery manufacturer.
- If the battery is drained or if you will not be using the remote control for an extended period of time, remove the battery to avoid damage to the remote control.
- Dispose of used batteries according to the manufacturer’s instructions and local environment regulations for your region.

