IFP110 On-Screen Display Menu
On-Screen Display (OSD) Menu - General Settings
Access Input, Display, and other general settings through the OSD Menu.
-
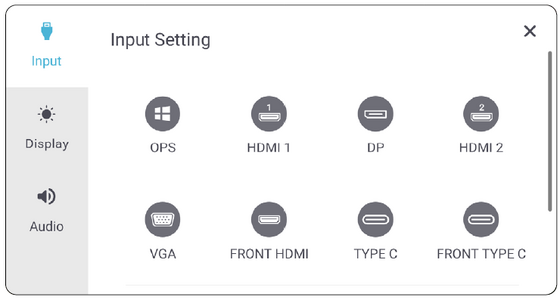 Input Settings
 -
 Display Settings


Open the OSD Menu by pressing INPUT on the remote control or touching the Input Source icon ![]() .
.

Input sources can also display the signal source icon.

Input Settings
To select an Input Source:
- Press INPUT on the remote control or touch the Input Source icon
 to display the Input Settings menu.
 - Press ▼/▲/◄/► on the remote control to select the input source you want.
Note: The PC source will only be visible when a slot-in computer is installed.
- Press ENTER on the remote control, or touch the input source.
- Press BACK
 on the remote control, or touch a blank area outside of the menu to exit.
To adjust the brightness:
- Press INPUT on the remote control or touch the Input Source icon to display the Input Settings menu.
- Touch and drag the brightness slider directly to adjust the backlight value.
- Press BACK on the remote control, or touch a blank area outside of the menu to exit.
To adjust the volume:
- Press INPUT on the remote control or touch the Input Source icon to display the Input Settings menu.
- Touch and drag the volume slider directly to adjust the value, or press +/- on the remote control to adjust.
Note: Pressing Mute on the remote control will mute/unmute the volume.
- Press BACK on the remote control, or touch a blank area outside of the menu to exit.
Display Settings


To adjust the display settings:
- Press INPUT on the remote control or touch the Input Source icon to display the Input Settings menu. Then select the Display tab.
- Press ▼/▲/◄/► on the remote control to select the menu option you want.
- Press ENTER on the remote control to confirm or press ◄/► to adjust the menu option.
Note: You can also touch/adjust the menu option directly.
- Press BACK on the remote control, or touch a blank area outside of the menu to exit.
Display Settings - Menu Options
| Item | Description | ||||||||||
|---|---|---|---|---|---|---|---|---|---|---|---|
| Auto Brightness | Automatic brightness adjustment. Adjusts maximum brightness according to ambient light levels. | ||||||||||
| Eye Care | Adjusts the filter that blocks high-energy blue light for a more comfortable viewing experience. | ||||||||||
| Picture Mode | Select a predefined picture setting.
| ||||||||||
| Brightness | Adjust the background black levels of the screen. | ||||||||||
| Contrast | Adjusts the difference between the image background (black level) and the foreground (white level). Use this to set the peak white level after you have previously adjusted the Brightness setting to suit your selected input and viewing environment. | ||||||||||
| Saturation | Adjust the amount of color present. | ||||||||||
| Sharpness | A high value results in a sharper picture; a low value softens the picture. | ||||||||||
| Color Temperature | Adjust the color temperature value. |
Eye Care
Eye Care blocks high-energy blue light for a more comfortable viewing experience.

- Calculating Breaks
- When viewing screens for extended periods, it is recommended to take periodic breaks from viewing. Short breaks of at least 10 minutes are recommended after one (1) hour of continuous viewing.
Taking shorter, more frequent breaks are generally more beneficial than longer, less frequent breaks. - Focus Fatigue (20-20-20 Rule)
- To reduce the risk of eye fatigue by constantly looking at the screen, look away from the screen at least every 20 minutes and gaze at a distant object (at least 20 feet away) for at least 20 seconds.
- Looking at Distant Objects
- While taking breaks, users can further reduce eye strain and dryness by focusing on objects that are further away from them for 10-15 seconds, then gaze at something up close for 10-15 seconds. Repeat this up to 10 times. This exercise reduces the risk of your eyes’ focusing ability to “lock up” after prolonged computer work.
Eye and Neck Exercises
Eye Exercises
Eye exercises can help minimize eye strain. Slowly roll your eyes to the left, right, up, and down. Repeat as many times as needed.

Neck Exercises
Neck exercises can also help minimize eye strain. Relax your arms and let them hang at your sides, bend forward slightly to stretch the neck, turn your head to the right and to the left. Repeat as many times as needed.
Applications
Much like any smart phone or tablet you can install several different applications.

Applications can be accessed from the Toolbar, directly from the Home Screen via shortcuts, or by selecting the Applications icon (![]() ).
).
| Icon | Description | |
|---|---|---|
| myViewBoard Display | Wirelessly mirror screens to a larger display. | |
| myViewBoard Manager | Remotely manage multiple installations of ViewSonic devices. | |
| myViewBoard Whiteboard | A digital whiteboarding application. | |
| Settings | Access the System Settings. | |
| vCast | Working with ViewBoard Cast software, receive vCastSender laptop screens (Windows/Mac/Chrome) and mobile (iOS/Android) users’ screens, photos, videos, annotations, and camera(s). | |