
M1X Using the Projector: Difference between revisions
// via Wikitext Extension for VSCode |
// via Wikitext Extension for VSCode |
||
| Line 19: | Line 19: | ||
<li> | <li> | ||
<p>Open the Smart Stand by moving the lens cover down.</p> | <p>Open the Smart Stand by moving the lens cover down.</p> | ||
<div class="res-img">[[File:M1X_Startup.png|350px]]</div> | <div class="res-img">[[File:M1X_Startup.png|350px|alt=Lens Cover down]]</div> | ||
</li> | </li> | ||
<li> | <li> | ||
<p>Move the Smart Stand to your desired viewing angle.</p> | <p>Move the Smart Stand to your desired viewing angle.</p> | ||
<div class="res-img">[[File:M1X_Smartstand.png|400px]]</div> | <div class="res-img">[[File:M1X_Smartstand.png|400px|alt=Adjusting the Smart Stand's tilt angle]]</div> | ||
{{Note|<br>Do not place any heavy objects or press down forcefully on the projector’s I/O side when opening the Smart Stand as it may cause damage to the projector.[[File:M1X_Smartstand_Warning.png|center|200px]] | {{Note|<br>Do not place any heavy objects or press down forcefully on the projector’s I/O side when opening the Smart Stand as it may cause damage to the projector.[[File:M1X_Smartstand_Warning.png|center|200px|Warning of heavy press on the I/O section]] | ||
}} | }} | ||
</li> | </li> | ||
| Line 35: | Line 35: | ||
</p> | </p> | ||
<div class="res-img">[[File:M1X_Height_Adjust.png|700px]]</div> | <div class="res-img">[[File:M1X_Height_Adjust.png|700px|Alt=Adjuting the height of the Smart Stand]]</div> | ||
{{Note|If the projector is not placed on a flat surface or the screen and the projector are not perpendicular to each other, the projected image can become trapezoidal. However, the “Auto Vertical Keystone” function will correct the issue automatically.}} | {{Note|If the projector is not placed on a flat surface or the screen and the projector are not perpendicular to each other, the projected image can become trapezoidal. However, the “Auto Vertical Keystone” function will correct the issue automatically.}} | ||
| Line 43: | Line 43: | ||
</p> | </p> | ||
<div class="res-img">[[File:M1X_Focus.png|400px]]</div> | <div class="res-img">[[File:M1X_Focus.png|400px|Alt=Adjusting the focus ring]]</div> | ||
=First Time Activation= | =First Time Activation= | ||
| Line 49: | Line 49: | ||
==Bluetooth Remote Pairing== | ==Bluetooth Remote Pairing== | ||
#Press and hold the '''Settings''' and '''Return''' button for three seconds to enter pairing mode. | |||
#The LED on the remote control will flash blue. | |||
#A “Successfully Paired” message will show. If not, please try again or select Next and go to: '''Apps Center''' > '''RC BT Pairing'''. | |||
<div class="res-img">[[File:M1X_BT_Remote_Pair.png|400px|alt=Using Bluetooth to remote paire a device]]</div> | |||
==Preferred Language== | ==Preferred Language== | ||
Select the desired language and press '''OK''' to confirm the selection. | <p>Select the desired language and press '''OK''' to confirm the selection.</p> | ||
<div class="res-img">[[File: | <div class="res-img">[[File:M1X_Preferred_Language.png|500px|alt=Selecting the desired language]]</div> | ||
==Projection Orientation== | ==Projection Orientation== | ||
Select the preferred projection orientation and press '''OK''' to confirm the selection. | <p>Select the preferred projection orientation and press '''OK''' to confirm the selection.</p> | ||
<div class="res-img">[[File: | <div class="res-img">[[File:M1X_Projection_Orientation.png|500px|Selecting the preferred projection orientation]]</div> | ||
= | ==Network Settings== | ||
<p>Select one of the available Wi-Fi options. For more information, see [[M1X_Connecting_Power_and_Devices#Connecting to Networks|Wi-Fi Connection]]</p> | |||
<div class="res-img">[[File: | <div class="res-img">[[File:M1X_Projection_Orientation.png|500px|Selecting one Wi-Fi option]]</div> | ||
=Shutting Down the Projector= | =Shutting Down the Projector= | ||
<ol><li>Press and hold the '''Power''' | <ol> | ||
<li> | |||
<div class="res-img">[[File: | <p> | ||
<li>Press the '''Up | Press and hold the '''Power''' <i class='fas fa-power-off'></i> button for three seconds on the remote control will result in the following message: | ||
<div class="res-img">[[File:M1X_Shut_Down.png|500px|Shutting Down the M1X]]</div> | |||
</p> | |||
</li> | |||
<li>Press the '''Up''' or '''Down''' directional buttons on the remote control to select '''Turn Off''' and press '''OK''' on the remote control.</li> | |||
{{Note|<nowiki>When not in use, please press the '''Power''' <i class='fas fa-power-off'></i> button to power off. If only using the '''Power''' <i class='fas fa-power-off'></i> button on the remote control to power off, the projector will enter standby mode and the embedded battery will still consume some power.</nowiki>}} | |||
</ol> | |||
[[Category:M1X]] | [[Category:M1X]] | ||
Revision as of 06:23, 4 July 2024
Starting the Projector
- Ensure the projector is connected to a power source or that the battery has sufficient charge.
-
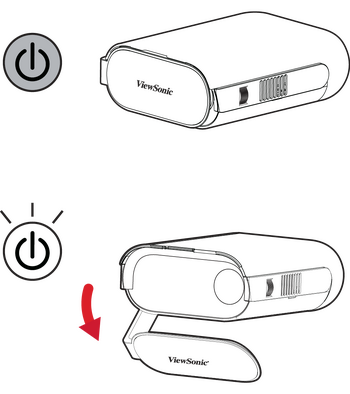
Open the Smart Stand by moving the lens cover down.
-
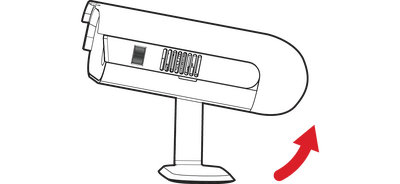
Move the Smart Stand to your desired viewing angle.
 Note:
Note:
Do not place any heavy objects or press down forcefully on the projector’s I/O side when opening the Smart Stand as it may cause damage to the projector.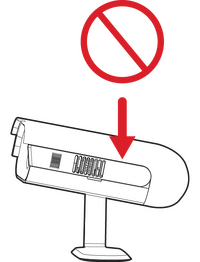
Warning of heavy press on the I/O section


Adjusting the Projected Image
Adjusting the Projector’s Height and Projection Angle
The projector is equipped with one Smart Stand. Adjusting the stand will change the projector’s height and the vertical projection angle. Carefully adjust the stand to fine tune the projected image’s position.

Adjusting the Focus
To adjust the focus of the on-screen image, slowly move the focus ring upwards or downwards.

First Time Activation
If the projector is activated for the first time, you will need to select your Preferred Language, Projection Orientation, and Network Settings. Follow the on-screen instructions using the OK and Up/Down/Left/Right buttons on the remote control. When the "Finish screen" appears, this indicates the projector is ready to use.
Bluetooth Remote Pairing
- Press and hold the Settings and Return button for three seconds to enter pairing mode.
- The LED on the remote control will flash blue.
- A “Successfully Paired” message will show. If not, please try again or select Next and go to: Apps Center > RC BT Pairing.

Preferred Language
Select the desired language and press OK to confirm the selection.
Projection Orientation
Select the preferred projection orientation and press OK to confirm the selection.

Network Settings
Select one of the available Wi-Fi options. For more information, see Wi-Fi Connection
Shutting Down the Projector
-
Press and hold the Power button for three seconds on the remote control will result in the following message:
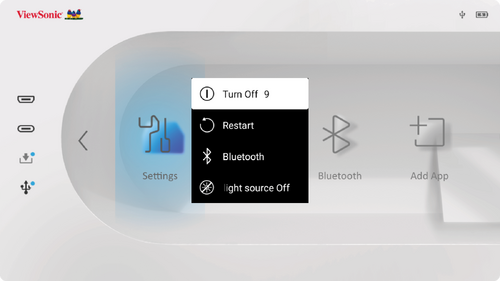
- Press the Up or Down directional buttons on the remote control to select Turn Off and press OK on the remote control.

