
M1X Connecting Power and Devices: Difference between revisions
// via Wikitext Extension for VSCode |
// via Wikitext Extension for VSCode |
||
| Line 124: | Line 124: | ||
">'''NOTE:''' | ">'''NOTE:''' | ||
:*The projector’s name will be labeled as “M1X”. | :*The projector’s name will be labeled as “M1X”. | ||
:*Only the Power <i class='fas fa-power-off'></i> and '''Return''' [[File:VCast_Pro_Return.svg| | :*Only the Power <i class='fas fa-power-off'></i> and '''Return''' [[File:VCast_Pro_Return.svg|15px]] buttons can exit Bluetooth mode.</div> | ||
</li> | </li> | ||
Revision as of 03:13, 4 July 2024
Connecting to Power
DC Power (Power Outlet)

- Connect the power cord to the power adapter.
- Connect the power adapter to the DC IN jack at the side of the projector.
- Connect the power cord plug to a power outlet. When connected, the status LED will turn white.
- IMPORTANT
- Use only the bundled power adapter to change the battery pack and supply power to your LED projector.
- Make sure your LED projector is connected to the power adapter before turning it on for the first time. We strongly recommend that you use a grounded wall socket while using your LED projector in power adapter mode.
- The socket outlet must be easily accessible and near your LED projector.
- To disconnect your LED projector from its main power supply, unplug your LED projector from the power socket.
Power by Power Bank
The projector can also be powered by a power bank.

- Connect one end of the USB Type-C cable to the USB-C port of the projector.
- Connect the other end of the USB Type-C cable to the power bank.
- The power bank should be 45W (15V/3A) at least, and support Power Delivery (PD) protocol output. Additionally, at 15V/3A the projector can be powered on and charge simultaneously.
- Due to the IC protection mechanism, the USB-C charging function may stop briefly then continue later on.
Using the Battery
The battery level icon will show at the top right of the Home Screen. As the battery’s power level runs low, the screen will show a “low battery message”.
| Charging | About 4.5 hours (Power Off) |
| Usage Hours | Up to 4 hours (Battery Saving)
Up to 2.5 hours (Eco) Up to 2 hours (Full) |
| Battery Level Indicator (Charging) | During Charging: Flashing White LED light
Full Charge: Solid White LED light |
Connecting to External Devices

HDMI Connection
Connect one end of an HDMI cable to the HDMI port of your video device. Then connect the other end of the cable to the HDMI port (supports HDCP 1.4/HDMI 1.4) of your projector.
USB Connection
USB Type A Connection
To enjoy photos, music, and movies, simply plug in a USB flash drive to the USB Type A port. For supported file formats, see Supported File Formats
USB Type-C Connection
Connect one end of a USB Type C cable to the USB-C port of your device. Then connect the other end of the cable to the USB-C port of your projector.
- Ensure your USB Type C device can support video transmission.
- The connected device can also be charged (5V/2A).
Audio Connection
You can connect to various external sound delivery devices via the Audio Out port.
Bluetooth Connection
Bluetooth Speaker
The projector is equipped with Bluetooth that allows the user to connect their device wirelessly for audio playback.
To connect and pair your device:
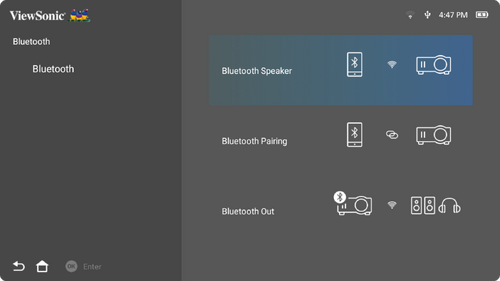
- Go to: Home > Bluetooth.
-
Use the Up or Down directional buttons on the remote control to select Bluetooth Speaker or Bluetooth Pairing. Then press OK on the remote control.
-
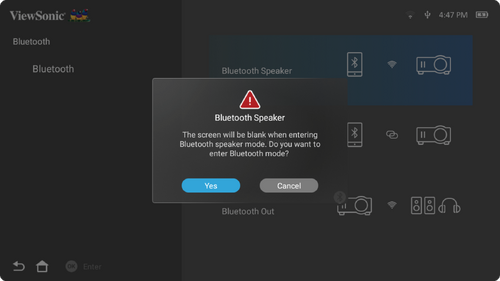
When the below dialogue box appears, select Yes and press OK on the remote control to enter Bluetooth mode.
- A sound effect will be audible upon entering pairing mode.
-
Upon successful connection, another sound effect will be audible.
- NOTE:
- The projector’s name will be labeled as “M1X”.
- Only the Power and Return
 buttons can exit Bluetooth mode.


