
M1X Introduction: Difference between revisions
From ViewSonic Documentation
Created page with "<noinclude> {{Sticky_Menu_Projector_No_Ceiling |1=M1X_Introduction |2=M1X_Remote_Control |3=M1X_Initial_Setup |4=M1X_Connecting_Power_and_Devices |5=M1X_Using_the_Projector |6=M1X_Operation |7=M1X_On-Screen_Display_Menu_Tree |8=M1X_On-Screen_Display_Menu_Options |9=M1X_Specifications |10=M1X_Regulatory_and_Service_Information }} </noinclude> =Package Contents= <gallery mode="traditional"> M1+_G2_Projector.svg| Projector M1+_G2_Remote_Control.svg| Remote Control with Batt..." |
No edit summary |
||
| Line 15: | Line 15: | ||
=Package Contents= | =Package Contents= | ||
<gallery mode="traditional"> | <gallery mode="traditional"> | ||
M1X_Projector.svg| Projector | |||
M1X_Remote_Control.svg| Remote Control with Batteries | |||
M1X_Type_C_Cable.svg| USB Type C Cable | |||
M1X_Power_Cord.svg| Power Cord | |||
M1X_Power_Adapter.svg| Power Adapter | |||
M1X_Carry_Bag.svg| Carrying Bag | |||
M1X_QSG.png| Quick Start Guide | |||
</gallery> | </gallery> | ||
=Projector Overview= | =Projector Overview= | ||
<div class="res-img">[[File: | <div class="res-img">[[File:M1X_Overview.svg|800px]]</div> | ||
{| class="wikitable" width=45% style="text-align: center"; | {| class="wikitable" width=45% style="text-align: center"; | ||
! style="text-align: center; font-weight:bold; background-color:#c41230; color:#ffffff;" | Number | ! style="text-align: center; font-weight:bold; background-color:#c41230; color:#ffffff;" | Number | ||
Revision as of 06:47, 3 July 2024
Package Contents
-
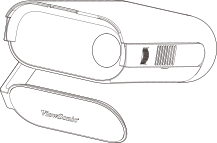 Projector
 -
Remote Control with Batteries
-
USB Type C Cable
-
Power Cord
-
Power Adapter
-
Carrying Bag
-
Quick Start Guide


Projector Overview

| Number | Item |
|---|---|
| 1 | Speaker |
| 2 | IR Receiver |
| 3 | Tripod mount |
| 4 | Focus Ring |
| 5 | Micro SD slot |
| 6 | DC IN |
| 7 | USB Type C |
| 8 | HDMI |
| 9 | Audio Out |
| 10 | USB Type A |
| 11 | Enter[1] / Power Button [2] |
| 12 | Volume Down[3] |
| 13 | Volume Up[4] |
| 14 | Return[5] |
| 15 | Speaker |
| 16 | IR Receiver |
| 17 | Battery Indicator |
| 18 | Smart Stand |
| 19 | Lens |
- ↑ Enacts the selected On-Screen Display (OSD) menu item.
- ↑ Press and hold for three (3) seconds to Power On/Off the projector.
- ↑ Decrease the volume level when the OSD menu doesn’t enable; Down.
- ↑ Increase the volume level when the OSD menu doesn’t enable; Up.
- ↑ Press and hold for three (3) seconds to view the source list.
Further Reading
 |