
M1 G2 Operation: Difference between revisions
From ViewSonic Documentation
No edit summary |
|||
| (9 intermediate revisions by the same user not shown) | |||
| Line 1: | Line 1: | ||
<noinclude> | <noinclude> {{Top}} | ||
{{Sticky_Menu_Projector_No_Ceiling | {{Sticky_Menu_Projector_No_Ceiling | ||
|1=M1_G2_Introduction | |1=M1_G2_Introduction | ||
| Line 20: | Line 20: | ||
Easily manage files and folders. | Easily manage files and folders. | ||
<gallery widths=300px heights=300px mode="nolines"> | <gallery widths=300px heights=300px mode="nolines"> | ||
File: | File:M1_G2_File_Management.png| Step 1 - Select File Management | ||
File: | File:M1_G2_File_Management_2.png| Step 2 - Navigate the files | ||
</gallery> | </gallery> | ||
# Select: '''Home''' > '''File Management'''. | # Select: '''Home''' > '''File Management'''. | ||
| Line 29: | Line 29: | ||
===How to Edit a File=== | ===How to Edit a File=== | ||
<div class="res-img">[[File: | <div class="res-img">[[File:M1_G2_File_Management_Edit.png|500px]]</div> | ||
# While in '''File Management''', press and hold the '''OK''' button for three (3) seconds. | # While in '''File Management''', press and hold the '''OK''' button for three (3) seconds. | ||
# A check box will appear at the front of each file. Use the directional buttons and press '''OK''' to select one or more files. | # A check box will appear at the front of each file. Use the directional buttons and press '''OK''' to select one or more files. | ||
| Line 38: | Line 38: | ||
====How to Use Control Bar Buttons==== | ====How to Use Control Bar Buttons==== | ||
The Control Bar buttons will appear on screen if a video, music, or photo file are selected to be opened. | The Control Bar buttons will appear on screen if a video, music, or photo file are selected to be opened. | ||
<div class="res-img">[[File: | <div class="res-img">[[File:M1_G2_Control_Bar.png|400px]]</div> | ||
'''Tips for using USB'''<br /> | '''Tips for using USB'''<br /> | ||
| Line 75: | Line 75: | ||
==Audio Mode== | ==Audio Mode== | ||
<gallery widths=300px heights=300px mode="nolines"> | |||
M1_G2_Audio_Mode_1.png| Step 1 - Select Audio Mode | |||
M1_G2_Audio_Mode_2.png| Step 2 - Choose an option | |||
M1_G2_Audio_Mode_3.png| User adjustment | |||
</gallery> | |||
# Select: '''Home''' > '''Audio Mode'''. | |||
# Choose your preferred sound play setting: '''Movie''', '''Music''', or '''User'''. | |||
==Advanced Settings== | ==Advanced Settings== | ||
<gallery widths=300px heights=300px mode="nolines"> | <gallery widths=300px heights=300px mode="nolines"> | ||
M1_G2_Advanced_Settings_1.png| Step 1 - Select Advanced Settings | |||
M1_G2_Advanced_Settings_2.png| Step 2 - Choose an option | |||
</gallery> | </gallery> | ||
# Select: '''Home | # Select: '''Home''' > '''Advanced Settings'''. | ||
# Use the '''Up''' and '''Down''' buttons to select the desired option and press '''OK'''. Then use the '''Left''' and '''Right''' buttons to make adjustments or selections. | # Use the '''Up''' and '''Down''' buttons to select the desired option and press '''OK'''. Then use the '''Left''' and '''Right''' buttons to make adjustments or selections. | ||
# To return to a previous menu press the '''Return''' button. | # To return to a previous menu press the '''Return''' button. | ||
| Line 89: | Line 95: | ||
:'''NOTE:''' Press the '''Home''' button on the remote control to return to the '''Home Screen''' at anytime. | :'''NOTE:''' Press the '''Home''' button on the remote control to return to the '''Home Screen''' at anytime. | ||
<gallery widths=300px heights=300px mode="nolines"> | <gallery widths=300px heights=300px mode="nolines"> | ||
M1_G2_Information_1.png| Step 1 - Select Information | |||
M1_G2_Information_2.png| Step 2 - View the information | |||
</gallery> | </gallery> | ||
# Select: '''Home | # Select: '''Home''' > '''Information'''. | ||
# View system status and information. | # View system status and information. | ||
== | ==Firmware Update== | ||
# | <div class="res-img">[[File:M1_G2_Firmware_Update.png|500px]]</div> | ||
# The | # Download the latest version from the ViewSoinc website and copy the file to a USB storage device. | ||
# | # Plug the USB storage device into the projector. | ||
# The system will detect the Firmware version and display the above dialogue message. | |||
# By selecting '''Yes''', a progress bar will appear as the update process begins. | |||
# After reaching 100%, the projector will restart. The whole process will take about 10 minutes. | |||
# After updating the Firmware, it will take a few minutes to restart the projector. | |||
:::<small>'''NOTE:''' Only the USB Type A port can support Firmware updating (USB format: FAT32).</small> | |||
[[Category:M1 G2]] | [[Category:M1 G2]] | ||
Latest revision as of 08:21, 17 November 2020
Home Screen
The Home Screen is displayed every time you start the projector. To navigate the Home Screen, simply use the directional buttons on the remote control. You can return to the main Home Screen at any time by pressing the Home button on the remote control, regardless of what page you are on.

File Management
Easily manage files and folders.
-
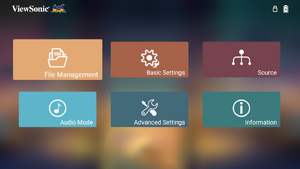 Step 1 - Select File Management
 -
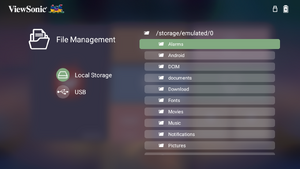 Step 2 - Navigate the files


- Select: Home > File Management.
- Select a device on the source list. Use the direction buttons to select the desired file. Then press OK on the remote control to open the selected file.
- Press the Return button to go to a previous a level.
- NOTE: Press the Home button on the remote control to return to the Home Screen at anytime.
How to Edit a File

- While in File Management, press and hold the OK button for three (3) seconds.
- A check box will appear at the front of each file. Use the directional buttons and press OK to select one or more files.
- By pressing the Right button, Copy, Paste, Cut, Delete, Select All, and Return boxes will be available for use.
- Select your desired action and press OK to execute.
- If you are Copying or Cutting, select your destination folder to complete the process.
How to Use Control Bar Buttons
The Control Bar buttons will appear on screen if a video, music, or photo file are selected to be opened.

Tips for using USB
When using USB for reading and/or storage please keep in mind the following:
- Some USB storage devices may not be compatible.
- If you use an USB extension cable, the USB device may not recognize the USB.
- Only use USB storage devices formatted with Windows FAT32 file system.
- Larger files will need extra time to load.
- Data on USB storage devices may be damaged or lost. Back up important files.
Supported File Formats
- Supported Office formats:

- Supported Multimedia formats:

Basic Settings
Under Basic Settings you can manage Language, Projector Projection, and Keystone settings.
-
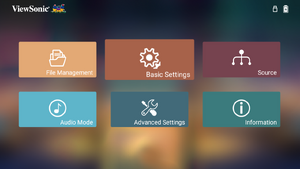 Step 1 - Select Basic Settings
 -
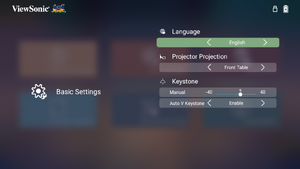 Step 2 - Choose an option


- Select: Home > Basic Settings.
- Use the Up and Down buttons to select the desired option and press OK. Then use the Left and Right buttons to make adjustments or selections.
- To return to a previous menu press the Return button.
Source
Select the preferred input source.
-
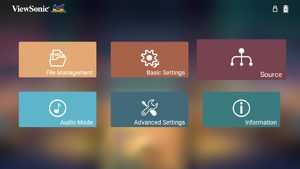 Step 1 - Select Source
 -
 Step 2 - Choose a source


- Select: Home > Source to display the available sources.
Audio Mode
-
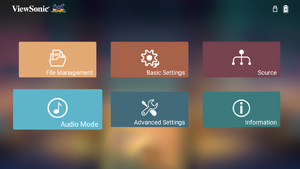 Step 1 - Select Audio Mode
 -
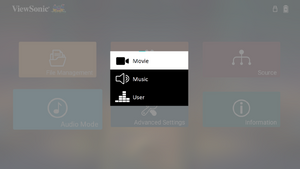 Step 2 - Choose an option
 -
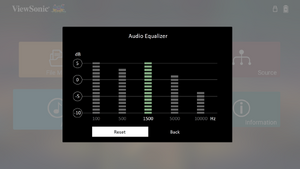 User adjustment


- Select: Home > Audio Mode.
- Choose your preferred sound play setting: Movie, Music, or User.
Advanced Settings
-
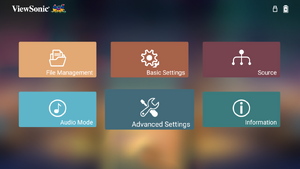 Step 1 - Select Advanced Settings
 -
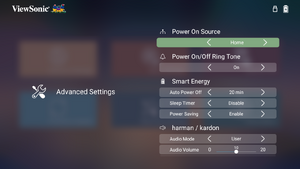 Step 2 - Choose an option


- Select: Home > Advanced Settings.
- Use the Up and Down buttons to select the desired option and press OK. Then use the Left and Right buttons to make adjustments or selections.
- To return to a previous menu press the Return button.
Information
- NOTE: Press the Home button on the remote control to return to the Home Screen at anytime.
-
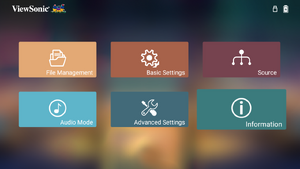 Step 1 - Select Information
 -
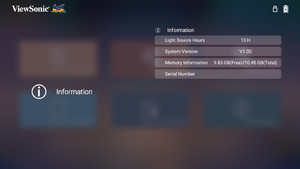 Step 2 - View the information


- Select: Home > Information.
- View system status and information.
Firmware Update

- Download the latest version from the ViewSoinc website and copy the file to a USB storage device.
- Plug the USB storage device into the projector.
- The system will detect the Firmware version and display the above dialogue message.
- By selecting Yes, a progress bar will appear as the update process begins.
- After reaching 100%, the projector will restart. The whole process will take about 10 minutes.
- After updating the Firmware, it will take a few minutes to restart the projector.
- NOTE: Only the USB Type A port can support Firmware updating (USB format: FAT32).