M1 mini Plus Connecting Power and Devices
Connecting to Power

Power Adapter
Connect the power adapter to the USB-C Port on the side of the projector (5V/1.5A).
- NOTE:
- Charge the projector for 2.5 hours via the power adapter before using it in battery mode for the first time.
- The DC IN port can accept 5V or 9V charging; however, 9V charging can only work in the Power On mode.
Battery Power
The battery level icon will show at the top right of the Home Screen. As the battery’s power level runs low, the screen will show a “low battery message”.
Battery Usage Time Information
| Charging | About 2.5 hours (5V/1.5A) |
| Usage Hours | 1.4 hours (Normal) / 1.5 hours (ECO) |
| Battery Level Indicator (Charging) | During Charging: Red LED light is On
Full Charge: Green LED light is On |
- NOTE: Charging time may be longer than 2.5 hours if using less than 5V/1.5A.
Power Bank Function
The projector can also act as a power bank for your mobile device.

To charge your mobile device:
- Turn off the projector by pushing the Power Switch.
- Use the USB Type A port on the projector to connect to a mobile device.
- A 5V/1A power charge can be provided to the mobile device.
- NOTE: The Power Bank function can only work when the projector is powered off.
Connecting to External Devices

HDMI Connection
Connect one end of an HDMI cable to the HDMI port of your video device. Then connect the other end of the cable to the HDMI port (supports HDCP 1.4/HDMI 1.4) of your projector.
USB Connection
To enjoy photos, music, and movies, simply plug in a USB flash drive to the USB Type A port.
Wireless Screen Mirroring
Please see Wireless Screen Mirroring
Connecting to Bluetooth
Bluetooth Speaker
The projector is equipped with Bluetooth that allows the user to connect their device wirelessly for audio playback.
-
Step 1 - Bluetooth
-
 Step 2 - Select Speaker or Pairing
 -
 Step 3 - Enter Bluetooth mode


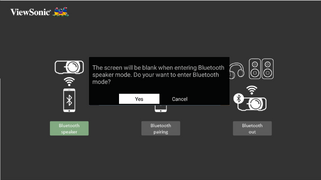
To connect and pair your device:
- Go to: Home > Bluetooth.
- Use the Left and Right directional buttons on the remote control to select Bluetooth Speaker or Bluetooth Pairing. Then press OK on the remote control.
- When the dialogue box appears, select Yes and press OK on the remote control to enter Bluetooth mode.
- A sound effect will be audible upon entering pairing mode.
- Upon successful connection, another sound effect will be audible.
- NOTE:
- Once paired, if both the projector and your device are powered On they will automatically connect via Bluetooth.
- The projector’s name will be labeled as “M1 mini Plus”.
- NOTE:
Bluetooth Out
Connect the projector to external headphones or speakers that support Bluetooth.
-
Step 1 - Bluetooth
-
 Step 2 - Select Bluetooth Out

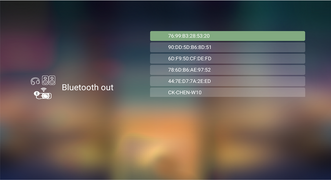
To connect and pair your device:
- Go to: Home > Bluetooth.
- Use the Left and Right directional buttons on the remote control to select the Bluetooth Out option.
- The projector will search for nearby Bluetooth devices. Select your device from the list and press OK on the remote control.
Connecting to Networks
Wi-Fi Connection
-
 Step 2 - Turn On Wi-Fi
 -
 Step 3 - Select Network
 -
 Step 4 - Enter credentials


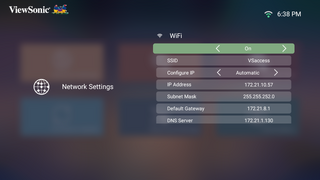
To connect to a Wi-Fi network:
- Go to: Home > Setting > Network Settings > Wi-Fi.
- Press Left or Right on the remote control to select On.
- Available Wi-Fi networks will then be displayed. Select one of the available Wi-Fi networks.
- If you connect to a secure Wi-Fi network, you must enter the password when prompted.
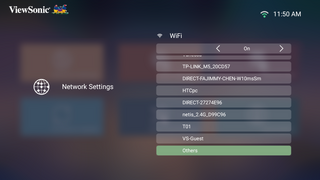
Custom SSID
- Go to: Home > Setting > Network Settings > Wi-Fi.
- Press Left or Right on the remote control to select On.
- From the available Wi-Fi networks list select Others and press OK on the remote control.
- Enter the SSID and select the security level.
- Enter the password when prompted.
-
 Step 3 - Select Others
 -
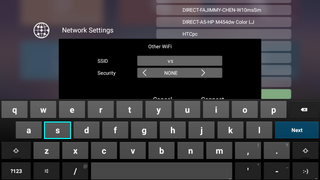 Step 4 - Enter SSID
 -
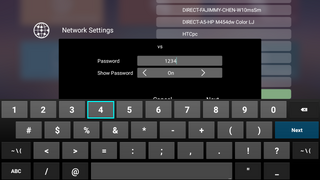 Step 5 - Enter Password


