VB-CAM-201 Appendix
From ViewSonic Documentation
Technical Specifications
Camera
| Item | Specifications |
|---|---|
| Video System | 4K@30fps, 1080P@30fps, 720P@30fps |
| Sensor | Sony, 1/2.5 inch, CMOS, 8.51M pixel |
| Lens | 121° (DFOV), 110° (HFOV), 5x Digital Zoom, Pan/Tilt ± 15° |
| PTZ | MPT + EPTZ |
| Digital Noise Reduction | 2D & 3D Digital Noise Reduction |
| Video S/N | ≥ 55dB |
| Backlight Compensation | Support |
Audio
| Item | Specifications |
|---|---|
| Full Frequency Speaker | 96 dB SPL in the case of 0.5 meters |
| Microphone Array | Beamforming microphone, pick up distance up to 6 meters |
USB Features
| Item | Specifications |
|---|---|
| Connection Type | USB 3.0, downward compatible with USB 2.0 |
| Video Compression | YUY2 / MJPG / H.264 |
| USB Audio | 32K sampling rate, support UAC 2.0 |
| USB Communication Protocol | UVC 1.1~1.5 |
| UVC PTZ Control | Support |
Input/Output Interface
| Item | Specifications |
|---|---|
| HD Output | 1 x HDMI (v. 2.0) (Video output only) |
| USB Interface | 1 x USB 3.0, 1 x USB 2.0 (for external microphone connection) |
| Network Interface | 1 x RJ45: 10M/100M adaptive Ethernet |
| Wireless | Bluetooth 5.0 |
| Power Jack | DC 12V, 1.5A (Max) |
General
| Item | Specifications |
|---|---|
| Control Method | 2.4G Remote Control |
| Installation Method | Desktop, Wall, TV and other display devices. |
| Operating Temperature | 0° C ~ 40° C (32° F~104° F) |
| Storage Temperature | -40° C ~ 60° C (-40°F~140° F) |
| Dimensions (W x H x D) |
601 x 116 x 142 mm (bracket included) (23.67" x 4.57" x 6") |
| Net Weight | 2.2 kg (4.86 lbs) |
LED Indicators
| Light | Description |
|---|---|
| Amber (Breathing) |
Firmware Upgrade |
 | |
| Blue (Chasing) |
Waiting for Remote Control pairing |
 | |
| Blue (Flashing) |
Remote Control pairing finished |
 | |
| Blue (Breathing) |
Bluetooth waiting for pairing |
 | |
| Blue (Flashing) |
Bluetooth pairing finished |
| |
| Blue (Steady) |
Bluetooth connecting |
| |
| White (Steady) |
Steaming is active |
 | |
| Purple (Steady) |
Streaming is not active/closing |
 | |
| Quick Flash | Button on Remote Control clicked |
| Solid Red (Steady) |
Microphone muted |
 | |
| Solid Red (Steady) |
3A function prohibited |
|
LED Indicators - Host 1 and Host 2 Mode
| Light | Description |
|---|---|
| Blue | Host 1 mode |
| |
| Blue | Host 2 mode |
|
Troubleshooting
| Problem or Issue | Possible Solutions |
|---|---|
| No power |
|
| The video image displayed by the camera is shaking |
|
Maintenance
General Precautions
- Make sure the camera is turned off and the power cable is unplugged from the power outlet if it will not be used for an extended period of time.
- Avoid lens should avoid bright objects (e.g., sunlight), and unstable light conditions.
- Do not use the camera around facilities that can transmit high-power radio waves (e.g., television station).
Cleaning the Camera Lens
- Wipe the camera lens with a clean, soft, lint-free cloth. This removes dust and other particles.
Cleaning the Case
- Use a soft, dry cloth to clean.
Disclaimer
- ViewSonic® does not recommend the use of any ammonia or alcohol-based cleaners on the device or case. Some chemical cleaners have been reported to damage the device and/or case.
- ViewSonic® will not be liable for damage resulting from use of any ammonia or alcohol-based cleaners.
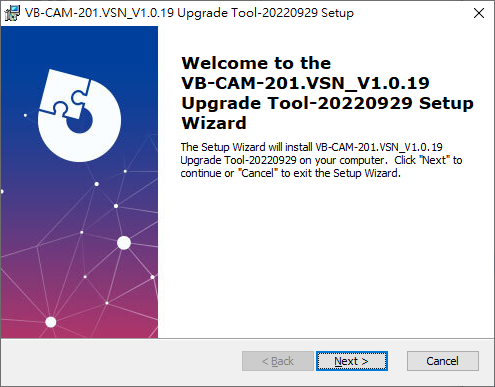
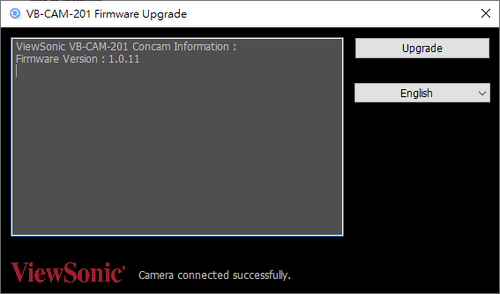
Firmware Update
Visit the ViewSonic website or VB-CAM-201 product page to get the latest firmware update for the VB-CAM-201.
- Download and open the firmware update tool. Click Next to continue the installation process.
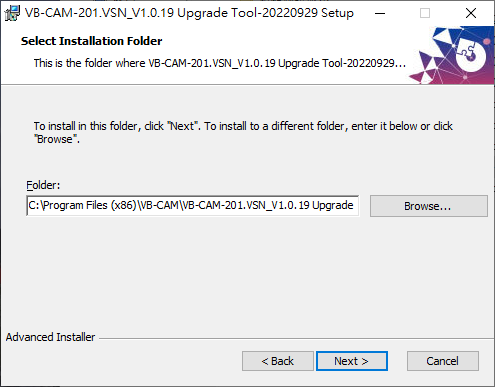
- Click Browse to select a different installation folder or click Next to continue the installation.
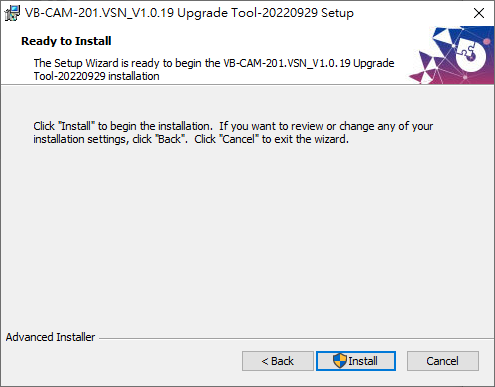
- Click Install to begin the installation.
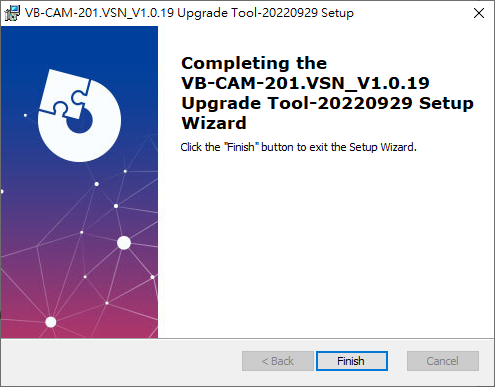
- When the installation is complete, click Finish.
- Open the VB-CAM-201 firmware update tool.
- Connect the VB-CAM-201 to your computer via USB cable. If the VB-CAM-201 is undetected, the tool will show “Camera connection failed” and you will need to check the connection status on your computer.
- NOTE: Connect your USB cable to the USB 3.0 port. The USB 2.0 port is only designed for external microphone connection.
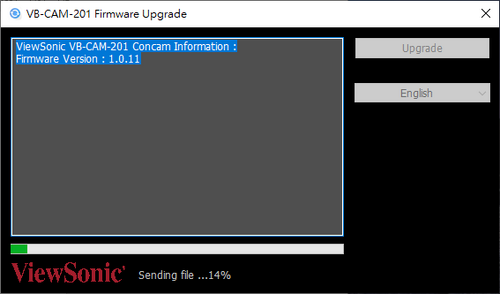
- Click Upgrade to start the firmware update process.
- NOTE: Wait for the update process to complete and do not disconnect the power or USB cable.
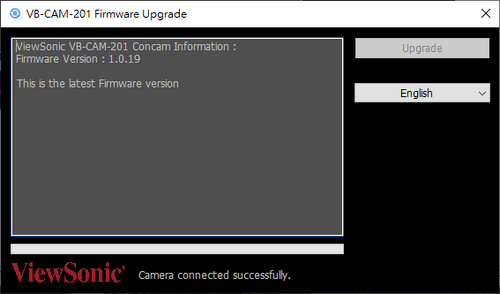
- Once the update is complete, the message “This is the latest Firmware version” will appear.
- NOTE:
- Do not disconnect or power off during the update.
- The update tool supports multiple languages.
- NOTE:


