From ViewSonic Documentation
PA700X On-Screen Display Menu Options
| Menu
|
Description
|
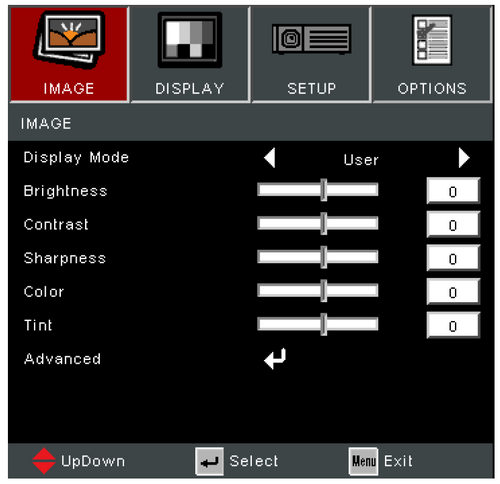
| Display Mode
|
There are several predefined display modes that you can choose from to suit your viewing preference.
| Mode
|
Description
|
| Standard
|
Suitable for daily circumstances in a daylight environment.
|
| Bright
|
Suitable for bright, well-lit environments.
|
| Movie
|
Provides the best balance of detail and colors for watching movies.
|
| Presentation
|
Suitable for most presenting needs for business and education environments.
|
| Blackboard
|
Achieve optimum color settings when projecting onto a blackboard.
|
| User
|
User’s custom settings.
|
| 3D
|
Optimized for 3D content.
- NOTE: 3D glasses are needed.
|
|
| Brightness
|
The higher the value, the brighter the image. Lower values will result in a darker image.
|
| Contrast
|
Use this to set the peak white level after you have previously adjusted the Brightness setting to suit your selected input and viewing environment.
|
| Sharpness
|
A high value results in a sharper picture; a low value softens the picture.
|
| Color
|
Adjust an image from black and white to fully saturated color.
|
| Tint
|
The higher the value, the more greenish the picture becomes. The lower the value, the more reddish the picture becomes.
|
| Advanced
|
Gamma
- Reflects the relationship between input source and picture brightness.
BrilliantColor™
- A color-processing algorithm and enhancements to enable higher brightness while providing true, more vibrant colors in picture.
Color Temperature
- Select from Warm, Medium, or Cold.
Color Setting
- Only in permanent installations with controlled lighting levels such as boardrooms, lecture theaters, or home theaters, should color management be considered. Color management provides fine color control adjustment to allow for more accurate color reproduction. Select Primary Color first and adjust its range/values in Hue, Saturation and Gain.
Color Space
- For HDMI signal, select Auto, RGB (0~255), RGB (16~235), and YUV color space. For VGA signal, select Auto, RGB, and YUV color space.
Signal
- Adjust the Phase, Frequency, Horizontal and Vertical position values of the input source.
Exit
- Exit the Advanced menu.
|
| Menu
|
Description
|
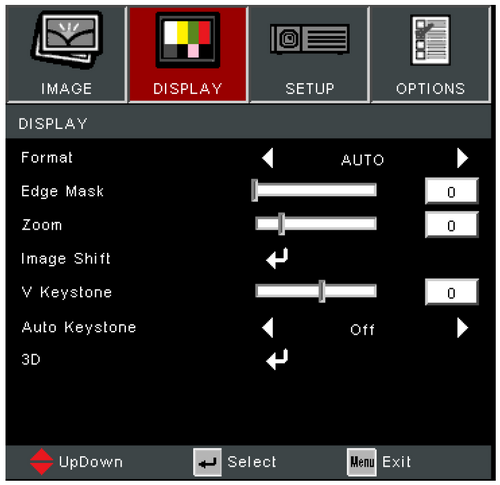
| Format
|
Select the aspect ratio of the projected image.
| Aspect Ratio
|
Description
|
| 4:3
|
Scales an image so that it is displayed in the center of the screen with a 4:3 aspect ratio. This is most suitable for 4:3 images like computer monitors, standard definition TV, and 4:3 aspect DVD movies, as it displays them without aspect alteration.
|
| 16:9
|
Scales an image so that it is displayed in the center of the screen with a 16:9 aspect ratio. This is most suitable for images which are already in a 16:9 aspect, like high definition TV.
|
| Native
|
Projects the image as its original resolution and resizes it to fit within the display area. For input signals with lower resolutions, the projected image will be displayed in its original size.
|
| Auto
|
Scales an image proportionally to fit the projector’s native resolution in its horizontal width. This is suitable for the incoming image which is neither 4:3 nor 16:9 and you want to make the most use of the screen without altering the image’s aspect ratio.
|
| LBX
|
For non-16:9 letterbox source and if you use an external 16:9 lens to display 2.35:1 aspect ratio in full resolution.
|
|
| Edge Mask
|
Remove the video encoding noise on the edge of the video source.
|
| Zoom
|
Reduce or magnify the projected image.
|
| Image Shift
|
Adjust the projected image horizontally or vertically.
|
| V. Keystone
|
Adjust image distortion vertically.
|
| Auto Keystone
|
Automatically correct the keystone.
|
| 3D
|
3D Mode
- Enable or disable the 3D function.
3D-2D
- Select how the 3D content should appear on screen.
| Option
|
Description
|
| 3D
|
Display the 3D signal.
|
| L (Left)
|
Display the left frame of the 3D content.
|
| R (Right)
|
Display the right frame of the 3D content.
|
3D Format
- Select the 3D content format.
- NOTE: A Blu-ray 3D source will be detected automatically, and options will not be selectable.
| Option
|
Description
|
| Auto
|
When a 3D identification signal is detected, the 3D format is selected automatically.
|
| Side by Side
|
Display in Side-by-Side format.
|
| Top and Bottom
|
Display in Top and Bottom format.
|
| Frame Sequential
|
Display in Frame Sequential format.
|
3D Sync Invert
- Enable or disable the 3D Sync Invert function.
|
- NOTE: This projector is a 3D ready projector with DLP-Link 3D solution. Please make sure your 3D glasses are for DLP-Link 3D. This projector supports frame sequential (page-flip) 3D via the HDMI 1/HDMI 2 ports. For the best performance, 1920 x 1080 resolution is recommended. Please note that 4K (3840 x 2160) resolution is not supported in 3D mode.
| Menu
|
Description
|
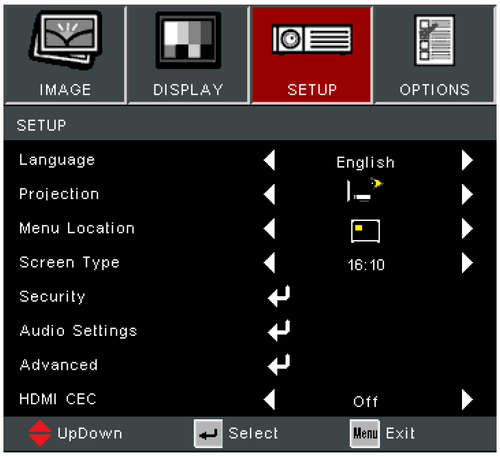
| Language
|
Select the On-Screen Display (OSD) Menu language.
|
| Projection
|
Select the preferred projection position.
|
| Menu Location
|
Select the location for the On-Screen Display (OSD) Menu.
|
| Screen Type
|
Select between a 16:10 or 16:9 aspect ratio.
|
| Security
|
Security
- Enable or disable a password prompt before using the projector.
- NOTE: The default password is:1234
Security Timer
- Set the amount of time the projector can be used. Once this time has elapsed you will be requested to enter your password again.
Change Password
- Set or modify the password.
|
| Audio Settings
|
Mute
- Temporarily turn off the sound.
Volume
- Adjust the volume level.
Audio Input
- Select the audio input source.
|
| Advanced
|
Logo
- Set the “startup screen”. If changes are made, they will take effect the next time the projector is powered on.
|
| HDMI CEC
|
When you connect HDMI CEC-compatible devices to the projector with HDMI cables, you can control them on the same power on or power off status using the HDMI CEC control feature in the projector’s OSD. This lets one device or multiple devices in a group power on or power off via HDMI CEC in a typical configuration.
- NOTE:
- In order for the CEC function to work properly, make sure that the device is correctly connected to the HDMI input of the projector via an HDMI cable, and its CEC function is turned on.
- Depending on the connected device, the CEC function may not work.
- The CEC function supports the projector powering off the device and the device powering on the projector.
|
| Menu
|
Description
|
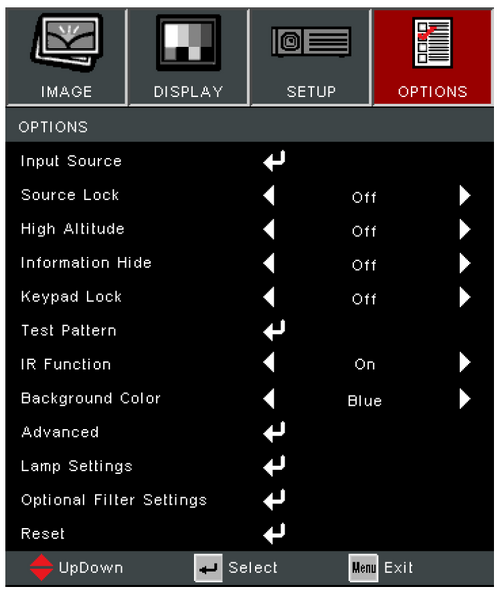
| Input Source
|
Use this option to enable / disable input sources.
|
| Source Lock
|
On
The projector will only search the current input selection.
Off
The projector will search for other signals if the current input signal is lost.
|
| High Altitude
|
When “On” is selected, the fans will spin faster. This feature is useful in high altitude areas where the air is thin.
|
| Information Hide
|
Choose “On” to hide the info message. Choose “Off” to show source message.
|
| Keypad Lock
|
When the keypad lock function is “On”, the control panel will be locked however, the projector can be operated by the remote control. By selecting “Off”, you will be able to use the control panel once more.
- NOTE: To turn off the keypad lock, press and hold “Enter” key on top of the projector for 5 seconds.
|
| Test Pattern
|
Select the test pattern from grid and white.
|
| IR Function
|
Enable/disable remote control operation.
|
| Background Color
|
Display a black, red, blue, green, or white screen when no input source is available.
|
| Advanced
|
Direct Power On
Automatically power on the projector when AC power is supplied, without pressing the Power button on the projector or the remote control.
Auto Power Off
A countdown timer will start when there is no signal being sent to the projector. The projector will automatically power off when the countdown has finished (in minutes).
Power Mode (Standby)
| Option
|
Description
|
| Active
|
Normal standby (> 0.5W) with VGA
available.
|
| Eco
|
Reduce power use (< 0.5W) with no
VGA available.
|
Signal Power On
Automatically power on the projector when a signal is detected from the input source, without pressing the Power button on the projector or on the remote control.
- NOTE: The projector will not power on automatically by HDMI if there is only one HDMI cable connected.
Exit
Exit the Advanced Menu.
|
| Lamp Settings
|
Lamp Hour
Displays the lamp hours of the current lamp.
Lamp Reminder
Show or to hide a warning message when the “change lamp message” is displayed.
Brightness Mode
| Option
|
Description
|
| Bright
|
Highest brightness and power consumption.
|
| Eco
|
Dim the light output, lowering power consumption.
|
| Dynamic
|
Automatically adjust the picture brightness in order to give optimum contrast performance.
|
Lamp Reset
Resets the Lamp Hour counter. Should be used after replacing the lamp.
Exit
Exit Lamp Settings.
|
| Optional Filter Settings
|
Optional Filter Installed
Select “Yes” to display warning message after a specified number of hours. Select “No” to turn off warning message.
- NOTE: The default setting is “No”. After installing a filter, please turn on the projector then press Menu, go to Options > Optional Filter Settings > Optional Filter Installed and select Yes.
Filter Usage Hours
Displays the filter hours.
Filter Reminder
Select the number of hours until the filter message is displayed.
- NOTE: Factory default is 500 hours.
Filter Reset
Reset the dust filter counter after replacing or cleaning the dust filter.
Exit
Exit the Optional Filter Settings menu.
|
| Reset
|
Return the settings to default.
- NOTE: When resetting, the following settings will still remain: Auto Keystone, Filter Usage Hours, High Altitude, Lamp hours, Language, Optional Filter installed, Password, Power Mode (Standby), Projection, Security, Security Timer, V Keystone.
|
- NOTE:
- Acoustic noise level of the projector may increase after installing a dust filter.
- For high temperature (> 35°C) or high attitude (> 1524 m) operation conditions, it is recommended to switch to “High Altitude” cooling mode when the dust filter is installed.
- It is recommended to clean the dust filter every 100 hours after the dust filter is installed.
- Turn off the projector and unplug it from its power source before installing or detaching the filter.


