From ViewSonic User Guide Database
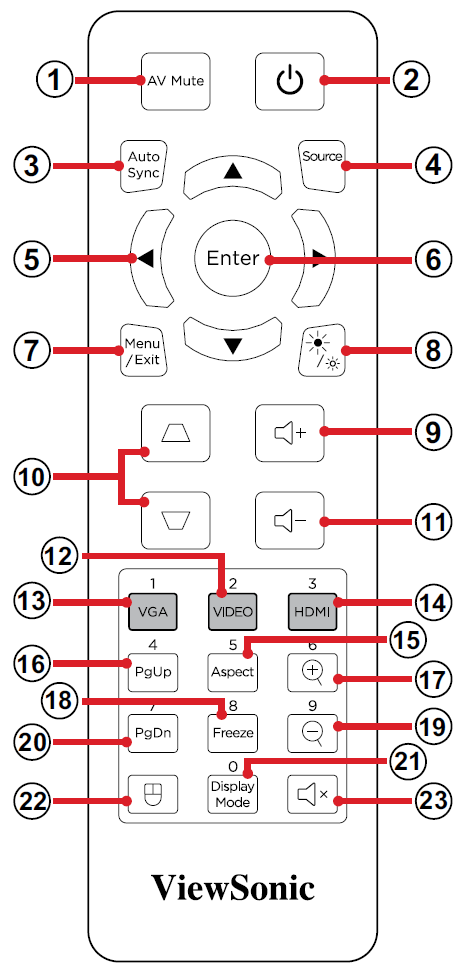
Overview
| Number
|
Button
|
Description
|
| 1
|
AV Mute
|
Hide and recover the screen picture and volume mute.
|
| 2
|
Power
|
Turns the projector On or Off.
|
| 3
|
Auto Sync
|
Automatically synchronize the projector to the input source.
|
| 4
|
Source
|
Toggle to the next input source.
|
| 5
|
Navigation Buttons
|
Navigates and selects the desired menu items and make adjustments when the On-Screen Display (OSD) Menu is activated.
|
| 6
|
Enter
|
Confirm the selection when the On-Screen Display (OSD) Menu is activated.
|
| 7
|
Menu/Exit
|
- Turns the On-Screen Display (OSD) Menu On or Off.
- Go back to a previous OSD Menu.
- Exit and Save menu settings.
|
| 8
|
Brightness
|
Displays the brightness selection bar.
|
| 9
|
Volume Up
|
Increase the volume level.
|
| 10
|
Keystone
|
Manually correct distorted images.
|
| 11
|
Volume Down
|
Decrease the volume level.
|
| 12
|
Video
|
Unsupported Button
|
| 13
|
VGA
|
Selects COMPUTER IN port for display.
|
| 14
|
HDMI
|
Selects the HDMI 1 or HDMI 2 input source.
|
| 15
|
Aspect
|
Displays the format selection bar.
|
| 16
|
Page Up
|
Operates your display software program (on a connected PC) which responds to page up commands (like Microsoft PowerPoint).
- NOTE: Only available when a PC input source is selected and the PC and projector are connected via USB.
|
| 17
|
Zoom In
|
Increase the projected image size.
|
| 18
|
Freeze
|
Freeze/un-freeze the projected image.
|
| 19
|
Zoom Out
|
Reduce the projected image size.
|
| 20
|
Page Down
|
Operates your display software program (on a connected PC) which responds to page down commands (like Microsoft PowerPoint).
- NOTE: Only available when a PC input source is selected and the PC and projector are connected via USB.
|
| 21
|
Display Mode
|
Displays the display mode selection bar.
|
| 22
|
Mouse Mode
|
Enable/disable the mouse function.
|
| 23
|
Mute
|
Mute/Unmute.
|
Using the Remote Control Mouse Mode and Page Up/Down Function
- Connect the PC/Notebook to the projector via the COMPUTER and USB ports.
- Set the input source to PC.
- Now you can operate your display software program which responds to page up/down commands (like Microsoft PowerPoint).
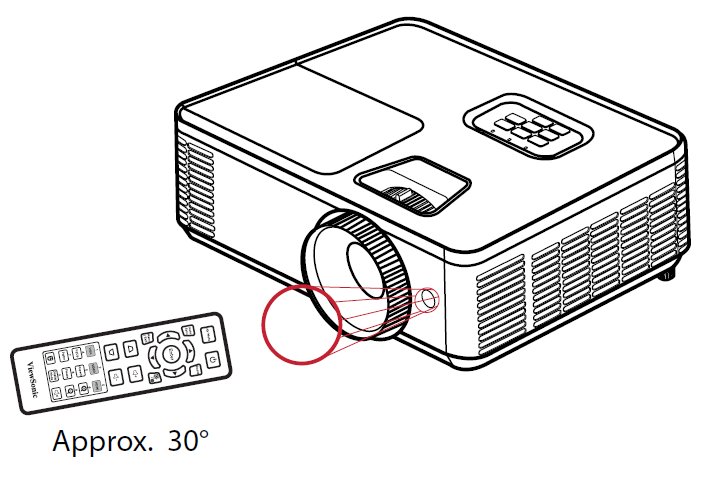
Remote Control - Receiver Range
|
To ensure proper function of the remote control follow the steps below:
- The remote control must be held at an angle within 30° perpendicular to the projector’s IR remote control sensor(s).
- The distance between the remote control and the sensor(s) should not exceed 10 m (32.8 ft.).
- NOTE: Refer to the illustration for the location of the infrared (IR) remote control sensor(s).
|
|
Replacing the Batteries
- Remove the battery cover from the bottom of the remote control by pressing the finger grip and sliding it across.
- Remove any existing batteries (if necessary) and install two AAA batteries.
- NOTE: Observe the battery’s polarities as indicated.
- Replace the battery cover by aligning it with the base and pushing it back into position.
- NOTE:
- Avoid leaving the remote control and batteries in excessive heat or a humid environment.
- Replace only with the same or equivalent type recommended by the battery manufacturer.
- If the battery is drained or if you will not be using the remote control for an extended period of time, remove the battery to avoid damage to the remote control.
- Dispose of used batteries according to the manufacturer’s instructions and local environment regulations for your region.


