CDE6530 Embedded Applications: Difference between revisions
From ViewSonic Documentation
Created page with "<noinclude> {{Sticky_Menu_Commercial_Display |1=CDE6530_Introduction |2=CDE6530_Remote_Control |3=CDE6530_Connecting_Devices |4=CDE6530_Using_the_Display |5=CDE6530_General_Se..." |
No edit summary Tag: Manual revert |
||
| (2 intermediate revisions by the same user not shown) | |||
| Line 13: | Line 13: | ||
}} | }} | ||
</noinclude> | </noinclude> | ||
= | =vCast= | ||
Working with ViewBoard® Cast software (vCast, vCast Pro, and vCastSender), the vCast application will allow the ViewBoard to receive laptop screens (Windows/Mac/Chrome) and mobile (iOS/Android) users’ screens, photos, videos, annotations, and camera(s) that are using the vCastSender application. | |||
<div class="res-img">[[File: | <div class="res-img">[[File:IFP52_vCast_Sender_1.png|ViewBoard Cast (vCast)|500px]]</div> | ||
:'''NOTE:''' | |||
:* ViewBoard® Cast software, laptops, and mobile devices can connect to both the same subnet and cross subnet by entering the on-screen PIN code. | |||
:* Connected devices will show up under '''Device List''' on the same subnet connection. | |||
:* If the device does not show up under '''Device List''', users will need to key-in the on-screen PIN code. | |||
==Network Information== | |||
* | *'''Ports:''' | ||
::<i class="fas fa-chevron-right fa-xs"></i> TCP 56789, 25123, 8121 & 8000 (Controlling message port & client device audio transfer) | |||
::<i class="fas fa-chevron-right fa-xs"></i> TCP 8600 (BYOM) | |||
::<i class="fas fa-chevron-right fa-xs"></i> TCP 53000 (Request share screen) | |||
::<i class="fas fa-chevron-right fa-xs"></i> TCP 52020 (Reverse control) | |||
::<i class="fas fa-chevron-right fa-xs"></i> TCP 52025 (Reverse control for ViewBoard Cast Button) | |||
::<i class="fas fa-chevron-right fa-xs"></i> TCP 52030 (Status sync) | |||
::<i class="fas fa-chevron-right fa-xs"></i> UDP 48689, 25123 (Device searching and broadcast & client device audio transfer) | |||
::<i class="fas fa-chevron-right fa-xs"></i> UDP 5353 (Multicast search device protocol) | |||
*'''Port and DNS Activation:''' | |||
= | ::<i class="fas fa-chevron-right fa-xs"></i> Port: 443 | ||
::<i class="fas fa-chevron-right fa-xs"></i> DNS: <nowiki>https://vcastactivate.viewsonic.com</nowiki> | |||
= | *'''OTA Service:''' | ||
::<i class="fas fa-chevron-right fa-xs"></i> Server Port: TCP443 | |||
::<i class="fas fa-chevron-right fa-xs"></i> Server FQDN Name: <nowiki>https://vcastupdate.viewsonic.com</nowiki> | |||
=== | ==Casting from Windows, MacBook, and Chrome Devices== | ||
<div class="res-img">[[File:IFP52_vCast_Sender_1-1.png|500px]]</div> | |||
<ol><li>Ensure the client device (e.g., laptop) is connected to the same network as the ViewBoard.</li> | |||
:'''NOTE:''' The network name can be found under '''Room Network'''. | |||
:<div class="res-img">[[File:vCast_Computer_1.png|400px]]</div> | |||
<li>On the client device, visit the address that is shown on the ViewBoard to download and install the vCastSender application.</li> | |||
<li>After installing, launch the vCastSender application.</li> | |||
<li>To connect to the ViewBoard, input the PIN code and click OK.</li> | |||
:'''NOTE:''' The '''PIN code''' can be found as highlighted below: | |||
:<div class="res-img">[[File:vCast_Computer_2.png|400px]]</div> | |||
<li>Additionally, you can connect to the ViewBoard or display by clicking '''Device List''' then the '''Device Name''' listed.</li> | |||
<div class="res-img">[[File:vCast_Computer_3.png|400px]]</div> | |||
:'''NOTE:''' The '''Device Name''' can be found as highlighted below: | |||
:<div class="res-img">[[File:vCast_Computer_4.png|400px]]</div></ol> | |||
== | ==Casting from Android Devices== | ||
<div class="res-img">[[File: | <div class="res-img">[[File:vCast_Mobile_Update_1.png|border|500px]]</div> | ||
<ol><li>Ensure the client device (e.g., Android phone or tablet) is connected to the same network as the ViewBoard.</li> | |||
:'''NOTE:''' The network name can be found under '''Room Network'''. | |||
:<div class="res-img">[[File:vCast_Computer_1.png|400px]]</div> | |||
<li>On the Android client device, scan the QR code shown on the ViewBoard to directly download the vCastSender application, or download the application from the Google Play Store.</li> | |||
:<div class="res-img">[[File:vCast_Sender_3.png|border|400px]]</div> | |||
<li>After installing, launch the vCastSender application.</li> | |||
<li>To connect to the display, input the '''PIN code''' and select OK.</li> | |||
:'''NOTE:''' The '''PIN code''' can be found as highlighted below: | |||
:<div class="res-img">[[File:vCast_Computer_2.png|400px]]</div> | |||
<li>You can also connect to the ViewBoard by clicking '''Device List''' then the '''Device Name''' listed.</li> | |||
<div class="res-img">[[File:vCast_Sender_Device_List_Scan.png|border|300px]]</div> | |||
:'''NOTE:''' The '''Device Name''' can be found as highlighted below: | |||
:<div class="res-img">[[File:vCast_Computer_4.png|400px]]</div> | |||
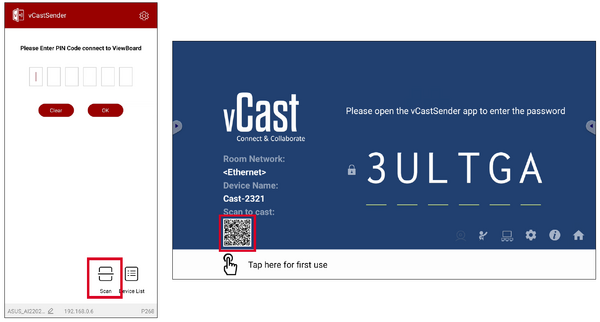
<li>Additionally, you can connect to the ViewBoard by selecting '''Scan''' then placing the on-screen QR code into the box to automatically connect.</li> | |||
:<div class="res-img">[[File:vCast_Computer_5.png|600px]]</div> | |||
</ol> | |||
== | ==Casting from Apple iOS Devices== | ||
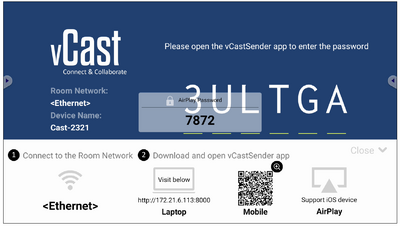
<div class="res-img">[[File: | Apple AirPlay® is compatible with vCast for screen mirroring and content streaming under the same subnet environment only. An “AirPlay Password” will be generated on-screen for connection when using AirPlay to cast to a ViewBoard. | ||
<div class="res-img">[[File:vCast_Apple_Main.png|border|500px]]</div> | |||
<ol><li>Ensure the client device (e.g., iPhone or iPad) is connected to the same network as the ViewBoard.</li> | |||
:'''NOTE:''' The network name can be found under '''Room Network'''. | |||
:<div class="res-img">[[File:vCast_Computer_1.png|400px]]</div> | |||
<li>On the iOS client device, directly open AirPlay and select the '''Device Name''' of the ViewBoard to connect.</li> | |||
= | :'''NOTE:''' The '''Device Name''' can be found as highlighted below: | ||
:<div class="res-img">[[File:vCast_Computer_4.png|400px]]</div> | |||
<li>Input the generated on-screen '''AirPlay Password''' on the client device to connect.</li> | |||
:<div class="res-img">[[File:vCast_Sender_4.png|border|400px]]</div> | |||
:<div class="res-img">[[File: | :'''NOTE:''' In a cross subnet environment, please download and connect with the vCastSender iOS application from the Apple App Store. | ||
<li>You can also connect to the ViewBoard by selecting '''Scan''' then placing the on-screen QR code into the box to automatically connect.</li> | |||
:<div class="res-img">[[File:vCast_Computer_5.png|600px]]</div></ol> | |||
=Other Default Applications= | =Other Default Applications= | ||
Latest revision as of 09:32, 22 October 2024
vCast
Working with ViewBoard® Cast software (vCast, vCast Pro, and vCastSender), the vCast application will allow the ViewBoard to receive laptop screens (Windows/Mac/Chrome) and mobile (iOS/Android) users’ screens, photos, videos, annotations, and camera(s) that are using the vCastSender application.

- NOTE:
- ViewBoard® Cast software, laptops, and mobile devices can connect to both the same subnet and cross subnet by entering the on-screen PIN code.
- Connected devices will show up under Device List on the same subnet connection.
- If the device does not show up under Device List, users will need to key-in the on-screen PIN code.
Network Information
- Ports:
- TCP 56789, 25123, 8121 & 8000 (Controlling message port & client device audio transfer)
- TCP 8600 (BYOM)
- TCP 53000 (Request share screen)
- TCP 52020 (Reverse control)
- TCP 52025 (Reverse control for ViewBoard Cast Button)
- TCP 52030 (Status sync)
- UDP 48689, 25123 (Device searching and broadcast & client device audio transfer)
- UDP 5353 (Multicast search device protocol)
- Port and DNS Activation:
- Port: 443
- DNS: https://vcastactivate.viewsonic.com
- OTA Service:
- Server Port: TCP443
- Server FQDN Name: https://vcastupdate.viewsonic.com
Casting from Windows, MacBook, and Chrome Devices

- Ensure the client device (e.g., laptop) is connected to the same network as the ViewBoard.
- NOTE: The network name can be found under Room Network.
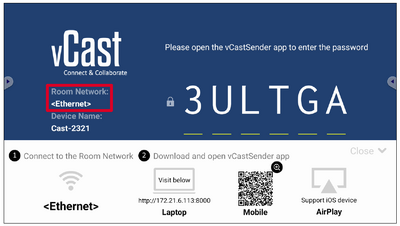
- On the client device, visit the address that is shown on the ViewBoard to download and install the vCastSender application.
- After installing, launch the vCastSender application.
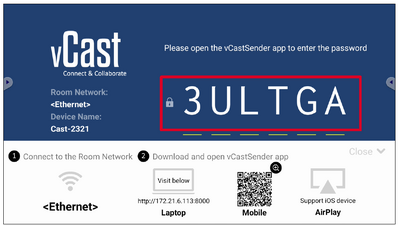
- To connect to the ViewBoard, input the PIN code and click OK.
- NOTE: The PIN code can be found as highlighted below:
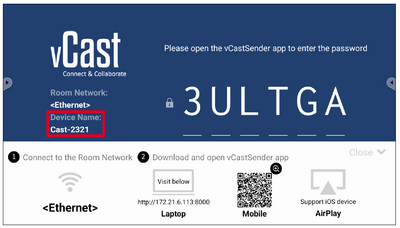
- Additionally, you can connect to the ViewBoard or display by clicking Device List then the Device Name listed.
- NOTE: The Device Name can be found as highlighted below:


Casting from Android Devices

- Ensure the client device (e.g., Android phone or tablet) is connected to the same network as the ViewBoard.
- NOTE: The network name can be found under Room Network.
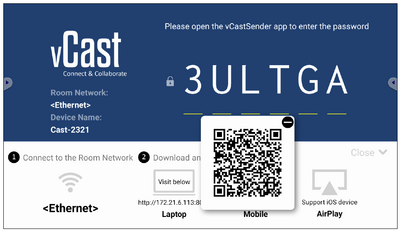
- On the Android client device, scan the QR code shown on the ViewBoard to directly download the vCastSender application, or download the application from the Google Play Store.
- After installing, launch the vCastSender application.
- To connect to the display, input the PIN code and select OK.
- NOTE: The PIN code can be found as highlighted below:
- You can also connect to the ViewBoard by clicking Device List then the Device Name listed.
- NOTE: The Device Name can be found as highlighted below:
- Additionally, you can connect to the ViewBoard by selecting Scan then placing the on-screen QR code into the box to automatically connect.


Casting from Apple iOS Devices
Apple AirPlay® is compatible with vCast for screen mirroring and content streaming under the same subnet environment only. An “AirPlay Password” will be generated on-screen for connection when using AirPlay to cast to a ViewBoard.

- Ensure the client device (e.g., iPhone or iPad) is connected to the same network as the ViewBoard.
- NOTE: The network name can be found under Room Network.
- On the iOS client device, directly open AirPlay and select the Device Name of the ViewBoard to connect.
- NOTE: The Device Name can be found as highlighted below:
- Input the generated on-screen AirPlay Password on the client device to connect.
- NOTE: In a cross subnet environment, please download and connect with the vCastSender iOS application from the Apple App Store.
- You can also connect to the ViewBoard by selecting Scan then placing the on-screen QR code into the box to automatically connect.

Other Default Applications
Folders
-
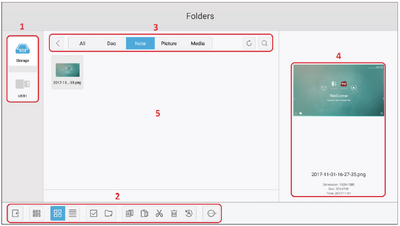 Folders Overview
 -
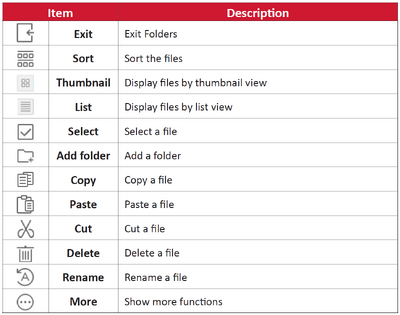 Folder Icons


| Number | Item |
|---|---|
| 1 | Storage Device Display |
| 2 | Icons |
| 3 | File Type Menu |
| 4 | File Information |
| 5 | Main Display Area |
File Type Menu
| Item | Description |
|---|---|
| All | All types |
| Doc | OFFICE files |
| Note | Image stored by myViewBoard, Side Tool Bar, and remote control Screen Capture button. |
| Picture | Image files |
| Media | Audio and Video files |
vSweeper
Clear unnecessary data and unwanted files.
Advanced Settings can also be customized to the user's needs.
