VG3456C On-Screen Display Menu Options
Input Select
- Press the 2/3/4/5 key to display the Quick Menu. Then press the 4 key to display the OSD Menu.
- Press the 1 (ViewMode) or 2 key to select Input Select. Then press the 3 key to enter the Input Select menu.
- Press the 1 (ViewMode) or 2 key to select the desired input source. Then press the 3 key to confirm the selection.
Audio Adjust
| Menu Option
|
Description
|
| Volume
|
Adjust the monitor's sound level.
|
| Mute
|
Turn off the monitor's sound.
|
- Press the 2/3/4/5 key to display the Quick Menu. Then press the 4 key to display the OSD Menu.
- Press the 1 (ViewMode) or 2 key to select Audio Adjust. Then press the 3 key to enter the Audio Adjust menu.
- Press the 1 (ViewMode) or 2 key to select the desired option. Then press the 3 key to enter its sub-menu.
- Press the 1 (ViewMode) or 2 key to adjust/select the setting, and press the 3 key to confirm the selection (if applicable).
ViewMode
| Menu Option
|
Description
|
| Off
|
Disable the ViewMode function.
|
| Office
|
Ideal screen settings for office applications.
|
| Movie
|
Ideal screen settings for watching movies.
|
| MAC
|
Ideal screen settings when connecting to Mac computers.
|
| Mono
|
Set the screen to a monochrome, grayscale.
|
| Game
|
Ideal screen settings for playing games.
|
- Press the 2/3/4/5 key to display the Quick Menu. Then press the 4 key to display the OSD Menu.
- Press the 1 (ViewMode) or 2 key to select ViewMode. Then press the 3 key to enter the ViewMode menu.
- Press the 1 (ViewMode) or 2 key to select the setting. Then press the 3 key to confirm the selection.
Color Adjust
Note: Some sub-menus may not be adjustable depending on the user’s custom settings.
| Menu Option
|
Description
|
| Contrast/Brightness
|
Contrast
- Adjusts the degree of difference between the lightest and darkest parts of the picture and changes the amount of black and white in the image.
|
Brightness
- Adjusts the background black levels of the screen image.
|
| Color Temperature
|
| Menu Option
|
Description
|
| Bluish
|
Set the color temperature to 9300K.
|
| Cool
|
Set the color temperature to 7500K.
|
| Native
|
Default color temperature. Recommended for daily use.
|
| Warm
|
Set the color temperature to 5000K.
|
| User
|
Set a custom color temperature.
|
|
| Color Space
|
| Menu Option
|
Description
|
| Auto
|
Automatically recognize the input signal's color space.
|
| RGB
|
Set the input signal color format as RGB.
|
| YUV
|
Set the input signal color format as YUV.
|
|
| Color Range |
| Menu Option
|
Description
|
| Auto
|
Automatically recognize the input signal's color range.
|
| Full Range
|
Black and white levels are full (0~255).
|
| Limited Range
|
Black and white levels are limited (16~235).
|
|
| Gamma
|
Manually adjust the brightness level of the monitor’s grayscale levels.
|
- Press the 2/3/4/5 key to display the Quick Menu. Then press the 4 key to display the OSD Menu.
- Press the 1 (ViewMode) or 2 key to select Color Adjust. Then press the 3 key to enter the Color Adjust menu.
- Press the 1 (ViewMode) or 2 key to select the menu option. Then press the 3 key to enter its sub-menu.
- Press the 1 (ViewMode) or 2 key to select the setting. Then press the 3 key to confirm the selection.
Note: Some sub-menu options may have another sub-menu. To enter the respective sub-menu, press the 3 key. Follow the key guide that appears on the screen to select the option or make adjustments.
Manual Image Adjust
| Menu Option
|
Description
|
| Sharpness
|
Adjust the on-screen image's clarity.
|
| Blue Light Filter
|
Block high-energy blue light for a more comfortable viewing experience.
|
| Aspect Ratio
|
Select the on-screen image's width and height.
|
| Overscan
|
Automatically enlarge the input signal's image horizontally and vertically to an equal aspect ratio that fills the screen.
|
- Press the 2/3/4/5 key to display the Quick Menu. Then press the 4 key to display the OSD Menu.
- Press the 1 (ViewMode) or 2 key to select Manual Image Adjust. Then press the 3 key to enter the Manual Image Adjust menu.
- Press the 1 (ViewMode) or 2 key to select the menu option. Then press the 3 key to enter its sub-menu.
- Press the 1 (ViewMode) or 2 key to adjust/select the setting. Then press the 3 key to confirm (if applicable).
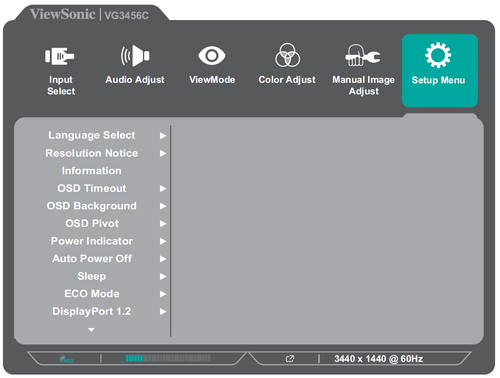
| Menu Option
|
Description
|
| Language Select
|
Set the language for the OSD Menu.
|
| Resolution Notice
|
When enabled, a notification message will appear on-screen when the current screen resolution is not the correct native resolution.
|
| Information
|
View information about the monitor.
|
| OSD Timeout
|
Set the length of time the OSD Menu remains on screen.
|
| OSD Background
|
Show/hide the OSD Menu's background when the OSD Menu is on screen.
|
| OSD Pivot
|
Set the OSD Menu orientation.
| Menu Option
|
Description
|
| 0°
|
Sets the OSD Menu without a pivot.
|
| +90°
|
Sets the OSD Menu with a +90° pivot.
|
| -90°
|
Sets the OSD Menu with a -90° pivot.
|
|
| Power Indicator
|
Turn the power indicator light on or off. When turned on, the power indicator light will be blue when the monitor is turned on.
|
| Auto Power Off
|
Set the monitor to automatically turn off after a certain amount of time.
|
| Sleep
|
Set the monitor to enter sleep mode after a certain amount of time.
|
| ECO Mode
|
Select a power saving mode.
|
| DisplayPort 1.2
|
Enable/disable DisplayPort 1.2 support.
|
| DDC/CI
|
Allow monitor control via the connected computer.
|
| Auto Detect
|
Automatically detect the input signal.
|
| All Recall
|
Resets all settings to their default values.
|
- Press the 2/3/4/5 key to display the Quick Menu. Then press the 4 key to display the OSD Menu.
- Press the 1 (ViewMode) or 2 key to select Setup Menu. Then press the 3 key to enter the Setup Menu menu.
- Press the 1 (ViewMode) or 2 key to select the menu option. Then press the 3 key to enter its sub-menu.
- Press the 1 (ViewMode) or 2 key to adjust/select the setting. Then press the 3 key to confirm (if applicable).
Note: Some sub-menu options may have another sub-menu. To enter the respective sub-menu, press the 3 key. Follow the key guide that appears on the screen to select the option or make adjustments.


