From ViewSonic User Guide Database
LDM136-151 On-Screen Display Menu
Use the On-Screen Display (OSD) Menu to adjust various settings.
Note: The OSD Menu is only available when there is an active input source (e.g., HDMI).
To open and operate the OSD Menu:
- Press the MENU
 button on the remote control.
- Press ▼/▲/◄/► on the remote control to select menu items or adjust values.
- Press OK to confirm your selection.
- Press the RETURN
 button to go back to the previous menu level.
- Press the MENU
 button to exit the OSD Menu.
| Sub-menu
|
Menu Option
|
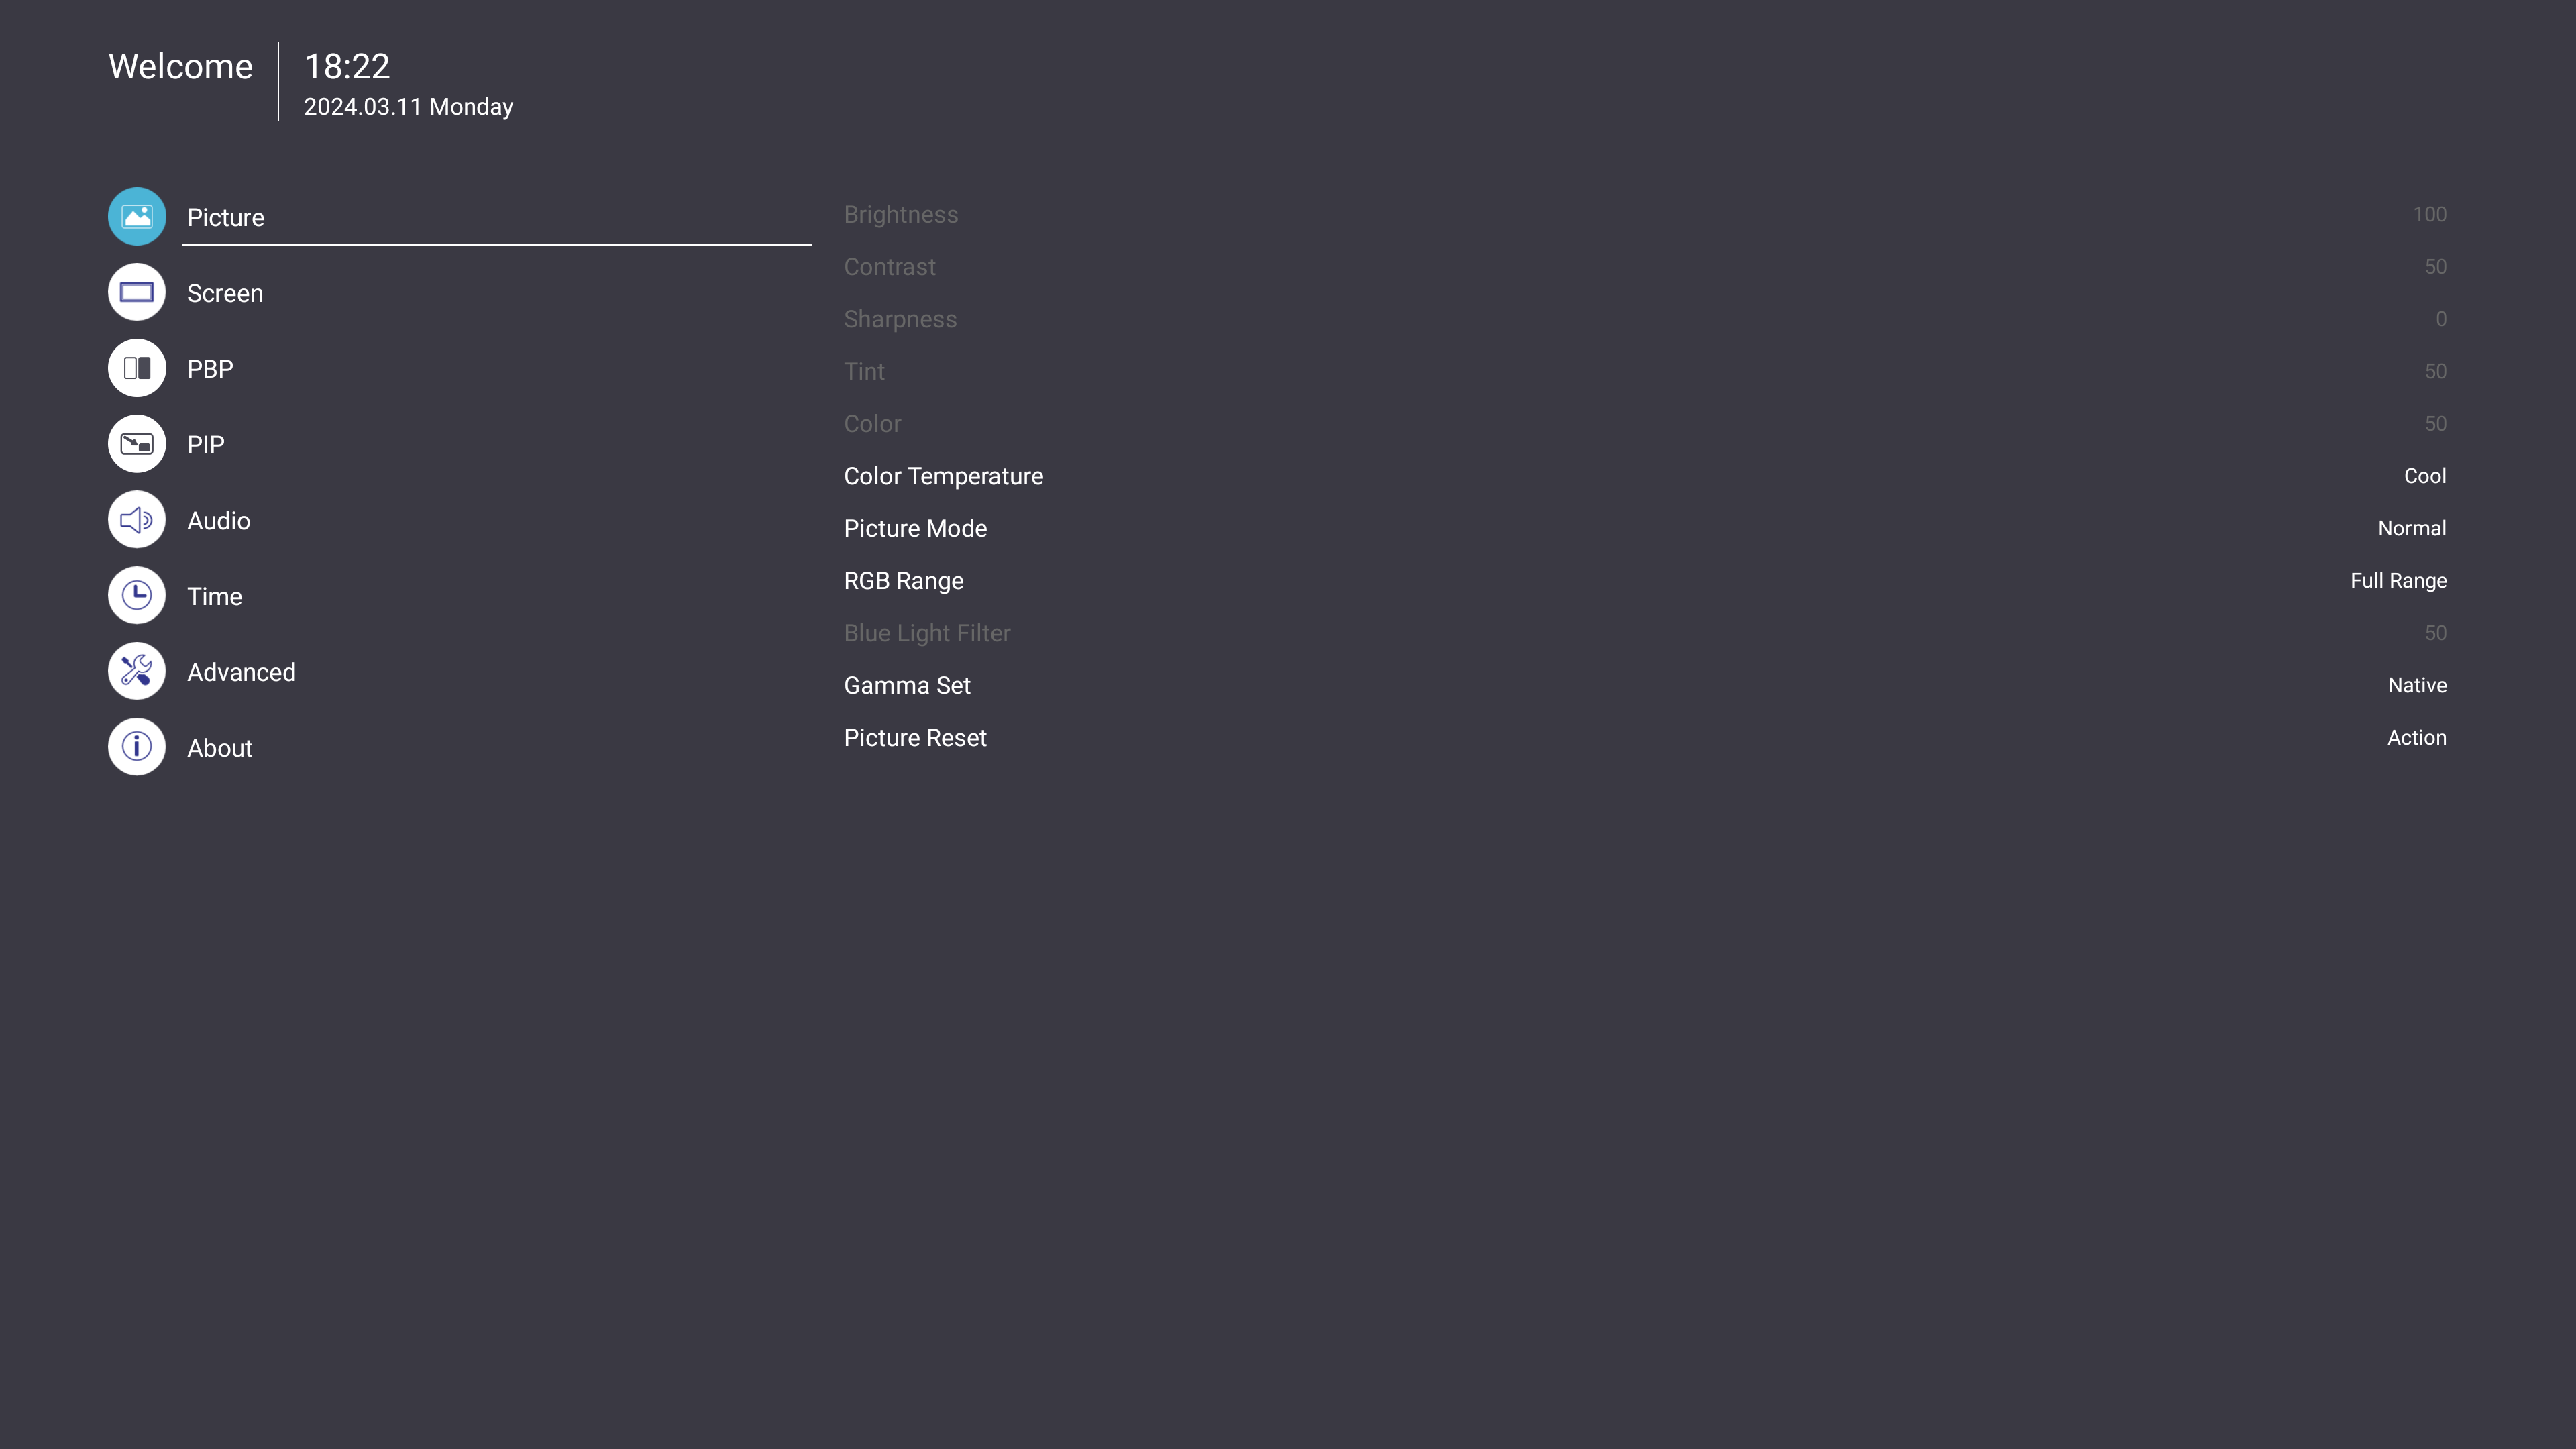
| Brightness
|
(-/+, 0~100)
|
| Contrast
|
(-/+, 0~100)
|
| Sharpness
|
(-/+, 0~15)
|
| Tint
|
(-/+, 0~100)
|
| Color
|
(-/+, 0~100)
|
| Color Temperature
|
Warm
|
| Normal
|
| Cool
|
| User
|
| Picture Mode
|
Normal
|
| Dynamic
|
| Soft
|
| User
|
| RGB Range
|
Full Range
|
| Limited Range
|
| Auto
|
| Blue Light Filter
|
(-/+, 0~100)
|
| Gamma Set
|
Native
|
| 2.2
|
| 2.4
|
| Picture Reset
|
Cancel
|
| Reset
|
| Sub-menu
|
Menu Option
|
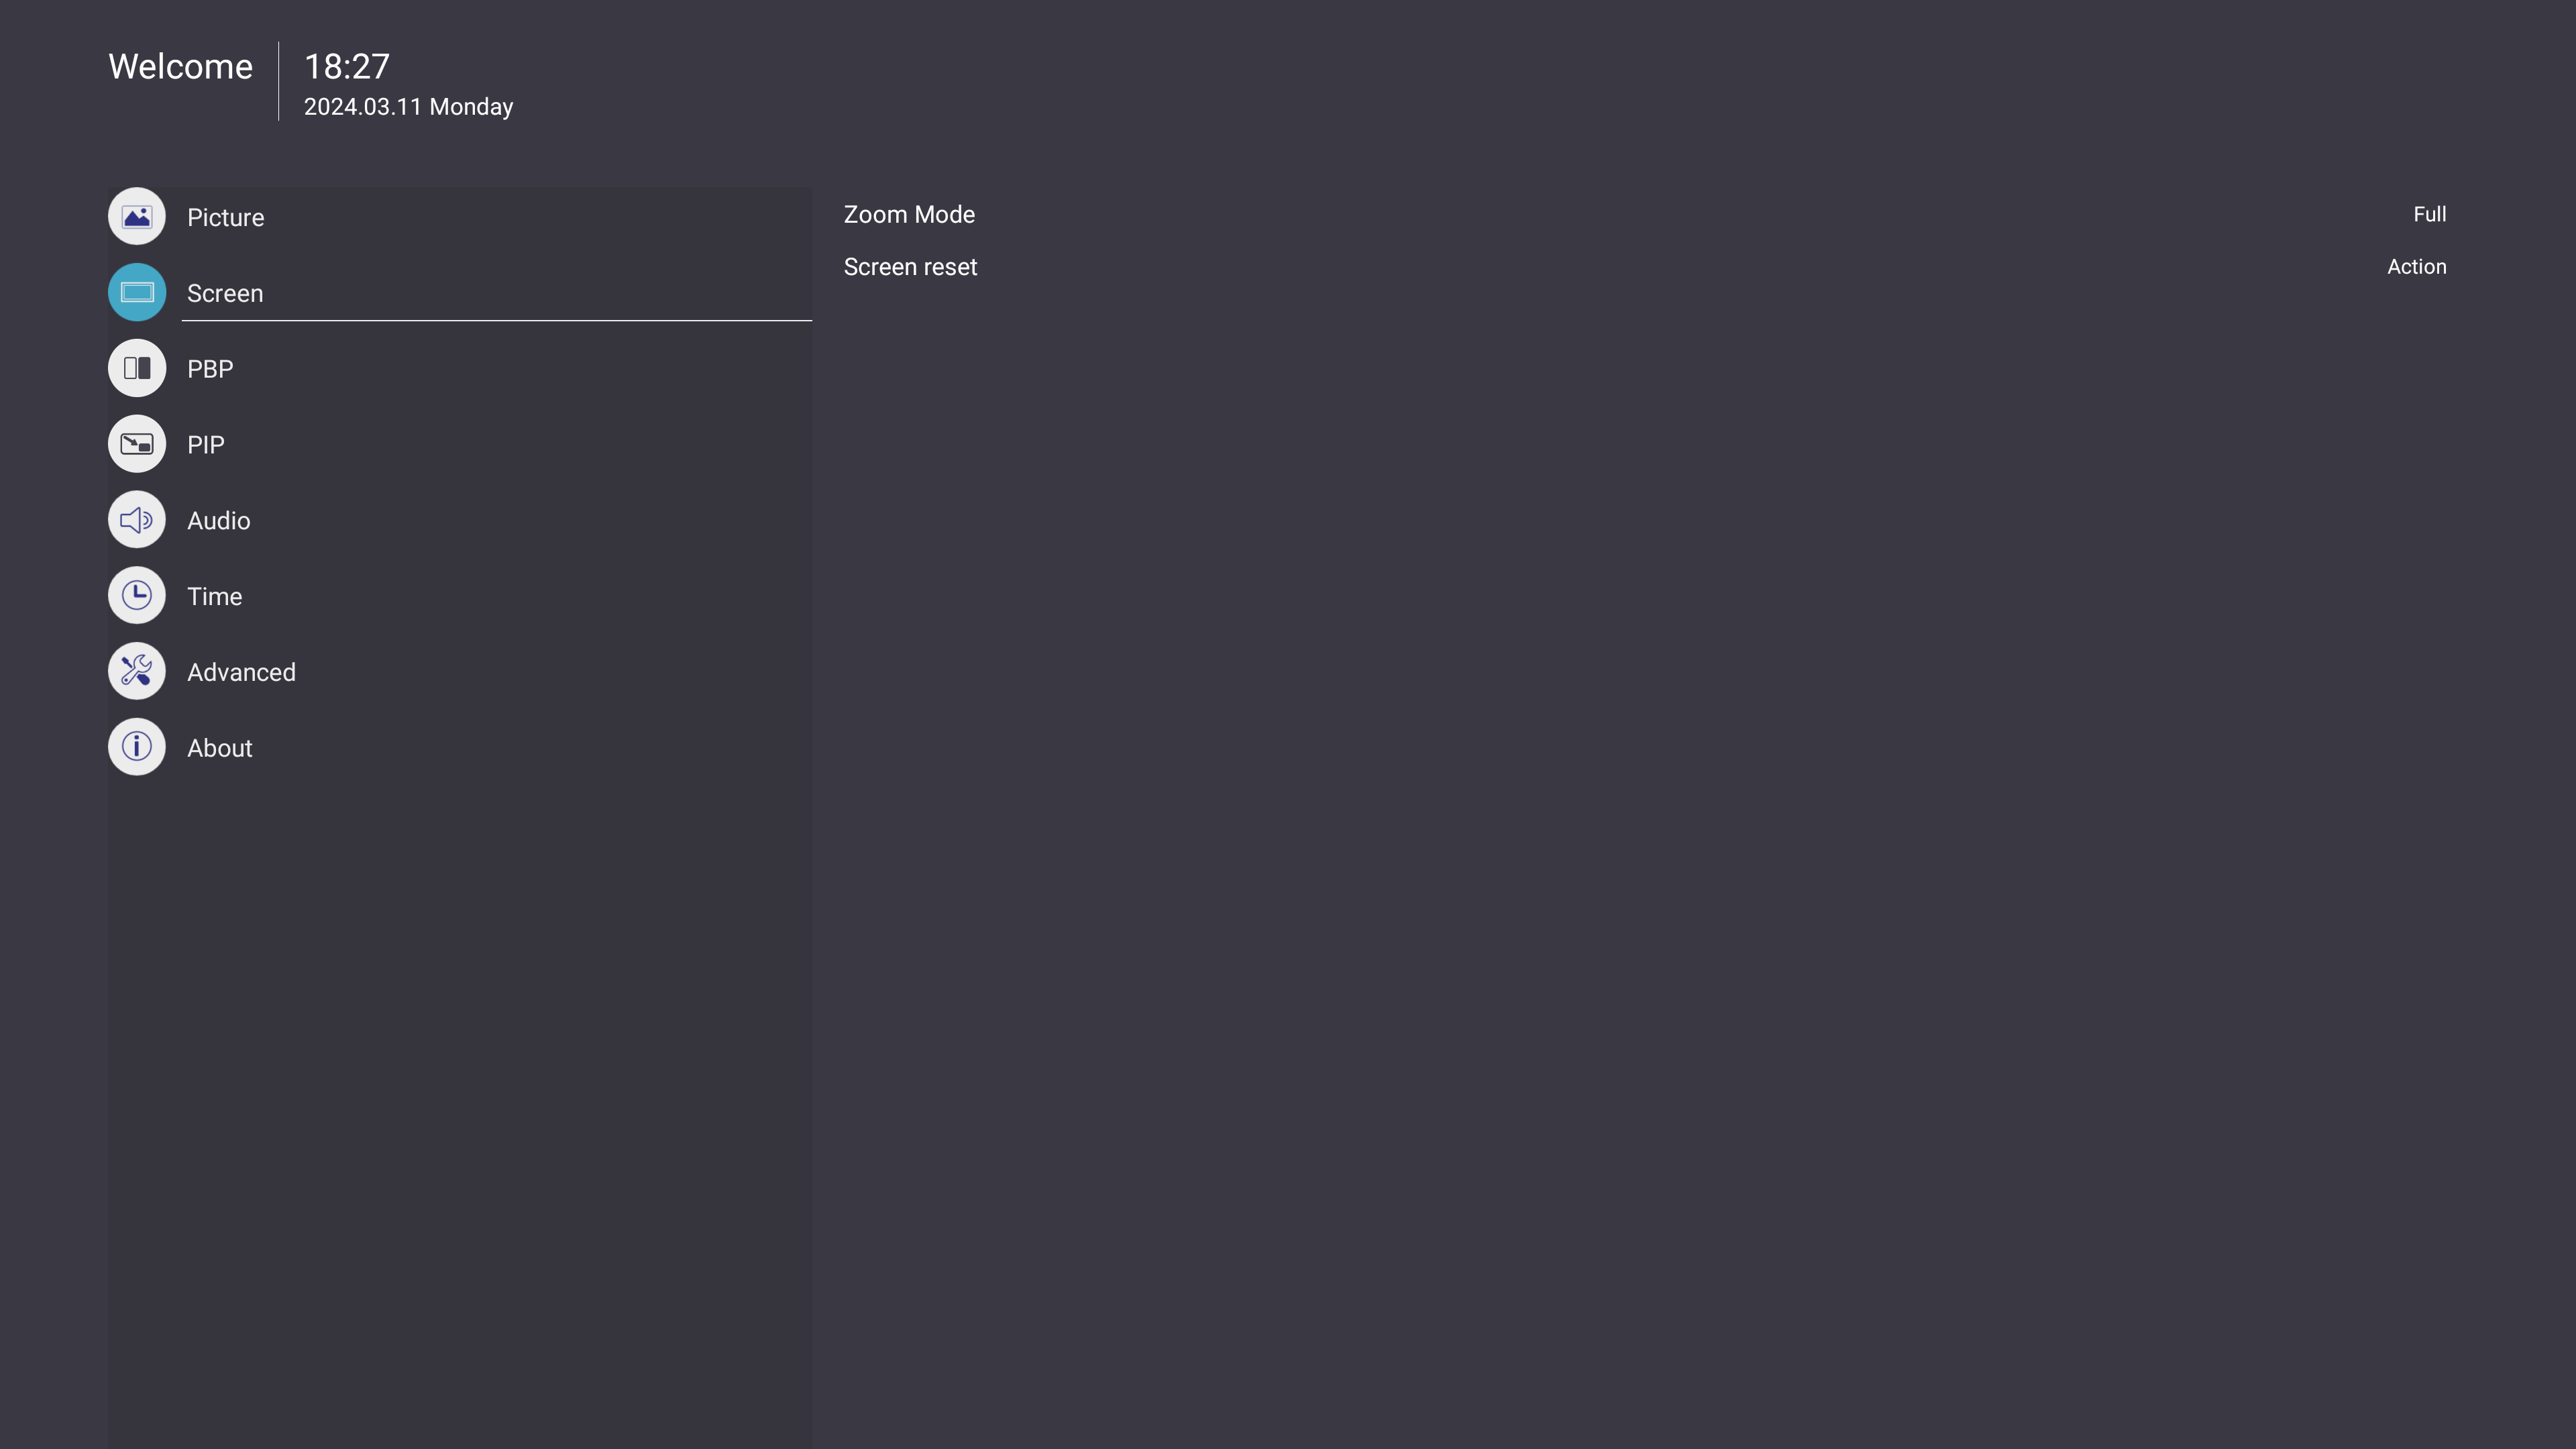
| Zoom Mode
|
Full
|
| Real
|
| Dynamic
|
| 21:9
|
| Screen Reset
|
Cancle
|
| Reset
|
| Sub-menu
|
Menu Option
|
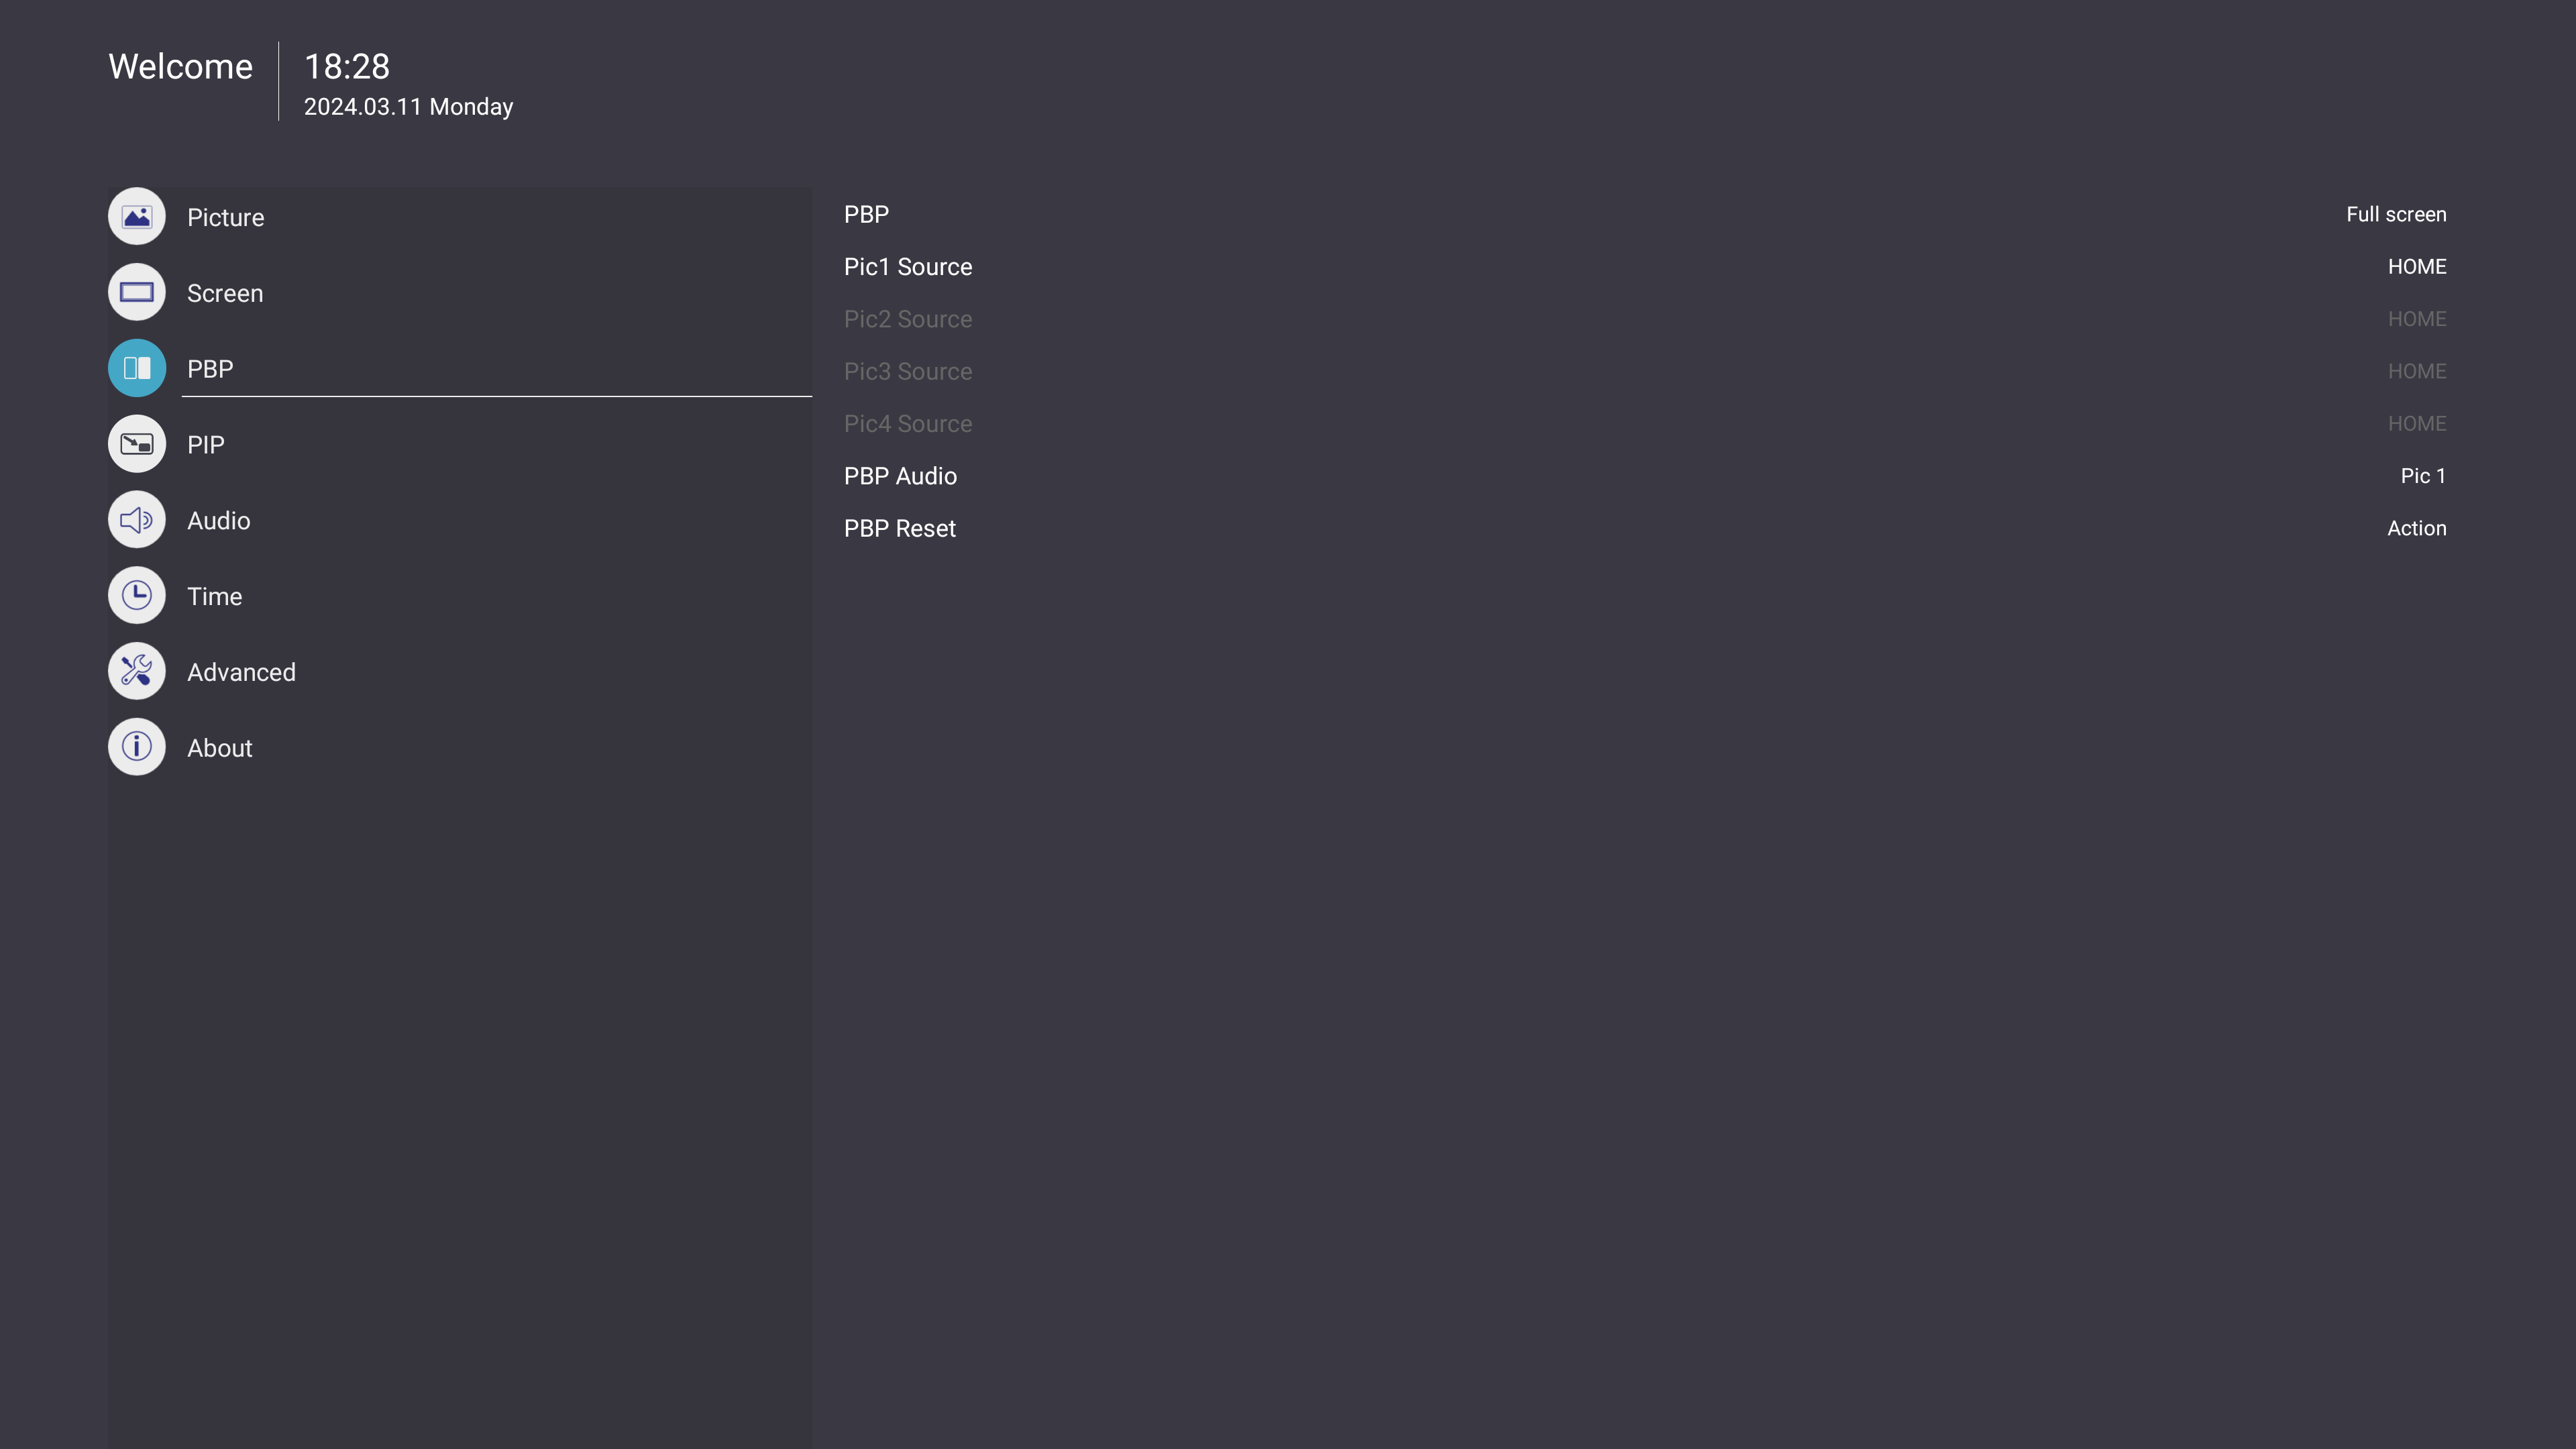
| PBP Mode
|
Full Screen
|
| Dual Screen
|
| Tree-part Screen
|
| Center Screen
|
| Quad Screen
|
| PBP Source
|
|
| PBP Audio
|
| PBP Reset
|
| Sub-menu
|
Menu Option
|
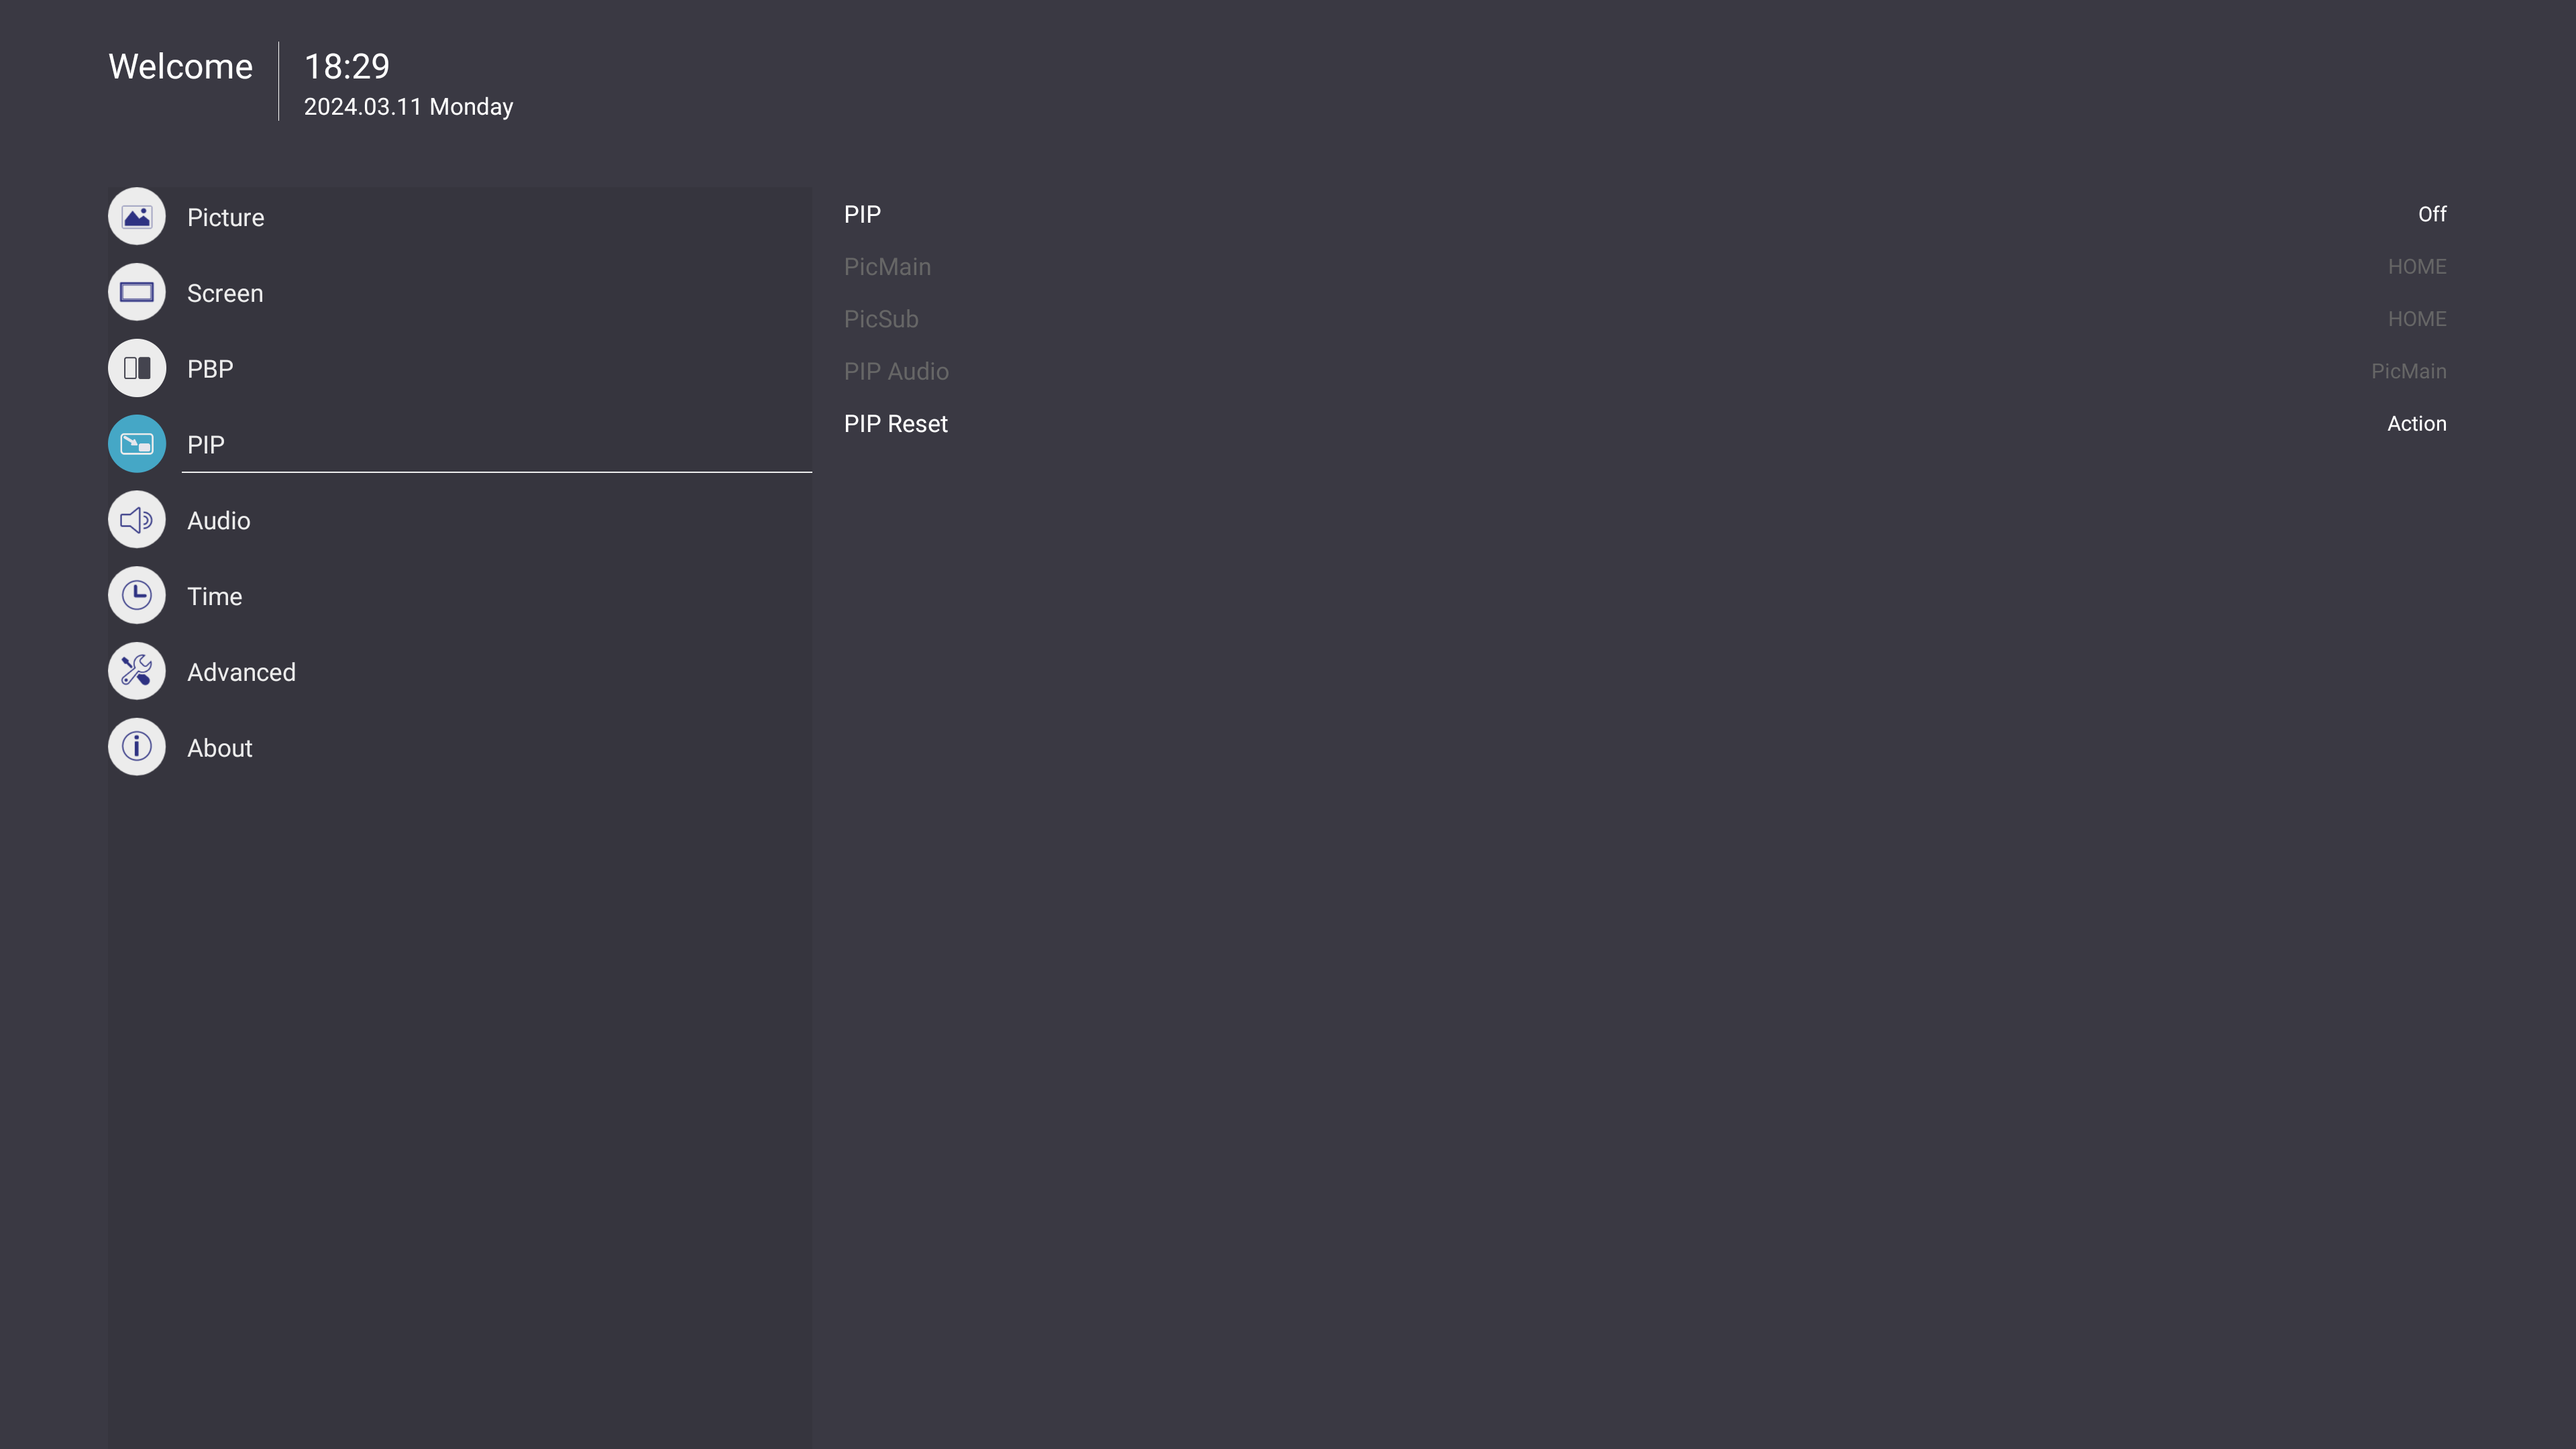
| PIP Mode
|
Top Left
|
| Top Right
|
| Bottom Left
|
| Bottom Right
|
| PicMain
|
|
| PicSub
|
| PIP Audio
|
| PIP Reset
|
| Sub-menu
|
Menu Option
|
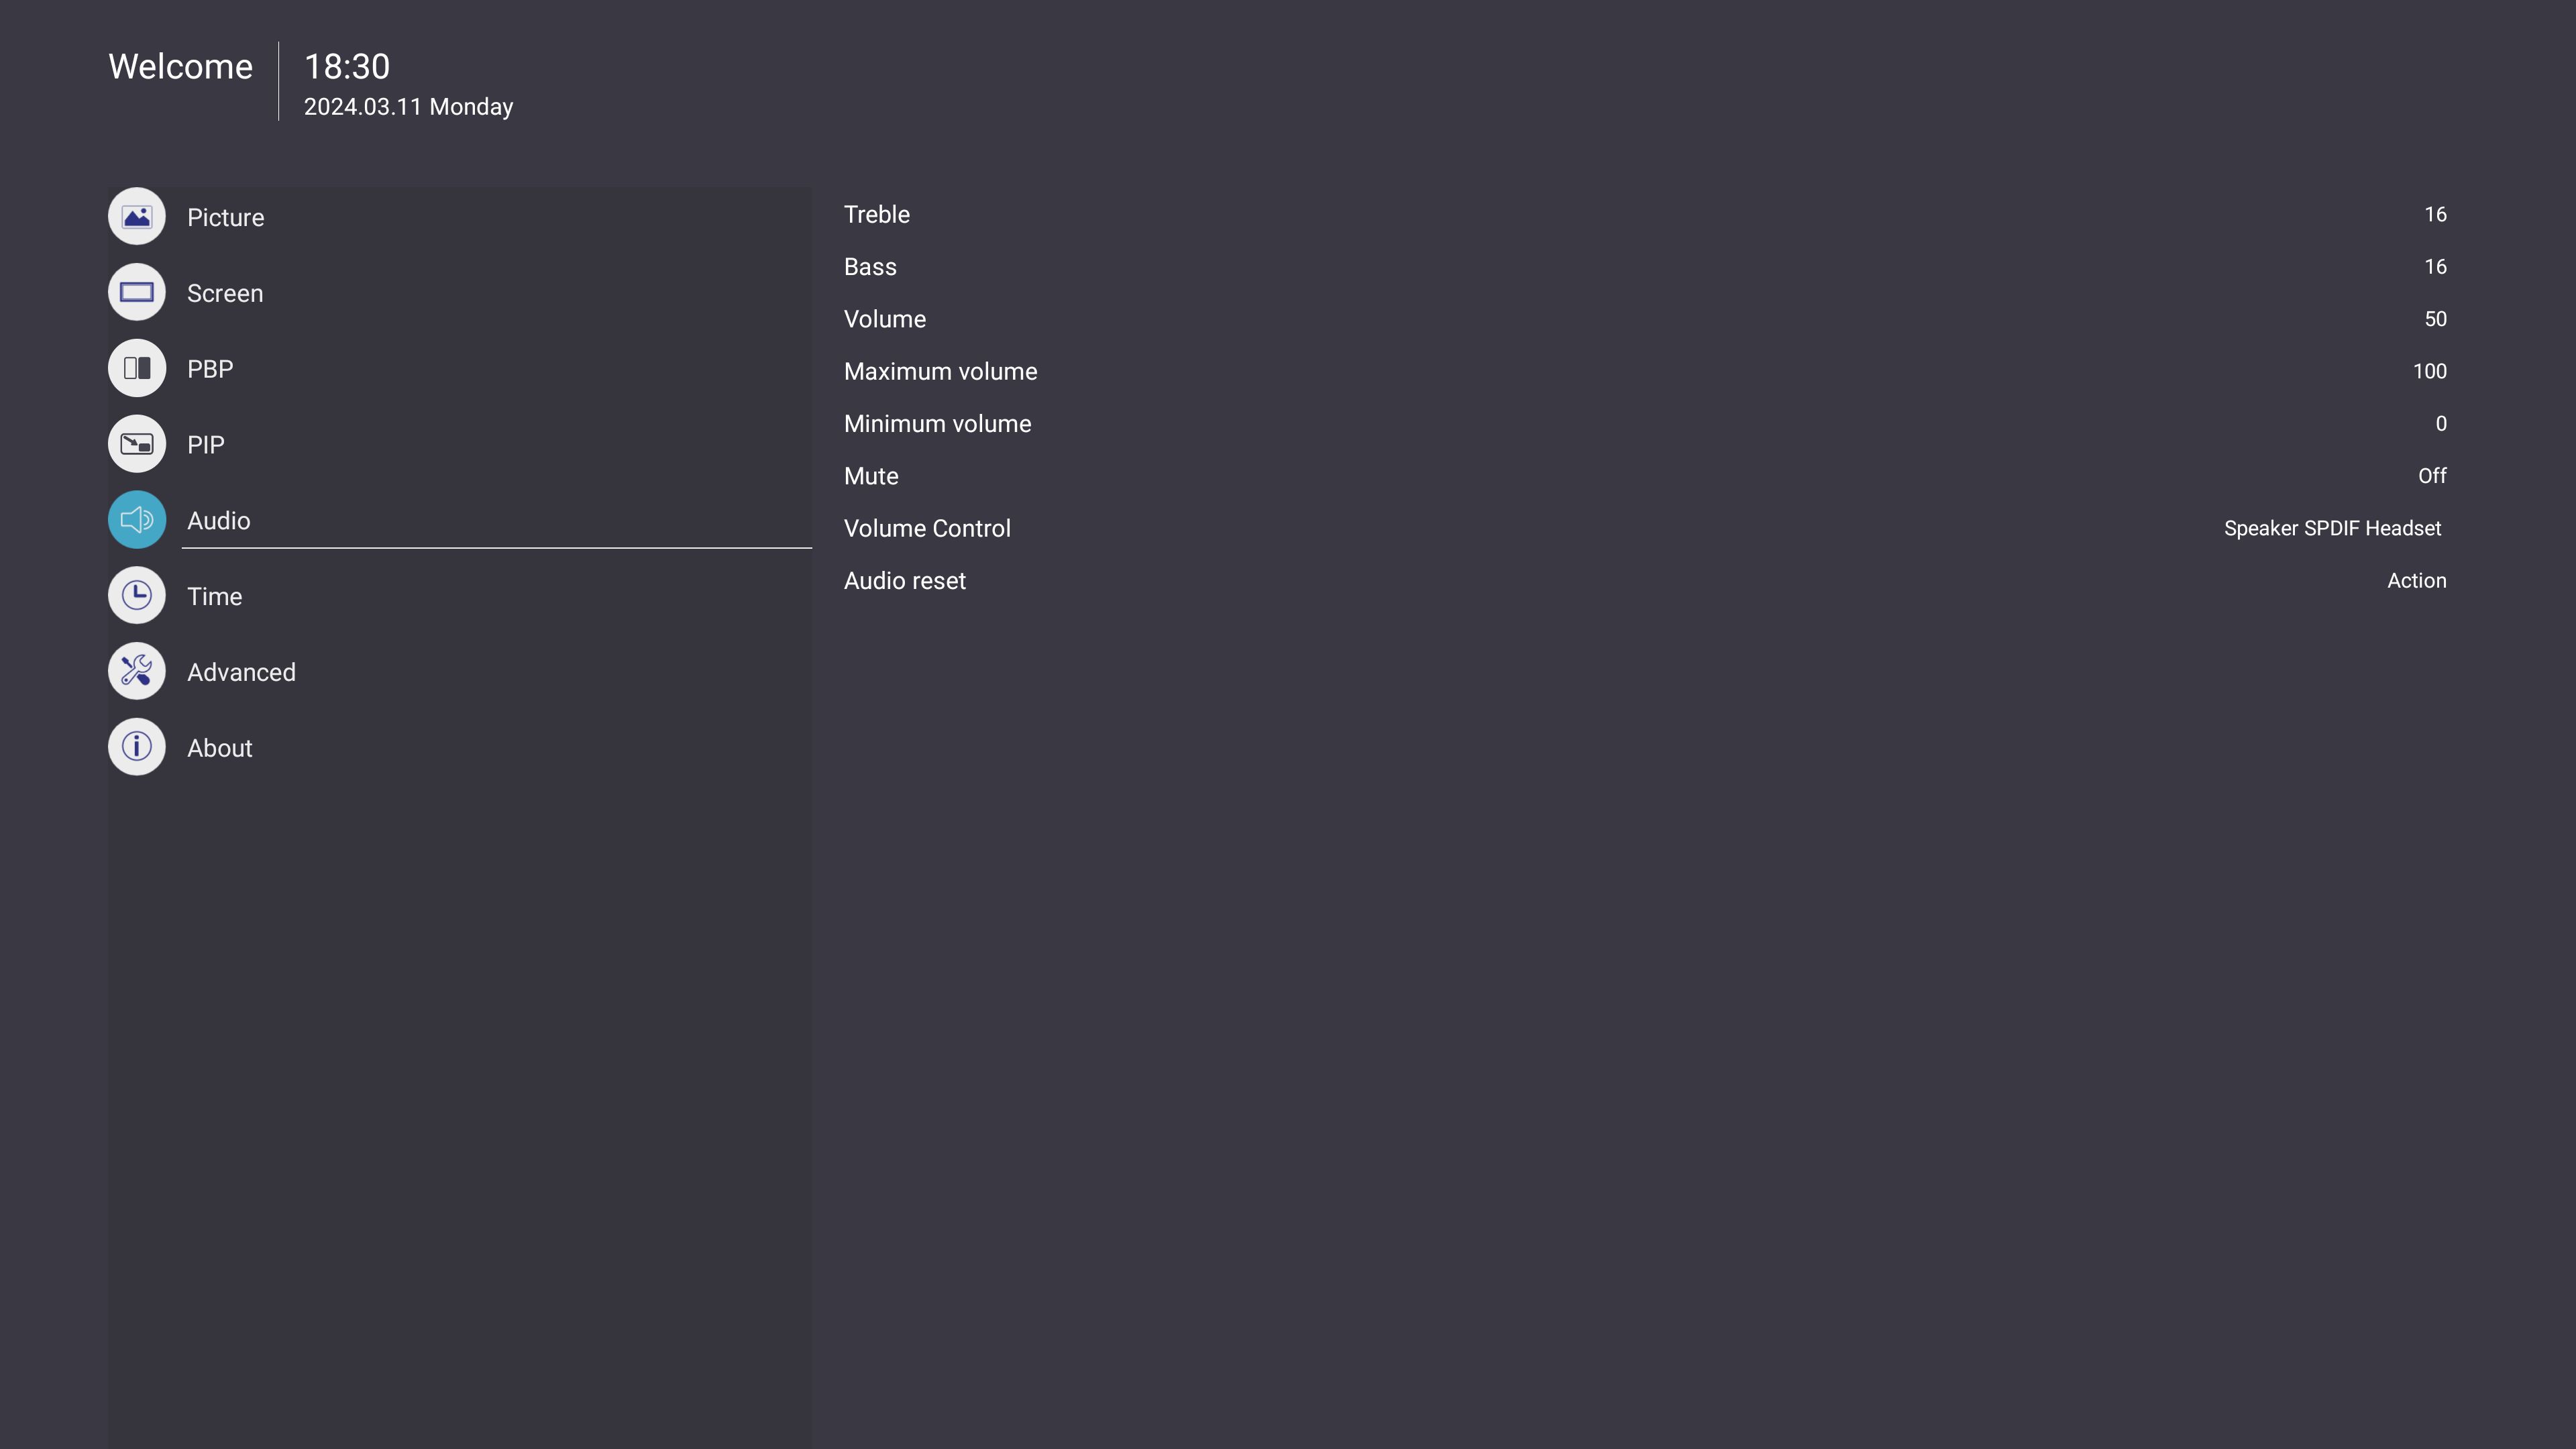
| Treble
|
(-/+, 0~24)
|
| Bass
|
(-/+, 0~24)
|
| Volume
|
(-/+, 0~100)
|
| Maximum Volume
|
(-/+, 0~100)
|
| Minimum Volume
|
(-/+, 0~99)
|
| Mute
|
Off
|
| On
|
| Volume Control
|
Speaker
|
| SPDIF
|
| Headset
|
| Audio Reset
|
Cancel
|
| Reset
|
| Sub-menu
|
Menu Option
|
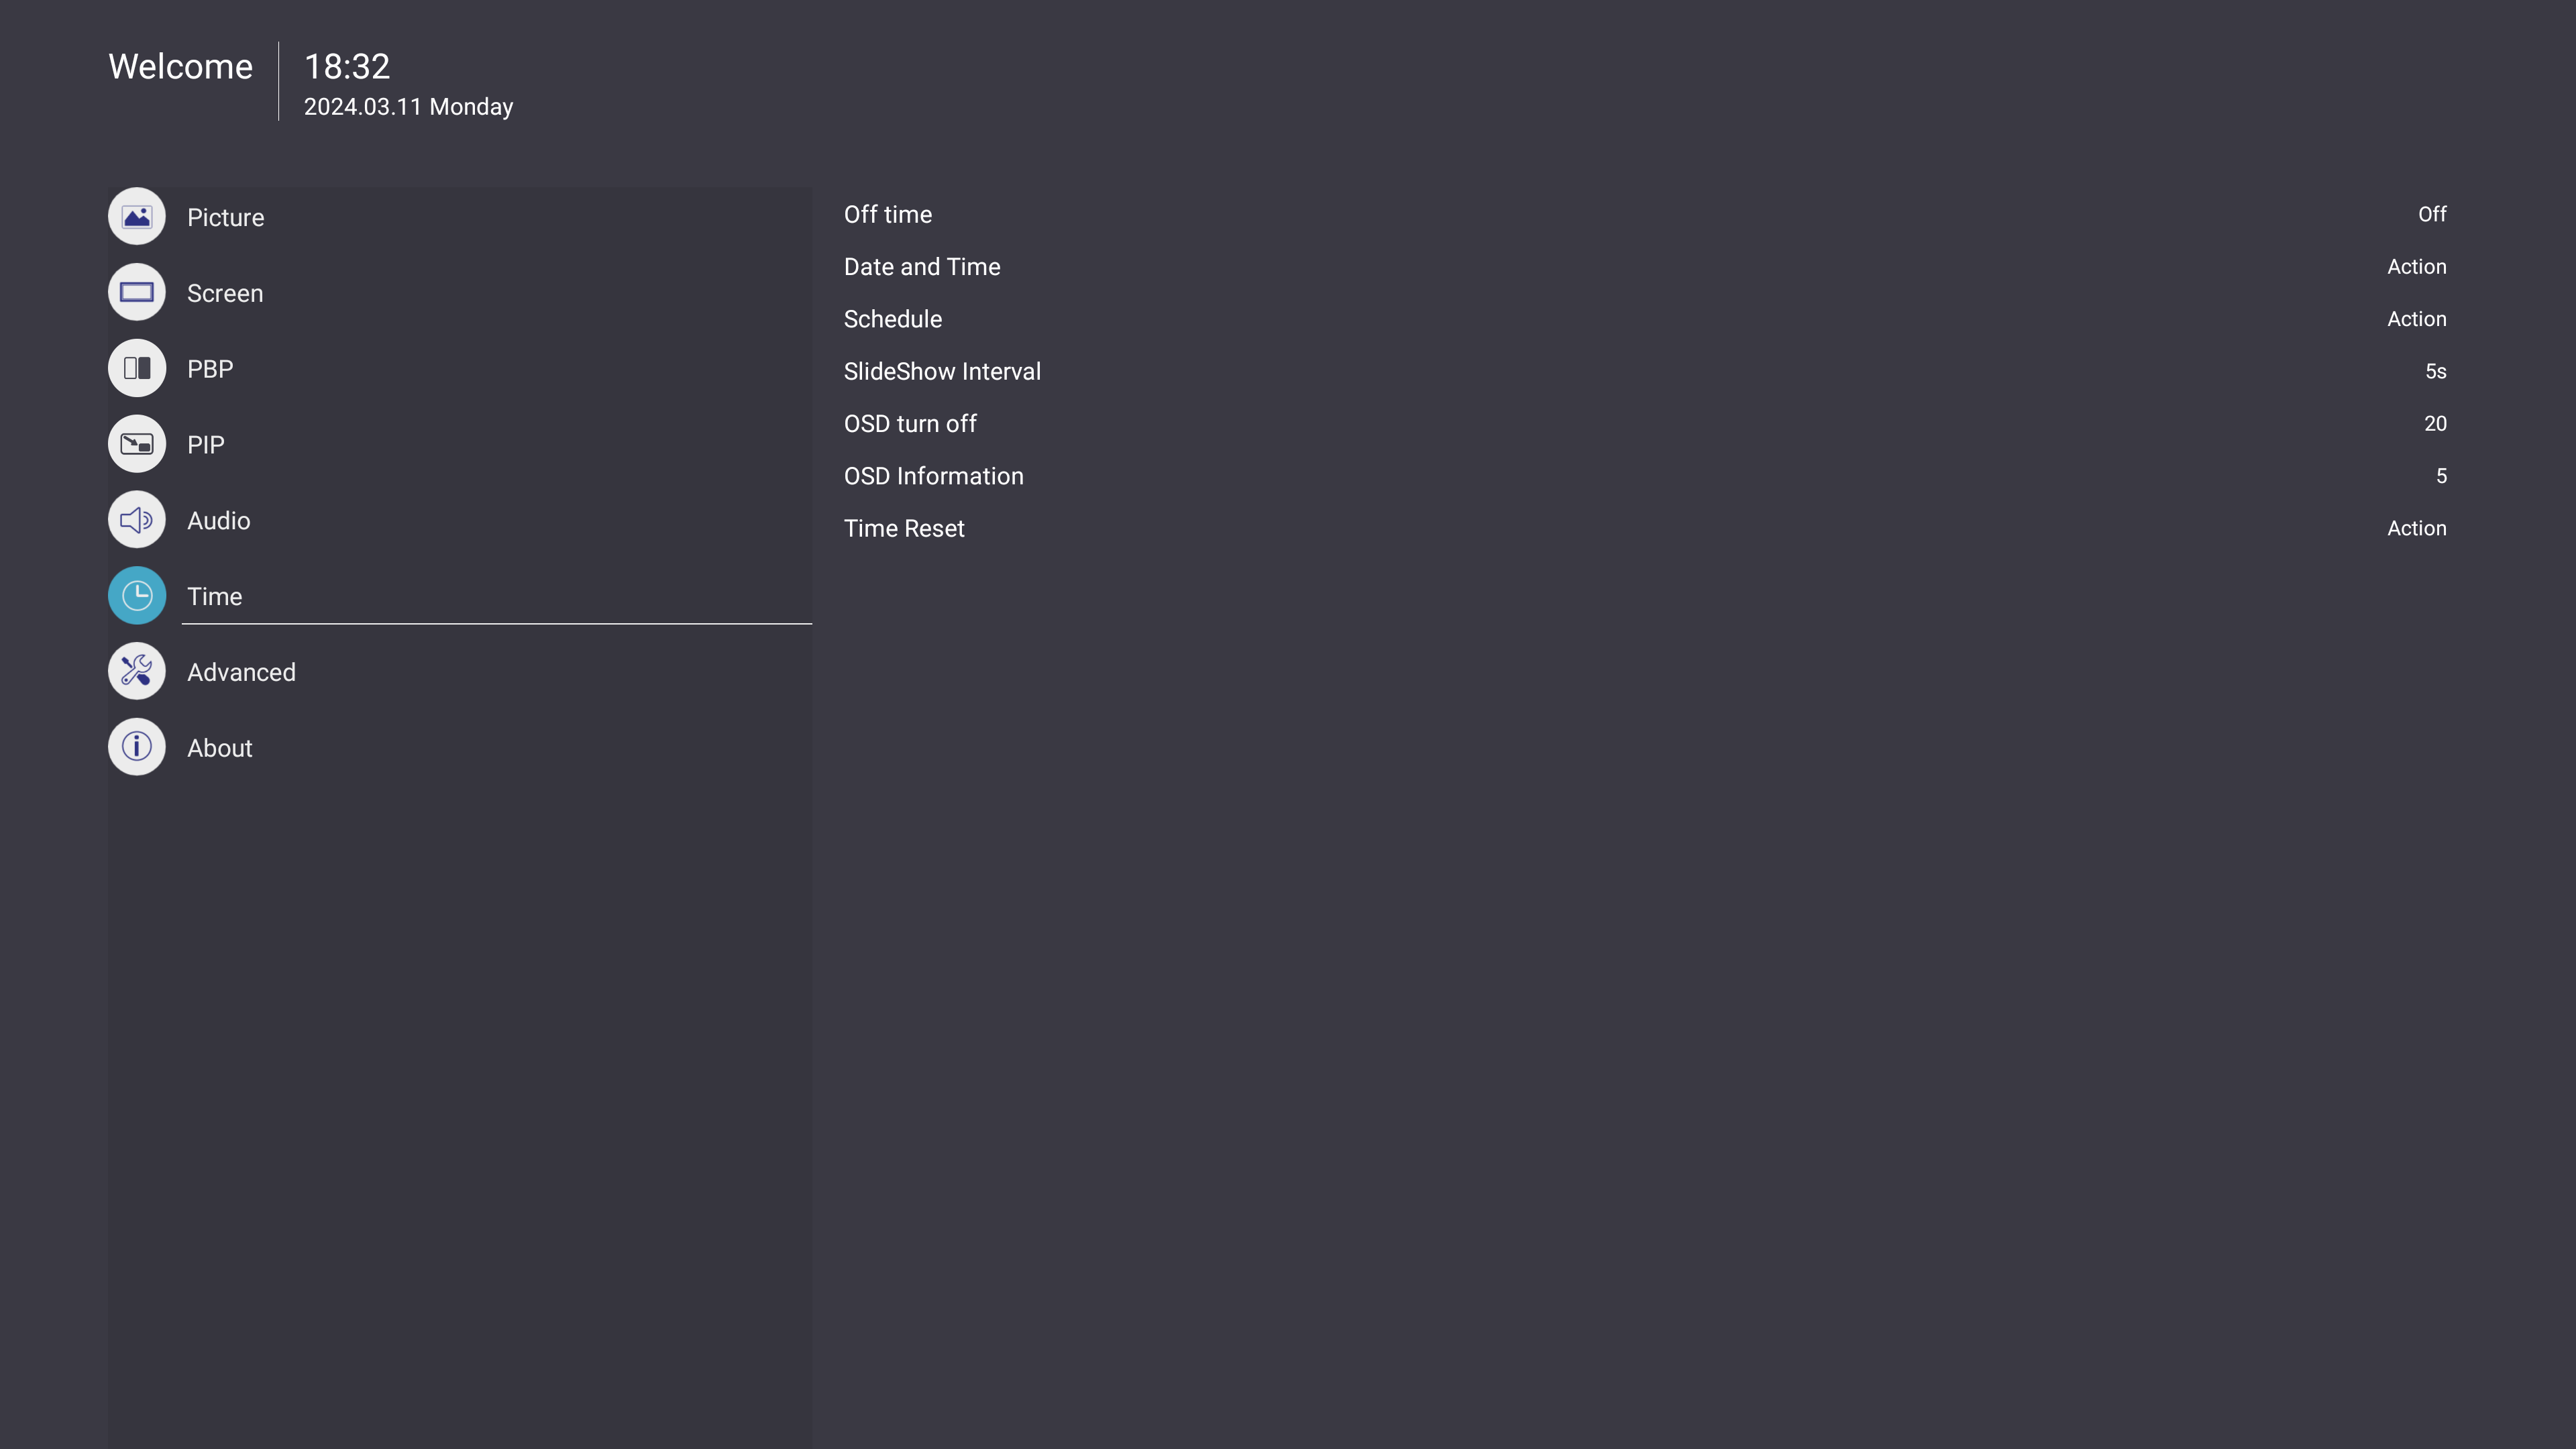
| Off Time
|
Off
|
| (10 mins~240 mins)
|
| Date and Time
|
Use Network-Provided Time
|
| Set Date Format
|
| Choose Time Zone
|
| Use 24-hour Format
|
| Schedule
|
Schedule List
|
| Enable
|
| Start Time
|
| End Time
|
| Input
|
| Day of the Week
|
| Every Week
|
| Slideshow Interval
|
(1s/3s/5s/10s/15s/20s/25s/30s)
|
| OSD Turn Off
|
Off
|
| (5~120 seconds)
|
| Information OSD
|
Off
|
| (1~60 seconds)
|
| Time Reset
|
Cancel
|
| Reset
|
| Sub-menu
|
Menu Option
|
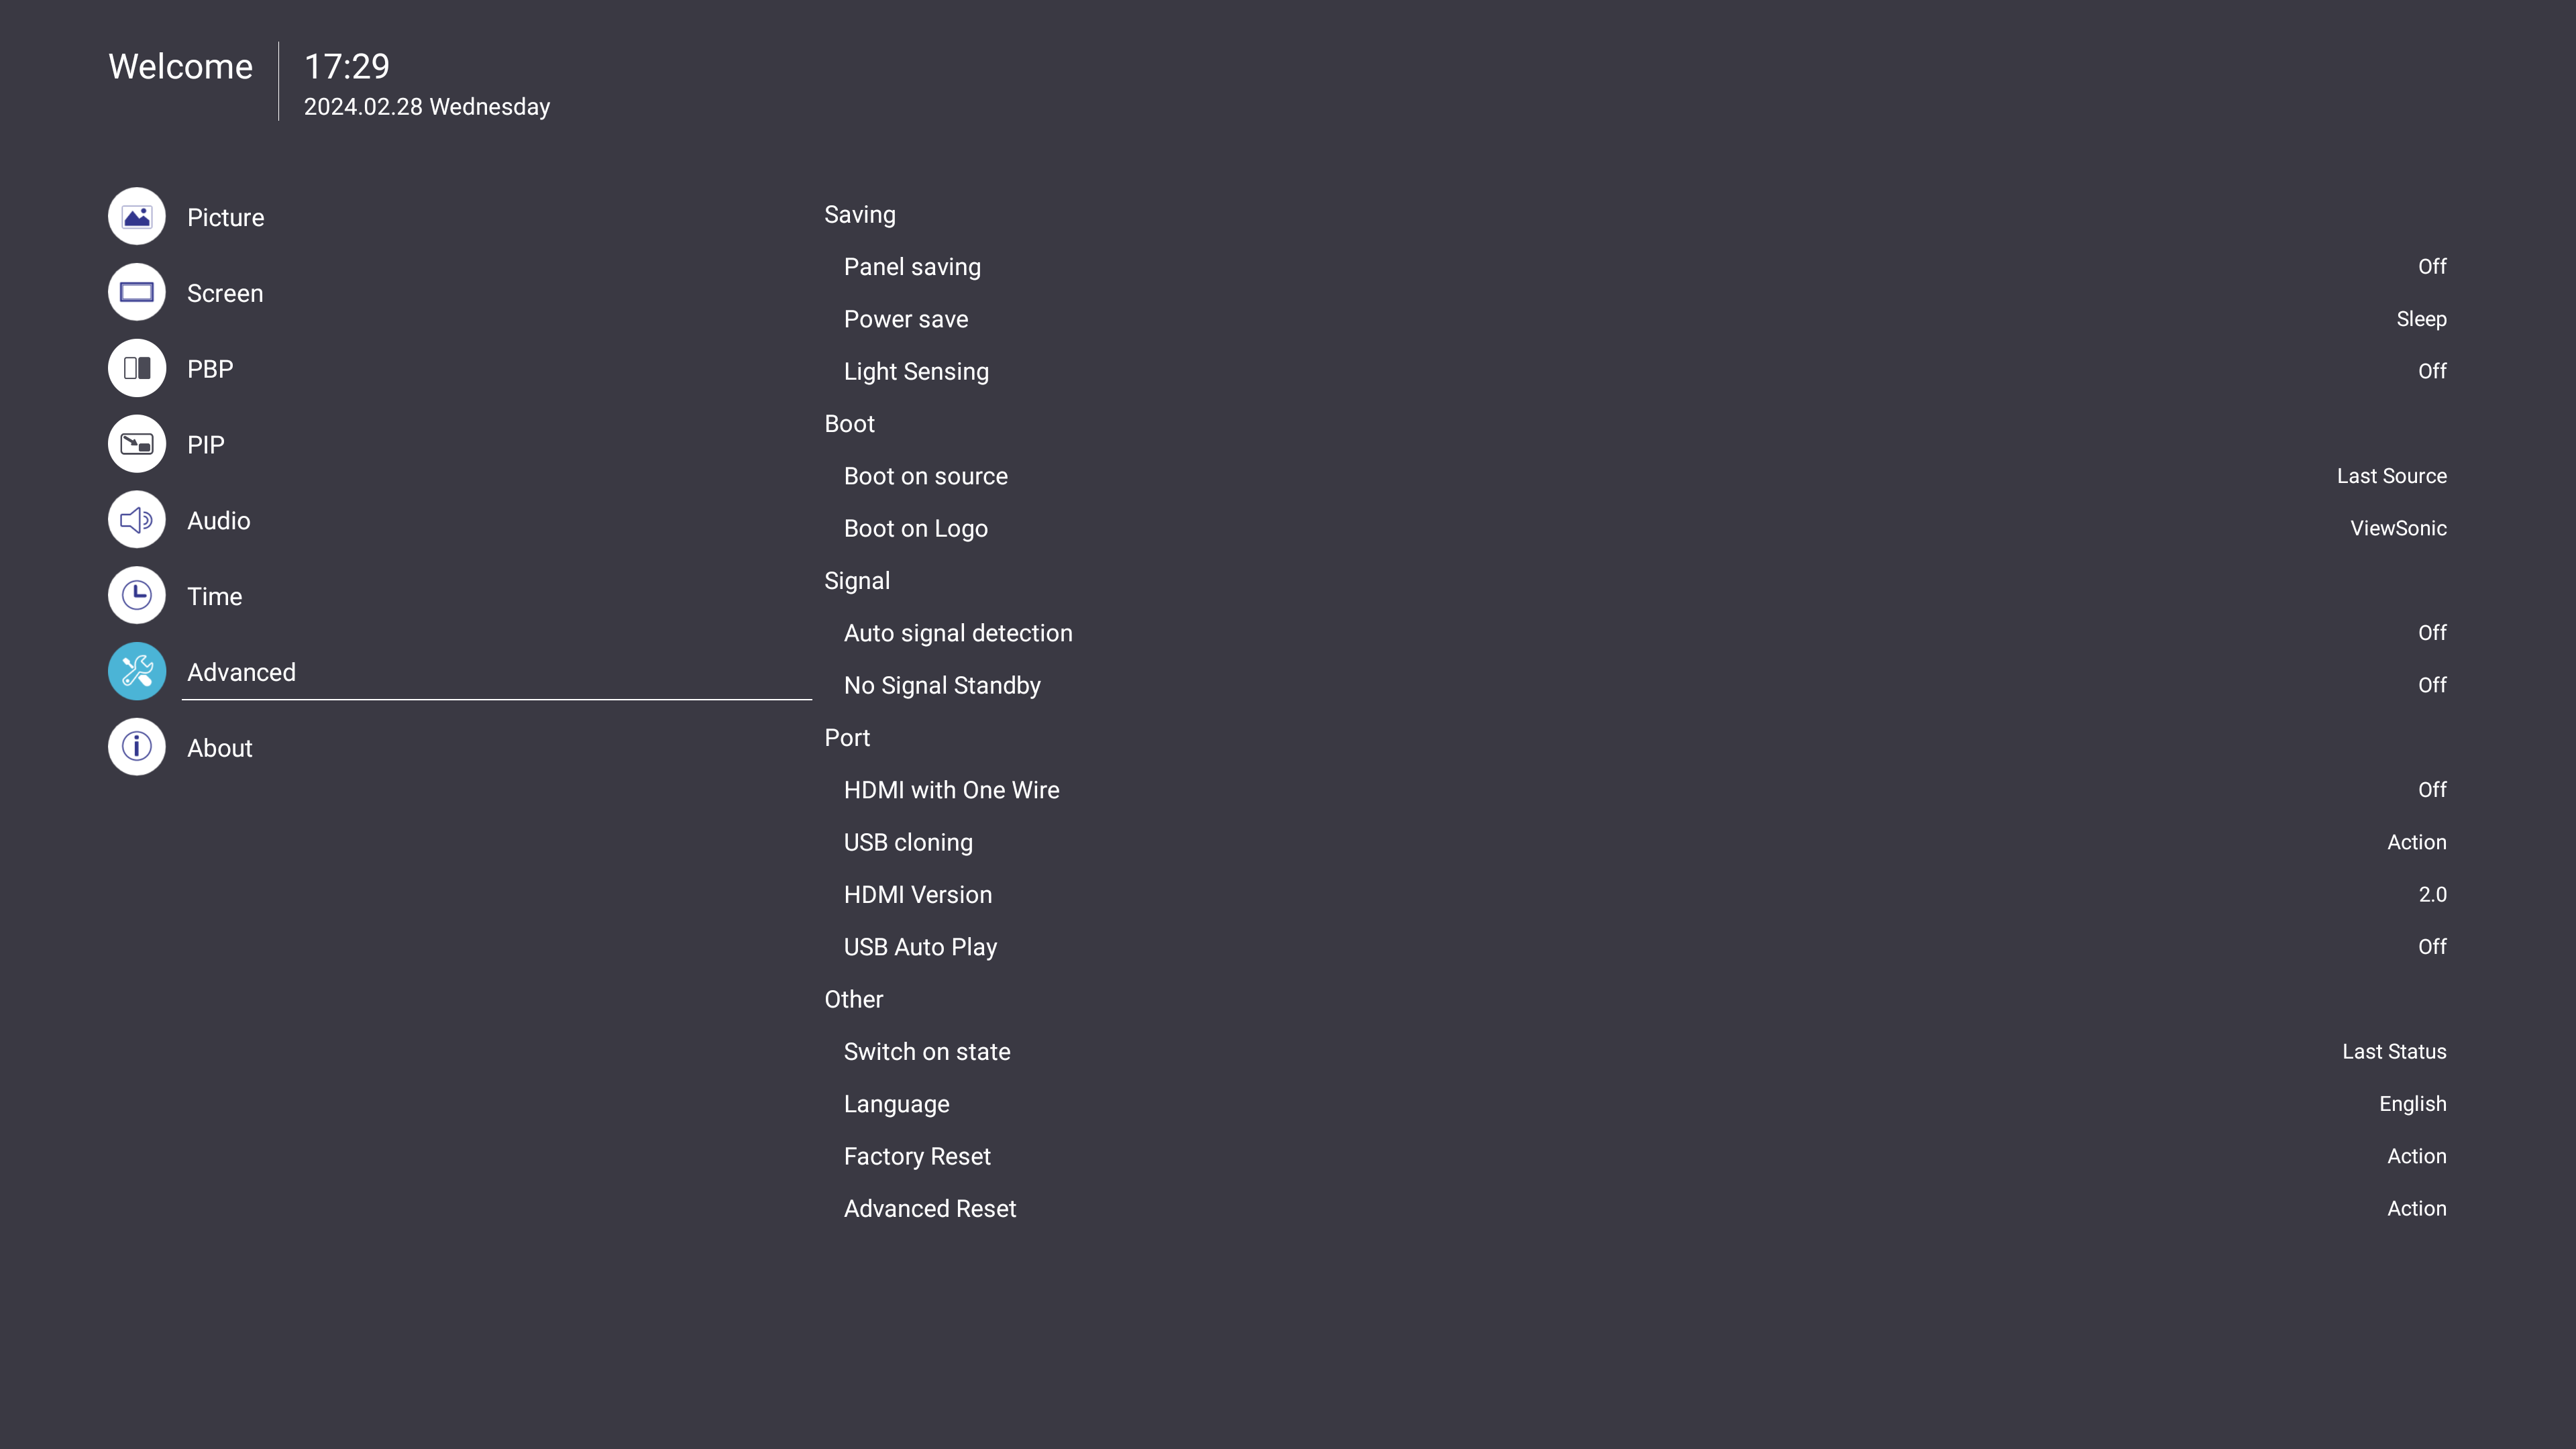
| Saving
|
Panel Saving
|
Off
|
| On
|
| Power Save
|
Sleep
|
| Hibernate
|
| Light Sensing
|
Off
|
| On
|
| Boot
|
Boot On Source
|
Last Source
|
| Input
|
| Boot On Logo
|
ViewSonic
|
| Blue
|
| Black
|
| Custom
|
| Signal
|
Auto Signal Detection
|
Off
|
| On
|
| No Signal Standby
|
(Off/0 min/5 min/15 min/30 min)
|
| Port
|
HDMI with One Wire
|
Off
|
| On
|
| HDMI Version
|
1.4
|
| 2.0
|
| Auto
|
| USB Cloning
|
Import
|
| Export
|
| USB Auto Play
|
Off
|
| On
|
| Other
|
Switch On State
|
Power Off
|
| Last Status
|
| Forced On
|
| Language
|
English
|
| French
|
| Spanish
|
| German
|
| Russian
|
| Dutch
|
| Traditional Chinese
|
| Simplified Chinese
|
| Turkish
|
| Arabic
|
| Factory Reset
|
Cancel
|
| Reset
|
| Advanced Reset
|
Cancel
|
| Reset
|
| Sub-menu
|
Menu Option
|
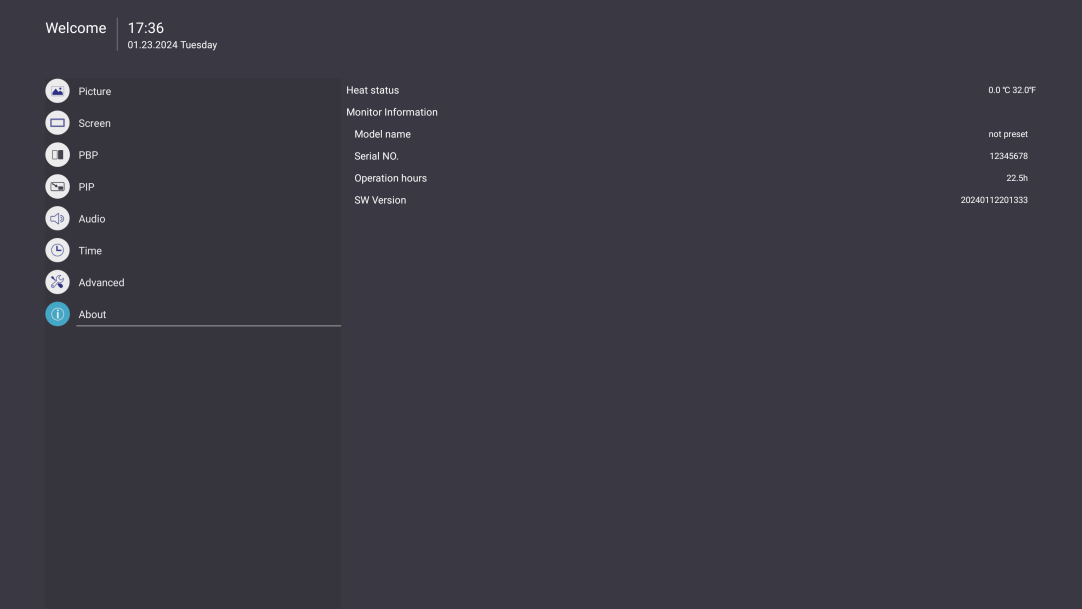
| Heat Status
|
xx° C / xx° F
|
| Monitor Information
|
Model Name
|
| Serial No.
|
| Operation Hours
|
| SW Version
|
Picture
- Press the MENU
 button on the remote control to display the OSD Menu.
- Then press OK or use ▼ / ▲ / ◄ / ► on the remote control to select the Picture menu.
- Press ▼ / ▲ to select the menu option. Then press OK to display its sub-menu, or press ◄ / ► to adjust/select the setting.
Note: Some sub-menu options may have another sub-menu layer.
| Menu Option
|
Description
|
| Brightness
|
Adjust the background black levels of the screen image.
|
| Contrast
|
- Adjust the degree of difference between the lightest and darkest parts of the picture.
- Cchanges the amount of black and white in the image.
|
| Sharpness
|
Adjust the on-screen image’s clarity.
|
| Tint
|
Adjust the color balance of the screen image. The higher the value, the more greenish the image becomes. The lower the value, the more reddish the image becomes.
|
| Color
|
Adjust the amount of color in the on-screen image.
|
| Color Temperature
|
Set how color appears on screen using the Kelvin scale.
|
| Picture Mode
|
Select the mode that best fits the display’s environment.
|
| RGB Range
|
Select from the following RGB Ranges.
- Full Range (black and white levels are full [0~255])
- Limited Range (Black and white levels are limited [16~235])
- Auto.
|
| Blue Light Filter
|
Block high-energy blue light for a more comfortable viewing experience.
|
| Gamma Set
|
Manually adjust the brightness level of the monitor’s grayscale levels.
|
| Picture Reset
|
Reset the Picture settings to their default values.
|
Screen
- Press the MENU
 button on the remote control to display the OSD Menu.
- Then press OK or use ▼ / ▲ / ◄ / ► on the remote control to select the Screen menu.
- Press ▼ / ▲ to select the menu option. Then press OK to display its sub-menu, or press ◄ / ► to adjust/select the setting.
Note: Some sub-menu options may have another sub-menu layer.
| Menu Option
|
Description
|
| Zoom Mode
|
Set the on-screen image’s width and height.
|
| Screen Reset
|
Reset the Screen settings to their default values.
|
Picture-by-Picture (PBP)
- Press the MENU
 button on the remote control to display the OSD Menu.
- Then press OK or use ▼ / ▲ / ◄ / ► on the remote control to select the PBP menu.
- Press ▼ / ▲ to select the menu option. Then press OK to display its sub-menu, or press ◄ / ► to adjust/select the setting.
Note: Some sub-menu options may have another sub-menu layer.
| Menu Option
|
Description
|
| PBP Mode
|
Select the type of PBP screen:
- Full
- Dual
- Three-part
- Center
- Quad
|
| PBP Source
|
Set the video source for the PBP.
|
| PBP Audio
|
Set the audio source for the PBP.
|
| PBP Reset
|
Reset the PBP settings to their default values.
|
Picture-in-Picture (PIP)
- Press the MENU
 button on the remote control to display the OSD Menu.
- Then press OK or use ▼ / ▲ / ◄ / ► on the remote control to select the PIP menu.
- Press ▼ / ▲ to select the menu option. Then press OK to display its sub-menu, or press ◄ / ► to adjust/select the setting.
Note: Some sub-menu options may have another sub-menu layer.
| Menu Option
|
Description
|
| PIP Mode
|
Select the location of the PIP screen:
- Top Left
- Top Right
- Bottom Left
- Bottom Right
|
| PicMain
|
Set the video input source of the main screen.
|
| PicSub
|
Set the video input source of the sub-screen.
|
| PIP Audio
|
Set the audio source for the PIP.
|
| PIP Reset
|
Reset the PIP settings to their default values.
|
Audio
- Press the MENU
 button on the remote control to display the OSD Menu.
- Then press OK or use ▼ / ▲ / ◄ / ► on the remote control to select the Audio menu.
- Press ▼ / ▲ to select the menu option. Then press OK to display its sub-menu, or press ◄ / ► to adjust/select the setting.
Note: Some sub-menu options may have another sub-menu layer.
| Menu Option
|
Description
|
| Treble
|
Adjust the display’s treble level (higher-pitched sounds).
|
| Bass
|
Adjust the display’s bass level (lower-pitched sounds).
|
| Volume
|
Adjust the display’s sound level.
|
| Maximum Volume
|
Set a maximum sound level.
|
| Minimum Volume
|
Set a minimum sound level.
|
| Mute
|
Turn off the display’s sound.
|
| Volume Control
|
Select the audio source:
- the display’s Speaker
- SPDIF port
- Audio Out port
|
| Audio Reset
|
Reset the Audio settings to their default values.
|
Time
- Press the MENU
 button on the remote control to display the OSD Menu.
- Then press OK or use ▼ / ▲ / ◄ / ► on the remote control to select the Time menu.
- Press ▼ / ▲ to select the menu option. Then press OK to display its sub-menu, or press ◄ / ► to adjust/select the setting.
Note: Some sub-menu options may have another sub-menu layer.
| Menu Option
|
Description
|
| Off Time
|
Set a time for the display to turn off.
|
| Date and Time
|
Set the date and time of the display.
|
| Schedule
|
Set a schedule to turn the display on and off.
|
| Slideshow Interval
|
Set the time interval to change between images for a photo slide show.
|
| OSD Turn Off
|
Set the length of time the OSD Menu remains on screen.
|
| OSD Information
|
Set the length of time that the Volume, Brightness, and Input Source menus remain on screen.
|
| Time Reset
|
Reset the Time settings to their default values.
|
| Audio Reset
|
Reset the Audio settings to their default values.
|
Advanced
- Press the MENU
 button on the remote control to display the OSD Menu.
- Then press OK or use ▼ / ▲ / ◄ / ► on the remote control to select the Advanced menu.
- Press ▼ / ▲ to select the menu option. Then press OK to display its sub-menu, or press ◄ / ► to adjust/select the setting.
Note: Some sub-menu options may have another sub-menu layer.
| Menu Option
|
Description
|
| Saving
|
Panel Saving
Reduces the risk of image burn-in when enabled.
|
Power Save
Reduce power consumption.
|
| Boot
|
Boot On Source
Select the input source to enter automatically after the display is turned on.
|
Boot On Logo
Show or hide a logo when the display is turned on.
|
| Port
|
HDMI with One Wire
Enable or disable CEC (Consumer Electronics Control).
CEC synchronizes power on/off operation via HDMI connection. That is, if a device that also supports CEC is connected to the HDMI input of the display, when the display’s power is turned off, the power of the connected device will also be turned off automatically. Conversely, when the power of the connected device is turned on, the display’s power will be turned on automatically.
|
| USB Cloning
Save the OSD Menu configuration to a USB storage device.
|
| HDMI Version
Select the HDMI version.
|
| USB Auto Play[1]
If enabled, the display will copy media files from a connected external USB storage device to the display’s internal storage and play the media files automatically.
|
| Other
|
Switch On State
Select the display status for the next time the power cord is connected to a power outlet:
- Power Off: The display will remain off.
- Last Status: The display will return to the previous power status.
- Forced On: The display will turn on.
|
Language
Set the language for the OSD Menu.
|
Factory Reset
Reset all OSD Menu settings to their default values.
|
Advanced Reset
Reset the Advanced settings to their default values.
|
Notes
- ↑ If power is lost during the file transfer, before trying again, please remove the files from the internal storage first.
About
- Press the MENU
 button on the remote control to display the OSD Menu.
- Then press OK or use ▼ / ▲ / ◄ / ► on the remote control to select the About menu.
- Press ▼ / ▲ to select the menu option. Then press OK to display its sub-menu, or press ◄ / ► to adjust/select the setting.
Note: Some sub-menu options may have another sub-menu layer.
| Menu Option
|
Description
|
| Heat Status
|
View the maximum temperature of the display
|
| Monitor Information
|
View information about the display such as: Model Name, Serial Number, Operation Hours, and Software Version.
|

