IFP52 Embedded Applications
myViewBoard Whiteboard
A digital whiteboarding application.
- NOTE: To learn more about myViewBoard Whiteboard, visit: https://wiki.myviewboard.com/Whiteboard_for_Android.

Floating Toolbar
| Item | Description | |
|---|---|---|
| Move | Move the Floating Toolbar. | |
| Present Mode | Switch between presentation and preparation modes. | |
| Paste from Clipboard | Insert the current clipboard content onto the canvas. | |
| Previous Page | Go to the previous page (if the canvas has multiple pages). | |
| Next Page | Go to the next page (if the canvas has multiple pages). | |
| New Page | Add a new canvas. | |
| Pages in Whiteboard | Create, select, rearrange, copy and delete pages. | |
Main Toolbar
| Item | Description | |
|---|---|---|
| Screen Capture | Screenshot, video, and audio recording. | |
| Move | Select and hold to move the toolbar to the left side, right side, or bottom of the screen. | |
| File | Open, save, export, and print whiteboard files. | |
| Magic Box | Import resources (image, video, audio, etc.) to the whiteboard. | |
| Embedded Browser | Open the built-in browser to access internet resources, which can be dragged onto the canvas. | |
| Infinite Canvas | Drag to move the canvas. Use two hands to zoom in/zoom out. Select again for an overview. | |
| Selection | Select objects, text, and other elements on the canvas. | |
| Pen | Writing tools and customization options. | |
| Eraser | Erase objects or clear the page. | |
| Shapes and Lines | Draw shapes, arrows, and add tables. | |
| Text and Handwriting | Add a text box. | |
| Undo | Undo the previous action. | |
| Redo | Redo the previous action. | |
Background Management
| Item | Description | |
|---|---|---|
| Sign In | Sign in to a myViewBoard account. | |
| Background Management | Change the canvas background. | |
| FollowMe Setting | Display custom images uploaded to a cloud storage account. | |
| Color Palette | Choose from solid or gradient colors as the background. | |
| Pre-installed | Choose backgrounds that come pre-installed with Whiteboard. | |
| myViewBoard Originals | Display original content created by myViewBoard. | |
| Local Hard Drive | Use images from the local hard drive. | |
vCast
Working with ViewBoard® Cast software (vCast, vCast Pro, and vCastSender), the vCast application will allow the ViewBoard to receive laptop screens (Windows/Mac/Chrome) and mobile (iOS/Android) users’ screens, photos, videos, annotations, and camera(s) that are using the vCastSender application.

- NOTE:
- ViewBoard® Cast software, laptops, and mobile devices can connect to both the same subnet and cross subnet by entering the on-screen PIN code.
- Connected devices will show up under Device List on the same subnet connection.
- If the device does not show up under Device List, users will need to key-in the on-screen PIN code.
Network Information
- Ports:
- TCP 56789, 25123, 8121 & 8000 (Controlling message port & client device audio transfer)
- TCP 8600 (BYOM)
- TCP 53000 (Request share screen)
- TCP 52020 (Reverse control)
- TCP 52025 (Reverse control for ViewBoard Cast Button)
- TCP 52030 (Status sync)
- TCP 52040 (Moderator mode)
- UDP 48689, 25123 (Device searching and broadcast & client device audio transfer)
- UDP 5353 (Multicast search device protocol)
- Port and DNS Activation:
- Port: 443
- DNS: https://vcastactivate.viewsonic.com
- OTA Service:
- Server Port: TCP443
- Server FQDN Name: https://vcastupdate.viewsonic.com
Display Group Settings
To adjust the Display Group Settings, select the Display Group icon (![]() ) located in the lower-right corner of the screen.
) located in the lower-right corner of the screen.

- Toggle the "Turn On/Off Display Group" ON to enable the Display Group feature.
- NOTE: Other preinstalled ViewBoard Cast devices in the same network will be listed.
- Select the devices you want to join the display group and select OK to save the settings.
- NOTE:
- If the devices you want to group are not listed, you can enter their respective IP address or connecting PIN code.
- The Display Group maximum device limit is six devices.
- If you frequently connect to the same device, you can select the Star icon (
 ) next to the device to add it to your frequently connected devices list, "My List of Devices in Group", for easier Display Group setup and management.


Synchronized Group Screen All the Time
When the “Synchronized group screen all the time” function is toggled ON, it will display a synchronized group screen continuously. If it is toggled OFF, it will work on vCast mirroring only.

- NOTE: Select the devices to group first, then toggle the "Synchronized group screen all the time” function ON to avoid interruption.
After confirming the above settings, you can share your screen to the main display, then the grouped client devices will be synced up to your screen.

Moderator Mode
Moderator Mode allows the moderator to take control of the devices connected to the ViewBoard. To enter Moderator Mode, select the Moderator Mode icon (![]() ) located in the lower-right corner of the screen.
) located in the lower-right corner of the screen.

When enabled, the moderator can view a list of all connected screens in the left floating window and can preview each participant’s screen and then select any of participant’s screen and cast to the ViewBoard’s main screen for presentation. The moderator can also control each participant’s screen, annotate on the ViewBoard, and remove unwanted participants by selecting the close icon (X).

Broadcast
When enabled, the ViewBoard’s screen will be broadcasted to all of the participant’s connected screens simultaneously. The participants can only view the presentation contents until the moderator disables the Broadcast function.

Multiple Screen Sharing
By default, vCast is set to allow multiple screen sharing, but can also be set to single screen sharing. To do this, the moderator can select the Multiple Screen Sharing icon to switch to single screen sharing.
Preview Screen
By default, vCast is set to let the moderator preview the participant’s screen contents prior to sharing to the ViewBoard. Selecting the Preview Screen icon, the Moderator can switch to see the participant’s name only.
Touch
By default, participants can use touch for collaboration after connecting. The moderator can enable/disable the touch function of a participant by selecting the Touch icon in their window.
NOTE:
- Moderator Mode is supported on all vCastSender and AirPlay devices, but mobile devices are limited to a "preview" function. Additionally, mobile Android devices cannot cast sound out.
- When you cast your Windows/Mac/Chrome screen to a ViewBoard, the selected full screen unit will not be broadcasted back to your device to avoid repetitive screen casting.
- The active presenter can touch each of the participant's screens to remotely control casting devices.
- The number of multi-screen presenters on-screen depends on your Windows CPU processor performance and router specifications.
Casting from Windows, MacBook, and Chrome Devices

- Ensure the client device (e.g., laptop) is connected to the same network as the ViewBoard.
- NOTE: The network name can be found under Room Network.
- On the client device, visit the address that is shown on the ViewBoard to download and install the vCastSender application.
- After installing, launch the vCastSender application.
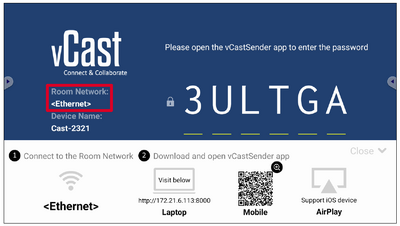
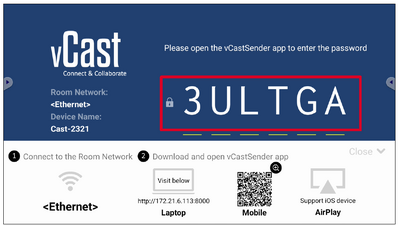
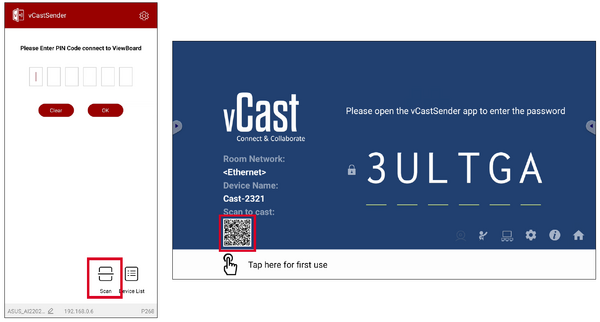
- To connect to the ViewBoard, input the PIN code and click OK.
- NOTE: The PIN code can be found as highlighted below:
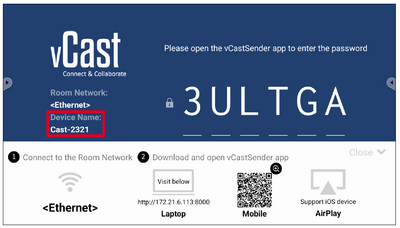
- Additionally, you can connect to the ViewBoard or display by clicking Device List then the Device Name listed.
- NOTE: The Device Name can be found as highlighted below:


Casting from Android Devices

- Ensure the client device (e.g., Android phone or tablet) is connected to the same network as the ViewBoard.
- NOTE: The network name can be found under Room Network.
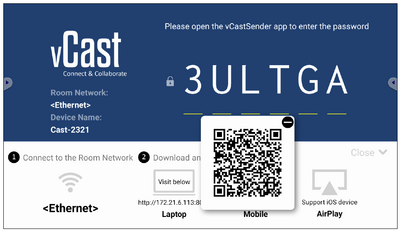
- On the Android client device, scan the QR code shown on the ViewBoard to directly download the vCastSender application, or download the application from the Google Play Store.
- After installing, launch the vCastSender application.
- To connect to the display, input the PIN code and select OK.
- NOTE: The PIN code can be found as highlighted below:
- You can also connect to the ViewBoard by clicking Device List then the Device Name listed.
- NOTE: The Device Name can be found as highlighted below:
- Additionally, you can connect to the ViewBoard by selecting Scan then placing the on-screen QR code into the box to automatically connect.


Casting from Apple iOS Devices
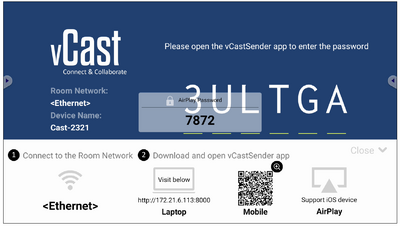
Apple AirPlay® is compatible with vCast for screen mirroring and content streaming under the same subnet environment only. An “AirPlay Password” will be generated on-screen for connection when using AirPlay to cast to a ViewBoard.

- Ensure the client device (e.g., iPhone or iPad) is connected to the same network as the ViewBoard.
- NOTE: The network name can be found under Room Network.
- On the iOS client device, directly open AirPlay and select the Device Name of the ViewBoard to connect.
- NOTE: The Device Name can be found as highlighted below:
- Input the generated on-screen AirPlay Password on the client device to connect.
- NOTE: In a cross subnet environment, please download and connect with the vCastSender iOS application from the Apple App Store.
- You can also connect to the ViewBoard by selecting Scan then placing the on-screen QR code into the box to automatically connect.

Connecting to a Display from a Mobile Device
Once connected, select Receive. The ViewBoard or selected display screen will appear on the mobile device with an on-screen toolbar. Users can interact with the ViewBoard or display with annotations, file sharing, etc.

| Item | Description | |
|---|---|---|
| Toggle | Hide or display the toolbar. | |
| Home | Return to the Home interface. | |
| Return | Return to the previous operation. | |
| Folder | View or open the mobile device's files. | |
| Share | Cast the mobile device's screen to the connected ViewBoard or display. | |
| Touch | Remotely control the connected ViewBoard or display. | |
| Annotate | Make annotations, and adjust the pen color. | |
| Clear | Clear everything on screen. | |
| Camera | Send camera images to the connected ViewBoard or display. | |
Screen Recorder
Capture everything that is displayed on screen in a video format.

To launch the Screen Recorder application:
- Select the Screen Recorder icon in the application drawer.
- Tap the record icon and select the preferred recording configurations. Then tap the check mark.
- Select Start Now and a three (3) second countdown will begin. Screen recording will begin immediately after the countdown.
- After stopping the recording, you will be able to preview the video, save it, or discard it.
Other Default Applications
vSweeper
Clear unnecessary data and unwanted files.
Advanced Settings can also be customized to the user's needs.

Screen Lock
Set a screen lock password and enable screen lock.
- NOTE: If the user forgets the password, use the remote control and press INPUT-0-2-1-4 to restore the password to default.
To set a screen lock password:
- Go to: Settings > Protection > Password for screen lock, or select the Screen Lock icon in the apps list.
- Select Set Password, and input a new four (4) digit password. Then select OK.
- Now when selecting the Screen Lock icon, the screen will be locked.
Chromium
Web browser for surfing the internet.

Folders
-
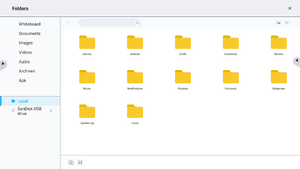 Folders Overview
 -
 Folder Icons

File Type Menu
| Item | Description |
|---|---|
| Whiteboard | Interactive whiteboard files |
| Documents | Office files |
| Images | Image files |
| Videos | Video files |
| Audio | Audio files |
| Archives | Compressed file |
| Apk | Apk files |