


| Sub-menu | Menu Option | |
|---|---|---|
| DisplayPort | Color Format | Auto |
| RGB (Full Range) | ||
| RGB (Limited Range) | ||
| YUV (Full Range) | ||
| YUV (Limited Range) | ||
| DisplayPort 1.4 | On | |
| Off | ||
| HDMI 1 | Color Format | Auto |
| RGB (Full Range) | ||
| RGB (Limited Range) | ||
| YUV (Full Range) | ||
| YUV (Limited Range) | ||
| HDMI 2.0 | On | |
| Off | ||
| HDMI 2 | Color Format | Auto |
| RGB (Full Range) | ||
| RGB (Limited Range) | ||
| YUV (Full Range) | ||
| YUV (Limited Range) | ||
| HDMI 2.0 | On | |
| Off | ||
| Type C | Color Format | Auto |
| RGB (Full Range) | ||
| RGB (Limited Range) | ||
| YUV (Full Range) | ||
| YUV (Limited Range) | ||
| USB 3.2 | On | |
| Off | ||
| DisplayPort 1.4 | On | |
| Off | ||
| Auto Detect | On | |
| Off | ||
VP2786a-4K
From ViewSonic Documentation
소개
패키지 내용물
- 모니터
- 전원 코드
- 비디오 케이블
- 요약 설명서
Note: 패키지에 포함된 케이블은 국가에 따라 다를 수 있습니다. 자세한 내용은 판매점에 문의하십시오.
제품 개요
-
 전면
전면 -
 후면
후면
| 번호 | 설명 |
|---|---|
| 1 | 조이 키 |
| 2 | 전원 버튼 |
| 3 | I/O 포트 |
| 4 | 보안 잠금 슬롯 |
I/O 포트

| 번호 | 설명 |
|---|---|
| 1 | AC 입력 |
| 2 | HDMI |
| 3 | DisplayPort |
| 4 | C 타입 USB |
| 5 | 오디오 출력 |
| 6 | USB 업스트림 |
| 7 | USB 다운스트림 |
| 8 | Micro USB |
최초 설치
스탠드 설치
 |
 |
- 편평하고 안정적인 표면에 화면이 바닥을 향하게 하여 모니터를 놓습니다.
- 모니터 스탠드의 상단 후크를 스탠드 장착 슬롯에 맞추고 밀어 넣으세요.
- 모니터를 평평하고 안정적인 표면에 똑바로 세워 놓으세요.
Note: 안전과 최적의 성능을 보장하기 위해 모니터를 평평하고 안정적인 표면에 배치하십시오. 그렇게 하지 않으면 모니터가 떨어져 모니터 자체에 손상을 입히거나 개인 상해의 위험을 초래할 수 있습니다.
스탠드 분리 및 모니터 장착하기
아래 표를 참조하여 장착 키트의 표준 치수를 확인하십시오.
Note: UL 인증 마운팅 키트/브래킷과 함께 사용하십시오. 벽걸이 키트나 높이 조절 베이스가 필요하시다면 ViewSonic® 또는 현지 판매자에게 문의해 주십시오.
| 최대 하중 | 패드 구멍 | 나사 사양 | 나사 수량 |
|---|---|---|---|
| 5.2 kg | 100 x 100 mm | M4 x 10mm | 나사 4개 |
Note: 장착 키트는 별도로 판매됩니다.
 |
 |
 |
Important: 스탠드를 제거하기 전에 모니터를 끄고 모든 케이블을 분리한 후 화면이 아래로 향하도록 평평하고 안정적인 표면에 모니터를 놓으십시오.
- 빠른 분리 탭을 누른 채로 스탠드를 조심스럽게 들어올립니다.
- 후크를 분리하고 스탠드를 제거하려면 약간 아래로 당기십시오.
- 벽걸이 브래킷을 모니터 후측에 위치하는 VESA 벽걸이 구멍에 부착합니다. 그런 다음 네 개의 나사(M4 x 10 mm)로 고정하십시오.
- 구매한 또는 선택한 장착 키트에 포함된 지침을 따라 모니터를 장착하십시오.
보안 슬롯 사용하기

모니터가 도난당하지 않도록 보안 슬롯 잠금 장치를 사용하여 모니터를 고정된 물체에 고정하십시오.
또한 모니터를 벽이나 고정된 물체에 보안 케이블로 고정하면 모니터가 넘어지는 것을 방지하기 위해 모니터의 무게를 지탱하는 데 도움이 될 수 있습니다.
연결하기
전원에 연결하기

- 모니터 후면의 AC IN 잭에 전원 코드를 연결하십시오.
- 전원 코드 플러그를 전원 콘센트에 끼웁니다.
디스플레이 연결
HDMI

- 모니터의 HDMI 포트에 HDMI 케이블의 한쪽 끝을 연결하십시오.
- 케이블의 다른 쪽 끝을 컴퓨터의 HDMI 포트에 연결하세요.
DisplayPort

- 모니터의 DP 포트에 DisplayPort 케이블의 한쪽 끝을 연결하세요.
- 케이블의 다른 쪽 끝을 컴퓨터의 DisplayPort 또는 Mini DisplayPort 포트에 연결하세요.
Note: 모니터를 Thunderbolt 포트에 연결하려면 (v. 1 & 2) Mac에서 "Mini DisplayPort to DisplayPort 케이블"의 Mini DisplayPort 끝을 Mac의 Thunderbolt 출력 포트에 연결합니다. 그런 다음 케이블의 다른 끝을 모니터의 DisplayPort 포트에 연결합니다.
Type C

- 모니터의 Type C 포트에 USB Type C 케이블의 한쪽 끝을 연결하세요.
- 케이블의 다른 쪽 끝을 컴퓨터의 USB Type C 포트에 연결하세요.
Note: 비디오 출력을 사용하려면 USB Type C 출력 장치(예: 노트북)와 케이블이 비디오 신호 전송을 지원하는지 확인하십시오.
USB 연결
모니터는 두 가지 유형의 USB 포트, 즉 업스트림과 다운스트림을 지원합니다. 연결 시 다음 지침을 준수하십시오.

| USB 타입 | 연결 유형 | 설명 | |
|---|---|---|---|
| 업스트림 | Type B | 컴퓨터와 모니터에 연결된 USB 장치 간에 데이터를 전송합니다. | |
| 다운스트림 | Type C | 오디오, 비디오 및 전원을 전송합니다. KVM 기능을 활성화합니다. | |
| 5V/3A, 9V/3A, 12V/3A, 15V/3A, 20V/3.25A (LPS) 충전을 지원합니다. | |||
| Type A | 주변 장치(예: 저장 장치, 키보드, 마우스 등)에 사용. | ||
| 5V/2A 충전 지원. | |||
| Micro USB | ColorPro™ Wheel 전용으로 사용하십시오. | ||
Note: USB Type A 포트가 있는 주변 장치를 사용하려면 컴퓨터를 모니터의 USB Type B 포트에도 연결해야 합니다.
USB 포트 사용법

- 다운스트림 USB Type A 포트를 사용하려면 USB Type B 케이블의 한쪽 끝을 모니터의 업스트림 USB Type B 포트에 연결합니다. USB Type A 케이블의 반대쪽 끝을 컴퓨터의 USB 포트에 연결합니다.
- 주변 장치를 모니터의 다운스트림 USB Type A 포트에 연결합니다.
오디오 연결

오디오 장치의 오디오 잭을 모니터의 Audio Out 포트에 연결하십시오.
Note: 모니터에는 듀얼 스피커가 장착되어 있습니다.
모니터 사용
시야각 조정
높이 조절

모니터를 원하는 높이(0에서 130mm)로 낮추거나 올리세요.
Note: 조정할 때는 모니터를 양손으로 옆에서 잡고 조정 트랙을 따라 단단히 눌러주세요.
화면 방향 조정 (모니터 피벗)
 |
 |
 |
- 모니터 높이를 가장 높은 위치로 조정하십시오. 그런 다음 모니터를 뒤로 기울여 최대 기울기 위치로 만듭니다.
- 모니터를 90° 시계 방향 또는 반시계 방향으로 회전하여 (3) 가로에서 세로 방향으로 전환합니다.
Note:
- 조정할 때는 모니터의 양쪽을 두 손으로 단단히 잡으세요.
- 자동 피벗 기능을 사용하는 경우 시스템이 화면 방향을 자동으로 감지할 수 있습니다.
스위블 조정

모니터를 원하는 시야각(60˚)으로 왼쪽 또는 오른쪽으로 회전시키세요.
기울기 조정

모니터를 앞으로 또는 뒤로 귀울여 시야각을 조절합니다(-5 ~ 60).
Note: 조절 시 한 손으로 스탠드를 지지하며 다른 손으로 모니터를 앞뒤로 기울입니다.
모니터 켜기/끄기

- 연결된 전원 어댑터를 전원 콘센트에 꽂으세요.
- 전원을 누르십시오 ( ) 모니터를 켜는 버튼.
- 모니터를 끄려면, 전원 버튼을 누르세요. ( ) 버튼 다시.
Note:
- OSD 메뉴가 화면에 계속 표시되면, 전원 버튼을 길게 누르세요. ( ) 버튼을 3초 동안 눌러 전원을 끕니다.
- 모니터는 전기 콘센트에 전원 코드가 연결되어 있는 동안 전력을 계속 소모합니다. 모니터를 장시간 사용하지 않을 경우, 콘센트에서 전원 코드를 뽑아주십시오.
조이 키 사용
Joy Key를 사용하여 핫키를 활성화하고, 화면 디스플레이(OSD) 메뉴를 탐색하며, 설정을 변경하세요.

시작 메뉴
조이 키를 이동하십시오 ( ![]() ) 시작 메뉴를 활성화하려면.
) 시작 메뉴를 활성화하려면.

Note: 화면에 나타나는 키 안내를 따라 옵션을 선택하거나 조정을 수행하세요.
주 메뉴
OSD(화면 표시) 메뉴에 들어가기

컬러 모드
사전 설정 표준 색 설정 중 하나를 선택합니다.

ViewMode
사전 설정 디스플레이 설정 중 하나를 선택합니다.

밝기
밝기 수준을 조정하세요.

입력
입력 소스를 선택합니다.

볼륨
볼륨 설정을 조정하세요.

Note: 조이 키를 이동하십시오 (  ) 이전 메뉴로 돌아가려면.
Hot Keys(단축키)
화면 표시 메뉴(OSD)가 꺼져 있을 때, 조이 키를 사용하여 특별 기능에 빠르게 접근할 수 있습니다.
| 키 | 설명 |
|---|---|
 |
키를 5초 동안 눌러 LED 조명을 활성화/비활성화합니다.
 |
 |
키를 눌러 OSD 메뉴를 잠그거나 잠금 해제합니다. 화면에 메뉴가 나타나면 OSD 메뉴를 잠그거나 잠금 해제하기 위해 키를 10초 동안 계속 누르고 있습니다.
 OSD 메뉴가 잠겨 있을 경우 화면에 아래 메시지가 나타납니다.  |
 |
키를 눌러 전원을 잠그거나 잠금 해제하세요. ( ) 버튼 화면에 메뉴가 나타나면, 전원 버튼을 잠그거나 잠금 해제하기 위해 키를 10초 동안 계속 누르고 있습니다. ( ) 버튼  만약 전력 ( ) 버튼이 잠기면 아래 메시지가 화면에 나타납니다.  |
 |
장치를 켤 때 부팅 화면을 표시/숨기려면 키를 10초 동안 누르고 계십시오.  |
 |
키를 10초 동안 눌러 초고속 모드를 활성화/비활성화하세요.  |
설정 구성
General Operations(일반 작동)
- 조이 키를 이동하십시오 ( ) 시작 메뉴를 표시합니다. 그런 다음 메인 메뉴로 이동하여 조이 키를 누릅니다. (
 ) OSD 메뉴를 표시하려면.
 - 조이 키를 이동하십시오 (
 ) 또는 (
  ) 주 메뉴를 선택하려면. 그런 다음 Joy Key를 누르세요 ( ) 선택한 메뉴에 들어가려면.
 - 조이 키를 이동하십시오 ( ) 또는 ( ) 원하는 메뉴 옵션을 선택합니다. 그런 다음 Joy Key를 누르세요 ( ) 하위 메뉴에 들어가려면.
- 조이 키를 이동하십시오 ( ) 또는 ( ) 설정을 조정/선택하려면. 그런 다음 Joy Key를 누르세요 ( ) 확인하기 위해.
- 조이 키를 이동하십시오 ( ) 이전 메뉴로 돌아가려면.


메뉴 옵션
입력
- 조이 키를 이동하십시오 ( ) 시작 메뉴를 표시합니다. 그런 다음 메인 메뉴로 이동하여 조이 키를 누릅니다. ( ) OSD 메뉴를 표시하려면.
- 조이 키를 이동하십시오 ( ) 또는 ( ) 입력을 선택합니다. 그런 다음 Joy Key를 누르세요 ( ) 입력 메뉴로 들어갑니다.
- 조이 키를 이동하십시오 ( ) 또는 ( ) 원하는 입력 소스를 선택합니다. 그런 다음 Joy Key를 누르세요 ( ) 선택을 확인합니다.
컬러 모드

- 조이 키를 이동하십시오 ( ) 시작 메뉴를 표시합니다. 그런 다음 메인 메뉴로 이동하여 조이 키를 누릅니다. ( OSD 메뉴를 표시하려면.
- 조이 키를 이동하십시오 ( ) 또는 ( ) 색상 모드를 선택합니다. 그런 다음 Joy Key를 누르세요 ( ) 색상 모드 메뉴에 들어가려면.
- 조이 키를 이동하십시오 ( ) 또는 ( ) 원하는 옵션을 선택하려면. 그런 다음 Joy Key를 누르세요 ( ) 하위 메뉴에 들어가려면.
- 조이 키를 이동하십시오 ( ) 또는 ( ) 설정을 조정/선택하고 Joy Key를 누르세요. ( ) 선택을 확인합니다(해당되는 경우).
| 메뉴 옵션 | 설명 |
|---|---|
| Adobe RGB | 정확한 색 영역과 Adobe RGB 표준의 감마. |
| DCI-P3 | 정확한 색 영역과 DCI-P3 표준의 감마. |
| sRGB | 정확한 색 영역과 sRGB 표준의 감마. |
| REC709 | 정확한 색 영역과 ITU-R Rec.의 감마 표준(2.2) |
| DICOM SIM. | 감마 곡선은 DICOM 시뮬레이션으로 설정됩니다. |
| 사용자 | 사용자 정의 설정. |
| CAL1/CAL2/CAL3 | 1/2/3 사용자 보정 모드로 표시합니다. |
| HDR | 밝은 영역과 어두운 영역에서 세밀한 부분이 보일 수 있도록 지정된 장면의 전체적인 대비를 줄입니다. |
ViewMode

- 조이 키를 이동하십시오 ( ) 시작 메뉴를 표시합니다. 그런 다음 메인 메뉴로 이동하여 조이 키를 누릅니다. ( ) OSD 메뉴를 표시하려면.
- 조이 키를 이동하십시오 ( ) 또는 ( ) ViewMode를 선택하려면. 그런 다음 Joy Key를 누르세요 ( ) ViewMode 메뉴에 들어가려면.
- 조이 키를 이동하십시오 ( ) 또는 ( ) 원하는 옵션을 선택하려면. 그런 다음 Joy Key를 누르세요 ( ) 하위 메뉴에 들어가려면.
| 메뉴 옵션 | 설명 |
|---|---|
| CAD/CAM | 그래픽 디자인 파일을 보려면 이 옵션을 선택하세요. |
| 비디오 편집 | 이 옵션을 선택하여 비디오 편집을 하세요. |
| 애니메이션 | 애니메이션을 위해 이 옵션을 선택하세요. |
| 사진작가 | Select this option for viewing photo files. |
| FPS 1 | Ideal for First-Person Shooter games. |
| FPS 2 | Ideal for First-Person Shooter games. |
| RTS | Ideal for Real-Time Strategy games. |
| MOBA | Select this option for Multiplayer Online Battle Arena games. |
Audio Adjust

- Move the Joy Key ( ) to display the Startup Menu. Then navigate to Main Menu and press the Joy Key ( ) to display the OSD Menu.
- Move the Joy Key ( ) or ( ) to select Audio Adjust. Then press the Joy Key ( ) to enter the Audio Adjust menu.
- Move the Joy Key ( ) or ( ) to select the desired option. Then press the Joy Key ( ) to enter its sub-menu.
- Move the Joy Key ( ) or ( ) to adjust/select the setting, and press the Joy Key ( ) to confirm the selection (if applicable).
| Menu Option | Description |
|---|---|
| Volume | Adjust the monitor’s sound level. |
| Mute | Turn off the monitor's sound. |
| Audio Input | Select the audio input source. |
Setup Menu

- Move the Joy Key ( ) to display the Startup Menu. Then navigate to Main Menu and press the Joy Key ( ) to display the OSD Menu.
- Move the Joy Key ( ) or ( ) to select Setup Menu. Then press the Joy Key ( ) to enter the Setup Menu menu.
- Move the Joy Key ( ) or ( ) to select the desired option. Then press the Joy Key ( ) to enter its sub-menu.
- Move the Joy Key ( ) or ( ) to adjust/select the setting, and press the Joy Key ( ) to confirm the selection (if applicable).
| Menu Option | Description |
|---|---|
| Language Select | Select an available language for the OSD Menu. |
| Adaptive Sync | Eliminates stuttering and tearing during gameplay. |
| Resolution Notice | Enable this option to allow the system to inform users that the current viewing resolution is not the correct native resolution. |
| PureXP™ | Short for “Pure Experience”, this feature can enhance the visual quality of moving objects, making them less vague with a clearer view. |
| Information | Display the monitor information. |
| OSD Timeout | Set the length of time the OSD Menu remains on screen. |
| OSD Background | Show/Hide the OSD background when the OSD Menu appears on the screen. |
| OSD Pivot | Set the OSD Menu orientation.
|
| Power Indicator | Set the Power Indicator On or Off. If the setting is set to On, the power indicator lights blue when the device is turned on. |
| Auto Power Off | Enable this option to allow the monitor to automatically turn off after a certain amount of time. |
| Sleep | Set the amount of idle time before the monitor enters Sleep mode. |
| Multi-Picture | Off
PBP Left-Right
PIP
Dual Color
|
| ECO Mode | Choose between various modes, based on power consumption. |
| Overscan | Enable this option to automatically enlarge the original picture horizontally and vertically to an equal aspect ratio that fills the screen. |
| Response Time | Adjust the response time, creating smooth images without streaking, blurring or ghosting. A low response time is perfect for the most graphic-intense gaming, and provides amazing visual quality while watching sports or action movies. |
| USB Charging | Enable/disable usb charging. |
| Backstage Lighting | Adjust the LED lighting. |
| Burn-in Eraser | Reduce image burn-in. |
| DDC/CI | Enable this option to allow the monitor control via the graphics card. |
| Rename | Rename the personalized custom profile. |
| All Recall | Resets all settings to their default values. |
Advanced Features and Settings
Auto Pivot
With the Auto Pivot function, the monitor can detect the image display and adjust the image’s orientation on the screen automatically when pivoting the screen vertically or horizontally.
Note: {{{1}}}
To enable the DDC/CI setting:
- Open the OSD Menu and select the Setup Menu menu. Then press the Joy Key ( ) to enter the menu.
- Move the Joy Key ( ) or ( ) to select DDC/CI. Then press the Joy Key ( ) to enter its sub-menu.
Move the Joy Key (
) or ( ) to select On. Then press the Joy Key ( ) to confirm.

After making sure DDC/CI is On, proceed to set OSD Pivot to Auto:
- Open the OSD Menu and select the Setup Menu menu. Then press the Joy Key ( ) to enter the menu.
- Move the Joy Key ( ) or ( ) to select OSD Pivot. Then press the Joy Key ( ) to enter its sub-menu.
- Move the Joy Key ( ) or ( ) to select Auto. Then press the Joy Key ( ) to confirm.
Backstage Lighting
With the Backstage Lighting function, the monitor can adjust the LED brightness to the optimal settings.
To configure the Backstage Lighting settings:
- Open the OSD Menu and select the Setup Menu menu. Then press the Joy Key ( ) to enter the menu.
- Move the Joy Key ( ) or ( ) to select Backstage Lighting. Then press the Joy Key ( ) to enter its sub-menu.
- Move the Joy Key ( ) or ( ) to select Level 1, Level 2, or Level 3 to enable the function. Then press the Joy Key ( ) to confirm.
Colorbration+
To ensure long-term color accuracy, some specific models support the hardware color calibration function. The Colorbration+ application installation file can be found at our website.
Standard monitor packing does not include the color sensor, which the Colorbration+ application needs for the calibration process.
Compatible color sensors include:
- X-Rite i1 Display Pro
- X-Rite i1 Pro 2
- X-Rite i1 Studio
- Xrite Colormunki Photo
- Xrite Colormunki Design
- Datacolor SpyderX series
- ColorPro™ Wheel
Dual Color
The monitor comes with a dual color engine to display two different color settings in PIP (Picture-in-Picture) or PBP (Picture-by-Picture) mode. You can set different color presets in both windows (The Main Window and Secondary Window).
Note: {{{1}}}
To configure Dual Color:
- Move the Joy Key ( ) to display the Startup Menu. Then navigate to Main Menu and press the Joy Key ( ) to display the OSD Menu.
- Move the Joy Key ( ) or ( ) to select the Setup Menu menu. Then press the Joy Key ( ) to enter the menu.
- Move the Joy Key ( ) or ( ) to select Multi-Picture. Then press the Joy Key ( ) to enter its sub-menu.
- Move the Joy Key ( ) or ( ) to select Dual Color. Then press the Joy Key ( ) to enter its sub-menu.
- Move the Joy Key ( ) or ( ) to select the desired color setting. Then press the Joy Key ( ) to confirm.
Firmware Update
For the best display performance and to resolve any known issues, it is best to keep your monitor updated with the latest firmware version. With the supplied USB cable and the vDisplayManager application, you can easily update your monitor’s firmware.
To update the firmware:
- Download and install the vDisplayManager application from our website.
- Connect one end of a USB Type B cable to the USB Type B port of the monitor. Then connect the other end of the cable to a USB port of the computer.
- Launch vDisplayManager. Select the Advanced tab in the side menu.
- Click Update to check for any updates to your monitor’s firmware.
- Wait until the update process is complete (if applicable).

Note: {{{1}}}
HDR (High-Dynamic-Range)
HDR reduces the overall contrast of a given scene so that detail in the highlights and shadows can be better seen.
Note: {{{1}}}
To enable the HDR function:
- Move the Joy Key ( ) to display the Startup Menu. Then navigate to Main Menu and press the Joy Key ( ) to display the OSD Menu.
- Move the Joy Key ( ) or ( ) to select Color Mode. Then press the Joy Key ( ) to enter the Color Mode menu.
- Move the Joy Key ( ) or ( ) to select HDR. Then press the Joy Key ( ) to enter its sub-menu.
- Move the Joy Key ( ) or ( ) to select one of the options . Then press the Joy Key ( ) to confirm.

KVM
The KVM function allows the user to control two computers connected to the same monitor from a single keyboard and mouse.
Note: {{{1}}}
To connect the two computers to the monitor:
- Connect one end of a USB Type C cable to the USB Type C port of the monitor. Then connect the other end of the cable to the USB Type C port of the laptop.
- Connect one end of a DisplayPort cable to the DisplayPort port of the monitor. Then connect the other end of the cable to the DisplayPort or Mini DisplayPort of the computer.
- Connect one end of a USB Type B cable to the USB Type B port of the monitor. Then connect the other end of the cable to a USB port of the computer.

To enable PBP mode:
- Move the Joy Key ( ) to display the Startup Menu. Then navigate to Main Menu and press the Joy Key ( ) to display the OSD Menu.
- Move the Joy Key ( ) or ( ) to select the Setup Menu menu. Then press the Joy Key ( ) to enter the menu.
- Move the Joy Key ( ) or ( ) to select Multi-Picture. Then press the Joy Key ( ) to enter its sub-menu.
- Move the Joy Key ( ) or ( ) to select PBP Left-Right. Then press the Joy Key ( ) to enable PBP mode.

To activate the KVM function:
- Move and hold the Joy Key (
 ) for two seconds to activate the KVM function.
 - Then you will be able to switch the cursor between the two screens (left/right window).

Multi-Picture
Multi-Picture allows users to further customize their work space by allowing up to four split windows from different inputs, displaying high resolution content with different aspect ratios, without distortion from the original input sources.

To enable Multi-Picture mode:
- Move the Joy Key ( ) to display the Startup Menu. Then navigate to Main Menu and press the Joy Key ( ) to display the OSD Menu.
- Move the Joy Key ( ) or ( ) to select Color Mode. Then press the Joy Key ( ) to enter the Color Mode menu.
- Move the Joy Key ( ) or ( ) to select Multi-Picture. Then press the Joy Key ( ) to enter its sub-menu.
- Move the Joy Key ( ) or ( ) to select PBP Left-Right or PIP. Then press the Joy Key ( ) to enter the selected mode.
PBP (Picture-by-Picture)

Note: {{{1}}}
To configure PBP:
- Move the Joy Key ( ) to display the Startup Menu. Then navigate to Main Menu and press the Joy Key ( ) to display the OSD Menu.
- Move the Joy Key ( ) or ( ) to select Setup Menu. Then press the Joy Key ( ) to enter the Setup Menu menu.
- Move the Joy Key ( ) or ( ) to select Multi-Picture. Then press the Joy Key ( ) to enter its sub-menu.
- Move the Joy Key ( ) or ( ) to select PBP Left-Right. Then press the Joy Key ( ) to enter its sub-menu.
- To change the input source, select the source location (Left Source Select/Right Source Select) and press the Joy Key ( ).
- Move the Joy Key ( ) or ( ) to select the desired input source and press the Joy Key ( ) to confirm.
- To swap the two windows, select Swap and press the Joy Key ( ) to confirm.
PIP (Picture-in-Picture)

To configure PIP:
- Move the Joy Key ( ) to display the Startup Menu. Then navigate to Main Menu and press the Joy Key ( ) to display the OSD Menu.
- Move the Joy Key ( ) or ( ) to select Setup Menu. Then press the Joy Key ( ) to enter the Setup Menu menu.
- Move the Joy Key ( ) or ( ) to select Multi-Picture. Then press the Joy Key ( ) to enter its sub-menu.
- Move the Joy Key ( ) or ( ) to select PIP. Then press the Joy Key ( ) to enter its sub-menu.
- To change the input source for the Inset Window, select PIP Source Select and press the Joy Key ( ). Then move the Joy Key ( ) or ( ) to select the desired input source and press the Joy Key ( ) to confirm.
- To adjust the Inset Window position, select PIP Position and press the Joy Key ( ).
- Press the Joy Key ( ) to select PIP H.Position or PIP V.Position.
- Move the Joy Key ( ) or ( ) to adjust the setting and press the Joy Key ( ) to confirm.
- To adjust the Inset Window size, select PIP Size and press the Joy Key ( ). Then move the Joy Key ( ) or ( ) to adjust the setting.
- To swap the two windows, select Swap and press the Joy Key ( ) to confirm.
Color Calibration
What is Colorbration⁺?
Color accuracy is one of the most important aspects of the creative workflow and ensuring that your monitor’s color accurately represents the color of your original image or digital file is essential. The software allows you to:
- Calibrate and profile your monitor quickly and easily.
- Control white point, luminance, contrast ratio, gamma, and more.
Where to Get Colorbration⁺?
The Colorbration⁺ software can be downloaded from our website.
After the download completes, launch the Setup file and follow the on-screen directions to install the software.
Connection Methods
In addition to downloading the software, make sure that your monitor, computer and colorimeter are properly connected.
There are two methods of connection for your monitor and computer:
HDMI or DisplayPort
Users with an HDMI or DisplayPort connection should also connect their monitor and computer via a USB Type C to USB Type A cable.

Type C
Users with a USB Type C connection can connect their monitor and computer directly.

Colorimeter Connection
Connect the USB Type A cable of the colorimeter to the USB Type A port of the monitor.

Preparing for Color Calibration
- Please make sure all connections have been made and are correct.
- Tilt your monitor upwards.
- Remove the lens cap (if applicable) and carefully place the measurement device in contact with the monitor’s screen.


Using Colorbration+
Upon initially launching Colorbration⁺ the user will have two modes to choose from:
- Basic Mode
- Advanced Mode
General Operation
To begin the Advanced Mode calibration process:
- Select Device Selection, then the monitor you wish to calibrate from the available options.
- Connect and select the measurement device you wish to use from the available options.
- Select Calibration on the Sidebar Menu.
- Choose your desired calibration settings from the drop-down menu, or create a custom profile.
- Once the calibration settings have been chosen, select to begin the calibrating process.
- Wait until the color calibration process is complete.
Important: {{{1}}}
Appendix
Product Specifications
| Item | Category | Specifications |
|---|---|---|
| LCD | Type | IPS type, a-si TFT Active Matrix 3840 x 2160 LCD, 0.1554 (H) mm x 0.1554 (V) mm pixel pitch |
| Display Size | 68.47 cm | |
| 27" viewable | ||
| Color Filter | RGB Vertical Stripe | |
| Glass Surface | Anti-Glare (Haze 25%), Hard Coating (3H) | |
| Input Signal | Video Sync | TMDS digital (100 Ω)
|
| Compatibility | PC | up to 3840 x 2160 |
| Macintosh | up to 3840 x 2160 | |
| Resolution and Timings[1] | Recommended | 3840 x 2160 @ 60 Hz |
| Supported |
| |
| Power[2] | Input Voltage | AC 100-240V, 50/60 Hz (auto switch) |
| Display Area | Active Size (H x V) |
596.74 x 335.66 mm |
| 23.49” x 13.21” | ||
| Operating Conditons | Altitude | 3.048 km |
| 10,000 ft | ||
| Relative Humidity | 20% to 90% (non-condensing) | |
| Temperature | 0° C to 40° C | |
| 32° F to 104° F | ||
| Storage Conditions | Altitude | 12 km |
| 39,370.1 ft | ||
| Relative Humidity | 5% to 90% (non-condensing) | |
| Temperature | -20° C to 60° C | |
| -4° F to 140° F | ||
| Dimensions
(with stand) |
Physical (W x H x D) |
613.10 x 569.11~449.11 x 232.4 mm |
| 24.14” x 22.41~17.68” x 9.15” | ||
| Weight
(with stand) |
Physical | 8.23 kg |
| 18.15 lb | ||
| Wall Mount | Dimensions | 100 x 100 mm |
| Power Consumption | On[3] | 45W (Typical) without Audio 74W (Maximum) with Audio |
| Off | < 0.3W (Maximum) |
| HDMI, HDMI High-Definition Multimedia Interface(고화질 멀티미디어 인터페이스), HDMI 트레이드 드레스 및 HDMI 로고라는 용어는 HDMI Licensing Administrator, Inc. 의 상표 또는 등록 상표입니다. |
On-Screen Display (OSD) Menu Tree
On-Screen Display (OSD) Tree
| Sub-menu | Menu Option | ||
|---|---|---|---|
| Adobe RGB | Brightness | (-/+, 0~100)/1 | |
| Color Temperature | 9300K | ||
| 7500K | |||
| 6500K | |||
| 6300K | |||
| 5000K | |||
| Gamma | 1 | ||
| 1.4 | |||
| 1.8 | |||
| 2.2 | |||
| 2.4 | |||
| 2.6 | |||
| Sharpness | (-/+, 0~100)/1 | ||
| Aspect Ratio | 1:1 | ||
| 4:3 | |||
| Full Screen | |||
| Uniformity | On | ||
| Off | |||
| Recall | |||
| DCI-P3 | Brightness | (-/+, 0~100)/1 | |
| Color Temperature | 9300K | ||
| 7500K | |||
| 6500K | |||
| 6300K | |||
| 5000K | |||
| Gamma | 1 | ||
| 1.4 | |||
| 1.8 | |||
| 2.2 | |||
| 2.4 | |||
| 2.6 | |||
| Sharpness | (-/+, 0~100)/1 | ||
| Aspect Ratio | 1:1 | ||
| 4:3 | |||
| Full Screen | |||
| Uniformity | On | ||
| Off | |||
| Recall | |||
| sRGB | Brightness | (-/+, 0~100)/1 | |
| Color Temperature | 9300K | ||
| 7500K | |||
| 6500K | |||
| 6300K | |||
| 5000K | |||
| Gamma | 1 | ||
| 1.4 | |||
| 1.8 | |||
| 2.2 | |||
| 2.4 | |||
| 2.6 | |||
| Sharpness | (-/+, 0~100)/1 | ||
| Aspect Ratio | 1:1 | ||
| 4:3 | |||
| Full Screen | |||
| Uniformity | On | ||
| Off | |||
| Recall | |||
| REC709 | Brightness | (-/+, 0~100)/1 | |
| Color Temperature | 9300K | ||
| 7500K | |||
| 6500K | |||
| 6300K | |||
| 5000K | |||
| Gamma | 1 | ||
| 1.4 | |||
| 1.8 | |||
| 2.2 | |||
| 2.4 | |||
| 2.6 | |||
| Sharpness | (-/+, 0~100)/1 | ||
| Aspect Ratio | 1:1 | ||
| 4:3 | |||
| Full Screen | |||
| Uniformity | On | ||
| Off | |||
| Recall | |||
| DICOM-SIM | Sharpness | (-/+, 0~100)/1 | |
| Aspect Ratio | 1:1 | ||
| 4:3 | |||
| Full Screen | |||
| Recall | |||
| Soft Proofing | Contrast | (-/+, 0~100)/1 | |
| Brightness | (-/+, 0~100)/1 | ||
| Color Temperature | 9300K | ||
| 7500K | |||
| 6500K | |||
| 6300K | |||
| 5000K | |||
| Gamma | 1 | ||
| 1.4 | |||
| 1.8 | |||
| 2.2 | |||
| 2.4 | |||
| 2.6 | |||
| Sharpness | (-/+, 0~100)/1 | ||
| Aspect Ratio | 1:1 | ||
| 4:3 | |||
| Full Screen | |||
| Uniformity | On | ||
| Off | |||
| Recall | |||
| User | Contrast | (-/+, 0~100)/1 | |
| Brightness | (-/+, 0~100)/1 | ||
| Color Temperature | 9300K | ||
| 7500K | |||
| 6500K | |||
| 6300K | |||
| 5000K | |||
| Gamma | 1 | ||
| 1.4 | |||
| 1.8 | |||
| 2.2 | |||
| 2.4 | |||
| 2.6 | |||
| Advanced DCR | (-/+, 0~100)/25 | ||
| Gain | Red | (-/+, 0~100) | |
| Green | (-/+, 0~100) | ||
| Blue | (-/+, 0~100) | ||
| Offset | Red | (-/+, 0~100) | |
| Green | (-/+, 0~100) | ||
| Blue | (-/+, 0~100) | ||
| Hue | Red | (-/+, 0~100) | |
| Green | (-/+, 0~100) | ||
| Blue | (-/+, 0~100) | ||
| Cyan | (-/+, 0~100) | ||
| Magenta | (-/+, 0~100) | ||
| Yellow | (-/+, 0~100) | ||
| Sharpness | (-/+, 0~100)/1 | ||
| Aspect Ratio | 1:1 | ||
| 4:3 | |||
| Full Screen | |||
| Blue Light Filter | (-/+, 0~5) | ||
| Uniformity | On | ||
| Off | |||
| Recall | |||
| CAL1/CAL2/CAL3 | Brightness | (-/+, 0~100)/1 | |
| Color Calibration Notice | Result | ||
| Remind Schedule Hour | |||
| Counter Hour | |||
| Recall | |||
| Sharpness | (-/+, 0~100)/1 | ||
| Aspect Ratio | 1:1 | ||
| 4:3 | |||
| Full Screen | |||
| Uniformity | On | ||
| Off | |||
| Recall | |||
| HDR | Standard | ||
| HDR_M | |||
| HDR_H | |||
| Smooth | |||
| Off | |||
| Sub-menu | Menu Option | |
|---|---|---|
| CAD/CAM | Ultra Clear | (-/+, 0~4) |
| Advanced-Sharpness | (-/+, 0~100) | |
| Advanced-Gamma | (-/+, 1.8~2.6) | |
| Video Edit | Ultra Clear | (-/+, 0~4) |
| Advanced-Sharpness | (-/+, 0~100) | |
| Advanced-Gamma | (-/+, 1.8~2.6) | |
| Animation | Ultra Clear | (-/+, 0~4) |
| Advanced-Sharpness | (-/+, 0~100) | |
| Black Stabilization | (-/+, 0~10) | |
| Photographer | Ultra Clear | (-/+, 0~4) |
| Advaned-Sharpness | (-/+, 0~100) | |
| Advanced-Gamma | (-/+, 1.8~2.6) | |
| FPS 1 | ||
| FPS 2 | ||
| RTS | ||
| MOBA | ||
| Sub-menu | Menu Option |
|---|---|
| Volume | (-/+, 0~100)/1 |
| Mute | On |
| Off | |
| Audio Input | DisplayPort |
| HDMI 1 | |
| HDMI 2 | |
| Type C |
| Sub-menu | Menu Option | ||
|---|---|---|---|
| Language Select | English | ||
| Français | |||
| Deutsch | |||
| Español | |||
| Italiano | |||
| Suomi | |||
| Русский | |||
| Türkçe | |||
| 日本語 | |||
| 한국어 | |||
| 繁體中文 | |||
| 简体中文 | |||
| Resolution Notice | On | ||
| Off | |||
| Information | |||
| OSD Timeout | (-/+, 5/15/30/60) | ||
| OSD Background | On | ||
| Off | |||
| OSD Pivot | Auto | ||
| 0° | |||
| +90° | |||
| -90° | |||
| 180° | |||
| Power Indicator | On | ||
| Off | |||
| Auto Power Off | On | ||
| Off | |||
| Sleep | 30 minutes | ||
| 45 minutes | |||
| 60 minutes | |||
| 120 minutes | |||
| Off | |||
| Multi-Picture | Off | ||
| PBP Left-Right | Left Source Select | DisplayPort | |
| HDMI 1 | |||
| HDMI 2 | |||
| Type C | |||
| Right Source Select | DisplayPort | ||
| HDMI 1 | |||
| HDMI 2 | |||
| Type C | |||
| Swap | |||
| PIP | PIP Source Select | DisplayPort | |
| HDMI 1 | |||
| HDMI 2 | |||
| Type C | |||
| PIP Position | PIP H. Position | ||
| PIP V. Position | |||
| PIP Size | (-/+, 0~100) | ||
| Swap | |||
| Dual Color | DCI-P3 | ||
| sRGB | |||
| REC709 | |||
| DICOM-SIM | |||
| User | |||
| CAL 1 | |||
| CAL 2 | |||
| CAL 3 | |||
| CAD/CAM | |||
| Video Edit | |||
| Animation | |||
| Photographer | |||
| FPS 1 | |||
| FPS 2 | |||
| RTS | |||
| MOBA | |||
| ECO Mode | Standard | ||
| Optimize | |||
| Conserve | |||
| Energy Saving | On | ||
| Off | |||
| Overscan | On | ||
| Off | |||
| Response Time | Standard | ||
| Advanced | |||
| Ultra Fast | |||
| USB Charging | On | ||
| Off | |||
| Backstage Lighting | Level 1 | ||
| Level 2 | |||
| Level 3 | |||
| Off | |||
| Burn-in Eraser | On | ||
| Off | |||
| DDC/CI | On | ||
| Off | |||
| Rename | |||
| All Recall | |||
Safety Precautions
Please read these instructions completely before using the equipment.
- Keep this user guide in a safe place for later reference.
- Read all warnings and follow all instructions.
- Sit at least 18" (45 cm) away from the device.
- Allow at least 4" (10 cm) clearance around the device to ensure proper ventilation.
- Place the device in a well-ventilated area. Do not place anything on the device that prevents heat dissipation.
- Do not use the device near water. To reduce the risk of fire or electric shock, do not expose the device to moisture.
- Avoid exposing the device to direct sunlight or other sources of sustained heat.
- Do not install near any heat sources such as radiators, heat registers, stoves, or other devices (including amplifiers) that may increase the temperature of the device to dangerous levels.
- Use a soft, dry cloth to clean the external housing. For more information, refer to the "Maintenance" section of this manual.
- Avoid touching the screen, as oil may collect on the screen if you touch it.
- Do not touch the screen surface with sharp or hard objects, as it may cause damage to the screen.
- Do not place the device on cloth or other materials that may be placed between the product and supporting furniture.
- When moving the device, be careful not to drop or bump the device on anything.
- Do not place the device on an uneven or unstable surface. The device may fall over resulting in an injury or a malfunction.
- Do not place any heavy objects on the device or connection cables.
- Always use cabinets, stands, or installation methods recommended by the manufacturer of the device set.
- Always use furniture that can safely support the device.
- Always ensure the device is not overhanging the edge of the supporting furniture.
- Do not place the device on tall furniture, such as cupboards or bookcases, without anchoring both the furniture and the device to a suitable support.
- Always educate children about the dangers of climbing on furniture to reach the device or related equipment.
- Do not place the monitor where children are likely to be present.
- Do not place items that might tempt children to climb, such as toys and remote controls, on the top of the device or furniture on which the product is placed.
- If smoke, an abnormal noise, or a strange odor is present, immediately turn the device off and call your dealer or ViewSonic®. It is dangerous to continue using the device.
- Do not attempt to circumvent the safety provisions of the polarized or grounding-type plug. A polarized plug has two blades with one wider than the other. A grounding-type plug has two blades and a third grounding prong. The wide blade and the third prong are provided for your safety. If the plug does not fit into your outlet, obtain an adapter and do not attempt to force the plug into the outlet.
- When connecting to a power outlet, Do not remove the grounding prong. Please ensure grounding prongs are never removed.
- Always route and manage cords and cables connected to your device so they cannot be tripped over, pulled, or grabbed.
- Protect the power cord from being treaded upon or pinched, particularly at the plug, and at the point where it emerges from the equipment. Ensure that the power outlet is located near the equipment so that it is easily accessible.
- Disconnect the power plug from the power outlet if the device is not being used for a long period of time.
- Please confirm the distribution system installed in the building. The system should provide a circuit breaker rated at 120/240V, 20A.
- Only use attachments/accessories, such as carts, stands, tripods, brackets or tables, specified by the manufacturer.
- When a cart is used, use with caution when moving the cart/equipment combination to avoid injury from tipping over.
- Refer all servicing to qualified service personnel. Service will be required when the unit has been damaged in any way, such as:
- if the power-supply cord or plug is damaged.
- if liquid is spilled onto or objects fall into the unit.
- if the unit is exposed to rain or moisture.
- if the unit does not operate normally or has been dropped.
- When using ear-/headphones, adjust the volume to appropriate levels, or hearing damage may result.
- Stability Hazard: The display may fall, causing serious personal injury or death. To prevent injury, this display must be securely attached to the floor/wall in accordance with the installation instructions.
- Fastening the display to a wall or fixed object using cordage or other restraining devices can help support the weight of the display in order to prevent the display from falling over.
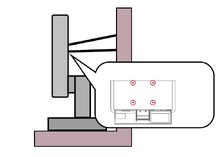
Note: {{{1}}}
- If the existing display is going to be retained and relocated, the same considerations as above should be applied.
Regulatory and Service Information
Compliance Information
This section addresses all connected requirements and statements regarding regulations. Confirmed corresponding applications shall refer to nameplate labels and relevant markings on the unit.
FCC Compliance Statement
This device complies with part 15 of FCC Rules. Operation is subject to the following two conditions: (1) this device may not cause harmful interference, and (2) this device must accept any interference received, including interference that may cause undesired operation. This equipment has been tested and found to comply with the limits for a Class B digital device, pursuant to part 15 of the FCC Rules.
These limits are designed to provide reasonable protection against harmful interference in a residential installation. This equipment generates, uses, and can radiate radio frequency energy, and if not installed and used in accordance with the instructions, may cause harmful interference to radio communications. However, there is no guarantee that interference will not occur in a particular installation. If this equipment does cause harmful interference to radio or television reception, which can be determined by turning the equipment off and on, the user is encouraged to try to correct the interference by one or more of the following measures:
- Reorient or relocate the receiving antenna.
- Increase the separation between the equipment and receiver.
- Connect the equipment into an outlet on a circuit different from that to which the receiver is connected.
- Consult the dealer or an experienced radio/TV technician for help.
Warning: You are cautioned that changes or modifications not expressly approved by the party responsible for compliance could void your authority to operate the equipment.
Industry Canada Statement
CAN ICES (B) / NMB (B)
CE Conformity for European Countries
 |
The device complies with the EMC Directive 2014/30/EU and Low Voltage Directive 2014/35/EU. |
The following information is only for EU-member states:
| The mark shown to the right is in compliance with the Waste Electrical and Electronic Equipment Directive 2012/19/EU (WEEE). The mark indicates the requirement NOT to dispose of the equipment as unsorted municipal waste, but use the return and collection systems according to local law. |
Declaration of RoHS2 Compliance
This product has been designed and manufactured in compliance with Directive 2011/65/EU of the European Parliament and the Council on restriction of the use of certain hazardous substances in electrical and electronic equipment (RoHS2 Directive) and is deemed to comply with the maximum concentration values issued by the European Technical Adaptation Committee (TAC) as shown below.
| Substance | Proposed Maximum Concentration | Actual Concentration |
|---|---|---|
| Lead (Pb) | 0.1% | < 0.1% |
| Mercury (Hg) | 0.1% | < 0.1% |
| Cadmium (Cd) | 0.01% | < 0.01% |
| Hexavalent Chromium (Cr6⁺) | 0.1% | < 0.1% |
| Polybrominated biphenyls (PBB) | 0.1% | < 0.1% |
| Polybrominated diphenyl ethers (PBDE) | 0.1% | < 0.1% |
| Bis (2-ethylhexyl) phthalate (DEHP) | 0.1% | < 0.1% |
| Butyl benzyl phthalate (BBP) | 0.1% | < 0.1% |
| Dibutyl phthalate (DBP) | 0.1% | < 0.1% |
| Diisobutyl phthalate (DIBP) | 0.1% | < 0.1% |
Certain components of products as stated above are exempted under the Annex III of the RoHS2 Directives as noted below. Examples of exempted components are:
- Copper alloy containing up to 4% lead by weight.
- Lead in high melting temperature type solders (i.e. lead-based alloys containing 85% by weight or more lead).
- Electrical and electronic components containing lead in a glass or ceramic other than dielectric ceramic in capacitors, e.g. piezoelectronic devices, or in a glass or ceramic matrix compound.
- Lead in dielectric ceramic in capacitors for a rated voltage of 125 V AC or 250 V DC or higher.
Indian Restriction of Hazardous Substances
Restriction on Hazardous Substances statement (India). This product complies with the “India E-waste Rule 2011” and prohibits use of lead, mercury, hexavalent chromium, polybrominated biphenyls or polybrominated diphenyl ethers in concentrations exceeding 0.1 weight % and 0.01 weight % for cadmium, except for the exemptions set in Schedule 2 of the Rule.
Product Disposal at End of Product Life
ViewSonic® respects the environment and is committed to working and living green. Thank you for being part of Smarter, Greener Computing. Please visit the ViewSonic® website to learn more.
USA & Canada:
https://www.viewsonic.com/us/go-green-with-viewsonic
Europe:
https://www.viewsonic.com/eu/environmental-social-governance/recycle
Taiwan:
https://recycle.moenv.gov.tw/
For EU users, please contact us for any safety/accident issue experienced with this product:
| ViewSonic Europe Limited Flevolaan 38, 1382JZ, Weesp the Netherlands | |
| +31 08000232999 | |
| EPREL@viewsoniceurope.com | |
| https://www.viewsonic.com/eu/ |
Copyright Information
Copyright© ViewSonic® Corporation, 2024. All rights reserved.
Macintosh and Power Macintosh are registered trademarks of Apple Inc.
Microsoft, Windows, and the Windows logo are registered trademarks of Microsoft Corporation in the United States and other countries.
ViewSonic® and the three birds logo are registered trademarks of ViewSonic® Corporation.
VESA is a registered trademark of the Video Electronics Standards Association. DPMS, DisplayPort, and DDC are trademarks of VESA.
ENERGY STAR® is a registered trademark of the U.S. Environmental Protection Agency (EPA).
As an ENERGY STAR® partner, ViewSonic® Corporation has determined that this product meets the ENERGY STAR® guidelines for energy efficiency.
Disclaimer: ViewSonic® Corporation shall not be liable for technical or editorial errors or omissions contained herein; nor for incidental or consequential damages resulting from furnishing this material, or the performance or use of this product.
In the interest of continuing product improvement, ViewSonic® Corporation reserves the right to change product specifications without notice. Information in this document may change without notice.
No part of this document may be copied, reproduced, or transmitted by any means, for any purpose without prior written permission from ViewSonic® Corporation.
VP2786a-4K_UG_ENG_1a_20240531
Important: Please visit: ViewSonic Support & Service
This page has been archived and is no longer maintained.
For technical support or product service, see the table below or contact your reseller.
Important: You will need the product’s serial number
Americas
| Country/Region | Website |
|---|---|
| Canada | https://www.viewsonic.com/us |
| Latin America | https://www.viewsonic.com/la |
| United States | https://www.viewsonic.com/us |
Asia Pacific & Africa
| Country/Region | Website |
|---|---|
| Australia | https://viewsonic.com/au/ |
| Bangladesh | https://www.viewsonic.com/bd/ |
| 中国 (China) | https://www.viewsonic.com.cn |
| 香港 (繁體中文) | https://www.viewsonic.com/hk/ |
| Hong Kong (English) | https://www.viewsonic.com/hk-en/ |
| India | https://www.viewsonic.com/in/ |
| Indonesia | https://www.viewsonic.com/id/ |
| Israel | https://www.viewsonic.com/il/ |
| 日本 (Japan) | https://www.viewsonic.com/jp/ |
| Korea | https://www.viewsonic.com/kr/ |
| Malaysia | https://www.viewsonic.com/my/ |
| Middle East | https://www.viewsonic.com/me/ |
| Myanmar | https://www.viewsonic.com/mm/ |
| Nepal | https://www.viewsonic.com/np/ |
| New Zealand | https://www.viewsonic.com/nz/ |
| Pakistan | https://www.viewsonic.com/pk/ |
| Philippines | https://www.viewsonic.com/ph/ |
| Singapore | https://www.viewsonic.com/sg/ |
| 臺灣 (Taiwan) | https://www.viewsonic.com/tw/ |
| ประเทศไทย | https://www.viewsonic.com/th/ |
| Việt Nam | https://www.viewsonic.com/vn/ |
| South Africa & Mauritius | https://www.viewsonic.com/za/ |
Europe
| Country/Region | Website |
|---|---|
| Europe | https://www.viewsonic.com/eu/ |
| France | https://www.viewsonic.com/fr/ |
| Deutschland | https://www.viewsonic.com/de/ |
| Қазақстан | https://www.viewsonic.com/kz/ |
| Россия | https://www.viewsonic.com/ru/ |
| España | https://www.viewsonic.com/es/ |
| Türkiye | https://www.viewsonic.com/tr/ |
| Україна | https://www.viewsonic.com/ua/ |
| United Kingdom | https://www.viewsonic.com/uk/ |
제한적 보증
ViewSonic® 디스플레이
보증 적용 범위:
ViewSonic®은 제품이 보증 기간 동안 재료 및 제조상 결함이 없음을 보증합니다. 보증 기간 동안 제품의 재료 또는 제조상 결함이 있는 것으로 입증되면 ViewSonic®은 단독 재량으로 고객의 유일한 구제 수단으로 제품을 수리하거나 유사한 제품으로 교체합니다. 교체 제품 또는 부품에는 다시 제조되거나 개조된 부품 또는 구성품이 포함될 수 있습니다. 수리 또는 교체 유닛이나 부품에는 고객의 원래 제한적 보증 기간 중 남은 기간만 적용되며 보증 기간은 연장되지 않습니다. ViewSonic®은 제품과 함께 제공되거나 고객이 설치한 모든 타사 소프트웨어, 승인되지 않은 하드웨어 부품 또는 구성품(예: 프로젝터 램프)의 설치에 대해 어떠한 보증도 제공하지 않습니다. ("보증에서 배제되어 적용되지 않은 범위" 절을 참조하십시오.)
보증 유효 기간:
ViewSonic® 디스플레이는 사용자가 구입한 국가에 따라 광원을 포함한 모든 부품에 대해서 최초 구입 날짜로부터 1년에서 3년까지 보증합니다.
보증 대상:
이 보증은 최초의 소비 구매자에게만 유효합니다.
보증에서 배제되거나 적용되지 않는 범위:
- 일련 번호가 훼손, 수정 또는 제거된 모든 제품
- 다음 원인에 의해 발생한 손상, 기능 저하 또는 오작동:
- 사고, 오용, 과실, 화재, 홍수, 번개 또는 기타 자연 재해, 승인되지 않은 제품 개조 또는 제품과 함께 제공된 지침을 따르지 않는 행위.
- ViewSonic®에서 승인하지 않은 사람에 의해 수리하거나 수리를 시도한 경우.
- 프로그램, 데이터 또는 이동식 저장 미디어가 손상되거나 손실된 경우.
- 통상적인 마모 및 파열.
- 제품의 제거 또는 설치.
- 수리나 교체 동안 발생한 소프트웨어 또는 데이터의 손실.
- 배송 중 발생한 제품의 손상.
- 전력 변동 또는 정전과 같은 제품 외적 원인.
- ViewSonic의 사양과 맞지 않는 소모품 또는 부품을 사용한 경우.
- 사용 설명서에 명시된 대로 소유자가 제품을 정기적으로 유지보수하지 않은 경우.
- 제품 결함과 관계없는 기타 모든 원인.
- 장시간 표시되는 정적(움직이지 않는) 이미지로 인한 손상(이미지 번인이라고도 부름).
- 소프트웨어 - 제품에 포함되어 있거나 고객이 설치한 타사 소프트웨어.
- 하드웨어/액세서리/부품/구성품 - 인증되지 않은 하드웨어, 부속품, 소모품 또는 구성품(예: 프로젝터 램프)의 설치).
- 제품 사용 설명서에 설명된 바와 같이 부적절한 청소에 의해 디스플레이 표면의 코팅이 손상되거나 남용된 경우.
- 제품의 벽 장착을 포함하여 제품의 제거, 설치 및 설정 서비스 요금.
서비스를 받는 방법:
- 보증 서비스를 받는 방법에 대한 자세한 내용은 ViewSonic® 고객 지원 센터에 문의하십시오("고객 서비스" 페이지 참조). 이 경우 제품의 일련 번호를 알려주어야 합니다.
- 보증 서비스를 받으려면 다음을 제공해야 합니다. (a) 최초 판매 일자 전표, (b) 이름, (c) 주소, (d) 문제에 대한 설명, (e) 제품의 일련 번호.
- 제품을 원래의 포장재로 포장하여 공인 ViewSonic®서비스 센터 나 ViewSonic®으로 가져오거나 운임을 선불하여 보내십시오.
- 가장 가까운 ViewSonic® 서비스 센터에 대한 추가 정보 또는 센터 이름은 ViewSonic®에 문의하십시오.
묵시적 보증의 한계:
당사는 상품성 및 특정 목적에의 적합성에 대한 묵시적인 보증을 포함하여 여기에 포함된 설명을 벗어나는 어떠한 명시적 또는 묵시적 보증도 하지 않습니다.
손해의 배제:
ViewSonic의 책임은 제품의 수리 또는 교체 비용에 국한됩니다. ViewSonic®은 다음에 대해 책임지지 않습니다.
- 제품의 결함으로 인해 발생한 다른 재산의 손해, 불편에 따른 손해, 제품 사용의 손실, 시간 손실, 이익 손실, 영업 기회의 상실, 영업권 손실, 비즈니스 관계의 방해 또는 기타 상업적 손실. 이는 이러한 손해의 가능성에 대해 통보받은 경우에도 마찬가지로 적용됩니다.
- 부수적이든, 결과적이든 기타 모든 손해.
- 다른 당사자에 의해 고객에게 제기된 모든 손해 배상.
- ViewSonic®에서 승인하지 않은 사람에 의해 수리하거나 수리를 시도한 경우.
주법의 효력:
이 보증은 고객에게 특정한 법적 권리를 부여하며 고객은 주별로 다른 기타 권리도 보유할 수 있습니다. 일부 주에서는 묵시적 보증에 대한 제한을 허용하지 않으며 부수적 또는 결과적 손해의 배제를 허용하지 않으므로 상기 제한 및 예외가 적용되지 않을 수도 있습니다.
미국 및 캐나다 이외의 지역에서 판매된 경우:
미국 및 캐나다 이외 지역에서 판매된 ViewSonic® 제품에 대한 보증 정보 및 서비스는 ViewSonic® 또는 현지 ViewSonic® 대리점에 문의하십시오.
중국 본토(홍콩, 마카오 및 대만 제외)에서 이 제품의 보증 기간은 유지보수 보증서의 조건에 따릅니다.
유럽 및 러시아 사용자의 경우 제공된 보증에 대해 자세한 전문은 다음에서 확인할 수 있습니다. http://www.viewsonic.com/eu/ 의 “지원/보증 정보”.
Mexico Limited Warranty
ViewSonic® Display
What the warranty covers:
ViewSonic® warrants its products to be free from defects in material and workmanship, under normal use, during the warranty period. If a product proves to be defective in material or workmanship during the warranty period, ViewSonic® will, at its sole option, repair or replace the product with a like product. Replacement product or parts may include remanufactured or refurbished parts or components & accessories.
How long the warranty is effective:
ViewSonic® LCD displays are warranted for between 1 and 3 years, depending on your country of purchase, for all parts including the light source and for all labour from the date of the first consumer purchase.
Who the warranty protects:
This warranty is valid only for the first consumer purchaser.
What the warranty excludes and does not cover:
- Any product on which the serial number has been defaced, modified, or removed.
- Damage, deterioration, or malfunction resulting from:
- Accident, misuse, neglect, fire, water, lightning, or other acts of nature, unauthorized product modification, or failure to follow instructions supplied with the product.
- Causes external to the product, such as electrical power fluctuations or failure.
- Use of supplies or parts not meeting ViewSonic®’s specifications.
- Normal wear and tear.
- Any other cause which does not relate to a product defect.
- Any product exhibiting a condition commonly known as “image burn-in” which results when a static image is displayed on the product for an extended period of time.
- Removal or installation of the product.
How to get service:
For information about receiving service under warranty, contact ViewSonic® Customer Support (Please refer to the “Customer Service” page). You will need to provide your product’s serial number, so please record the product information in the space provided below on your purchase for your future use. Please retain your receipt of proof of purchase to support your warranty claim.
| For Your Records | |
|---|---|
| Product Name:___________________ | Model Number:___________________ |
| Document Number:___________________ | Serial Number:___________________ |
| Purchase Date:___________________ | Extended Warranty Purchase?__________(Y/N) |
| If so, what date does the warranty expire?___________________ | |
- To obtain warranty service, you will be required to provide: (a) the original dated sales slip, (b) your name, (c) your address, (d) a description of the problem, and (e) the serial number of the product.
- Take or ship the product, freight prepaid, in the original container to an authorized ViewSonic® service center.
- Round trip transportation costs for in-warranty products will be paid by ViewSonic®.
Limitation of implied warranties:
There are no warranties, express or implied, which extend beyond the description contained herein including the implied warranty of merchantability and fitness for a particular purpose.
Exclusion of damages:
ViewSonic®’s liability is limited to the cost of repair or replacement of the product. ViewSonic® shall not be liable for:
- Damage to other property caused by any defects in the product, damages based upon inconvenience, loss of use of the product, loss of time, loss of profits, loss of business opportunity, loss of goodwill, interference with business relationships, or other commercial loss, even if advised of the possibility of such damages.
- Any other damages, whether incidental, consequential or otherwise.
- Any claim against the customer by any other party.
- Repair or attempted repair by anyone not authorized by ViewSonic®.
| Contact Information for Sales & Authorized Service (Centro Autorizado de Servicio) within Mexico | |
|---|---|
|
Name, address, of manufacturer and importers: | |
| NÚMERO GRATIS DE ASISTENCIA TÉCNICA PARA TODO MÉXICO: 001.866.823.2004 | |
|
Chihuahua |
Cuernavaca |
|
Distrito Federal |
Guadalajara, Jal |
|
Guerrero Acapulco |
Hermosillo
Distribuciones y Servicios Computacionales SA de CV. |
|
Merida |
Monterrey |
|
Oaxaca, Oax. |
Puebla, Pue. (Matriz) |
|
Tijuana |
Veracruz, Ver. |
|
Vilahermosa |
For USA Support |