


| Sub-menu | Menu Option | |
|---|---|---|
| DisplayPort | Color Format | Auto |
| RGB (Full Range) | ||
| RGB (Limited Range) | ||
| YUV (Full Range) | ||
| YUV (Limited Range) | ||
| DisplayPort 1.4 | On | |
| Off | ||
| HDMI 1 | Color Format | Auto |
| RGB (Full Range) | ||
| RGB (Limited Range) | ||
| YUV (Full Range) | ||
| YUV (Limited Range) | ||
| HDMI 2.0 | On | |
| Off | ||
| HDMI 2 | Color Format | Auto |
| RGB (Full Range) | ||
| RGB (Limited Range) | ||
| YUV (Full Range) | ||
| YUV (Limited Range) | ||
| HDMI 2.0 | On | |
| Off | ||
| Type C | Color Format | Auto |
| RGB (Full Range) | ||
| RGB (Limited Range) | ||
| YUV (Full Range) | ||
| YUV (Limited Range) | ||
| USB 3.2 | On | |
| Off | ||
| DisplayPort 1.4 | On | |
| Off | ||
| Auto Detect | On | |
| Off | ||
VP2786a-4K
From ViewSonic Documentation
簡介
包裝內容物
- 顯示器
- 電源線
- 視頻電纜
- 快速入門指南
Note: 包裝中包含的電纜可能因您所在的國家/地區而異。如需更多資訊,請聯絡當地經銷商。
產品概述
-
 前檢視
前檢視 -
 後檢視
後檢視
| 編號 | 說明 |
|---|---|
| 1 | Joy 鍵 |
| 2 | 電源按鈕 |
| 3 | I/O 連接埠 |
| 4 | 安全鎖 |
I/O 連接埠

| 編號 | 說明 |
|---|---|
| 1 | AC 輸入 |
| 2 | HDMI |
| 3 | DisplayPort |
| 4 | USB Type C |
| 5 | 音訊輸出 |
| 6 | USB 上行 |
| 7 | USB 下行 |
| 8 | Micro USB |
最初設定
安裝支架
 |
 |
- 將顯示器放在平坦、穩定的表面上,螢幕朝下。
- 將顯示器支架的上挂鉤對齊並滑入支架安裝槽。
- 將顯示器抬起到平坦、穩定的表面上的直立位置。
Note: 為了安全和確保最佳性能,請將顯示器放置在平坦、穩定的表面上。否則可能會導致顯示器掉落,從而損壞顯示器本身和/或造成人身傷害。
拆卸支架和安裝顯示器
有關安裝套件的標準尺寸,請參閱下表。
Note: 僅適用於 UL 認證的安裝套件/支架。要獲取壁掛式安裝套件或高度調節底座,請聯繫 ViewSonic® 或您當地的轉銷商。
| 最大負載 | 焊盤孔 | 螺絲規格 | 螺絲數量 |
|---|---|---|---|
| 5.2 kg | 2465.92 x 1049.56 mm | M4 x 10 毫米 | 4 顆螺絲 |
Note: 安裝套件單獨出售。
 |
 |
 |
Important: 在卸下支架之前,請關閉顯示器,斷開所有電纜,並將顯示器放在平坦、穩定的表面上,螢幕朝下。
- 按住快速釋放卡舌並小心地提起支架。
- 稍微向下拉以鬆開挂鉤並取下支架。
- 將安裝支架安裝到顯示器背面的 VESA 安裝孔中。然後用四顆螺絲 (M4 x 10 mm) 固定。
- 按照購買或可選安裝套件隨附的說明安裝顯示器。
使用安全槽

為了説明防止顯示器被盜,請使用安全槽鎖定裝置將顯示器固定在固定物體上。
此外,使用安全電纜將顯示器固定在牆壁或固定物體上有助於支撐顯示器的重量,以防止顯示器翻倒。
建立連接
連接至電源

- 將電源線連接到顯示器背面的「AC IN」插孔。
- 將電源線插頭插入電源插座。
顯示器連接
HDMI

- 將 HDMI 電纜的一端連接到顯示器的 HDMI 連接埠。
- 將電纜的另一端插入電腦的 HDMI 埠。
DisplayPort

- 將 DisplayPort 電纜的一端連接到顯示器的 DP 連接埠。
- 將電纜的另一端插入計算機的 DisplayPort 或 Mini DisplayPort 埠。
Note: 要將顯示器連接到 Thunderbolt 連接埠 (v.1 & 2)在您的Mac上,將“Mini DisplayPort至DisplayPort線”的Mini DisplayPort端連接到Mac的Thunderbolt輸出埠。然後將電纜的另一端連接到顯示器的 DisplayPort 埠。
Type C

- 將 USB Type C 電纜的一端連接到顯示器的“Type C”連接埠。
- 將電纜的另一端插入計算機的USB Type C埠。
Note: 如果是視訊輸出使用,請確保 USB Type C 輸出裝置(例如筆記型電腦)和纜線支援視訊訊號傳輸。
USB 連接
顯示器支援兩種 USB 連接埠:上游和下游。進行連接時,請遵循下列準則。

| USB 類型 | 接頭類型 | 說明 | |
|---|---|---|---|
| 上游 | Type B | 在連接至顯示器的電腦與 USB 裝置之間傳輸資料。 | |
| 下游 | Type C | 傳輸音訊、視訊和電力。啟用 KVM 功能。 | |
| 支援 5V/3A、9V/3A、12V/3A、15V/3A、20V/3.25A (LPS) 充電。 | |||
| Type A | 適用於周邊裝置(例如儲存裝置、鍵盤、滑鼠等)。 | ||
| 支援 5V/2A 充電。 | |||
| Micro USB | 僅適用於 ColorPro™ Wheel。 | ||
Note: 若要將周邊裝置與 USB Type A 連接埠搭配使用,也請將電腦連接至顯示器的 USB Type B 連接埠。
使用 USB 連接埠

- 若要使用下游 USB Type A 連接埠,請將 USB Type B 纜線的一端連接至顯示器的上游 USB Type B 連接埠。將纜線的另一端 (USB Type A) 插入電腦的 USB 連接埠。
- 將周邊裝置連接至顯示器的下游 USB Type A 連接埠。
音訊連接

將音訊設備的音訊插孔插入顯示器的 「Audio Out」 連接埠。
Note: 顯示器還配備了雙揚聲器。
使用監視器
調整視角
高度調節

將顯示器降低或升高到所需的高度(0 至 130 毫米)。
Note: 調整時,請雙手放在側面,握住顯示器,沿調節軌道用力按下。
螢幕方向調整 (Monitor Pivot)
 |
 |
 |
- 將顯示器高度調整到最高位置。然後將顯示器向後傾斜至完全傾斜位置。
- 將顯示器順時針或逆時針旋轉 90° (3) 從橫向旋轉至縱向。
Note:
- 調整時,請務必用雙手牢牢握住顯示器的兩側。
- 如果使用 Auto Pivot 功能,系統可以自動檢測螢幕方向。
旋轉調整

向左或向右旋轉顯示器以獲得所需的視角 (60°)。
傾斜調整

將顯示器向前或向後傾斜至所需的視角(-5° 至 21°)。
Note: 調整時,用一隻手牢牢支撐支架,同時用另一隻手向前或向後傾斜顯示器。
打開/關閉顯示器

- 將連接的電源介面器插入電源插座。
- 按下 電源 ( ) 按鈕打開顯示器。
- 要關閉顯示器,請按 電源 ( ) 按鈕。
Note:
- 如果OSD功能表仍在螢幕上,請按住 電源 ( ) 按鈕 3 秒以關閉電源。
- 只要電源線連接到電源插座,顯示器仍會消耗一些電量。如果長時間不使用顯示器,請從電源插座上拔下電源插頭。
使用搖桿鍵
使用 Joy Key 啟動熱鍵,導航屏幕顯示 (OSD) 功能表,並更改設置。

啟動功能表
移動 Joy Key ( ![]() ) 以啟動 Startup Menu。
) 以啟動 Startup Menu。

Note: 按照螢幕上顯示的關鍵指南選擇選項或進行調整。
主功能表
進入螢幕顯示 (OSD) 選單

色彩模式
選擇一種預設標準顏色設置。

視圖模式
選擇任一預設顯示設定。

Brightness(亮度)
調整亮度。

輸入
選擇輸入來源。

Volume(音量)
調整音量設置。

Note: 移動 Joy Key (  ) 返回上一個功能表。
熱鍵
當螢幕顯示 (OSD) 選單關閉時,您可以使用 Joy Key 快速存取特殊功能。
| 按鍵 | 說明 |
|---|---|
 |
按住該鍵 5 秒鐘可啟動/停用 LED 照明。
 |
 |
按住該鍵可鎖定/解鎖OSD功能表。 當功能表出現在螢幕上時,繼續按住該鍵 10 秒鐘以鎖定/解鎖 OSD 功能表。
 如果 OSD 選單被鎖定,螢幕上將顯示以下訊息:  |
 |
按住 鍵鎖定/解鎖 電源 ( ) 按鈕 當功能表出現在螢幕上時,繼續按住該鍵 10 秒鐘以鎖定/解鎖“電源” ( ) 按鈕  如果 Power ( ) 按鈕被鎖定,螢幕上將出現以下消息。  |
 |
按住該鍵 10 秒鐘可在設備打開時顯示/隱藏啟動螢幕。  |
 |
按住該鍵 10 秒鐘可啟動/停用 Ultra Fast。  |
配置設定
一般操作
- 移動 Joy Key ( ) 以顯示 Startup Menu。然後導航到 主功能表 並按下 Joy 鍵 (
 ) 以顯示OSD功能表。
 - 移動 Joy Key' (
 ) 或 (
) 或 (  ) 以選擇主功能表。然後按 Joy Key ( ) 進入選單。
 - 移動 Joy Key' ( ) 或 ( ) 以選擇所需的功能表選項。然後按 Joy Key ( ) 進入子功能表。
- 移動 Joy Key' ( ) 或 ( ) 調整/選擇設置。然後按 Joy Key ( ) 進行確認。
- 移動 Joy Key ( ) 返回上一個功能表。


選單選項
輸入
- 移動 Joy Key ( ) 以顯示 Startup Menu。然後導航到 主功能表 並按下 Joy 鍵 ( ) 以顯示OSD功能表。
- 移動 Joy Key' ( ) 或 ( ) 選擇 Input。然後按 Joy Key ( ) 進入 Input 功能表。
- 移動 Joy Key' ( ) 或 ( ) 以選擇所需的輸入源。然後按 Joy Key ( ) 以確認選擇。
色彩模式

- 移動 Joy Key ( ) 以顯示 Startup Menu。然後導航到 主功能表 並按下 Joy 鍵 ( 以顯示OSD功能表。
- 移動 Joy Key' ( ) 或 ( ) 選擇 Color Mode。然後按 Joy Key ( ) 進入 Color Mode 功能表。
- 移動 Joy Key' ( ) 或 ( ) 以選擇所需的選項。然後按 Joy Key ( ) 進入其子功能表。
- 移動 Joy Key ( ) 或 ( ) 調整/選擇設置,然後按 Joy Key ( ) 以確認選擇 (如果適用)。
| 選單選項 | 說明 |
|---|---|
| Adobe RGB | Precise color gamut and gamma of Adobe RGB standard. |
| DCI-P3 | Precise color gamut and gamma of DCI-P3 standard. |
| sRGB | Precise color gamut and gamma of sRGB standard. |
| REC709 | Precise color gamut and gamma of ITU-R Rec. 709 standard. |
| DICOM-SIM | Gamma curves are set to a DICOM simulation. |
| User | Custom, user-defined settings. |
| CAL1/CAL2/CAL3 | Display with the 1st/2nd/3rd user calibration mode. |
| HDR | Reduce the overall contrast of a given scene so that detail in the highlights and shadows can be seen. |
ViewMode

- Move the Joy Key ( ) to display the Startup Menu. Then navigate to Main Menu and press the Joy Key ( ) to display the OSD Menu.
- Move the Joy Key ( ) or ( ) to select ViewMode. Then press the Joy Key ( ) to enter the ViewMode menu.
- Move the Joy Key ( ) or ( ) to select the desired option. Then press the Joy Key ( ) to enter its sub-menu.
| Menu Option | Description |
|---|---|
| CAD/CAM | Select this option for viewing graphic design files. |
| Video Edit | Select this option for video editing. |
| Animation | Select this option for animation. |
| Photographer | Select this option for viewing photo files. |
| FPS 1 | Ideal for First-Person Shooter games. |
| FPS 2 | Ideal for First-Person Shooter games. |
| RTS | Ideal for Real-Time Strategy games. |
| MOBA | Select this option for Multiplayer Online Battle Arena games. |
Audio Adjust

- Move the Joy Key ( ) to display the Startup Menu. Then navigate to Main Menu and press the Joy Key ( ) to display the OSD Menu.
- Move the Joy Key ( ) or ( ) to select Audio Adjust. Then press the Joy Key ( ) to enter the Audio Adjust menu.
- Move the Joy Key ( ) or ( ) to select the desired option. Then press the Joy Key ( ) to enter its sub-menu.
- Move the Joy Key ( ) or ( ) to adjust/select the setting, and press the Joy Key ( ) to confirm the selection (if applicable).
| Menu Option | Description |
|---|---|
| Volume | Adjust the monitor’s sound level. |
| Mute | Turn off the monitor's sound. |
| Audio Input | Select the audio input source. |
Setup Menu

- Move the Joy Key ( ) to display the Startup Menu. Then navigate to Main Menu and press the Joy Key ( ) to display the OSD Menu.
- Move the Joy Key ( ) or ( ) to select Setup Menu. Then press the Joy Key ( ) to enter the Setup Menu menu.
- Move the Joy Key ( ) or ( ) to select the desired option. Then press the Joy Key ( ) to enter its sub-menu.
- Move the Joy Key ( ) or ( ) to adjust/select the setting, and press the Joy Key ( ) to confirm the selection (if applicable).
| Menu Option | Description |
|---|---|
| Language Select | Select an available language for the OSD Menu. |
| Adaptive Sync | Eliminates stuttering and tearing during gameplay. |
| Resolution Notice | Enable this option to allow the system to inform users that the current viewing resolution is not the correct native resolution. |
| PureXP™ | Short for “Pure Experience”, this feature can enhance the visual quality of moving objects, making them less vague with a clearer view. |
| Information | Display the monitor information. |
| OSD Timeout | Set the length of time the OSD Menu remains on screen. |
| OSD Background | Show/Hide the OSD background when the OSD Menu appears on the screen. |
| OSD Pivot | Set the OSD Menu orientation.
|
| Power Indicator | Set the Power Indicator On or Off. If the setting is set to On, the power indicator lights blue when the device is turned on. |
| Auto Power Off | Enable this option to allow the monitor to automatically turn off after a certain amount of time. |
| Sleep | Set the amount of idle time before the monitor enters Sleep mode. |
| Multi-Picture | Off
PBP Left-Right
PIP
Dual Color
|
| ECO Mode | Choose between various modes, based on power consumption. |
| Overscan | Enable this option to automatically enlarge the original picture horizontally and vertically to an equal aspect ratio that fills the screen. |
| Response Time | Adjust the response time, creating smooth images without streaking, blurring or ghosting. A low response time is perfect for the most graphic-intense gaming, and provides amazing visual quality while watching sports or action movies. |
| USB Charging | Enable/disable usb charging. |
| Backstage Lighting | Adjust the LED lighting. |
| Burn-in Eraser | Reduce image burn-in. |
| DDC/CI | Enable this option to allow the monitor control via the graphics card. |
| Rename | Rename the personalized custom profile. |
| All Recall | Resets all settings to their default values. |
Advanced Features and Settings
Auto Pivot
With the Auto Pivot function, the monitor can detect the image display and adjust the image’s orientation on the screen automatically when pivoting the screen vertically or horizontally.
Note: {{{1}}}
To enable the DDC/CI setting:
- Open the OSD Menu and select the Setup Menu menu. Then press the Joy Key ( ) to enter the menu.
- Move the Joy Key ( ) or ( ) to select DDC/CI. Then press the Joy Key ( ) to enter its sub-menu.
Move the Joy Key (
) or ( ) to select On. Then press the Joy Key ( ) to confirm.

After making sure DDC/CI is On, proceed to set OSD Pivot to Auto:
- Open the OSD Menu and select the Setup Menu menu. Then press the Joy Key ( ) to enter the menu.
- Move the Joy Key ( ) or ( ) to select OSD Pivot. Then press the Joy Key ( ) to enter its sub-menu.
- Move the Joy Key ( ) or ( ) to select Auto. Then press the Joy Key ( ) to confirm.
Backstage Lighting
With the Backstage Lighting function, the monitor can adjust the LED brightness to the optimal settings.
To configure the Backstage Lighting settings:
- Open the OSD Menu and select the Setup Menu menu. Then press the Joy Key ( ) to enter the menu.
- Move the Joy Key ( ) or ( ) to select Backstage Lighting. Then press the Joy Key ( ) to enter its sub-menu.
- Move the Joy Key ( ) or ( ) to select Level 1, Level 2, or Level 3 to enable the function. Then press the Joy Key ( ) to confirm.
Colorbration+
To ensure long-term color accuracy, some specific models support the hardware color calibration function. The Colorbration+ application installation file can be found at our website.
Standard monitor packing does not include the color sensor, which the Colorbration+ application needs for the calibration process.
Compatible color sensors include:
- X-Rite i1 Display Pro
- X-Rite i1 Pro 2
- X-Rite i1 Studio
- Xrite Colormunki Photo
- Xrite Colormunki Design
- Datacolor SpyderX series
- ColorPro™ Wheel
Dual Color
The monitor comes with a dual color engine to display two different color settings in PIP (Picture-in-Picture) or PBP (Picture-by-Picture) mode. You can set different color presets in both windows (The Main Window and Secondary Window).
Note: {{{1}}}
To configure Dual Color:
- Move the Joy Key ( ) to display the Startup Menu. Then navigate to Main Menu and press the Joy Key ( ) to display the OSD Menu.
- Move the Joy Key ( ) or ( ) to select the Setup Menu menu. Then press the Joy Key ( ) to enter the menu.
- Move the Joy Key ( ) or ( ) to select Multi-Picture. Then press the Joy Key ( ) to enter its sub-menu.
- Move the Joy Key ( ) or ( ) to select Dual Color. Then press the Joy Key ( ) to enter its sub-menu.
- Move the Joy Key ( ) or ( ) to select the desired color setting. Then press the Joy Key ( ) to confirm.
Firmware Update
For the best display performance and to resolve any known issues, it is best to keep your monitor updated with the latest firmware version. With the supplied USB cable and the vDisplayManager application, you can easily update your monitor’s firmware.
To update the firmware:
- Download and install the vDisplayManager application from our website.
- Connect one end of a USB Type B cable to the USB Type B port of the monitor. Then connect the other end of the cable to a USB port of the computer.
- Launch vDisplayManager. Select the Advanced tab in the side menu.
- Click Update to check for any updates to your monitor’s firmware.
- Wait until the update process is complete (if applicable).

Note: {{{1}}}
HDR (High-Dynamic-Range)
HDR reduces the overall contrast of a given scene so that detail in the highlights and shadows can be better seen.
Note: {{{1}}}
To enable the HDR function:
- Move the Joy Key ( ) to display the Startup Menu. Then navigate to Main Menu and press the Joy Key ( ) to display the OSD Menu.
- Move the Joy Key ( ) or ( ) to select Color Mode. Then press the Joy Key ( ) to enter the Color Mode menu.
- Move the Joy Key ( ) or ( ) to select HDR. Then press the Joy Key ( ) to enter its sub-menu.
- Move the Joy Key ( ) or ( ) to select one of the options . Then press the Joy Key ( ) to confirm.

KVM
The KVM function allows the user to control two computers connected to the same monitor from a single keyboard and mouse.
Note: {{{1}}}
To connect the two computers to the monitor:
- Connect one end of a USB Type C cable to the USB Type C port of the monitor. Then connect the other end of the cable to the USB Type C port of the laptop.
- Connect one end of a DisplayPort cable to the DisplayPort port of the monitor. Then connect the other end of the cable to the DisplayPort or Mini DisplayPort of the computer.
- Connect one end of a USB Type B cable to the USB Type B port of the monitor. Then connect the other end of the cable to a USB port of the computer.

To enable PBP mode:
- Move the Joy Key ( ) to display the Startup Menu. Then navigate to Main Menu and press the Joy Key ( ) to display the OSD Menu.
- Move the Joy Key ( ) or ( ) to select the Setup Menu menu. Then press the Joy Key ( ) to enter the menu.
- Move the Joy Key ( ) or ( ) to select Multi-Picture. Then press the Joy Key ( ) to enter its sub-menu.
- Move the Joy Key ( ) or ( ) to select PBP Left-Right. Then press the Joy Key ( ) to enable PBP mode.

To activate the KVM function:
- Move and hold the Joy Key (
 ) for two seconds to activate the KVM function.
 - Then you will be able to switch the cursor between the two screens (left/right window).

Multi-Picture
Multi-Picture allows users to further customize their work space by allowing up to four split windows from different inputs, displaying high resolution content with different aspect ratios, without distortion from the original input sources.

To enable Multi-Picture mode:
- Move the Joy Key ( ) to display the Startup Menu. Then navigate to Main Menu and press the Joy Key ( ) to display the OSD Menu.
- Move the Joy Key ( ) or ( ) to select Color Mode. Then press the Joy Key ( ) to enter the Color Mode menu.
- Move the Joy Key ( ) or ( ) to select Multi-Picture. Then press the Joy Key ( ) to enter its sub-menu.
- Move the Joy Key ( ) or ( ) to select PBP Left-Right or PIP. Then press the Joy Key ( ) to enter the selected mode.
PBP (Picture-by-Picture)

Note: {{{1}}}
To configure PBP:
- Move the Joy Key ( ) to display the Startup Menu. Then navigate to Main Menu and press the Joy Key ( ) to display the OSD Menu.
- Move the Joy Key ( ) or ( ) to select Setup Menu. Then press the Joy Key ( ) to enter the Setup Menu menu.
- Move the Joy Key ( ) or ( ) to select Multi-Picture. Then press the Joy Key ( ) to enter its sub-menu.
- Move the Joy Key ( ) or ( ) to select PBP Left-Right. Then press the Joy Key ( ) to enter its sub-menu.
- To change the input source, select the source location (Left Source Select/Right Source Select) and press the Joy Key ( ).
- Move the Joy Key ( ) or ( ) to select the desired input source and press the Joy Key ( ) to confirm.
- To swap the two windows, select Swap and press the Joy Key ( ) to confirm.
PIP (Picture-in-Picture)

To configure PIP:
- Move the Joy Key ( ) to display the Startup Menu. Then navigate to Main Menu and press the Joy Key ( ) to display the OSD Menu.
- Move the Joy Key ( ) or ( ) to select Setup Menu. Then press the Joy Key ( ) to enter the Setup Menu menu.
- Move the Joy Key ( ) or ( ) to select Multi-Picture. Then press the Joy Key ( ) to enter its sub-menu.
- Move the Joy Key ( ) or ( ) to select PIP. Then press the Joy Key ( ) to enter its sub-menu.
- To change the input source for the Inset Window, select PIP Source Select and press the Joy Key ( ). Then move the Joy Key ( ) or ( ) to select the desired input source and press the Joy Key ( ) to confirm.
- To adjust the Inset Window position, select PIP Position and press the Joy Key ( ).
- Press the Joy Key ( ) to select PIP H.Position or PIP V.Position.
- Move the Joy Key ( ) or ( ) to adjust the setting and press the Joy Key ( ) to confirm.
- To adjust the Inset Window size, select PIP Size and press the Joy Key ( ). Then move the Joy Key ( ) or ( ) to adjust the setting.
- To swap the two windows, select Swap and press the Joy Key ( ) to confirm.
Color Calibration
What is Colorbration⁺?
Color accuracy is one of the most important aspects of the creative workflow and ensuring that your monitor’s color accurately represents the color of your original image or digital file is essential. The software allows you to:
- Calibrate and profile your monitor quickly and easily.
- Control white point, luminance, contrast ratio, gamma, and more.
Where to Get Colorbration⁺?
The Colorbration⁺ software can be downloaded from our website.
After the download completes, launch the Setup file and follow the on-screen directions to install the software.
Connection Methods
In addition to downloading the software, make sure that your monitor, computer and colorimeter are properly connected.
There are two methods of connection for your monitor and computer:
HDMI or DisplayPort
Users with an HDMI or DisplayPort connection should also connect their monitor and computer via a USB Type C to USB Type A cable.

Type C
Users with a USB Type C connection can connect their monitor and computer directly.

Colorimeter Connection
Connect the USB Type A cable of the colorimeter to the USB Type A port of the monitor.

Preparing for Color Calibration
- Please make sure all connections have been made and are correct.
- Tilt your monitor upwards.
- Remove the lens cap (if applicable) and carefully place the measurement device in contact with the monitor’s screen.


Using Colorbration+
Upon initially launching Colorbration⁺ the user will have two modes to choose from:
- Basic Mode
- Advanced Mode
General Operation
To begin the Advanced Mode calibration process:
- Select Device Selection, then the monitor you wish to calibrate from the available options.
- Connect and select the measurement device you wish to use from the available options.
- Select Calibration on the Sidebar Menu.
- Choose your desired calibration settings from the drop-down menu, or create a custom profile.
- Once the calibration settings have been chosen, select to begin the calibrating process.
- Wait until the color calibration process is complete.
Important: {{{1}}}
Appendix
Product Specifications
| Item | Category | Specifications |
|---|---|---|
| LCD | Type | IPS type, a-si TFT Active Matrix 3840 x 2160 LCD, 0.1554 (H) mm x 0.1554 (V) mm pixel pitch |
| Display Size | 68.47 cm | |
| 27" viewable | ||
| Color Filter | RGB Vertical Stripe | |
| Glass Surface | Anti-Glare (Haze 25%), Hard Coating (3H) | |
| Input Signal | Video Sync | TMDS digital (100 Ω)
|
| Compatibility | PC | up to 3840 x 2160 |
| Macintosh | up to 3840 x 2160 | |
| Resolution and Timings[1] | Recommended | 3840 x 2160 @ 60 Hz |
| Supported |
| |
| Power[2] | Input Voltage | AC 100-240V, 50/60 Hz (auto switch) |
| Display Area | Active Size (H x V) |
596.74 x 335.66 mm |
| 23.49” x 13.21” | ||
| Operating Conditons | Altitude | 3.048 km |
| 10,000 ft | ||
| Relative Humidity | 20% to 90% (non-condensing) | |
| Temperature | 0° C to 40° C | |
| 32° F to 104° F | ||
| Storage Conditions | Altitude | 12 km |
| 39,370.1 ft | ||
| Relative Humidity | 5% to 90% (non-condensing) | |
| Temperature | -20° C to 60° C | |
| -4° F to 140° F | ||
| Dimensions
(with stand) |
Physical (W x H x D) |
613.10 x 569.11~449.11 x 232.4 mm |
| 24.14” x 22.41~17.68” x 9.15” | ||
| Weight
(with stand) |
Physical | 8.23 kg |
| 18.15 lb | ||
| Wall Mount | Dimensions | 100 x 100 mm |
| Power Consumption | On[3] | 45W (Typical) without Audio 74W (Maximum) with Audio |
| Off | < 0.3W (Maximum) |
| HDMI、HDMI 高畫質多媒體介面、HDMI 商業外觀及 HDMI 識別標章等詞彙均為 HDMI Licensing Administrator, Inc. 的商標或註冊商標。 |
On-Screen Display (OSD) Menu Tree
On-Screen Display (OSD) Tree
| Sub-menu | Menu Option | ||
|---|---|---|---|
| Adobe RGB | Brightness | (-/+, 0~100)/1 | |
| Color Temperature | 9300K | ||
| 7500K | |||
| 6500K | |||
| 6300K | |||
| 5000K | |||
| Gamma | 1 | ||
| 1.4 | |||
| 1.8 | |||
| 2.2 | |||
| 2.4 | |||
| 2.6 | |||
| Sharpness | (-/+, 0~100)/1 | ||
| Aspect Ratio | 1:1 | ||
| 4:3 | |||
| Full Screen | |||
| Uniformity | On | ||
| Off | |||
| Recall | |||
| DCI-P3 | Brightness | (-/+, 0~100)/1 | |
| Color Temperature | 9300K | ||
| 7500K | |||
| 6500K | |||
| 6300K | |||
| 5000K | |||
| Gamma | 1 | ||
| 1.4 | |||
| 1.8 | |||
| 2.2 | |||
| 2.4 | |||
| 2.6 | |||
| Sharpness | (-/+, 0~100)/1 | ||
| Aspect Ratio | 1:1 | ||
| 4:3 | |||
| Full Screen | |||
| Uniformity | On | ||
| Off | |||
| Recall | |||
| sRGB | Brightness | (-/+, 0~100)/1 | |
| Color Temperature | 9300K | ||
| 7500K | |||
| 6500K | |||
| 6300K | |||
| 5000K | |||
| Gamma | 1 | ||
| 1.4 | |||
| 1.8 | |||
| 2.2 | |||
| 2.4 | |||
| 2.6 | |||
| Sharpness | (-/+, 0~100)/1 | ||
| Aspect Ratio | 1:1 | ||
| 4:3 | |||
| Full Screen | |||
| Uniformity | On | ||
| Off | |||
| Recall | |||
| REC709 | Brightness | (-/+, 0~100)/1 | |
| Color Temperature | 9300K | ||
| 7500K | |||
| 6500K | |||
| 6300K | |||
| 5000K | |||
| Gamma | 1 | ||
| 1.4 | |||
| 1.8 | |||
| 2.2 | |||
| 2.4 | |||
| 2.6 | |||
| Sharpness | (-/+, 0~100)/1 | ||
| Aspect Ratio | 1:1 | ||
| 4:3 | |||
| Full Screen | |||
| Uniformity | On | ||
| Off | |||
| Recall | |||
| DICOM-SIM | Sharpness | (-/+, 0~100)/1 | |
| Aspect Ratio | 1:1 | ||
| 4:3 | |||
| Full Screen | |||
| Recall | |||
| Soft Proofing | Contrast | (-/+, 0~100)/1 | |
| Brightness | (-/+, 0~100)/1 | ||
| Color Temperature | 9300K | ||
| 7500K | |||
| 6500K | |||
| 6300K | |||
| 5000K | |||
| Gamma | 1 | ||
| 1.4 | |||
| 1.8 | |||
| 2.2 | |||
| 2.4 | |||
| 2.6 | |||
| Sharpness | (-/+, 0~100)/1 | ||
| Aspect Ratio | 1:1 | ||
| 4:3 | |||
| Full Screen | |||
| Uniformity | On | ||
| Off | |||
| Recall | |||
| User | Contrast | (-/+, 0~100)/1 | |
| Brightness | (-/+, 0~100)/1 | ||
| Color Temperature | 9300K | ||
| 7500K | |||
| 6500K | |||
| 6300K | |||
| 5000K | |||
| Gamma | 1 | ||
| 1.4 | |||
| 1.8 | |||
| 2.2 | |||
| 2.4 | |||
| 2.6 | |||
| Advanced DCR | (-/+, 0~100)/25 | ||
| Gain | Red | (-/+, 0~100) | |
| Green | (-/+, 0~100) | ||
| Blue | (-/+, 0~100) | ||
| Offset | Red | (-/+, 0~100) | |
| Green | (-/+, 0~100) | ||
| Blue | (-/+, 0~100) | ||
| Hue | Red | (-/+, 0~100) | |
| Green | (-/+, 0~100) | ||
| Blue | (-/+, 0~100) | ||
| Cyan | (-/+, 0~100) | ||
| Magenta | (-/+, 0~100) | ||
| Yellow | (-/+, 0~100) | ||
| Sharpness | (-/+, 0~100)/1 | ||
| Aspect Ratio | 1:1 | ||
| 4:3 | |||
| Full Screen | |||
| Blue Light Filter | (-/+, 0~5) | ||
| Uniformity | On | ||
| Off | |||
| Recall | |||
| CAL1/CAL2/CAL3 | Brightness | (-/+, 0~100)/1 | |
| Color Calibration Notice | Result | ||
| Remind Schedule Hour | |||
| Counter Hour | |||
| Recall | |||
| Sharpness | (-/+, 0~100)/1 | ||
| Aspect Ratio | 1:1 | ||
| 4:3 | |||
| Full Screen | |||
| Uniformity | On | ||
| Off | |||
| Recall | |||
| HDR | Standard | ||
| HDR_M | |||
| HDR_H | |||
| Smooth | |||
| Off | |||
| Sub-menu | Menu Option | |
|---|---|---|
| CAD/CAM | Ultra Clear | (-/+, 0~4) |
| Advanced-Sharpness | (-/+, 0~100) | |
| Advanced-Gamma | (-/+, 1.8~2.6) | |
| Video Edit | Ultra Clear | (-/+, 0~4) |
| Advanced-Sharpness | (-/+, 0~100) | |
| Advanced-Gamma | (-/+, 1.8~2.6) | |
| Animation | Ultra Clear | (-/+, 0~4) |
| Advanced-Sharpness | (-/+, 0~100) | |
| Black Stabilization | (-/+, 0~10) | |
| Photographer | Ultra Clear | (-/+, 0~4) |
| Advaned-Sharpness | (-/+, 0~100) | |
| Advanced-Gamma | (-/+, 1.8~2.6) | |
| FPS 1 | ||
| FPS 2 | ||
| RTS | ||
| MOBA | ||
| Sub-menu | Menu Option |
|---|---|
| Volume | (-/+, 0~100)/1 |
| Mute | On |
| Off | |
| Audio Input | DisplayPort |
| HDMI 1 | |
| HDMI 2 | |
| Type C |
| Sub-menu | Menu Option | ||
|---|---|---|---|
| Language Select | English | ||
| Français | |||
| Deutsch | |||
| Español | |||
| Italiano | |||
| Suomi | |||
| Русский | |||
| Türkçe | |||
| 日本語 | |||
| 한국어 | |||
| 繁體中文 | |||
| 简体中文 | |||
| Resolution Notice | On | ||
| Off | |||
| Information | |||
| OSD Timeout | (-/+, 5/15/30/60) | ||
| OSD Background | On | ||
| Off | |||
| OSD Pivot | Auto | ||
| 0° | |||
| +90° | |||
| -90° | |||
| 180° | |||
| Power Indicator | On | ||
| Off | |||
| Auto Power Off | On | ||
| Off | |||
| Sleep | 30 minutes | ||
| 45 minutes | |||
| 60 minutes | |||
| 120 minutes | |||
| Off | |||
| Multi-Picture | Off | ||
| PBP Left-Right | Left Source Select | DisplayPort | |
| HDMI 1 | |||
| HDMI 2 | |||
| Type C | |||
| Right Source Select | DisplayPort | ||
| HDMI 1 | |||
| HDMI 2 | |||
| Type C | |||
| Swap | |||
| PIP | PIP Source Select | DisplayPort | |
| HDMI 1 | |||
| HDMI 2 | |||
| Type C | |||
| PIP Position | PIP H. Position | ||
| PIP V. Position | |||
| PIP Size | (-/+, 0~100) | ||
| Swap | |||
| Dual Color | DCI-P3 | ||
| sRGB | |||
| REC709 | |||
| DICOM-SIM | |||
| User | |||
| CAL 1 | |||
| CAL 2 | |||
| CAL 3 | |||
| CAD/CAM | |||
| Video Edit | |||
| Animation | |||
| Photographer | |||
| FPS 1 | |||
| FPS 2 | |||
| RTS | |||
| MOBA | |||
| ECO Mode | Standard | ||
| Optimize | |||
| Conserve | |||
| Energy Saving | On | ||
| Off | |||
| Overscan | On | ||
| Off | |||
| Response Time | Standard | ||
| Advanced | |||
| Ultra Fast | |||
| USB Charging | On | ||
| Off | |||
| Backstage Lighting | Level 1 | ||
| Level 2 | |||
| Level 3 | |||
| Off | |||
| Burn-in Eraser | On | ||
| Off | |||
| DDC/CI | On | ||
| Off | |||
| Rename | |||
| All Recall | |||
Safety Precautions
Please read these instructions completely before using the equipment.
- Keep this user guide in a safe place for later reference.
- Read all warnings and follow all instructions.
- Sit at least 18" (45 cm) away from the device.
- Allow at least 4" (10 cm) clearance around the device to ensure proper ventilation.
- Place the device in a well-ventilated area. Do not place anything on the device that prevents heat dissipation.
- Do not use the device near water. To reduce the risk of fire or electric shock, do not expose the device to moisture.
- Avoid exposing the device to direct sunlight or other sources of sustained heat.
- Do not install near any heat sources such as radiators, heat registers, stoves, or other devices (including amplifiers) that may increase the temperature of the device to dangerous levels.
- Use a soft, dry cloth to clean the external housing. For more information, refer to the "Maintenance" section of this manual.
- Avoid touching the screen, as oil may collect on the screen if you touch it.
- Do not touch the screen surface with sharp or hard objects, as it may cause damage to the screen.
- Do not place the device on cloth or other materials that may be placed between the product and supporting furniture.
- When moving the device, be careful not to drop or bump the device on anything.
- Do not place the device on an uneven or unstable surface. The device may fall over resulting in an injury or a malfunction.
- Do not place any heavy objects on the device or connection cables.
- Always use cabinets, stands, or installation methods recommended by the manufacturer of the device set.
- Always use furniture that can safely support the device.
- Always ensure the device is not overhanging the edge of the supporting furniture.
- Do not place the device on tall furniture, such as cupboards or bookcases, without anchoring both the furniture and the device to a suitable support.
- Always educate children about the dangers of climbing on furniture to reach the device or related equipment.
- Do not place the monitor where children are likely to be present.
- Do not place items that might tempt children to climb, such as toys and remote controls, on the top of the device or furniture on which the product is placed.
- If smoke, an abnormal noise, or a strange odor is present, immediately turn the device off and call your dealer or ViewSonic®. It is dangerous to continue using the device.
- Do not attempt to circumvent the safety provisions of the polarized or grounding-type plug. A polarized plug has two blades with one wider than the other. A grounding-type plug has two blades and a third grounding prong. The wide blade and the third prong are provided for your safety. If the plug does not fit into your outlet, obtain an adapter and do not attempt to force the plug into the outlet.
- When connecting to a power outlet, Do not remove the grounding prong. Please ensure grounding prongs are never removed.
- Always route and manage cords and cables connected to your device so they cannot be tripped over, pulled, or grabbed.
- Protect the power cord from being treaded upon or pinched, particularly at the plug, and at the point where it emerges from the equipment. Ensure that the power outlet is located near the equipment so that it is easily accessible.
- Disconnect the power plug from the power outlet if the device is not being used for a long period of time.
- Please confirm the distribution system installed in the building. The system should provide a circuit breaker rated at 120/240V, 20A.
- Only use attachments/accessories, such as carts, stands, tripods, brackets or tables, specified by the manufacturer.
- When a cart is used, use with caution when moving the cart/equipment combination to avoid injury from tipping over.
- Refer all servicing to qualified service personnel. Service will be required when the unit has been damaged in any way, such as:
- if the power-supply cord or plug is damaged.
- if liquid is spilled onto or objects fall into the unit.
- if the unit is exposed to rain or moisture.
- if the unit does not operate normally or has been dropped.
- When using ear-/headphones, adjust the volume to appropriate levels, or hearing damage may result.
- Stability Hazard: The display may fall, causing serious personal injury or death. To prevent injury, this display must be securely attached to the floor/wall in accordance with the installation instructions.
- Fastening the display to a wall or fixed object using cordage or other restraining devices can help support the weight of the display in order to prevent the display from falling over.
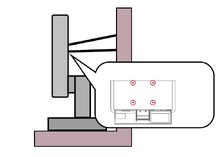
Note: {{{1}}}
- If the existing display is going to be retained and relocated, the same considerations as above should be applied.
Regulatory and Service Information
Compliance Information
This section addresses all connected requirements and statements regarding regulations. Confirmed corresponding applications shall refer to nameplate labels and relevant markings on the unit.
FCC Compliance Statement
This device complies with part 15 of FCC Rules. Operation is subject to the following two conditions: (1) this device may not cause harmful interference, and (2) this device must accept any interference received, including interference that may cause undesired operation. This equipment has been tested and found to comply with the limits for a Class B digital device, pursuant to part 15 of the FCC Rules.
These limits are designed to provide reasonable protection against harmful interference in a residential installation. This equipment generates, uses, and can radiate radio frequency energy, and if not installed and used in accordance with the instructions, may cause harmful interference to radio communications. However, there is no guarantee that interference will not occur in a particular installation. If this equipment does cause harmful interference to radio or television reception, which can be determined by turning the equipment off and on, the user is encouraged to try to correct the interference by one or more of the following measures:
- Reorient or relocate the receiving antenna.
- Increase the separation between the equipment and receiver.
- Connect the equipment into an outlet on a circuit different from that to which the receiver is connected.
- Consult the dealer or an experienced radio/TV technician for help.
Warning: You are cautioned that changes or modifications not expressly approved by the party responsible for compliance could void your authority to operate the equipment.
Industry Canada Statement
CAN ICES (B) / NMB (B)
CE Conformity for European Countries
 |
The device complies with the EMC Directive 2014/30/EU and Low Voltage Directive 2014/35/EU. |
The following information is only for EU-member states:
| The mark shown to the right is in compliance with the Waste Electrical and Electronic Equipment Directive 2012/19/EU (WEEE). The mark indicates the requirement NOT to dispose of the equipment as unsorted municipal waste, but use the return and collection systems according to local law. |
Declaration of RoHS2 Compliance
This product has been designed and manufactured in compliance with Directive 2011/65/EU of the European Parliament and the Council on restriction of the use of certain hazardous substances in electrical and electronic equipment (RoHS2 Directive) and is deemed to comply with the maximum concentration values issued by the European Technical Adaptation Committee (TAC) as shown below.
| Substance | Proposed Maximum Concentration | Actual Concentration |
|---|---|---|
| Lead (Pb) | 0.1% | < 0.1% |
| Mercury (Hg) | 0.1% | < 0.1% |
| Cadmium (Cd) | 0.01% | < 0.01% |
| Hexavalent Chromium (Cr6⁺) | 0.1% | < 0.1% |
| Polybrominated biphenyls (PBB) | 0.1% | < 0.1% |
| Polybrominated diphenyl ethers (PBDE) | 0.1% | < 0.1% |
| Bis (2-ethylhexyl) phthalate (DEHP) | 0.1% | < 0.1% |
| Butyl benzyl phthalate (BBP) | 0.1% | < 0.1% |
| Dibutyl phthalate (DBP) | 0.1% | < 0.1% |
| Diisobutyl phthalate (DIBP) | 0.1% | < 0.1% |
Certain components of products as stated above are exempted under the Annex III of the RoHS2 Directives as noted below. Examples of exempted components are:
- Copper alloy containing up to 4% lead by weight.
- Lead in high melting temperature type solders (i.e. lead-based alloys containing 85% by weight or more lead).
- Electrical and electronic components containing lead in a glass or ceramic other than dielectric ceramic in capacitors, e.g. piezoelectronic devices, or in a glass or ceramic matrix compound.
- Lead in dielectric ceramic in capacitors for a rated voltage of 125 V AC or 250 V DC or higher.
Indian Restriction of Hazardous Substances
Restriction on Hazardous Substances statement (India). This product complies with the “India E-waste Rule 2011” and prohibits use of lead, mercury, hexavalent chromium, polybrominated biphenyls or polybrominated diphenyl ethers in concentrations exceeding 0.1 weight % and 0.01 weight % for cadmium, except for the exemptions set in Schedule 2 of the Rule.
Product Disposal at End of Product Life
ViewSonic® respects the environment and is committed to working and living green. Thank you for being part of Smarter, Greener Computing. Please visit the ViewSonic® website to learn more.
USA & Canada:
https://www.viewsonic.com/us/go-green-with-viewsonic
Europe:
https://www.viewsonic.com/eu/environmental-social-governance/recycle
Taiwan:
https://recycle.moenv.gov.tw/
For EU users, please contact us for any safety/accident issue experienced with this product:
| ViewSonic Europe Limited Flevolaan 38, 1382JZ, Weesp the Netherlands | |
| +31 08000232999 | |
| EPREL@viewsoniceurope.com | |
| https://www.viewsonic.com/eu/ |
Copyright Information
Copyright© ViewSonic® Corporation, 2024. All rights reserved.
Macintosh and Power Macintosh are registered trademarks of Apple Inc.
Microsoft, Windows, and the Windows logo are registered trademarks of Microsoft Corporation in the United States and other countries.
ViewSonic® and the three birds logo are registered trademarks of ViewSonic® Corporation.
VESA is a registered trademark of the Video Electronics Standards Association. DPMS, DisplayPort, and DDC are trademarks of VESA.
ENERGY STAR® is a registered trademark of the U.S. Environmental Protection Agency (EPA).
As an ENERGY STAR® partner, ViewSonic® Corporation has determined that this product meets the ENERGY STAR® guidelines for energy efficiency.
Disclaimer: ViewSonic® Corporation shall not be liable for technical or editorial errors or omissions contained herein; nor for incidental or consequential damages resulting from furnishing this material, or the performance or use of this product.
In the interest of continuing product improvement, ViewSonic® Corporation reserves the right to change product specifications without notice. Information in this document may change without notice.
No part of this document may be copied, reproduced, or transmitted by any means, for any purpose without prior written permission from ViewSonic® Corporation.
VP2786a-4K_UG_ENG_1a_20240531
Important: Please visit: ViewSonic Support & Service
This page has been archived and is no longer maintained.
For technical support or product service, see the table below or contact your reseller.
Important: You will need the product’s serial number
Americas
| Country/Region | Website |
|---|---|
| Canada | https://www.viewsonic.com/us |
| Latin America | https://www.viewsonic.com/la |
| United States | https://www.viewsonic.com/us |
Asia Pacific & Africa
| Country/Region | Website |
|---|---|
| Australia | https://viewsonic.com/au/ |
| Bangladesh | https://www.viewsonic.com/bd/ |
| 中国 (China) | https://www.viewsonic.com.cn |
| 香港 (繁體中文) | https://www.viewsonic.com/hk/ |
| Hong Kong (English) | https://www.viewsonic.com/hk-en/ |
| India | https://www.viewsonic.com/in/ |
| Indonesia | https://www.viewsonic.com/id/ |
| Israel | https://www.viewsonic.com/il/ |
| 日本 (Japan) | https://www.viewsonic.com/jp/ |
| Korea | https://www.viewsonic.com/kr/ |
| Malaysia | https://www.viewsonic.com/my/ |
| Middle East | https://www.viewsonic.com/me/ |
| Myanmar | https://www.viewsonic.com/mm/ |
| Nepal | https://www.viewsonic.com/np/ |
| New Zealand | https://www.viewsonic.com/nz/ |
| Pakistan | https://www.viewsonic.com/pk/ |
| Philippines | https://www.viewsonic.com/ph/ |
| Singapore | https://www.viewsonic.com/sg/ |
| 臺灣 (Taiwan) | https://www.viewsonic.com/tw/ |
| ประเทศไทย | https://www.viewsonic.com/th/ |
| Việt Nam | https://www.viewsonic.com/vn/ |
| South Africa & Mauritius | https://www.viewsonic.com/za/ |
Europe
| Country/Region | Website |
|---|---|
| Europe | https://www.viewsonic.com/eu/ |
| France | https://www.viewsonic.com/fr/ |
| Deutschland | https://www.viewsonic.com/de/ |
| Қазақстан | https://www.viewsonic.com/kz/ |
| Россия | https://www.viewsonic.com/ru/ |
| España | https://www.viewsonic.com/es/ |
| Türkiye | https://www.viewsonic.com/tr/ |
| Україна | https://www.viewsonic.com/ua/ |
| United Kingdom | https://www.viewsonic.com/uk/ |
有限保固
ViewSonic® 顯示器
保固範圍:
ViewSonic® 保證其產品在保固期內,無材料和做工瑕疵。如果產品在保固期內經證明有材料或做工瑕疵,ViewSonic® 將自行斟酌修復產品或以同型產品替換,此為唯一補救辦法。替換產品或零件可能包含重新製造或整修的零件或組件。維修或替換裝置或零件視客戶的原始有限保固剩下的時間而定,保固期不延長。ViewSonic® 不對產品隨附或客戶安裝的任何第三方軟體、安裝任何未經授權的硬體零件或元件(例如投影機燈泡)提供擔保。(請參閱:「不在保固範圍內的事項 」一 節 )。
有效保固期限:
視所在國家而定,ViewSonic® 顯示器保固期為 1 到 3 年,適用於包括光源在內的所有零件、以及自第一消費者購買日起的所有人力。
保固範圍:
此保固僅對第一購買者有效。
不在保固範圍內的事項:
- 任何序號被損毀、塗改或擦除的產品。
- 由於以下原因造成的產品損壞、損傷或故障:
- 意外事故、操作失當、疏忽、火災、水災、閃電或其他自然災害、未經授權的產品修改或未遵循產品提供的說明而造成的損壞。
- 被未經 ViewSonic® 授權的任何個人修復或嘗試修復過。
- 任何程式、資料或卸除式儲存媒體的損壞或遺失。
- 正常磨損。
- 搬運或安裝產品造成的損壞。
- 維修或更換期間發生的軟體或資料遺失。
- 由於運輸造成的損壞。
- 產品以外的原因,例如電源波動或故障。
- 使用不符合 ViewSonic 規格的供應品或零件。
- 擁有者未依照使用指南所述執行定期產品維護。
- 與產品缺陷無關的其他原因所致。
- 長時間顯示的靜態(非移動)影像造成的損壞(又稱為影像烙印)。
- 軟體—產品隨附或客戶安裝的任何第三方軟體。
- 硬體/配件/零件/元件 - 安裝任何未經授權的硬體、配件、消耗品或元件(例如投影機燈泡)。
- 透過產品使用指南所述的不當清潔,損壞或濫用顯示器表面上的塗層。
- 拆卸、安裝和設定服務費用,包括產品的壁掛式安裝。
如何獲得服務:
- 欲瞭解如何在保固期內獲得服務,請聯繫 ViewSonic® 客戶支援(請參閱「客戶服務」頁)。您必須提供產品序號。
- 若要獲得保固服務,您必須提供:(a) 標有日期的原始購買單據、(b) 您的姓名、(c) 您的住址、(d) 問題說明、(e) 產品序號。
- 以預付運費的方式,將產品裝在原包裝箱內送到或運至 ViewSonic® 授權服務中心或 ViewSonic®。
- 如需其他資訊或離您最近的 ViewSonic® 服務中心名稱,請聯繫 ViewSonic®。
損失免責條款:
ViewSonic 不做任何超出本文所含描述的明示或默示保證,包括適銷性和特定用途適用性的默示保證。
ViewSonic 將不負責承擔:
ViewSonic 的責任僅限於負擔產品的維修或更換成本。ViewSonic® 對以下情況概不負責:
- 由於本產品缺陷導致的任何財產損失、由於本產品使用不便導致的損失、使用本產品導致的損失、時間損失、利潤損失、商業機會損失、商譽損失、業務關係損失、其他商業損失,即便已被提醒會造成這樣的損失也不負責。
- 任何其他損失,不論是意外的、繼發性的或其他損失。
- 任何他方對客戶提出的索賠。
- 被未經 ViewSonic® 授權的任何個人修復或嘗試修復過。
美國州法的效力 :
此保固為您提供特定的法律權利,您也有可能因為所在州的不同而享有其他權利。某些州不允許隱含保固限制、及/或不允許意外或繼發性損失免責,所以上述限制和免責條款可能不適用於您。
美國、加拿大以外地區之銷售:
如需在美國和加拿大以外地區銷售的 ViewSonic® 產品保固資訊和服務,請聯繫 ViewSonic® 或當地 ViewSonic® 經銷商。
本產品在中國大陸(香港、澳門、台灣除外)的保固期,受維修保證卡的條款與細則約束。
歐洲和俄羅斯使用者如需完整的保固資訊,請至:http://www.viewsonic.com/eu/ 的「Support/Warranty Information」下查看。
Mexico Limited Warranty
ViewSonic® Display
What the warranty covers:
ViewSonic® warrants its products to be free from defects in material and workmanship, under normal use, during the warranty period. If a product proves to be defective in material or workmanship during the warranty period, ViewSonic® will, at its sole option, repair or replace the product with a like product. Replacement product or parts may include remanufactured or refurbished parts or components & accessories.
How long the warranty is effective:
ViewSonic® LCD displays are warranted for between 1 and 3 years, depending on your country of purchase, for all parts including the light source and for all labour from the date of the first consumer purchase.
Who the warranty protects:
This warranty is valid only for the first consumer purchaser.
What the warranty excludes and does not cover:
- Any product on which the serial number has been defaced, modified, or removed.
- Damage, deterioration, or malfunction resulting from:
- Accident, misuse, neglect, fire, water, lightning, or other acts of nature, unauthorized product modification, or failure to follow instructions supplied with the product.
- Causes external to the product, such as electrical power fluctuations or failure.
- Use of supplies or parts not meeting ViewSonic®’s specifications.
- Normal wear and tear.
- Any other cause which does not relate to a product defect.
- Any product exhibiting a condition commonly known as “image burn-in” which results when a static image is displayed on the product for an extended period of time.
- Removal or installation of the product.
How to get service:
For information about receiving service under warranty, contact ViewSonic® Customer Support (Please refer to the “Customer Service” page). You will need to provide your product’s serial number, so please record the product information in the space provided below on your purchase for your future use. Please retain your receipt of proof of purchase to support your warranty claim.
| For Your Records | |
|---|---|
| Product Name:___________________ | Model Number:___________________ |
| Document Number:___________________ | Serial Number:___________________ |
| Purchase Date:___________________ | Extended Warranty Purchase?__________(Y/N) |
| If so, what date does the warranty expire?___________________ | |
- To obtain warranty service, you will be required to provide: (a) the original dated sales slip, (b) your name, (c) your address, (d) a description of the problem, and (e) the serial number of the product.
- Take or ship the product, freight prepaid, in the original container to an authorized ViewSonic® service center.
- Round trip transportation costs for in-warranty products will be paid by ViewSonic®.
Limitation of implied warranties:
There are no warranties, express or implied, which extend beyond the description contained herein including the implied warranty of merchantability and fitness for a particular purpose.
Exclusion of damages:
ViewSonic®’s liability is limited to the cost of repair or replacement of the product. ViewSonic® shall not be liable for:
- Damage to other property caused by any defects in the product, damages based upon inconvenience, loss of use of the product, loss of time, loss of profits, loss of business opportunity, loss of goodwill, interference with business relationships, or other commercial loss, even if advised of the possibility of such damages.
- Any other damages, whether incidental, consequential or otherwise.
- Any claim against the customer by any other party.
- Repair or attempted repair by anyone not authorized by ViewSonic®.
| Contact Information for Sales & Authorized Service (Centro Autorizado de Servicio) within Mexico | |
|---|---|
|
Name, address, of manufacturer and importers: | |
| NÚMERO GRATIS DE ASISTENCIA TÉCNICA PARA TODO MÉXICO: 001.866.823.2004 | |
|
Chihuahua |
Cuernavaca |
|
Distrito Federal |
Guadalajara, Jal |
|
Guerrero Acapulco |
Hermosillo
Distribuciones y Servicios Computacionales SA de CV. |
|
Merida |
Monterrey |
|
Oaxaca, Oax. |
Puebla, Pue. (Matriz) |
|
Tijuana |
Veracruz, Ver. |
|
Vilahermosa |
For USA Support |