


| Sub-menu | Menu Option | |
|---|---|---|
| DisplayPort | Color Format | Auto |
| RGB (Full Range) | ||
| RGB (Limited Range) | ||
| YUV (Full Range) | ||
| YUV (Limited Range) | ||
| DisplayPort 1.4 | On | |
| Off | ||
| HDMI 1 | Color Format | Auto |
| RGB (Full Range) | ||
| RGB (Limited Range) | ||
| YUV (Full Range) | ||
| YUV (Limited Range) | ||
| HDMI 2.0 | On | |
| Off | ||
| HDMI 2 | Color Format | Auto |
| RGB (Full Range) | ||
| RGB (Limited Range) | ||
| YUV (Full Range) | ||
| YUV (Limited Range) | ||
| HDMI 2.0 | On | |
| Off | ||
| Type C | Color Format | Auto |
| RGB (Full Range) | ||
| RGB (Limited Range) | ||
| YUV (Full Range) | ||
| YUV (Limited Range) | ||
| USB 3.2 | On | |
| Off | ||
| DisplayPort 1.4 | On | |
| Off | ||
| Auto Detect | On | |
| Off | ||
VP2786a-4K
From ViewSonic Documentation
はじめに
付属品
- モニター
- 電源コード
- ビデオケーブル
- クイックスタートガイド
Note: 同梱されているケーブルは、お住まいの国や地域によって規格が異なる場合があります。詳細については、お近くの販売代理店にお問い合わせください。
各部の名称
-
 前面図
前面図 -
 リアビュー
リアビュー
| 番号 | 説明 |
|---|---|
| 1 | ジョイ・キー |
| 2 | 電源ボタン |
| 3 | 入出力ポート |
| 4 | セキュリティロックスロット |
入出力ポート

| 番号 | 説明 |
|---|---|
| 1 | AC入力 |
| 2 | HDMI |
| 3 | DisplayPort |
| 4 | USB Type C |
| 5 | オーディオ出力 |
| 6 | USBアップストリーム |
| 7 | USBダウンストリーム |
| 8 | Micro USB |
最初の組み立て
スタンドの組み立て
 |
 |
- 平らで安定した面に、画面が下を向いた状態でモニタを置きます。
- モニタスタンド上部のフックをスタンド取り付けスロットに合わせ、スライドさせます。
- モニターを平らで安定した面に直立させた状態に持ち上げてください。
Note: 安全のため、また最適なパフォーマンスを得るために、モニターは平らで安定した場所に置いてください。これを怠ると、モニタが落下し、モニタ自体が破損したり、人身事故につながる恐れがあります。
スタンドの取り外しとモニターの取り付け
取り付けキットの標準寸法は、以下の表を参照してください。
Note: UL認定の取り付けキット/ブラケットでのみ使用します。壁面取り付けキットや高さ調整台座の入手は、ViewSonic®またはお近くの販売店にお問い合わせください。
| 最大ローディング | パッドホール | ねじ仕様 | スクリュー数量 |
|---|---|---|---|
| 5.2 kg | 400 x 200mm | M4 x 10 mm | ネジ4本 |
Note: 取り付けキットは別売です。
 |
 |
 |
Important: スタンドを取り外す前に、モニタの電源を切り、すべてのケーブルを外し、画面を下に向けた状態でモニタを平らで安定した場所に置きます。
- クイックリリース タブを押しながらつかみ、スタンドを慎重に持ち上げてください。
- 少し引き下げるとフックが外れ、スタンドが外れます。
- モニタ背面のVESA取り付け穴にマウントブラケットを取り付けます。次に4本のネジ(M4×10mm)で固定します。
- モニタの取り付けは、購入またはオプションのマウントキットに付属している指示に従ってください。
セキュリティスロットの使用

モニタの盗難を避けるために、セキュリティスロットロックデバイスを使用して、モニタを固定物に固定します。
また、セキュリティケーブルを使用してモニタを壁や固定物に固定すると、モニタの転倒を防止するためにモニタの重量を支えるのに役立ちます。
本体の接続
電源との接続

- 電源コードをモニター背面のAC入力ジャックに接続します。
- 電源コードのプラグをコンセントに差し込みます。
ディスプレイ接続
HDMI

- HDMIケーブルの一端をモニターの「HDMI」ポートに接続します。
- ケーブルのもう一方の端を、コンピューターのHDMIポートに差し込みます。
DisplayPort

- DisplayPortケーブルの一端をモニターの「DP」ポートに接続します。
- ケーブルのもう一方の端をコンピュータのDisplayPortまたはMini DisplayPortポートに接続します。
Note: {{{1}}}
タイプC

- USBタイプCケーブルの一端をモニターのUSB-Cポートに接続し、
- ケーブルのもう一方の端(USBタイプC)をコンピュータのUSBポートに差し込みます。
Note: ビデオ出力を使用する場合は、使用するUSBタイプC出力デバイス(ノートパソコンなど)とケーブルがビデオ信号伝送に対応していることを確認してください。
USB接続
モニターは、アップストリームとダウンストリームの2種類のUSBポートをサポートします。接続する際には、以下のガイドラインに従ってください。

| USBタイプ | 接続タイプ | 説明 | |
|---|---|---|---|
| アップストリーム | タイプB | コンピュータとモニターに接続されたUSBデバイスの間でデータを転送します。 | |
| ダウンストリーム | タイプC | オーディオ、ビデオ、電源を転送します。KVM機能を有効にします。 | |
| 5V/3A、9V/3A、12V/3A、15V/3A、20V/3.25A(LPS)の充電に対応。 | |||
| タイプA | 周辺機器(ストレージデバイス、キーボード、マウスなど)用です。 | ||
| 5V/2A充電をサポートします。 | |||
| Micro USB | ColorPro™ホイール専用です。 | ||
Note: USBタイプAポートを備えた周辺機器を使用する場合は、コンピュータをモニターのUSBタイプBポートに接続してください。
USBポートの使用

- ダウンストリームUSBタイプAポートを使用するには、USBタイプBケーブルの一端をモニターのアップストリームUSBタイプBポートに接続します。ケーブルのもう一方の端(USBタイプA)をコンピュータのUSBポートに差し込みます。
- 周辺機器をモニターのダウンストリームUSBタイプAポートに接続します。
オーディオ接続

オーディオデバイスのオーディオジャックをモニターの「オーディオ出力」ポートに接続します。
Note: モニターにはデュアルスピーカーも搭載。
モニタの使用方法
視野角の調整
高さ調整

モニターをお好みの高さ(0~130mm)まで下げるか上げます。
Note: 調整するときは、モニターを横にした両手で、調整トラックに沿ってしっかりと押し下げます。
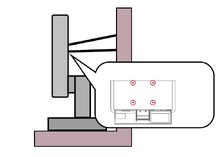
画面の向き調整(モニタのピボット)
 |
 |
 |
- モニターの高さを一番高い位置に調整します。次に、モニターを後方に傾けて、フルチルトの位置にします。
- モニタを横向きから縦向きに時計回りまたは反時計回りに90°回転させます(3)。
Note:
- 調整するときは、モニターの両側を両手でしっかり押さえてください。
- オートピボット機能を使えば、画面の向きを自動的に検出できます。
回転調整

モニタを左右に回転させて、好みの視野角(60˚)にします。
チルト調整

モニタを任意の視野角(-5˚~21˚)まで前後に傾けます。
Note: 調整するときは、片手でスタンドをしっかり支えながら、もう一方の手でモニターを前後に傾けます。
モニタのオン/オフ

- 接続されている電源アダプタをコンセントに差し込みます。
- 「」キーを押して電源 ( ) ボタンをクリックして、モニタの電源をオンにします。
- モニターの電源を切るには、電源 ( ) ボタンをもう一度クリックします。
Note:
- OSDメニューがまだ画面に表示されている場合は、電源 ( ) ボタンを3秒間押して電源を切ります。
- 電源コードが電源コンセントに接続されている限り、モニタは若干の電力を消費します。モニターを長期間使用しない場合は、電源プラグをコンセントから抜いてください。
ジョイキーの使用
「ジョイキー」を使用して、ホットキーの有効化、オンスクリーンディスプレイ(OSD)メニューの操作、および設定の変更を行います。

スタートアップメニュー
'''''''''''''''''''''''''''''' ( ![]() ) をクリックして、スタートアップメニューをアクティブにします。
) をクリックして、スタートアップメニューをアクティブにします。

Note: 画面に表示されるキーガイドに従って、オプションを選択するか、調整を行います。
メインメニュー
オンスクリーンディスプレイ(OSD)メニューを表示する

カラーモード
プリセットされた標準カラー設定のいずれかを選択します。

ViewMode(Viewモード)
プリセット済みのディスプレイ設定の中から1つ選択します。

輝度
明るさのレベルを調整します。

入力
入力方式を選択できます。

音量
音量設定を調整します。

'Note: '''''''''''''''''''''''''''''' (  ) をクリックして前のメニューに戻ります。
ホットキー
オンスクリーンディスプレイ(OSD)メニューがオフの場合は 、 「 ジョイキー」を使用することで、特別な機能にすばやくアクセスできます。
| ボタン | 説明 |
|---|---|
 |
キーを5秒間長押しして、LED照明をオン/オフにします。
 |
 |
キーを長押しすると、OSDメニューがロック/アンロックされます。 メニューが画面に表示されたら、キーを10秒間押し続けるとOSDメニューがロック/アンロックされます。
 OSDメニューがロックされている場合、以下のメッセージが画面に表示されます。  |
 |
キーを長押しして、電源のロック/ロック解除 ( ) ボタン メニューが画面に表示されたら、キーを10秒間押し続けると、電源 ( ) ボタン  Power ( ) ボタンがロックされている場合、画面に以下のメッセージが表示されます。  |
 |
キーを10秒間押し続けると、デバイスの電源を入れたときに起動画面を表示/非表示にできます。  |
 |
キーを10秒間長押しして、超高速をオン/オフにします。  |
設定
一般的な操作
- '''''''''''''''''''''''''''''' ( ) をクリックすると、スタートアップメニューが表示されます。次に、メインメニューに移動し、ジョイキー (
 ) をクリックしてOSDメニューを表示します。
 - '''''''''''''''''''''''''''''' (
 ) または (
  ) をクリックしてメインメニューを選択します。次に、'ジョイキー ( ) をクリックして、選択したメニューに入ります。
 - '''''''''''''''''''''''''''''' ( ) または ( ) をクリックして目的のメニューオプションを選択します。次に、'ジョイキー ( ) をクリックしてサブメニューに入ります。
- '''''''''''''''''''''''''''''' ( ) または ( ) をクリックして設定を調整/選択します。次に、'ジョイキー ( ) をクリックして確認します。
- '''''''''''''''''''''''''''''' ( ) をクリックして前のメニューに戻ります。


メニューオプション
入力
- '''''''''''''''''''''''''''''' ( ) をクリックすると、スタートアップメニューが表示されます。次に、メインメニューに移動し、ジョイキー ( ) をクリックしてOSDメニューを表示します。
- '''''''''''''''''''''''''''''' ( ) または ( ) キーを押して「入力」を選択します。次に、'ジョイキー ( ) を押して「入力」メニューに入ります。
- '''''''''''''''''''''''''''''' ( ) または ( ) をクリックして目的の入力ソースを選択します。次に、'ジョイキー ( ) をクリックして選択を確定します。
カラーモード

- '''''''''''''''''''''''''''''' ( ) をクリックすると、スタートアップメニューが表示されます。次に、メインメニューに移動し、ジョイキー ( をクリックしてOSDメニューを表示します。
- '''''''''''''''''''''''''''''' ( ) または ( ) をクリックして「カラーモード」を選択します。次に、'ジョイキー ( ) を押して「カラーモード」メニューに入ります。
- '''''''''''''''''''''''''''''' ( ) または ( ) をクリックして目的のオプションを選択します。次に、'ジョイキー ( ) をクリックしてサブメニューに入ります。
- '''''''''''''''''''''''''''''' ( ) または ( ) をクリックして設定を調整/選択し、ジョイキー ( ) をクリックして選択を確定します(該当する場合)。
| メニューオプション | 説明 |
|---|---|
| Adobe RGB | Adobe RGB規格の正確な色域とガンマ。 |
| DCI-P3 | DCI-P3規格の精密な色域とガンマを実現。 |
| sRGB | sRGB規格の正確な色域とガンマ。 |
| REC709 | ITU-R Rec.の正確な色域とガンマ線標準 |
| DICOM SIM | ガンマ曲線はDICOMシミュレーションに設定される。 |
| ユーザー | ユーザー定義のカスタム設定。 |
| CAL1/CAL2/CAL3 | 1/2/3ユーザーキャリブレーションモードで表示します。 |
| HDR | 特定のシーンの全体的なコントラストを下げて、ハイライト部分とシャドウ部分の詳細を確認できるようにします。 |
ViewMode(Viewモード)

- '''''''''''''''''''''''''''''' ( ) をクリックすると、スタートアップメニューが表示されます。次に、メインメニューに移動し、ジョイキー ( ) をクリックしてOSDメニューを表示します。
- '''''''''''''''''''''''''''''' ( ) または ( ) をクリックして「ビューモード」を選択します。次に、'ジョイキー ( ) をクリックして、ViewModeメニューに入ります。
- '''''''''''''''''''''''''''''' ( ) または ( ) をクリックして目的のオプションを選択します。次に、'ジョイキー ( ) をクリックしてサブメニューに入ります。
| メニューオプション | 説明 |
|---|---|
| CAD/CAM | グラフィックデザインファイルを表示する場合に選択します。 |
| ビデオ編集 | ビデオ編集の場合はこのオプションを選択します。 |
| アニメーション | アニメーションを行う場合はこのオプションを選択します。 |
| 写真家 | 写真ファイルを表示する場合に選択します。 |
| FPS 1 | ファーストパーソン・シューターゲームに最適。 |
| FPS 2 | ファーストパーソン・シューターゲームに最適。 |
| RTS | リアルタイムストラテジーゲームに最適。 |
| MOBA | マルチプレイヤーオンラインバトルアリーナゲームの場合はこのオプションを選択します。 |
オーディオ調整

- '''''''''''''''''''''''''''''' ( ) をクリックすると、スタートアップメニューが表示されます。次に、メインメニューに移動し、ジョイキー ( ) をクリックしてOSDメニューを表示します。
- '''''''''''''''''''''''''''''' ( ) または ( ) をクリックして「オーディオ調整」を選択します。次に、'ジョイキー ( ) をクリックして「オーディオ調整」メニューに入ります。
- '''''''''''''''''''''''''''''' ( ) または ( ) をクリックして目的のオプションを選択します。次に、'ジョイキー ( ) をクリックしてサブメニューに入ります。
- '''''''''''''''''''''''''''''' ( ) または ( ) をクリックして設定を調整/選択し、ジョイキー ( ) をクリックして選択を確定します(該当する場合)。
| メニューオプション | 説明 |
|---|---|
| 音量 | モニターのサウンドレベルを調整します。 |
| ミュート | モニターのサウンドをオフにします。 |
| オーディオ入力 | 音声入力方式を選択できます。 |
Setup Menu(セットアップメニュー)

- '''''''''''''''''''''''''''''' ( ) をクリックすると、スタートアップメニューが表示されます。次に、メインメニューに移動し、ジョイキー ( ) をクリックしてOSDメニューを表示します。
- '''''''''''''''''''''''''''''' ( ) または ( ) をクリックして「セットアップメニュー」を選択します。次に、'ジョイキー ( ) をクリックして「セットアップメニュー」メニューに入ります。
- '''''''''''''''''''''''''''''' ( ) または ( ) をクリックして目的のオプションを選択します。次に、'ジョイキー ( ) をクリックしてサブメニューに入ります。
- '''''''''''''''''''''''''''''' ( ) または ( ) をクリックして設定を調整/選択し、ジョイキー ( ) をクリックして選択を確定します(該当する場合)。
| メニューオプション | 説明 |
|---|---|
| 言語選択 | OSDメニューで使用できる言語を選択します。 |
| Adaptive Sync | ゲームプレイ中のスタッタリングやティアリングを防止します。 |
| Resolution Notice(解像度のお知らせ) | 現在の表示解像度が正しいネイティブ解像度ではないことをユーザーに通知できるようにするには、このオプションを有効にします。 |
| PureXP™ | 「Pure Experience」の略語で、この機能によって移動体の視覚品質を高め、より鮮明な視界で曖昧さを軽減することができます。 |
| 情報 | モニタ情報を表示します。 |
| OSD Timeout(OSD表示時間) | OSDメニューを画面に表示する時間を設定します。 |
| OSD Background(OSD背景) | OSDメニューが画面に表示されたときにOSDの背景を表示/非表示にします。 |
| OSDピボット | OSDメニューの向きを設定します。
|
| Power Indicator(電源インジケーター) | 電源インジケータのオン/オフを設定します。設定が「オン」の場合、デバイスの電源を入れると電源インジケータが青色に点灯します。 |
| 自動電源オフ | このオプションを有効にすると、一定時間が経過するとモニタの電源が自動的に切れます。 |
| Sleep(スリープ) | モニタがスリープモードに入るまでのアイドル時間を設定します。 |
| マルチピクチャ | オフ
PBP Left-Right
PIP
デュアルカラー
|
| エコモード | 消費電力に応じて、さまざまなモードを選択できます。 |
| Overscan(オーバースキャン) | このオプションを有効にすると、自動的に元の絵を縦横比で画面いっぱいに拡大します。 |
| 応答速度 | 応答時間を調整し、スジやぼかし、ゴーストのない滑らかな画像を作成します。低応答時間は、グラフィックを多用するゲームに最適で、スポーツやアクション映画を鑑賞しながら驚異的なビジュアル品質を提供します。 |
| USB充電 | usb充電を有効/無効にします。 |
| バックステージ照明 | LED照明を調整します。 |
| 焼き込み消しゴム | イメージの焼き付きを軽減します。 |
| DDC/CI | このオプションを有効にすると、グラフィックスカード経由でモニタコントロールが可能になります。 |
| 名前を変更 | パーソナライズされたカスタムプロファイルの名前を変更します。 |
| すべてのリコール | すべての設定をデフォルト値にリセットします。 |
高度な機能と設定
オートピボット
オートピボット機能により、モニターは画像表示を検出し、画面を縦または横に回転させるときに、画面上の画像の向きを自動的に調整することができます。
Note: オートピボット機能は、DDC/CIを使用してモニターと通信します。オートピボット機能を適用する前に、DDC/CI設定が「オン」に設定されていることを確認してください。
DDC/CI設定を有効にするには
- OSDメニューを開き、セットアップメニュー'メニューを選択します。次に、ジョイキー ( ) をクリックしてメニューに入ります。
- '''''''''''''''''''''''''''''' ( ) または ( ) をクリックして「DDC/CI」を選択します。次に、ジョイキー ( ) をクリックしてサブメニューに入ります。
'''''''''''''''''''''''''''''' (
) または ( ) を押して「オン」を選択します。次に、'ジョイキー ( ) をクリックして確認します。

「DDC/CI」が「オン」になっていることを確認したら、「OSDピボット」を「自動」に設定します。
- OSDメニューを開き、セットアップメニュー'メニューを選択します。次に、ジョイキー ( ) をクリックしてメニューに入ります。
- '''''''''''''''''''''''''''''' ( ) または ( ) をクリックして「OSDピボット」を選択します。次に、'ジョイキー ( ) をクリックしてサブメニューに入ります。
- '''''''''''''''''''''''''''''' ( ) または ( ) を押して「自動」を選択します。次に、'ジョイキー ( ) をクリックして確認します。
バックステージ照明
With the Backstage Lighting function, the monitor can adjust the LED brightness to the optimal settings.
To configure the Backstage Lighting settings:
- Open the OSD Menu and select the Setup Menu menu. Then press the Joy Key ( ) to enter the menu.
- Move the Joy Key ( ) or ( ) to select Backstage Lighting. Then press the Joy Key ( ) to enter its sub-menu.
- Move the Joy Key ( ) or ( ) to select Level 1, Level 2, or Level 3 to enable the function. Then press the Joy Key ( ) to confirm.
Colorbration+
長期にわたる色精度を保証するため、一部の特定のモデルはハードウェアの色補正機能をサポートしています。Colorbration+アプリケーションのインストールファイルは[https: / /color.viewsonic.com/support/software/ website]から入手できます。
標準モニタパッキングには、Colorbration+アプリケーションがキャリブレーションプロセスに必要とするカラーセンサーは含まれていません。
対応カラーセンサーは、
- X-Rite i1 Display Pro
- X-Rite i1 Pro 2
- X-Rite i1 Studio
- Xrite Colormunki Photo
- Xrite Colormunki Design
- Datacolor SpyderX series
- ColorPro™ Wheel
デュアルカラー
モニターにはデュアルカラーエンジンが搭載されており、PIP(ピクチャーインピクチャー)モードまたはPBP(ピクチャーバイピクチャー)モードで2つの異なるカラー設定を表示できます。両方のウィンドウ(メインウィンドウとセカンダリウィンドウ)で異なる色のプリセットを設定できます。
Note: PIPまたはPBPモードを有効にするには、Multi-Pictureセクションを参照してください。
デュアルカラーを設定するには
- '''''''''''''''''''''''''''''' ( ) をクリックすると、スタートアップメニューが表示されます。次に、メインメニューに移動し、ジョイキー ( ) をクリックしてOSDメニューを表示します。
- '''''''''''''''''''''''''''''' ( ) または ( ) をクリックして「セットアップメニュー」メニューを選択します。次に、'ジョイキー ( ) をクリックしてメニューに入ります。
- '''''''''''''''''''''''''''''' ( ) または ( ) をクリックして「マルチピクチャ」を選択します。次に、'ジョイキー ( ) をクリックしてサブメニューに入ります。
- '''''''''''''''''''''''''''''' ( ) または ( ) をクリックして「デュアルカラー」を選択します。次に、'ジョイキー ( ) をクリックしてサブメニューに入ります。
- '''''''''''''''''''''''''''''' ( ) または ( ) をクリックして、目的のカラー設定を選択します。次に、'ジョイキー ( ) をクリックして確認します。
ファームウェアのアップデート
ディスプレイパフォーマンスを最大限にして、既知の問題を解決するため、モニターを最新のファームウェアバージョンで更新することを推奨します。付属のUSBケーブルとvDisplayManagerアプリケーションを使用すれば、モニターのファームウェアを簡単に更新できます。
ファームウェアを更新する方法:
- 当社のWebサイトからvDisplayManagerアプリケーションをダウンロードしてインストールします。 ウェブサイト.
- USB Type Bケーブルの一方の端をモニターのUSB Type Bポートに接続します。その後、ケーブルのもう片方の端をコンピュータのUSBポートに接続します。
- vDisplayManagerを起動します。サイドメニューにある[詳細設定]タブを選択します。
- [更新]をクリックして、モニターのファームウェアにアップデートがないか確認します。
- アップデートプロセスが完了するまで待機します(該当する場合)。

Note: ファームウェアアップデートプロセス中に中断すると、モニタが完全に損なわれる可能性があります。USBケーブルを抜かないでください。また、PCおよびモニタの電源を切らないでください。
HDR (High-Dynamic-Range)
HDRは特定のシーンの全体的なコントラストを下げて、ハイライト部分とシャドウ部分の詳細を確認できるようにします。
Note: モニターでHDRを有効にする前に、まずデバイスでHDR設定がオンになっていることを確認してください。
HDR機能を有効にするには
- '''''''''''''''''''''''''''''' ( ) をクリックすると、スタートアップメニューが表示されます。次に、メインメニューに移動し、ジョイキー ( ) をクリックしてOSDメニューを表示します。
- '''''''''''''''''''''''''''''' ( ) または ( ) をクリックして「カラーモード」を選択します。次に、'ジョイキー ( ) を押して「カラーモード」メニューに入ります。
- '''''''''''''''''''''''''''''' ( ) または ( ) をクリックして'HDRを選択します。次に、ジョイキー ( ) をクリックしてサブメニューに入ります。
- '''''''''''''''''''''''''''''' ( ) または ( ) をクリックして、オプションのいずれかを選択します。次に、'ジョイキー ( ) をクリックして確認します。

KVM
KVM機能は、同じモニターに接続された2台のパソコンを1台のキーボードとマウスから操作できる機能です。
Note: PBP(ピクチャーバイピクチャー)モードでのみ適用されます。
2台のコンピュータをモニタに接続するには、次の手順を実行します。
- USBタイプCケーブルの一端をモニターのUSBタイプCポートに接続し、その後、ケーブルのもう一方の端をノートパソコンのUSB Type Cポートに接続します。
- DisplayPortケーブルの一端をモニターのDisplayPortポートに接続します。次に、ケーブルのもう一方の端をコンピュータのDisplayPortまたはMini DisplayPortに接続します。
- USB Type Bケーブルの一方の端をモニターのUSB Type Bポートに接続します。その後、ケーブルのもう片方の端をコンピュータのUSBポートに接続します。

PBPモードを有効にするには
- '''''''''''''''''''''''''''''' ( ) をクリックすると、スタートアップメニューが表示されます。次に、メインメニューに移動し、ジョイキー ( ) をクリックしてOSDメニューを表示します。
- '''''''''''''''''''''''''''''' ( ) または ( ) をクリックして「セットアップメニュー」メニューを選択します。次に、'ジョイキー ( ) をクリックしてメニューに入ります。
- '''''''''''''''''''''''''''''' ( ) または ( ) をクリックして「マルチピクチャ」を選択します。次に、'ジョイキー ( ) をクリックしてサブメニューに入ります。
- '''''''''''''''''''''''''''''' ( ) または ( ) を押して「PBP Left-Right」を選択します。次に、'ジョイキー ( ) PBPモードを有効にします。

KVM機能を有効にするには、次の手順を実行します。
- ジョイキーを長押し (
 ) を2秒間押すとKVM機能が起動する。
 - 次に、2つの画面(左/右ウィンドウ)の間で、カーソルを切り替えることができます。

マルチピクチャ
Multi-Pictureでは、異なる入力から最大4つのウィンドウを分割でき、元の入力ソースからの歪みがなく、アスペクト比の異なる高解像度のコンテンツを表示することで、作業スペースをさらにカスタマイズできます。

マルチピクチャモードを有効にするには
- '''''''''''''''''''''''''''''' ( ) をクリックすると、スタートアップメニューが表示されます。次に、メインメニューに移動し、ジョイキー ( ) をクリックしてOSDメニューを表示します。
- '''''''''''''''''''''''''''''' ( ) または ( ) をクリックして「カラーモード」を選択します。次に、'ジョイキー ( ) をクリックしてカラーモードメニューに入ります。
- '''''''''''''''''''''''''''''' ( ) または ( ) をクリックして「マルチピクチャ」を選択します。次に、'ジョイキー ( ) をクリックしてサブメニューに入ります。
- '''''''''''''''''''''''''''''' ( ) または ( ) キーを押して「PBP Left-Right」または「PIP」を選択します。次に、'ジョイキー ( ) キーを押すと、選択したモードになります。
PBP (Picture-by-Picture)

Note: フルサイズの画像をウィンドウに表示するには、画面解像度を1920×1080(PBP左右)に調整してください。
PBPを設定するには、次の手順を実行します。
- '''''''''''''''''''''''''''''' ( ) をクリックすると、スタートアップメニューが表示されます。次に、メインメニューに移動し、ジョイキー ( ) をクリックしてOSDメニューを表示します。
- '''''''''''''''''''''''''''''' ( ) または ( ) をクリックして「セットアップメニュー」を選択します。次に、'ジョイキー ( ) をクリックして「セットアップメニュー」メニューに入ります。
- '''''''''''''''''''''''''''''' ( ) または ( ) をクリックして「マルチピクチャ」を選択します。次に、'ジョイキー ( ) をクリックしてサブメニューに入ります。
- '''''''''''''''''''''''''''''' ( ) または ( ) を押して「PBP Left-Right」を選択します。次に、'ジョイキー ( ) をクリックしてサブメニューに入ります。
- 入力ソースを変更するには、ソースの場所(「左ソース選択」/「右ソース選択」)を選択し、ジョイキー ( ).
- '''''''''''''''''''''''''''''' ( ) または ( ) をクリックして、目的の入力ソースを選択し、ジョイキー ( ) をクリックして確認します。
- 2つのウィンドウを入れ替えるには、''''''''''''''''''''''''''''''''''''''''''''''''''''''''''''''''''''''''''''''''''''''''''''''''''''''''''''''''''''' ( ) をクリックして確認します。
PIP (Picture-in-Picture)

PIPを設定するには、次の手順を実行します。
- '''''''''''''''''''''''''''''' ( ) をクリックすると、スタートアップメニューが表示されます。次に、メインメニューに移動し、ジョイキー ( ) をクリックしてOSDメニューを表示します。
- '''''''''''''''''''''''''''''' ( ) または ( ) をクリックして「セットアップメニュー」を選択します。次に、'ジョイキー ( ) をクリックして「セットアップメニュー」メニューに入ります。
- '''''''''''''''''''''''''''''' ( ) または ( ) をクリックして「マルチピクチャ」を選択します。次に、'ジョイキー ( ) をクリックしてサブメニューに入ります。
- '''''''''''''''''''''''''''''' ( ) または ( ) をクリックして「PIP」を選択します。次に、'ジョイキー ( ) をクリックしてサブメニューに入ります。
- インセットウィンドウの入力ソースを変更するには、PIPソース選択'を選択し、ジョイキーを押します。 ( ). 次に、'ジョイキーを ( ) または ( ) をクリックして、目的の入力ソースを選択し、ジョイキー ( ) をクリックして確認します。
- インセットウィンドウの位置を調整するには、'''''''''''''''''''''''''''''''''''''''''''''''''''''''''''''''''''''''''''''''''''''''''''''''''''''''''''''''''''''''''''''' ( ).
- ジョイキー' ( ) をクリックして 、 「 ' 'PIP H.Position' ' 」 または「'PIP V.Position' ' ' 」を選択します。
- '''''''''''''''''''''''''''''' ( ) または ( ) をクリックして設定を調整し、ジョイキー ( ) をクリックして確認します。
- インセットウィンドウのサイズを調整するには、'PIPサイズ'を選択し、'ジョイキー ( ). 次に、'ジョイキーを ( ) または ( ) をクリックして設定を調整します。
- 2つのウィンドウを入れ替えるには、''''''''''''''''''''''''''''''''''''''''''''''''''''''''''''''''''''''''''''''''''''''''''''''''''''''''''''''''''''' ( ) をクリックして確認します。
カラーキャリブレーション
とは Colorbration⁺?
色精度さはクリエイティブワークフローの最も重要な側面の1つです。また、ディスプレイの色が元の画像またはデジタルファイルの色を正確に表していることを確認することが重要です。このソフトウェアでは、次のことができます。
- ディスプレイをすばやく簡単に校正およびプロファイルすること。
- 白色点、輝度、コントラスト比、ガンマなどを制御すること。
入手先 Colorbration⁺?
Colorbration⁺ソフトウェアは、当社の ウェブサイト.
ダウンロードが完了したら、セットアップファイルを起動し、画面の指示に従ってソフトウェアをインストールします。
接続方法
ソフトウェアをダウンロードするだけでなく、モニター、コンピューター、測色計が正しく接続されていることを確認してください。
ディスプレイとコンピューターを接続するには、次の2つの方法があります。
HDMI または DisplayPort
HDMIまたはDisplayPort接続を使用するユーザーは、USBタイプB-USBタイプAケーブルを介してディスプレイとコンピューターを接続する必要もあります。

Type C
USBタイプC接続を使用するユーザーは、ディスプレイとコンピューターを直接接続できます。

測色計の接続
測色器のUSB Type AケーブルをモニターのUSB Type Aポートに接続します。

色校正の準備
- すべての接続が行われており、正しいことを確認してください。
- モニターを上に傾けます。
- レンズキャップを取り外し(該当する場合)、モニタの画面に測定デバイスを慎重に接触させます。


使用 Colorbration+
Colorbration⁺を初めて起動するとき、ユーザーは次の2つのモードから選択できます。
- 基本モード
- 詳細モード
一般的な操作
詳細モードの校正プロセスを開始するには、次の手順に従います:
- [Device Selection(デバイスの選択)]を選択し、使用可能なオプションから調整するディスプレイを選択します。
- 利用可能なオプションから使用する測定デバイスを接続して選択します。
- サイドバーメニューの[Calibration(校正)]を選択します。
- ドロップダウン メニューから目的の校正設定を選択するか、カスタムプロファイルを作成します
- 校正設定を選択した後、選択して校正プロセスを開始します。
- 色校正プロセスが完了するまで待ちます。
Important: 色校正プロセス中に中断すると、ディスプレイの色が完全に損なわれる可能性があります。USBケーブルを抜かないでください。また、PCまたはディスプレイの電源を切らないでください。
付録
製品仕様
| 項目 | 区分 | 仕様 |
|---|---|---|
| LCD | Type | IPS type, a-si TFT Active Matrix 3840 x 2160 LCD, 0.1554 (H) mm x 0.1554 (V) mm pixel pitch |
| Display Size | 68.47 cm | |
| 27" viewable | ||
| Color Filter | RGB Vertical Stripe | |
| Glass Surface | Anti-Glare (Haze 25%), Hard Coating (3H) | |
| 入力信号 | Video Sync | TMDS digital (100 Ω)
|
| 互換性 | PC | up to 3840 x 2160 |
| Macintosh | up to 3840 x 2160 | |
| Resolution and Timings[1] | Recommended | 3840 x 2160 @ 60 Hz |
| 対応 |
| |
| 電源[2] | Input Voltage | AC 100-240V, 50/60 Hz (auto switch) |
| 表示領域 | Active Size (H x V) |
596.74 x 335.66 mm |
| 23.49” x 13.21” | ||
| 動作条件 | Altitude | 3.048 km |
| 10,000 ft | ||
| Relative Humidity | 20% to 90% (non-condensing) | |
| Temperature | 0° C to 40° C | |
| 32° F to 104° F | ||
| 保管環境 | Altitude | 12 km |
| 39,370.1 ft | ||
| Relative Humidity | 5% to 90% (non-condensing) | |
| Temperature | -20° C to 60° C | |
| -4° F to 140° F | ||
| 寸法
(with stand) |
Physical (W x H x D) |
613.10 x 569.11~449.11 x 232.4 mm |
| 24.14” x 22.41~17.68” x 9.15” | ||
| 重量
(with stand) |
Physical | 8.23 kg |
| 18.15 lb | ||
| ウォールマウント | Dimensions | 100 x 100 mm |
| 節約モード | On[3] | 45W (Typical) without Audio 74W (Maximum) with Audio |
| Off | < 0.3W (Maximum) |
| HDMI、HDMI High-Definition Multimedia Interfaceという語、HDMIのトレードドレスおよびHDMIのロゴは、HDMI Licensing Administrator, Inc.の商標または登録商標です。 |
On-Screen Display (OSD) Menu Tree
On-Screen Display (OSD) Tree
| Sub-menu | Menu Option | ||
|---|---|---|---|
| Adobe RGB | Brightness | (-/+, 0~100)/1 | |
| Color Temperature | 9300K | ||
| 7500K | |||
| 6500K | |||
| 6300K | |||
| 5000K | |||
| Gamma | 1 | ||
| 1.4 | |||
| 1.8 | |||
| 2.2 | |||
| 2.4 | |||
| 2.6 | |||
| Sharpness | (-/+, 0~100)/1 | ||
| Aspect Ratio | 1:1 | ||
| 4:3 | |||
| Full Screen | |||
| Uniformity | On | ||
| Off | |||
| Recall | |||
| DCI-P3 | Brightness | (-/+, 0~100)/1 | |
| Color Temperature | 9300K | ||
| 7500K | |||
| 6500K | |||
| 6300K | |||
| 5000K | |||
| Gamma | 1 | ||
| 1.4 | |||
| 1.8 | |||
| 2.2 | |||
| 2.4 | |||
| 2.6 | |||
| Sharpness | (-/+, 0~100)/1 | ||
| Aspect Ratio | 1:1 | ||
| 4:3 | |||
| Full Screen | |||
| Uniformity | On | ||
| Off | |||
| Recall | |||
| sRGB | Brightness | (-/+, 0~100)/1 | |
| Color Temperature | 9300K | ||
| 7500K | |||
| 6500K | |||
| 6300K | |||
| 5000K | |||
| Gamma | 1 | ||
| 1.4 | |||
| 1.8 | |||
| 2.2 | |||
| 2.4 | |||
| 2.6 | |||
| Sharpness | (-/+, 0~100)/1 | ||
| Aspect Ratio | 1:1 | ||
| 4:3 | |||
| Full Screen | |||
| Uniformity | On | ||
| Off | |||
| Recall | |||
| REC709 | Brightness | (-/+, 0~100)/1 | |
| Color Temperature | 9300K | ||
| 7500K | |||
| 6500K | |||
| 6300K | |||
| 5000K | |||
| Gamma | 1 | ||
| 1.4 | |||
| 1.8 | |||
| 2.2 | |||
| 2.4 | |||
| 2.6 | |||
| Sharpness | (-/+, 0~100)/1 | ||
| Aspect Ratio | 1:1 | ||
| 4:3 | |||
| Full Screen | |||
| Uniformity | On | ||
| Off | |||
| Recall | |||
| DICOM-SIM | Sharpness | (-/+, 0~100)/1 | |
| Aspect Ratio | 1:1 | ||
| 4:3 | |||
| Full Screen | |||
| Recall | |||
| Soft Proofing | Contrast | (-/+, 0~100)/1 | |
| Brightness | (-/+, 0~100)/1 | ||
| Color Temperature | 9300K | ||
| 7500K | |||
| 6500K | |||
| 6300K | |||
| 5000K | |||
| Gamma | 1 | ||
| 1.4 | |||
| 1.8 | |||
| 2.2 | |||
| 2.4 | |||
| 2.6 | |||
| Sharpness | (-/+, 0~100)/1 | ||
| Aspect Ratio | 1:1 | ||
| 4:3 | |||
| Full Screen | |||
| Uniformity | On | ||
| Off | |||
| Recall | |||
| User | Contrast | (-/+, 0~100)/1 | |
| Brightness | (-/+, 0~100)/1 | ||
| Color Temperature | 9300K | ||
| 7500K | |||
| 6500K | |||
| 6300K | |||
| 5000K | |||
| Gamma | 1 | ||
| 1.4 | |||
| 1.8 | |||
| 2.2 | |||
| 2.4 | |||
| 2.6 | |||
| Advanced DCR | (-/+, 0~100)/25 | ||
| Gain | Red | (-/+, 0~100) | |
| Green | (-/+, 0~100) | ||
| Blue | (-/+, 0~100) | ||
| Offset | Red | (-/+, 0~100) | |
| Green | (-/+, 0~100) | ||
| Blue | (-/+, 0~100) | ||
| Hue | Red | (-/+, 0~100) | |
| Green | (-/+, 0~100) | ||
| Blue | (-/+, 0~100) | ||
| Cyan | (-/+, 0~100) | ||
| Magenta | (-/+, 0~100) | ||
| Yellow | (-/+, 0~100) | ||
| Sharpness | (-/+, 0~100)/1 | ||
| Aspect Ratio | 1:1 | ||
| 4:3 | |||
| Full Screen | |||
| Blue Light Filter | (-/+, 0~5) | ||
| Uniformity | On | ||
| Off | |||
| Recall | |||
| CAL1/CAL2/CAL3 | Brightness | (-/+, 0~100)/1 | |
| Color Calibration Notice | Result | ||
| Remind Schedule Hour | |||
| Counter Hour | |||
| Recall | |||
| Sharpness | (-/+, 0~100)/1 | ||
| Aspect Ratio | 1:1 | ||
| 4:3 | |||
| Full Screen | |||
| Uniformity | On | ||
| Off | |||
| Recall | |||
| HDR | Standard | ||
| HDR_M | |||
| HDR_H | |||
| Smooth | |||
| Off | |||
| Sub-menu | Menu Option | |
|---|---|---|
| CAD/CAM | Ultra Clear | (-/+, 0~4) |
| Advanced-Sharpness | (-/+, 0~100) | |
| Advanced-Gamma | (-/+, 1.8~2.6) | |
| Video Edit | Ultra Clear | (-/+, 0~4) |
| Advanced-Sharpness | (-/+, 0~100) | |
| Advanced-Gamma | (-/+, 1.8~2.6) | |
| Animation | Ultra Clear | (-/+, 0~4) |
| Advanced-Sharpness | (-/+, 0~100) | |
| Black Stabilization | (-/+, 0~10) | |
| Photographer | Ultra Clear | (-/+, 0~4) |
| Advaned-Sharpness | (-/+, 0~100) | |
| Advanced-Gamma | (-/+, 1.8~2.6) | |
| FPS 1 | ||
| FPS 2 | ||
| RTS | ||
| MOBA | ||
| Sub-menu | Menu Option |
|---|---|
| Volume | (-/+, 0~100)/1 |
| Mute | On |
| Off | |
| Audio Input | DisplayPort |
| HDMI 1 | |
| HDMI 2 | |
| Type C |
| Sub-menu | Menu Option | ||
|---|---|---|---|
| Language Select | English | ||
| Français | |||
| Deutsch | |||
| Español | |||
| Italiano | |||
| Suomi | |||
| Русский | |||
| Türkçe | |||
| 日本語 | |||
| 한국어 | |||
| 繁體中文 | |||
| 简体中文 | |||
| Resolution Notice | On | ||
| Off | |||
| Information | |||
| OSD Timeout | (-/+, 5/15/30/60) | ||
| OSD Background | On | ||
| Off | |||
| OSD Pivot | Auto | ||
| 0° | |||
| +90° | |||
| -90° | |||
| 180° | |||
| Power Indicator | On | ||
| Off | |||
| Auto Power Off | On | ||
| Off | |||
| Sleep | 30 minutes | ||
| 45 minutes | |||
| 60 minutes | |||
| 120 minutes | |||
| Off | |||
| Multi-Picture | Off | ||
| PBP Left-Right | Left Source Select | DisplayPort | |
| HDMI 1 | |||
| HDMI 2 | |||
| Type C | |||
| Right Source Select | DisplayPort | ||
| HDMI 1 | |||
| HDMI 2 | |||
| Type C | |||
| Swap | |||
| PIP | PIP Source Select | DisplayPort | |
| HDMI 1 | |||
| HDMI 2 | |||
| Type C | |||
| PIP Position | PIP H. Position | ||
| PIP V. Position | |||
| PIP Size | (-/+, 0~100) | ||
| Swap | |||
| Dual Color | DCI-P3 | ||
| sRGB | |||
| REC709 | |||
| DICOM-SIM | |||
| User | |||
| CAL 1 | |||
| CAL 2 | |||
| CAL 3 | |||
| CAD/CAM | |||
| Video Edit | |||
| Animation | |||
| Photographer | |||
| FPS 1 | |||
| FPS 2 | |||
| RTS | |||
| MOBA | |||
| ECO Mode | Standard | ||
| Optimize | |||
| Conserve | |||
| Energy Saving | On | ||
| Off | |||
| Overscan | On | ||
| Off | |||
| Response Time | Standard | ||
| Advanced | |||
| Ultra Fast | |||
| USB Charging | On | ||
| Off | |||
| Backstage Lighting | Level 1 | ||
| Level 2 | |||
| Level 3 | |||
| Off | |||
| Burn-in Eraser | On | ||
| Off | |||
| DDC/CI | On | ||
| Off | |||
| Rename | |||
| All Recall | |||
安全上のご注意
機器をご使用になる前に、これらの説明を完全にお読みください。 本ユーザーガイドは、安全な場所に保管してください。 全ての注意事項を読み、全ての仕様説明に従ってください。
- デバイスから18インチ(45cm)以上離して座ります。
換気を妨げないよう、ディスプレイの周囲、最低10㎝は、清潔な状態を保ってください。 ディスプレイは風通しの良い場所に置いてください。また、ディスプレイの内部に 熱がこもらないように通風孔周辺には物を置かないでください。 発火や感電の危険を減らすため、水気、湿気がある場所での使用は避けてください。 ディスプレイは直射日光の当たる場所に置かないでください。 また、エアコンやストーブ、その他発熱する機器などの近くには設置しないでください。 本体の清掃は、やわらかい乾いた布などで行ってください。詳しくは、本マニュアルの「メンテナンス」をご覧ください。 ※画面に触ると油が溜まることがありますので、触らないでください。 画面の表面は傷つきやすいので、鋭利なものや硬いもので触れないようにしてください。 ※製品と支持家具の間に布などを置くような場所には置かないでください。 本体を移動させる際は、落としたり、何かにぶつけたりしないように十分にご注意ください。 本体を傾斜や凹凸のある場所、不安定な場所に置かないでください。本体が転倒・落下してけがや故障の原因となります。 また、ディスプレイや接続ケーブルの上には重いものを置かないでください。 ※キャビネット、スタンド、または装置セットの製造元が推奨する設置方法を必ず使用してください。 ※家具は必ず安全に装置を支えられるものを使用してください。
- 装置が支持家具の端からはみ出していないことを常に確認してください。
※器具と器具の両方を適切な支柱に固定せずに、食器棚や本棚など背の高い家具の上に器具を置かないでください。 ※器具や関連器具にたどり着くために家具に登ることの危険性について、常に子供たちに教育する。 ※子供が居そうな場所にはモニターを置かないでください。 ※おもちゃやリモコンなど、子供が登りたくなるようなものは、製品を置く器具や家具の上などには置かないでください。 万一、煙、異音、異臭などが発生した場合は、直ちに本体の電源を切り、販売店またはViewSonic®にご連絡ください。そのままご使用を続けることは大変危険です。 分極プラグや接地プラグの安全規定を妨げないようにしてください。分極プラグは2つのブレードがあり、一方がやや幅広になっています。アースタイプのプラグには、2本のブレードと1本のアース用突起があります。幅広の刃と3つ目の突起は、安全のために用意されています。プラグがコンセントに合わない場合は、形状が一致する変換アダプタをご使用ください。 プラグをコンセントに接続するときは、アース端子を絶対に取り外さないでください。
- デバイスに接続されているコードやケーブルは、つまずいたり、引っ張られたり、つかまれたりしないように、常に配線および管理してください。
プラグや電源コードが、何か物に踏まれたり、挟まれたりしないようにしてください。本体から突出した電源コード部分は、特に注意してください。電源プラグはコンセントの近くに設置し、容易に抜き差し可能な状態でご使用ください。 ※長期間使用しない場合には、コンセントから電源コードを抜いてください。 ※館内に設置されている配信システムをご確認ください。システムは定格120/240V、20Aのサーキットブレーカーを備えている必要があります。 ※カート、スタンド、三脚、ブラケット、テーブルなど、メーカー指定のアタッチメント/アクセサリのみを使用してください。 ※カートを使用する場合は、転倒による怪我を防ぐため、カートと機器の組み合わせを移動する際は注意して使用してください。 製品の修理は、認定されたサービス担当者にご依頼ください。ユニットが以下のような何らかの損傷を受けた場合は、サービスが必要となります。
- 電源コードまたはプラグが破損している場合。
- 液体がユニットにこぼれたり、物体がユニット内に落下した場合。
- 本体が雨や湿気にさらされている場合。
- 装置が正常に動作しないか、または落下した場合。
※イヤホン/ヘッドホンを使用する場合は、音量を適切なレベルに調整してください。音量を調節しないと、聴覚に障害が生じることがあります。
- 安定性ハザード:ディスプレイが落下し、重大な人身事故や死亡事故につながる恐れがあります。怪我を防ぐため、このディスプレイは設置説明書に従って床/壁にしっかりと取り付ける必要があります。
※ディスプレイを壁や固定物に固定する場合は、コードなどの固定具を使用して固定すると、ディスプレイの転倒を防止するため、ディスプレイの重量を支えるのに役立ちます。
Note:
- 拘束装置/索具は100Nの力に耐えられるものでなければならない。
- 索具がまっすぐになっているか確認し、緩みがないか確認します。外力を受けて装置が傾かないように、装置の背面は壁を向くように設置してください。
- ディスプレイは、デバイスの高さと回転角度に関係なく、外力を受けて傾かないようにしてください。
- 既存のディスプレイを保持して再配置する場合は、上記と同様の考慮事項を適用する必要があります。
規制およびサービス情報
コンプライアンス情報
本セクションでは、関連するすべての要件と規制に関する声明を扱います。確認された対応用途は、本体上の銘板ラベルおよび関連マーキングを参照してください。
FCC コンプライアンス声明
本装置は、FCC 規則パート 15 に準拠しています。操作は次の2つの条件に従うものとします:(1)本装置は有害な干渉を引き起こさない必要があり、また、(2)本装置は望ましくない動作を引き起こす可能性がある干渉を含め、あらゆる干渉を受け入れる必要があります。本装置は、FCC規則パート15に従って試験され、クラスBデジタル装置の制限に準拠していることが判明しています。
これらの制限は、住宅における設置で有害な干渉から適切な保護を提供するように設計されています。本装置は、無線周波エネルギーを生成、使用しており、放射する可能性があり、指示に従って設置および使用しない場合には、無線通信に有害な干渉を引き起こす可能性があります。ただし、特定の設置環境で干渉が発生しないという保証はありません。本装置がラジオまたはテレビの受信に有害な干渉を引き起こした場合(装置の電源を入れ直して判断できます)、次のいずれかの方法で干渉を是正するようにしてください。
受信アンテナの向きまたは位置を変えてください。 本装置と受信機の間隔を広げてください。 受信機が接続されているコンセントとは別のコンセントに本装置を接続してください。 販売店または経験豊富なラジオ/テレビ技術者に相談してください。
コンプライアンス担当者が明示的に承認していない変更または修正を行うと、本装置の操作権限が失われる可能性があることに注意してください。
カナダ産業省の声明
CAN ICES (B) / NMB (B)
CE 欧州諸国のCE適合
 |
本装置は、EMC指令2014/30/EUおよび低電圧指令2014/35/EUに準拠しています。 |
次の情報は、EU加盟国のみに適用されます:
| 右側のマークは、廃電気電子機器指令2012/19/EU(WEEE)に準拠しています。このマークは、本装置を未分類の地方自治体の廃棄物として処分せず、現地の法律に従って回収し、回収システムを使用する必要があることを示しています。 |
Declaration of RoHS2 Compliance
This product has been designed and manufactured in compliance with Directive 2011/65/EU of the European Parliament and the Council on restriction of the use of certain hazardous substances in electrical and electronic equipment (RoHS2 Directive) and is deemed to comply with the maximum concentration values issued by the European Technical Adaptation Committee (TAC) as shown below.
| Substance | Proposed Maximum Concentration | Actual Concentration |
|---|---|---|
| Lead (Pb) | 0.1% | < 0.1% |
| Mercury (Hg) | 0.1% | < 0.1% |
| Cadmium (Cd) | 0.01% | < 0.01% |
| Hexavalent Chromium (Cr6⁺) | 0.1% | < 0.1% |
| Polybrominated biphenyls (PBB) | 0.1% | < 0.1% |
| Polybrominated diphenyl ethers (PBDE) | 0.1% | < 0.1% |
| Bis (2-ethylhexyl) phthalate (DEHP) | 0.1% | < 0.1% |
| Butyl benzyl phthalate (BBP) | 0.1% | < 0.1% |
| Dibutyl phthalate (DBP) | 0.1% | < 0.1% |
| Diisobutyl phthalate (DIBP) | 0.1% | < 0.1% |
Certain components of products as stated above are exempted under the Annex III of the RoHS2 Directives as noted below. Examples of exempted components are:
- Copper alloy containing up to 4% lead by weight.
- Lead in high melting temperature type solders (i.e. lead-based alloys containing 85% by weight or more lead).
- Electrical and electronic components containing lead in a glass or ceramic other than dielectric ceramic in capacitors, e.g. piezoelectronic devices, or in a glass or ceramic matrix compound.
- Lead in dielectric ceramic in capacitors for a rated voltage of 125 V AC or 250 V DC or higher.
インドの有害物質規制
有害物質規制に関する声明(インド)。本製品は、「インドE廃棄ルール2011」に準拠しており、鉛、水銀、六価クロム、ポリ臭素化ビフェニルまたはポリ臭素化ジフェニルエーテルに対する濃度が0.1重量%、カドミウムに対する濃度が0.01重量%を超えるものを使用することが禁止されています。ただし、規則の附属書2に定められた免除を除きます。
Indian Restriction of Hazardous Substances
Restriction on Hazardous Substances statement (India). This product complies with the “India E-waste Rule 2011” and prohibits use of lead, mercury, hexavalent chromium, polybrominated biphenyls or polybrominated diphenyl ethers in concentrations exceeding 0.1 weight % and 0.01 weight % for cadmium, except for the exemptions set in Schedule 2 of the Rule.
Product Disposal at End of Product Life
ViewSonic® respects the environment and is committed to working and living green. Thank you for being part of Smarter, Greener Computing. Please visit the ViewSonic® website to learn more.
USA & Canada:
https://www.viewsonic.com/us/go-green-with-viewsonic
Europe:
https://www.viewsonic.com/eu/environmental-social-governance/recycle
Taiwan:
https://recycle.moenv.gov.tw/
For EU users, please contact us for any safety/accident issue experienced with this product:
| ViewSonic Europe Limited Flevolaan 38, 1382JZ, Weesp the Netherlands | |
| +31 08000232999 | |
| EPREL@viewsoniceurope.com | |
| https://www.viewsonic.com/eu/ |
著作権情報
Copyright© ViewSonic® Corporation, 2024.All rights reserved.
Macintosh 及び Power Macintosh はアップル社Apple Inc.の登録商標です。
Microsoft、Windows 及び Windows ロゴは米国及び他諸国のマイクロソフト社の登録商標です。
ViewSonic®および三羽の鳥のロゴは、ViewSonic® Corporationの登録商標です。
VESA は Video Electronics Standards Association の登録商標です。DPMS、DisplayPort 及び DDC は VESA の商標です。
ENERGY STAR®は米国およびその他の国における環境保護庁(EPA)の認可を受けている。
ENERGY STAR® パートナーとして、ViewSonic® Corporationは本製品がエネルギー効率のための ENERGY STAR® ガイドラインに準拠することを決定しています。
ViewSonic® Corporationは, 本書における技術的または編集上の誤りについてその責を負いません。また、本資料の提供または本製品の動作或いは使用に起因する二次的または間接的損害についてもその責を負いません。
製品の継続的な品質向上のために、ViewSonic® Corporationは製品の仕様を予告なしに変更することができます。本文書の内容は予告なしに変更されることがあります。
本書のいかなる部分も、ViewSonic®Corporationから事前に書面による許可を得ることなく、いかなる方法によっても無断で複写、複製、転送することを禁じます。
VP2786a-4K_UG_ENG_1a_20240531
Important: Please visit: ViewSonic Support & Service
This page has been archived and is no longer maintained.
For technical support or product service, see the table below or contact your reseller.
Important: You will need the product’s serial number
Americas
| Country/Region | Website |
|---|---|
| Canada | https://www.viewsonic.com/us |
| Latin America | https://www.viewsonic.com/la |
| United States | https://www.viewsonic.com/us |
Asia Pacific & Africa
| Country/Region | Website |
|---|---|
| Australia | https://viewsonic.com/au/ |
| Bangladesh | https://www.viewsonic.com/bd/ |
| 中国 (China) | https://www.viewsonic.com.cn |
| 香港 (繁體中文) | https://www.viewsonic.com/hk/ |
| Hong Kong (English) | https://www.viewsonic.com/hk-en/ |
| India | https://www.viewsonic.com/in/ |
| Indonesia | https://www.viewsonic.com/id/ |
| Israel | https://www.viewsonic.com/il/ |
| 日本 (Japan) | https://www.viewsonic.com/jp/ |
| Korea | https://www.viewsonic.com/kr/ |
| Malaysia | https://www.viewsonic.com/my/ |
| Middle East | https://www.viewsonic.com/me/ |
| Myanmar | https://www.viewsonic.com/mm/ |
| Nepal | https://www.viewsonic.com/np/ |
| New Zealand | https://www.viewsonic.com/nz/ |
| Pakistan | https://www.viewsonic.com/pk/ |
| Philippines | https://www.viewsonic.com/ph/ |
| Singapore | https://www.viewsonic.com/sg/ |
| 臺灣 (Taiwan) | https://www.viewsonic.com/tw/ |
| ประเทศไทย | https://www.viewsonic.com/th/ |
| Việt Nam | https://www.viewsonic.com/vn/ |
| South Africa & Mauritius | https://www.viewsonic.com/za/ |
Europe
| Country/Region | Website |
|---|---|
| Europe | https://www.viewsonic.com/eu/ |
| France | https://www.viewsonic.com/fr/ |
| Deutschland | https://www.viewsonic.com/de/ |
| Қазақстан | https://www.viewsonic.com/kz/ |
| Россия | https://www.viewsonic.com/ru/ |
| España | https://www.viewsonic.com/es/ |
| Türkiye | https://www.viewsonic.com/tr/ |
| Україна | https://www.viewsonic.com/ua/ |
| United Kingdom | https://www.viewsonic.com/uk/ |
Limited Warranty
ViewSonic® Display
What the warranty covers:
ViewSonic® warrants its products to be free from defects in material and workmanship during the warranty period. If a product proves to be defective in material or workmanship during the warranty period, ViewSonic® will, at its sole option, and as your sole remedy, repair or replace the product with a similar product. Replacement Product or parts may include remanufactured or refurbished parts or components. The repair or replacement unit or parts or components will be covered by the balance of the time remaining on the customer’s original limited warranty and the warranty period will not be extended. ViewSonic® provides no warranty for any third-party software whether included with the product or installed by the customer, installation of any unauthorized hardware parts or components (e.g. Projector Lamps). (Please refer to: “What the warranty excludes and does not cover” section).
How long the warranty is effective:
ViewSonic® displays are warranted for between 1 and 3 years, depending on your country of purchase, for all parts including the light source and for all labor from the date of the first consumer purchase.
Who the warranty protects:
This warranty is valid only for the first consumer purchaser.
What the warranty excludes and does not cover:
- Any product on which the serial number has been defaced, modified, or removed.
- Damage, deterioration, or malfunction resulting from:
- Accident, misuse, neglect, fire, water, lightning, or other acts of nature, unauthorized product modification, or failure to follow instructions supplied with the product.
- Repair or attempted repair by anyone not authorized by ViewSonic®.
- Damage to or loss of any programs, data, or removable storage media.
- Normal wear and tear.
- Removal or installation of the product.
- Software or data loss occurring during repair or replacement.
- Any damage of the product due to shipment.
- Causes external to the product, such as electric power fluctuations or failure.
- Use of supplies or parts not meeting ViewSonic’s specifications.
- Failure of owner to perform periodic product maintenance as stated in the User Guide.
- Any other cause which does not relate to a product defect.
- Damage caused by static (non-moving) images displayed for lengthy periods of time (also referred to as image burn-in).
- Software - Any third-party software included with the product or installed by the customer.
- Hardware/Accessories/Parts/Components – Installation of any unauthorized hardware, accessories, consumable parts or components (e.g. Projector Lamps).
- Damage to, or abuse of, the coating on the surface of the display through inappropriate cleaning as described in the product User Guide.
- Removal, installation, and set-up service charges, including wall-mounting of the product.
How to get service:
- For information about receiving service under warranty, contact ViewSonic® Customer Support (Please refer to the “Customer Service” page). You will need to provide your product’s serial number.
- To obtain warranty service, you will be required to provide: (a) the original dated sales slip, (b) your name, (c) your address, (d) a description of the problem, and (e) the serial number of the product.
- Take or ship the product, freight prepaid, in the original container to an authorized ViewSonic® service center or ViewSonic®.
- For additional information or the name of the nearest ViewSonic® service center, contact ViewSonic®.
Limitation of implied warranties:
There are no warranties, express or implied, which extend beyond the description contained herein including the implied warranty of merchantability and fitness for a particular purpose.
Exclusion of damages:
ViewSonic’s liability is limited to the cost of repair or replacement of the product. ViewSonic® shall not be liable for:
- Damage to other property caused by any defects in the product, damages based upon inconvenience, loss of use of the product, loss of time, loss of profits, loss of business opportunity, loss of goodwill, interference with business relationships, or other commercial loss, even if advised of the possibility of such damages.
- Any other damages, whether incidental, consequential or otherwise.
- Any claim against the customer by any other party.
- Repair or attempted repair by anyone not authorized by ViewSonic®.
Effect of state law:
This warranty gives you specific legal rights, and you may also have other rights which vary from state to state. Some states do not allow limitations on implied warranties and/or do not allow the exclusion of incidental or consequential damages, so the above limitations and exclusions may not apply to you.
Sales outside the U.S.A. and Canada:
For warranty information and service on ViewSonic® products sold outside of the U.S.A. and Canada, contact ViewSonic® or your local ViewSonic® dealer.
The warranty period for this product in mainland China (Hong Kong, Macao, and Taiwan Excluded) is subject to the terms and conditions of the Maintenance Guarantee Card.
For users in Europe and Russia, full details of warranty provided can be found at: ViewSonic EU under “Support/Warranty Information”.
Mexico Limited Warranty
ViewSonic® Display
What the warranty covers:
ViewSonic® warrants its products to be free from defects in material and workmanship, under normal use, during the warranty period. If a product proves to be defective in material or workmanship during the warranty period, ViewSonic® will, at its sole option, repair or replace the product with a like product. Replacement product or parts may include remanufactured or refurbished parts or components & accessories.
How long the warranty is effective:
ViewSonic® LCD displays are warranted for between 1 and 3 years, depending on your country of purchase, for all parts including the light source and for all labour from the date of the first consumer purchase.
Who the warranty protects:
This warranty is valid only for the first consumer purchaser.
What the warranty excludes and does not cover:
- Any product on which the serial number has been defaced, modified, or removed.
- Damage, deterioration, or malfunction resulting from:
- Accident, misuse, neglect, fire, water, lightning, or other acts of nature, unauthorized product modification, or failure to follow instructions supplied with the product.
- Causes external to the product, such as electrical power fluctuations or failure.
- Use of supplies or parts not meeting ViewSonic®’s specifications.
- Normal wear and tear.
- Any other cause which does not relate to a product defect.
- Any product exhibiting a condition commonly known as “image burn-in” which results when a static image is displayed on the product for an extended period of time.
- Removal or installation of the product.
How to get service:
For information about receiving service under warranty, contact ViewSonic® Customer Support (Please refer to the “Customer Service” page). You will need to provide your product’s serial number, so please record the product information in the space provided below on your purchase for your future use. Please retain your receipt of proof of purchase to support your warranty claim.
| For Your Records | |
|---|---|
| Product Name:___________________ | Model Number:___________________ |
| Document Number:___________________ | Serial Number:___________________ |
| Purchase Date:___________________ | Extended Warranty Purchase?__________(Y/N) |
| If so, what date does the warranty expire?___________________ | |
- To obtain warranty service, you will be required to provide: (a) the original dated sales slip, (b) your name, (c) your address, (d) a description of the problem, and (e) the serial number of the product.
- Take or ship the product, freight prepaid, in the original container to an authorized ViewSonic® service center.
- Round trip transportation costs for in-warranty products will be paid by ViewSonic®.
Limitation of implied warranties:
There are no warranties, express or implied, which extend beyond the description contained herein including the implied warranty of merchantability and fitness for a particular purpose.
Exclusion of damages:
ViewSonic®’s liability is limited to the cost of repair or replacement of the product. ViewSonic® shall not be liable for:
- Damage to other property caused by any defects in the product, damages based upon inconvenience, loss of use of the product, loss of time, loss of profits, loss of business opportunity, loss of goodwill, interference with business relationships, or other commercial loss, even if advised of the possibility of such damages.
- Any other damages, whether incidental, consequential or otherwise.
- Any claim against the customer by any other party.
- Repair or attempted repair by anyone not authorized by ViewSonic®.
| Contact Information for Sales & Authorized Service (Centro Autorizado de Servicio) within Mexico | |
|---|---|
|
Name, address, of manufacturer and importers: | |
| NÚMERO GRATIS DE ASISTENCIA TÉCNICA PARA TODO MÉXICO: 001.866.823.2004 | |
|
Chihuahua |
Cuernavaca |
|
Distrito Federal |
Guadalajara, Jal |
|
Guerrero Acapulco |
Hermosillo
Distribuciones y Servicios Computacionales SA de CV. |
|
Merida |
Monterrey |
|
Oaxaca, Oax. |
Puebla, Pue. (Matriz) |
|
Tijuana |
Veracruz, Ver. |
|
Vilahermosa |
For USA Support |