
VP2786a-4K Advanced Features and Settings: Difference between revisions
No edit summary |
|||
| Line 16: | Line 16: | ||
}} | }} | ||
</noinclude> | </noinclude> | ||
=Auto Pivot= | =Auto Pivot= | ||
<div> | <div> | ||
| Line 93: | Line 43: | ||
</div> | </div> | ||
=Backstage Lighting= | |||
<p>With the Backstage Lighting function, the monitor can adjust the LED brightness to the optimal settings.</p> | |||
<p>To configure the Backstage Lighting settings:</p> | |||
# Open the OSD Menu and select the '''Setup Menu''' menu. Then touch the '''Joy Key''' [[File:Icon_Joy_Key_Press.svg|30px|alt=Joy Key Press]] to enter the menu. | |||
# Move the '''Joy Key''' [[File:Icon_Joy_Key_Up.svg|30px|alt=Joy Key Up]] or [[File:Icon_Joy_Key_Down.svg|30px|alt=Joy Key Down]] to select '''Backstage Lighting'''. Then touch the '''Joy Key''' [[File:Icon_Joy_Key_Press.svg|30px|alt=Joy Key Press]] to enter its sub-menu. | |||
# Move the '''Joy Key''' [[File:Icon_Joy_Key_Up.svg|30px|alt=Joy Key Up]] or [[File:Icon_Joy_Key_Down.svg|30px|alt=Joy Key Down]] to select '''Level 1''', '''Level 2''', or '''Level 3''' to enable the function. Then touch the '''Joy Key''' [[File:Icon_Joy_Key_Press.svg|30px|alt=Joy Key Press]] to confirm. | |||
=Colorbration+= | =Colorbration+= | ||
<p>To ensure long-term color accuracy, some specific models support the hardware color calibration function. The Colorbration+ application installation file can be found at our [http://color.viewsonic.com/support/software/ website].</p> | <p>To ensure long-term color accuracy, some specific models support the hardware color calibration function. The Colorbration+ application installation file can be found at our [http://color.viewsonic.com/support/software/ website].</p> | ||
| Line 118: | Line 77: | ||
<li>Move the '''Joy Key''' [[File:Icon_Joy_Key_Up.svg|30px|alt=Joy Key Up]] or [[File:Icon_Joy_Key_Down.svg|30px|alt=Joy Key Down]] to select the desired color setting. Then press the '''Joy Key''' [[File:Icon_Joy_Key_Press.svg|30px|alt=Joy Key Press]] to confirm.</li> | <li>Move the '''Joy Key''' [[File:Icon_Joy_Key_Up.svg|30px|alt=Joy Key Up]] or [[File:Icon_Joy_Key_Down.svg|30px|alt=Joy Key Down]] to select the desired color setting. Then press the '''Joy Key''' [[File:Icon_Joy_Key_Press.svg|30px|alt=Joy Key Press]] to confirm.</li> | ||
</ol> | </ol> | ||
=Firmware Update= | |||
<p>For the best display performance and to resolve any known issues, it is best to keep your monitor updated with the latest firmware version. With the supplied USB cable and the vDisplayManager application, you can easily update your monitor’s firmware.</p> | |||
<p>To update the firmware:</p> | |||
<ol> | |||
<li>Download and install the vDisplayManager application from our [https://color.viewsonic.com/support/software/ website].</li> | |||
<li>Connect the USB Type B male cable (square with 2 cut corners) to the USB Type B port of your monitor. Then connect the other end of the cable to the USB port of the computer.</li> | |||
<li>Launch vDisplayManager. Select the '''Advanced''' tab in the side menu.</li> | |||
<li>Click '''Update''' to check for any updates to your monitor’s firmware.</li> | |||
<li> | |||
<p>Wait until the update process is complete (if applicable).</p> | |||
<div class="res-img">[[File:VP2776T-4K_FW_Update.png|400px]]</div> | |||
{{Note|Any interruptions during the firmware update process may permanently damage your monitor. Do not disconnect the USB cable or turn off your PC and monitor.}} | |||
</li> | |||
</ol> | |||
=HDR (High-Dynamic-Range)= | |||
HDR reduces the overall contrast of a given scene so that detail in the highlights and shadows can be better seen. | |||
{{Note|Please make sure the HDR setting is turned on on your device first before enabling HDR on the monitor.}} | |||
To enable the HDR function: | |||
<ol> | |||
<li>Move the '''Joy Key''' ( [[File:Icon_Joy_Key_Left.svg|25px|link=|Move the Joy Key left]] ) to display the Startup Menu. Then navigate to '''Main Menu''' and press the '''Joy Key''' ( [[File:Icon_Joy_Key_Press.svg|25px|link=|Press the Joy Key]] ) to display the OSD Menu.</li> | |||
<li>Move the '''Joy Key''' ( [[File:Icon_Joy_Key_Up.svg|25px|link=|Move the Joy Key up]] ) or ( [[File:Icon_Joy_Key_Down.svg|25px|link=|Move the Joy Key down]] ) to select '''Color Mode'''. Then press the '''Joy Key''' ( [[File:Icon_Joy_Key_Press.svg|25px|link=|Press the Joy Key]] ) to enter the '''Color Mode''' menu.</li> | |||
<li>Move the '''Joy Key''' ( [[File:Icon_Joy_Key_Up.svg|25px|link=|Move the Joy Key up]] ) or ( [[File:Icon_Joy_Key_Down.svg|25px|link=|Move the Joy Key down]] ) to select '''HDR'''. Then press the '''Joy Key''' ( [[File:Icon_Joy_Key_Press.svg|25px|link=|Press the Joy Key]] ) to enter its sub-menu.</li> | |||
<li>Move the '''Joy Key''' ( [[File:Icon_Joy_Key_Up.svg|25px|link=|Move the Joy Key up]] ) or ( [[File:Icon_Joy_Key_Down.svg|25px|link=|Move the Joy Key down]] ) to select one of the options . Then press the '''Joy Key''' ( [[File:Icon_Joy_Key_Press.svg|25px|link=|Press the Joy Key]] ) to confirm.</li> | |||
<div class="res-img">[[File:VP2786a-4K_HDR.png|500px|HDR (High-Dynamic-Range)]]</div></ol> | |||
=KVM= | |||
<div> | |||
The KVM function allows the user to control two computers connected to the same monitor from a single keyboard and mouse. | |||
{{Note|Only applicable in PBP (Picture-by-Picture) mode.}} | |||
<p>To connect the two computers to the monitor:</p> | |||
<ol> | |||
<li>Connect one end of a Thunderbolt cable to the Thunderbolt In port of the monitor. Then connect the other end of the cable to the Thunderbolt port of the laptop.</li> | |||
<li>Connect one end of a DisplayPort cable to the DisplayPort of the monitor. Then connect the other end of the cable to the DisplayPort or Mini DisplayPort port of the computer.</li> | |||
<li> | |||
<p>Connect one end of a USB Type C cable to the USB Type C port of the monitor. Then connect the other end of the cable to the USB port of the computer. | |||
<div class="res-img">[[File:VP2776T-4K_KVM_1.png|500px]] | |||
</p> | |||
</li> | |||
</ol> | |||
<P>To enable PBP mode:</P> | |||
<ol> | |||
<li>Move the '''Joy Key''' [[File:Icon_Joy_Key_Left.svg|30px|alt=Joy Key Left]] to display the Startup Menu. Then navigate to '''Main Menu''' and press the '''Joy Key''' [[File:Icon_Joy_Key_Press.svg|30px|alt=Joy Key Press]] to display the OSD Menu.</li> | |||
<li>Move the '''Joy Key''' [[File:Icon_Joy_Key_Up.svg|30px|alt=Joy Key Up]] or [[File:Icon_Joy_Key_Down.svg|30px|alt=Joy Key Down]] to select the '''Setup Menu''' menu. Then press the '''Joy Key''' [[File:Icon_Joy_Key_Press.svg|30px|alt=Joy Key Press]] to enter the menu.</li> | |||
<li>Move the '''Joy Key''' [[File:Icon_Joy_Key_Up.svg|30px|alt=Joy Key Up]] or [[File:Icon_Joy_Key_Down.svg|30px|alt=Joy Key Down]] to select '''Multi-Picture'''. Then press the '''Joy Key''' [[File:Icon_Joy_Key_Press.svg|30px|alt=Joy Key Press]] to enter its sub-menu.</li> | |||
<li> | |||
<p>Move the '''Joy Key''' [[File:Icon_Joy_Key_Up.svg|30px|alt=Joy Key Up]] or [[File:Icon_Joy_Key_Down.svg|30px|alt=Joy Key Down]] to select '''PBP Left-Right'''. Then press the '''Joy Key''' [[File:Icon_Joy_Key_Press.svg|30px|alt=Joy Key Press]] to enable PBP mode. | |||
<div class="res-img">[[File:VP2776T-4K_PBP.png|700px]] | |||
</p> | |||
</li> | |||
</ol> | |||
<p>To activate the KVM function:</p> | |||
<ol> | |||
<li>Press and hold the '''Joy Key''' [[File:Icon_Joy_Key_Right.svg|30px|alt=Joy Key Right]] for two seconds to activate the KVM function.</li> | |||
<li> | |||
<p>Then you will be able to switch the cursor between the two screens (left/right window).</p> | |||
<div class="res-img">[[File:VP2776_KVM_2.png|500px]]</div> | |||
</li> | |||
</ol> | |||
</div> | |||
=Multi-Picture= | =Multi-Picture= | ||
| Line 173: | Line 198: | ||
<li>To swap the two windows, select '''Swap''' and press the '''Joy Key''' [[File:Icon_Joy_Key_Press.svg|30px|alt=Joy Key Press]] to confirm.</li></ol> | <li>To swap the two windows, select '''Swap''' and press the '''Joy Key''' [[File:Icon_Joy_Key_Press.svg|30px|alt=Joy Key Press]] to confirm.</li></ol> | ||
{{#seo: | {{#seo: | ||
Revision as of 08:01, 5 September 2024
Auto Pivot
With the Auto Pivot function, the monitor can detect the image display and adjust the image’s orientation on the screen automatically when pivoting the screen vertically or horizontally.
To enable the DDC/CI setting:
- Open the OSD Menu and select the Setup Menu menu. Then press the Joy Key
 to enter the menu.
 - Move the Joy Key
 or
or  to select DDC/CI. Then press the Joy Key to enter its sub-menu.
 Move the Joy Key
or to select On. Then press the Joy Key to confirm.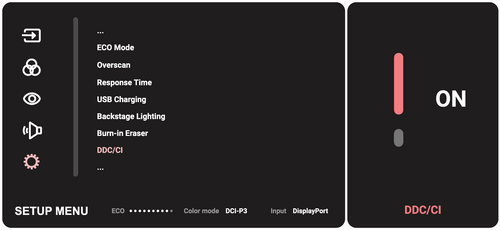


After ensuring DDC/CI is On, proceed to set OSD Pivot to Auto:
- Open the OSD Menu and select the Setup Menu menu. Then press the Joy Key to enter the menu.
- Move the Joy Key or to select OSD Pivot. Then press the Joy Key to enter its sub-menu.
- Move the Joy Key or to select Auto. Then press the Joy Key to confirm.
Backstage Lighting
With the Backstage Lighting function, the monitor can adjust the LED brightness to the optimal settings.
To configure the Backstage Lighting settings:
- Open the OSD Menu and select the Setup Menu menu. Then touch the Joy Key to enter the menu.
- Move the Joy Key or to select Backstage Lighting. Then touch the Joy Key to enter its sub-menu.
- Move the Joy Key or to select Level 1, Level 2, or Level 3 to enable the function. Then touch the Joy Key to confirm.
Colorbration+
To ensure long-term color accuracy, some specific models support the hardware color calibration function. The Colorbration+ application installation file can be found at our website.
Standard monitor packing does not include the color sensor, which the Colorbration+ application needs for the calibration process.
Compatible color sensors include:
- X-Rite i1 Display Pro
- X-Rite i1 Pro 2
- X-Rite i1 Studio
- Xrite Colormunki Photo
- Xrite Colormunki Design
- Datacolor SpyderX series
Dual Color
The monitor comes with a dual color engine to display two different color settings in PIP (Picture-in-Picture) or PBP mode. You can set different color presets in both windows (Main Window and Secondary Window).

To configure Dual Color:
- Move the Joy Key
 to display the Startup Menu. Then navigate to Main Menu and press the Joy Key to display the OSD Menu.
 - Move the Joy Key or to select the Setup Menu menu. Then press the Joy Key to enter the menu.
- Move the Joy Key or to select Multi-Picture. Then press the Joy Key to enter its sub-menu.
- Move the Joy Key or to select Dual Color. Then press the Joy Key to enter its sub-menu.
- Move the Joy Key or to select the desired color setting. Then press the Joy Key to confirm.

Firmware Update
For the best display performance and to resolve any known issues, it is best to keep your monitor updated with the latest firmware version. With the supplied USB cable and the vDisplayManager application, you can easily update your monitor’s firmware.
To update the firmware:
- Download and install the vDisplayManager application from our website.
- Connect the USB Type B male cable (square with 2 cut corners) to the USB Type B port of your monitor. Then connect the other end of the cable to the USB port of the computer.
- Launch vDisplayManager. Select the Advanced tab in the side menu.
- Click Update to check for any updates to your monitor’s firmware.
-
Wait until the update process is complete (if applicable).
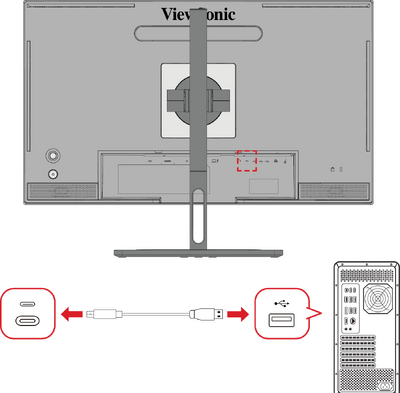 Note: Any interruptions during the firmware update process may permanently damage your monitor. Do not disconnect the USB cable or turn off your PC and monitor.

HDR (High-Dynamic-Range)
HDR reduces the overall contrast of a given scene so that detail in the highlights and shadows can be better seen.
To enable the HDR function:
- Move the Joy Key ( ) to display the Startup Menu. Then navigate to Main Menu and press the Joy Key ( ) to display the OSD Menu.
- Move the Joy Key ( ) or ( ) to select Color Mode. Then press the Joy Key ( ) to enter the Color Mode menu.
- Move the Joy Key ( ) or ( ) to select HDR. Then press the Joy Key ( ) to enter its sub-menu.
- Move the Joy Key ( ) or ( ) to select one of the options . Then press the Joy Key ( ) to confirm.

KVM
The KVM function allows the user to control two computers connected to the same monitor from a single keyboard and mouse.
To connect the two computers to the monitor:
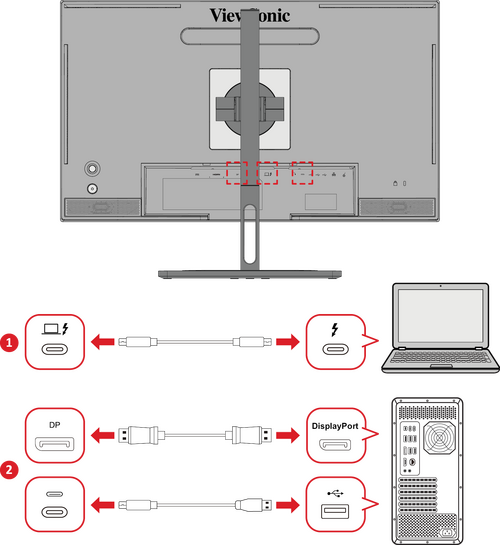
- Connect one end of a Thunderbolt cable to the Thunderbolt In port of the monitor. Then connect the other end of the cable to the Thunderbolt port of the laptop.
- Connect one end of a DisplayPort cable to the DisplayPort of the monitor. Then connect the other end of the cable to the DisplayPort or Mini DisplayPort port of the computer.
-
Connect one end of a USB Type C cable to the USB Type C port of the monitor. Then connect the other end of the cable to the USB port of the computer.

To enable PBP mode:
- Move the Joy Key to display the Startup Menu. Then navigate to Main Menu and press the Joy Key to display the OSD Menu.
- Move the Joy Key or to select the Setup Menu menu. Then press the Joy Key to enter the menu.
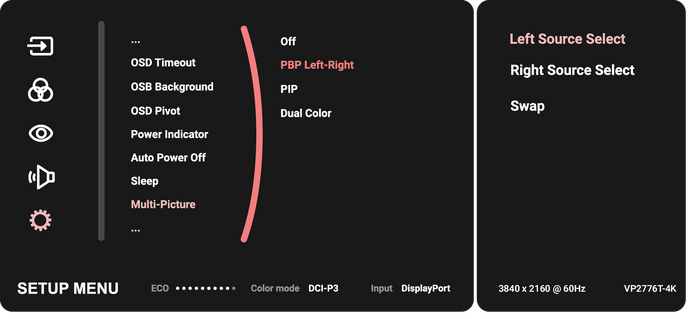
- Move the Joy Key or to select Multi-Picture. Then press the Joy Key to enter its sub-menu.
-
Move the Joy Key
or to select PBP Left-Right. Then press the Joy Key to enable PBP mode.

To activate the KVM function:
- Press and hold the Joy Key
 for two seconds to activate the KVM function.
 -
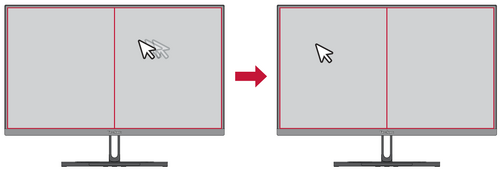
Then you will be able to switch the cursor between the two screens (left/right window).


Multi-Picture
Multi-Picture allows users to further customize their work space by allowing up to four split windows from different inputs, displaying high resolution content with different aspect ratios, without distortion from the original input sources.
To enable Multi-Picture mode:
- Move the Joy Key to display the Startup Menu. Then navigate to Main Menu and press the Joy Key to display the OSD Menu.
- Move the Joy Key or to select Color Mode. Then press the Joy Key to enter the Color Mode menu.
- Move the Joy Key or to select Multi-Picture. Then press the Joy Key to enter its sub-menu.
-
Move the Joy Key
or to select PBP Left-Right or PIP. Then press the Joy Key to enter the selected mode.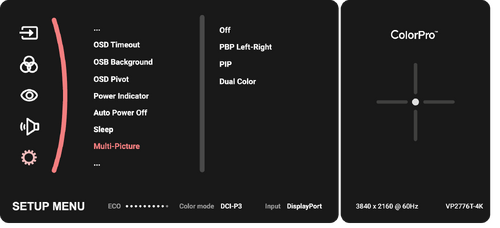

PBP (Picture-by-Picture)

To configure PBP:
- Move the Joy Key to display the Startup Menu. Then navigate to Main Menu and press the Joy Key to display the OSD Menu.
- Move the Joy Key or to select Setup Menu. Then press the Joy Key to enter the Setup Menu menu.
- Move the Joy Key or to select Multi-Picture. Then press the Joy Key to enter its sub-menu.
- Move the Joy Key or to select PBP Left-Right. Then press the Joy Key to enter its sub-menu.
- To change the input source, select the source location (Left Source Select/Right Source Select) and press the Joy Key .
- Move the Joy Key or to select the desired input source and press the Joy Key to confirm.
- To swap the two windows, select Swap and press the Joy Key to confirm.
PIP (Picture-in-Picture)

To configure PIP:
- Move the Joy Key to display the Startup Menu. Then navigate to Main Menu and press the Joy Key to display the OSD Menu.
- Move the Joy Key or to select Setup Menu. Then press the Joy Key to enter the Setup Menu menu.
- Move the Joy Key or to select Multi-Picture. Then press the Joy Key to enter its sub-menu.
- Move the Joy Key or to select PIP. Then press the Joy Key to enter its sub-menu.
- To change the input source for the Inset Window, select PIP Source Select and press the Joy Key . Then move the Joy Key or to select the desired input source and press the Joy Key to confirm.
- To adjust the Inset Window position, select PIP Position and press the Joy Key .
- Press the Joy Key to select PIP H.Position or PIP V.Position.
- Move the Joy Key or to adjust the setting and press the Joy Key to confirm.
- Press the Joy Key
- To adjust the Inset Window size, select PIP Size and press the Joy Key . Then move the Joy Key or to adjust the setting.
- To swap the two windows, select Swap and press the Joy Key to confirm.