PD2211 PD2211T Making Connections: Difference between revisions
No edit summary |
|||
| Line 16: | Line 16: | ||
=Installing Drivers and Software= | =Installing Drivers and Software= | ||
'''System Requirements:'''<br /> | '''System Requirements:'''<br /> | ||
Operating system: Windows 10, 11, or later.<br /> | Operating system: Windows 7, 10, 11, or later; Linux Ubuntu; Chrome OS by request.<br /> | ||
PC I/O: USB 2.0/above | PC I/O: USB 2.0/above | ||
Latest revision as of 06:05, 31 May 2024
Installing Drivers and Software
System Requirements:
Operating system: Windows 7, 10, 11, or later; Linux Ubuntu; Chrome OS by request.
PC I/O: USB 2.0/above
Before connecting and using the pen display, it is necessary to install the below software. The software can be downloaded at:
PD2211 – Driver and Software Download
DisplayLink Driver
Open the DisplayLink installation file and install the driver.

- NOTE: DisplayLink Driver can be installed through Windows Update when connected to the Internet.
Pen Display Driver
ViewSonic Pen Manager can be used to map the active area and adjust the feel of the pen.
- Open the ViewSign Console installation file and install the driver (ViewSonic Pen Manager).
- Restart the computer after the installation completes.
- NOTE: For further ViewSign Console information, please visit: Pen Display Software - ViewSonic Pen Display Software

Connecting to Power

- Connect the power cord to the power adapter.
- Connect the power adapter to the DC IN jack at the rear of the display.
- Connect the power cord to a power outlet.
Connecting External Devices
-
 HDMI Connection
 -
 VGA Connection
 -
 DVI Connection
 -
 Audio Connection
 -
 USB Connection


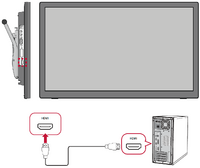
HDMI
Connect one end of an HDMI cable to the HDMI port of the display. Then connect the other end of the cable to the HDMI port of your computer.
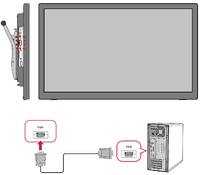
VGA
Connect one end of a VGA cable to the VGA port of the display. Then connect the other end of the cable to the VGA port of your computer.
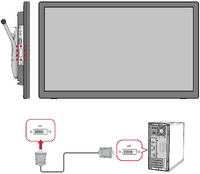
DVI
Connect one end of a DVI cable to the DVI port of the display. Then connect the other end of the cable to your computer.
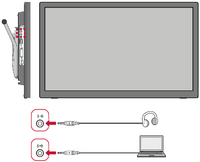
Audio
Plug an audio cable into the Audio In/Audio Out port of the display. Plug the other end into your computer (Audio In) or ear-/headphones (Audio Out).
- NOTE: The display is also equipped with dual speakers.
USB
Connect one end of a USB cable to a USB port of the monitor. Then connect the other end of the cable to a USB port of your computer.
USB Number Description Type B One (1) Connect the USB Type B male cable (square with 2 cut corners) to this port, and then connect the other end of the cable to the USB downstream port of your computer. Type A One (1) Connection for your Type A peripheral device(s). (e.g. storage device). - NOTE: To activate the USB Type A port, ensure your computer is also connected to the monitor’s USB Type B port.
Touch Function Control (PD2211T only)
Before using the touch function, ensure the USB Type B to Type A cable is connected to your computer and the Windows operating system is running.

When using the touch function, please note:
- The touch function may need about five (5) seconds to resume if the USB cable is removed and plugged in again, or the computer resumes from Sleep Mode.
- The touchscreen can only detect up to ten (10) fingers simultaneously.
- If the Windows’ cursor does not accurately follow your finger when you touch the screen, do the following:
- Open: Control Panel > Hardware and Sound > Tablet PC Settings.
- Select Calibration.
- Follow the instructions to recalibrate your screen.