IFP62 Using the ViewBoard: Difference between revisions
From ViewSonic Documentation
| Line 65: | Line 65: | ||
# Tap a Toolbar trigger icon. | # Tap a Toolbar trigger icon. | ||
# Tap on your desired tool icon. | # Tap on your desired tool icon. | ||
::<div class="res-img">[[File: | ::<div class="res-img">[[File:IFP52_Home_Toolbar_Closeup.png|400px]]</div> | ||
::<small>'''NOTE:''' The default toolbar setting is to be available for all input sources; however, users can go to: '''Settings''' > '''Preference''' > '''Toolbar setting''' to adjust the options: (1) available for all input sources, (2) hide the toolbar for all input sources.</small> | |||
==Toolbar Icons== | ==Toolbar Icons== | ||
{| class="wikitable" width=45% | {| class="wikitable" width=45% | ||
|- | |- | ||
! style="font-weight:bold; text-align:center; background-color:#c41230; color:#ffffff;"| Icon | ! style="font-weight:bold; text-align:center; background-color:#c41230; color:#ffffff;"|Icon | ||
! style="font-weight:bold; text-align:center; background-color:#c41230; color:#ffffff;"| Description | ! style="font-weight:bold; text-align:center; background-color:#c41230; color:#ffffff;"|Description | ||
|- style="font-weight:bold; text-align:center;" | |||
| <div class="res-img">[[File:IFP52_Icon_Return.png]]</div> | |||
| style="font-weight:normal; text-align:left;" | Return to the previous operation screen. | |||
|- style="font-weight:bold; text-align:center;" | |||
| <div class="res-img">[[File:IFP52_Icon_Home.png]]</div> | |||
| style="font-weight:normal; text-align:left;" | Return to the Home Screen of the Embedded Player. | |||
|- style="font-weight:bold; text-align:center;" | |||
| <div class="res-img">[[File:IFP52_Icon_Recent.png]]</div> | |||
| style="font-weight:normal; text-align:left;" | Display all embedded applications that are currently being used. | |||
|- style="font-weight:bold; text-align:center;" | |||
| <div class="res-img">[[File:IFP52_Icon_App.png]]</div> | |||
| style="font-weight:normal; text-align:left;" | View all installed applications. | |||
|- style="font-weight:bold; text-align:center;" | |||
| <div class="res-img">[[File:IFP52_Icon_mvb.png]]</div> | |||
| style="font-weight:normal; text-align:left;" | Launch the myViewBoard software. | |||
|- style="font-weight:bold; text-align:center;" | |||
| <div class="res-img">[[File:IFP52_Icon_Recorder.png]]</div> | |||
| style="font-weight:normal; text-align:left;" | Record, view, and save the on-screen content. | |||
|- style="font-weight:bold; text-align:center;" | |||
| rowspan="9" | <div class="res-img">[[File:IFP52_Icon_Draw.png]]</div> | |||
| style="font-weight:normal; text-align:left;" | Access the pen, highlighter, clear, and save options. | |||
<center> | |||
{| | |||
|- | |- | ||
| | | <div class="res-img">[[File:IFP52_Pen_Icon.png|center|50px]]</div> | ||
| | | <div class="res-img">[[File:IFP52_Highlighter_Icon.png|center|50px]]</div> | ||
<div class="res-img">[[File: | | <div class="res-img">[[File:IFP52_Eraser.png|center|50px]]</div> | ||
|- | | <div class="res-img">[[File:IFP52_Undo_Icon.png|center|50px]]</div> | ||
| | |- | ||
| <center>'''Pen'''</center> | |||
| <center>'''Highlighter'''</center> | |||
| <center>'''Eraser'''</center> | |||
| <center>'''Undo'''</center> | |||
|- | |||
| <div class="res-img">[[File:IFP52_Redo_Icon.png|center|50px]]</div> | |||
| <div class="res-img">[[File:IFP52_Clean_Icon.png|center|50px]]</div> | |||
| <div class="res-img">[[File:IFP52_Save_Icon.png|center|50px]]</div> | |||
| <div class="res-img">[[File:IFP52_Exit_Icon.png|center|50px]]</div> | |||
|- | |||
| <center>'''Redo'''</center> | |||
| <center>'''Clean'''</center> | |||
| <center>'''Save'''</center> | |||
| <center>'''Exit'''</center> | |||
|} | |||
</center> | |||
|- | |||
| <u>Pen</u><br />Annotate the overlay of any input source with black, white, yellow, orange, red, pink, green, or blue ink.<br /> | |||
|- | |||
| <u>Highlighter</u><br />Mark and highlight with yellow, grey, gold, orange, red, pink, green or blue ink.<br /> | |||
|- | |||
| <u>Eraser</u><br />Selectively remove the digital ink on the screen. | |||
|- | |||
| <u>Undo</u><br />Undo the previous action. | |||
|- | |||
| <u>Redo</u><br />Redo the previous action. | |||
|- | |||
| <u>Clean</u><br />Clears all the digital ink on the screen. | |||
|- | |- | ||
| | | <u>Save</u><br />Save the screen image and any annotations. | ||
|- | |- | ||
| | | <u>Exit</u><br />Close the drawing tool. | ||
|- style="font-weight:bold; text-align:center;" | |||
| rowspan="7" | <div class="res-img">[[File:IFP52_Icon_More.png|150px]]</div> | |||
| style="font-weight:normal; text-align:left;" | View more applications within the ViewBoard toolbar. | |||
<center> | |||
{| | |||
|- | |- | ||
| | | <div class="res-img">[[File:IFP52_Screen_Freeze_Icon.png|center|40px]]</div> | ||
| | | <div class="res-img">[[File:IFP52_Spotlight_Icon.png|center|40px]]</div> | ||
<div class="res-img">[[File: | | <div class="res-img">[[File:IFP52_Stopwatch_Icon.png|center|40px]]</div> | ||
|- | |- | ||
| | | <center>'''Screen Freeze'''</center> | ||
| <center>'''Spotlight'''</center> | |||
| <center>'''Stopwatch'''</center> | |||
|- | |- | ||
| | | <div class="res-img">[[File:IFP52_Timer_Icon.png|center|center|40px]]</div> | ||
| <div class="res-img">[[File:IFP52_Hide_Unhide_Icon.png|center|60px]]</div> | |||
| <div class="res-img">[[File:IFP52_Screen_Capture_Icon.png|center|40px]]</div> | |||
|- | |- | ||
| | | <center>'''Timer'''</center> | ||
| <center>'''Hide/Unhide'''</center> | |||
| <center>'''Screen Capture'''</center> | |||
|} | |||
</center> | |||
|- | |- | ||
| | | <u>Screen Freeze</u><br />Convert the currently displayed content into a still image; then you can zoom in, zoom out, go back to full screen, and exit. | ||
|- | |- | ||
| <u>Spotlight</u><br />Highlight the focus content zone. Tap the Setting icon to adjust the spotlight size and alpha blending effect. | |||
< | |||
|- | |- | ||
| | | <u>Stopwatch</u><br />Tapping Start will initiate the stopwatch. At any time, the stopwatch can be paused, resumed, split, or reset. | ||
|- | |- | ||
| | | <u>Timer</u><br />Access the countdown timer with an optional alarm setting. Touch and swipe to adjust the numeric values, then click Start. At any time, the countdown timer can be paused, resumed, or reset. | ||
|- | |- | ||
| | | <u>Hide/Unhide</u><br />Hide or unhide the Tool bar trigger icons. | ||
|- | |- | ||
| <u>Screen Capture</u><br />Take a screenshot of the current screen. | |||
|- style="font-weight:bold; text-align:center;" | |||
| <div class="res-img">[[File:IFP52_Icon_Settings.png|150px]]</div> | |||
| style="font-weight:normal; text-align:left;" | Access the General Settings. | |||
|} | |} | ||
Revision as of 09:02, 9 June 2022
Power On/Off your ViewBoard
- Ensure the power cord is connected, plugged into a power outlet, and the power switch is in the “On” position.
- Press the Power button to turn on the ViewBoard.
- To turn the ViewBoard off, press and hold the Power button.

Initial Launch Setup
When you first turn on your ViewBoard, an initial setup wizard will launch.
-
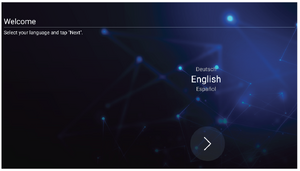 Language Select
 -
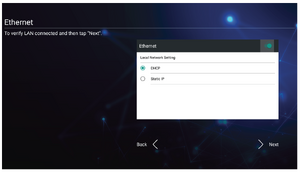 Network Connection
 -
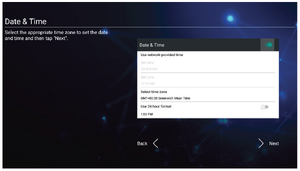 Date and Time
 -
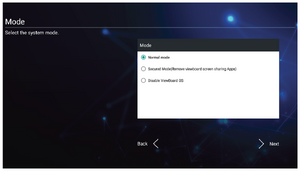 System Mode
 -
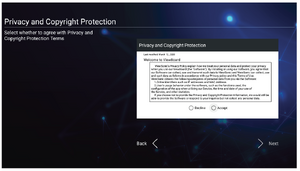 Privacy and Copyright Protection


- Select your Language.
- Setup and verify your LAN connection.
- Select your Time Zone to set the Date and Time.
- Select your preferred System Mode.
- Accept or Decline the Privacy and Copyright Protection Terms.
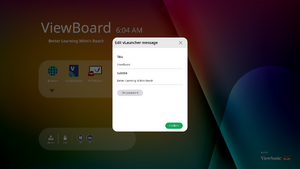
vLauncher - Customizable Welcome Screen

vLauncher Message
-
 Tap to edit
 -
 Set a password


Both the vLauncher Title and Subtitle can be customized by tapping on them. Additionally, a password can be set by tapping on Set Password.
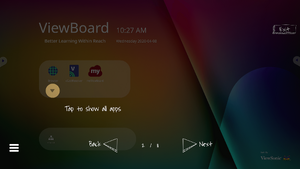
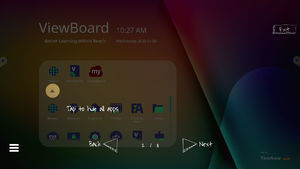
Applications
-
 Open application drawer
 -
 Close application drawer
 -
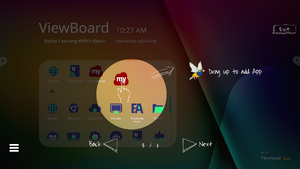 Add a shortcut
 -
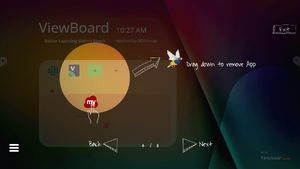 Remove a shortcut


- Installed applications can all be found on the welcome screen. To view all applications tap on the Down Arrow.
- To hide the application drawer tap the Up Arrow.
- To add a shortcut to an application, tap, hold, and drag up the icon.
- To remove an application shortcut, tap, hold, and drag the icon down.
Toolbar
Toolbar trigger icons are on the edge of the ViewBoard launcher providing access to your tools.

To launch a tool:
- Tap a Toolbar trigger icon.
- Tap on your desired tool icon.
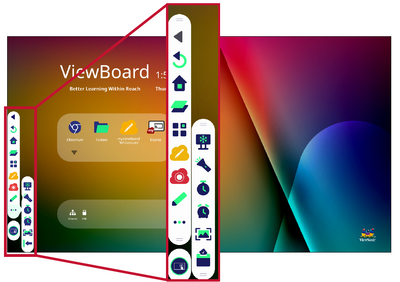
- NOTE: The default toolbar setting is to be available for all input sources; however, users can go to: Settings > Preference > Toolbar setting to adjust the options: (1) available for all input sources, (2) hide the toolbar for all input sources.

Toolbar Icons
| Icon | Description | ||||||||||||||||
|---|---|---|---|---|---|---|---|---|---|---|---|---|---|---|---|---|---|
| Return to the previous operation screen. | |||||||||||||||||
| Return to the Home Screen of the Embedded Player. | |||||||||||||||||
| Display all embedded applications that are currently being used. | |||||||||||||||||
| View all installed applications. | |||||||||||||||||
| Launch the myViewBoard software. | |||||||||||||||||
| Record, view, and save the on-screen content. | |||||||||||||||||
Access the pen, highlighter, clear, and save options.
| |||||||||||||||||
| Pen Annotate the overlay of any input source with black, white, yellow, orange, red, pink, green, or blue ink. | |||||||||||||||||
| Highlighter Mark and highlight with yellow, grey, gold, orange, red, pink, green or blue ink. | |||||||||||||||||
| Eraser Selectively remove the digital ink on the screen. | |||||||||||||||||
| Undo Undo the previous action. | |||||||||||||||||
| Redo Redo the previous action. | |||||||||||||||||
| Clean Clears all the digital ink on the screen. | |||||||||||||||||
| Save Save the screen image and any annotations. | |||||||||||||||||
| Exit Close the drawing tool. | |||||||||||||||||
| View more applications within the ViewBoard toolbar.
| |||||||||||||||||
| Screen Freeze Convert the currently displayed content into a still image; then you can zoom in, zoom out, go back to full screen, and exit. | |||||||||||||||||
| Spotlight Highlight the focus content zone. Tap the Setting icon to adjust the spotlight size and alpha blending effect. | |||||||||||||||||
| Stopwatch Tapping Start will initiate the stopwatch. At any time, the stopwatch can be paused, resumed, split, or reset. | |||||||||||||||||
| Timer Access the countdown timer with an optional alarm setting. Touch and swipe to adjust the numeric values, then click Start. At any time, the countdown timer can be paused, resumed, or reset. | |||||||||||||||||
| Hide/Unhide Hide or unhide the Tool bar trigger icons. | |||||||||||||||||
| Screen Capture Take a screenshot of the current screen. | |||||||||||||||||
| Access the General Settings. |
