


| Sub-menu | Menu Option | |
|---|---|---|
| DisplayPort | Color Format | Auto |
| RGB (Full Range) | ||
| RGB (Limited Range) | ||
| YUV (Full Range) | ||
| YUV (Limited Range) | ||
| DisplayPort 1.4 | On | |
| Off | ||
| HDMI 1 | Color Format | Auto |
| RGB (Full Range) | ||
| RGB (Limited Range) | ||
| YUV (Full Range) | ||
| YUV (Limited Range) | ||
| HDMI 2.0 | On | |
| Off | ||
| HDMI 2 | Color Format | Auto |
| RGB (Full Range) | ||
| RGB (Limited Range) | ||
| YUV (Full Range) | ||
| YUV (Limited Range) | ||
| HDMI 2.0 | On | |
| Off | ||
| Type C | Color Format | Auto |
| RGB (Full Range) | ||
| RGB (Limited Range) | ||
| YUV (Full Range) | ||
| YUV (Limited Range) | ||
| USB 3.2 | On | |
| Off | ||
| DisplayPort 1.4 | On | |
| Off | ||
| Auto Detect | On | |
| Off | ||
VP2786a-4K/zh-tw: Difference between revisions
From ViewSonic Documentation
Importing translations from CSV |
Updating to match new version of source page |
||
| (4 intermediate revisions by 2 users not shown) | |||
| Line 1: | Line 1: | ||
{{Print}} | |||
=簡介= | =簡介= | ||
==包裝內容物== | ==包裝內容物== | ||
| Line 494: | Line 495: | ||
|- | |- | ||
| style="text-align:center;" | '''DDC/CI''' | | style="text-align:center;" | '''DDC/CI''' | ||
| | |啟用此選項可允許顯示器通過顯卡進行控制。 | ||
|- | |- | ||
| style="text-align:center;" | ''' | | style="text-align:center;" | '''重新命名''' | ||
| | |重新命名個人化自訂設定檔。 | ||
|- | |- | ||
| style="text-align:center;" | ''' | | style="text-align:center;" | '''所有召回''' | ||
| | |將所有設定重設為預設值。 | ||
|- | |- | ||
|} | |} | ||
= | =高級功能和設置= | ||
== | ==自動旋轉== | ||
借助自動旋轉功能,顯示器可以檢測圖像顯示,並在垂直或水平旋轉螢幕時自動調整圖像在螢幕上的方向。 | |||
{{Note| | {{Note|Auto Pivot 功能使用 DDC/CI 與監視器通信。在應用自動旋轉功能之前,請確保 DDC/CI 設置設置為 '''On'''。}} | ||
要啟用 DDC/CI 設定,請執行以下操作: | |||
<ol> | <ol> | ||
<li> | <li>打開 OSD 功能表並選擇 '''設置功能表'' 功能表。然後按 '''Joy Key'' ( [[File:Icon_Joy_Key_Press.svg|25px|按下 Joy 鍵]] ) 進入功能表。</li> | ||
<li> | <li>移動 '''Joy Key''' ( [[File:Icon_Joy_Key_Up.svg|25px|上移 Joy 鍵]] ) 或 ( [[File:Icon_Joy_Key_Down.svg|25px|向下移動Joy Key]] ) 選擇 '''DDC/CI'''。然後按 '''Joy Key'' ( [[File:Icon_Joy_Key_Press.svg|25px|按下 Joy 鍵]] ) 進入其子功能表。</li> | ||
<li><p> | <li><p>移動 '''Joy Key''' ( [[File:Icon_Joy_Key_Up.svg|25px|上移 Joy 鍵]] ) 或 ( [[File:Icon_Joy_Key_Down.svg|25px|向下移動Joy Key]] ) 選擇 '''On''。然後按 '''Joy Key'' ( [[File:Icon_Joy_Key_Press.svg|25px|按下 Joy 鍵]] ) 進行確認。</li> | ||
<div class="res-img">[[File:VP2786a-4K_Auto_Pivot.png|500px| | <div class="res-img">[[File:VP2786a-4K_Auto_Pivot.png|500px|啟用 Auto Pivot]]</div> | ||
</ol> | </ol> | ||
確保 DDC/CI''' 為 '''On'' 後,繼續將 '''OSD Pivot''' 設置為 '''Auto''': | |||
<ol> | <ol> | ||
<li> | <li>打開 OSD 功能表並選擇 '''設置功能表'' 功能表。然後按 '''Joy Key'' ( [[File:Icon_Joy_Key_Press.svg|25px|按下 Joy 鍵]] ) 進入功能表。</li> | ||
<li> | <li>移動 '''Joy Key''' ( [[File:Icon_Joy_Key_Up.svg|25px|上移 Joy 鍵]] ) 或 ( [[File:Icon_Joy_Key_Down.svg|25px|向下移動Joy Key]] ) 選擇 '''OSD Pivot''。然後按 '''Joy Key'' ( [[File:Icon_Joy_Key_Press.svg|25px|按下 Joy 鍵]] ) 進入其子功能表。</li> | ||
<li> | <li>移動 '''Joy Key''' ( [[File:Icon_Joy_Key_Up.svg|25px|上移 Joy 鍵]] ) 或 ( [[File:Icon_Joy_Key_Down.svg|25px|向下移動Joy Key]] ) 選擇 '''自動''。然後按 '''Joy Key'' ( [[File:Icon_Joy_Key_Press.svg|25px|按下 Joy 鍵]] ) 進行確認。</li> | ||
</ol> | </ol> | ||
== | ==後檯燈光== | ||
With the Backstage Lighting function, the monitor can adjust the LED brightness to the optimal settings. | With the Backstage Lighting function, the monitor can adjust the LED brightness to the optimal settings. | ||
| Line 535: | Line 536: | ||
</ol> | </ol> | ||
== | ==著色+== | ||
為保證長期的色彩準確度,部分特定型號支持硬體色彩校準功能。Colorbration+ 應用程式安裝檔可以在我們的 [https://color.viewsonic.com/support/software/ 網站] 找到。 | |||
標準顯示器包裝不包括顏色感測器,Colorbration+ 應用程式在校準過程中需要顏色感測器。 | |||
相容的顏色感測器包括: | |||
<ul><li>X-Rite i1 Display Pro</li> | <ul><li>X-Rite i1 Display Pro</li> | ||
<li>X-Rite i1 Pro 2</li> | <li>X-Rite i1 Pro 2</li> | ||
| Line 555: | Line 550: | ||
<li>ColorPro™ Wheel</li></ul> | <li>ColorPro™ Wheel</li></ul> | ||
== | ==雙色== | ||
顯示器帶有雙色引擎,可在 PIP(畫中畫)或 PBP(畫中畫)模式下顯示兩種不同的顏色設置。您可以在兩個視窗(主視窗和輔助視窗)中設置不同的顏色預設。 | |||
{{Note| | {{Note|要啟用 PIP 或 PBP 模式,請參考 [[VP2786a-4K_Advanced_Features_and_Settings#Multi-Picture|Multi-Picture]] 部分。}} | ||
:<div class="res-img">[[File:VP2786a-4K_Dual_Color.png|400px| | :<div class="res-img">[[File:VP2786a-4K_Dual_Color.png|400px|雙色]]</div> | ||
要設定雙色: | |||
<ol><li> | <ol><li>移動 '''Joy Key''' ( [[File:Icon_Joy_Key_Left.svg|25px|link=|向左移動 Joy Key]] ) 以顯示 '''啟動功能表''。然後導航到 '''主功能表''' 並按下 ''Joy 鍵'' ( [[File:Icon_Joy_Key_Press.svg|25px|link=|按下 Joy 鍵]] ) 以顯示OSD功能表。</li> | ||
<li> | <li>移動 '''Joy Key''' ( [[File:Icon_Joy_Key_Up.svg|25px|link=|上移 Joy 鍵]] ) 或 ( [[File:Icon_Joy_Key_Down.svg|25px|link=|向下移動Joy Key]] ) 選擇 '''Setup Menu'' 功能表。然後按 '''Joy Key'' ( [[File:Icon_Joy_Key_Press.svg|25px|link=|按下 Joy 鍵]] ) 進入功能表。</li> | ||
<li> | <li>移動 '''Joy Key''' ( [[File:Icon_Joy_Key_Up.svg|25px|link=|上移 Joy 鍵]] ) 或 ( [[File:Icon_Joy_Key_Down.svg|25px|link=|向下移動Joy Key]] ) 選擇 '''Multi-Picture''。然後按 '''Joy Key'' ( [[File:Icon_Joy_Key_Press.svg|25px|link=|按下 Joy 鍵]] ) 進入其子功能表。</li> | ||
<li> | <li>移動 '''Joy Key''' ( [[File:Icon_Joy_Key_Up.svg|25px|link=|上移 Joy 鍵]] ) 或 ( [[File:Icon_Joy_Key_Down.svg|25px|link=|向下移動Joy Key]] ) 選擇 '''Dual Color''' 。然後按 '''Joy Key'' ( [[File:Icon_Joy_Key_Press.svg|25px|link=|按下 Joy 鍵]] ) 進入其子功能表。</li> | ||
<li> | <li>移動 '''Joy Key''' ( [[File:Icon_Joy_Key_Up.svg|25px|link=|上移 Joy 鍵]] ) 或 ( [[File:Icon_Joy_Key_Down.svg|25px|link=|向下移動Joy Key]] ) 選擇所需的顏色設置。然後按 '''Joy Key'' ( [[File:Icon_Joy_Key_Press.svg|25px|link=|按下 Joy 鍵]] ) 進行確認。</li></ol> | ||
== | ==韌體更新== | ||
為了達到最佳的顯示效能並解決任何已知問題,最好使用最新的韌體版本更新您的顯示器。您可以使用隨附的 USB 線與 vDisplayManager 應用程式,輕鬆升級顯示器的韌體。 | |||
更新韌體: | |||
<ol><li>從我們的 [https://color.viewsonic.com/support/software/ 網站].</li> | |||
<li>將 USB Type B 電纜的一端連接到顯示器的 USB Type B 埠。然後將電纜的另一端連接到電腦的 USB 埠。</li> | |||
<ol><li> | <div class="res-img">[[File:VP2786a-4K_FW_Update.png|500px|使用 USB B 型電纜將顯示器連接到電腦。]]</div> | ||
<li> | <li>啟動 vDisplayManager。選擇側邊功能表的進階標籤。</li> | ||
<div class="res-img">[[File:VP2786a-4K_FW_Update.png|500px| | <li>按一下更新,檢查您的顯示器韌體是否有任何更新。</li> | ||
<li> | <li>等到更新程序完成 (若適用)。</li></ol> | ||
<li> | {{Note|固件更新過程中的任何中斷都可能會永久損壞您的顯示器。請勿斷開 USB 電纜或關閉 PC 和顯示器。}} | ||
<li> | |||
{{Note| | |||
==HDR (High-Dynamic-Range)== | ==HDR (High-Dynamic-Range)== | ||
HDR 會降低給定場景的整體對比度,以便更好地查看高光和陰影中的細節。 | |||
{{Note| | {{Note|在顯示器上啟用 HDR 之前,請先確保您的設備上已打開 HDR 設置。}} | ||
要啟用 HDR 功能: | |||
<ol> | <ol> | ||
<li> | <li>移動 '''Joy Key''' ( [[File:Icon_Joy_Key_Left.svg|25px|link=|向左移動 Joy Key]] ) 以顯示 Startup Menu。然後導航到 '''主功能表''' 並按下 ''Joy 鍵'' ( [[File:Icon_Joy_Key_Press.svg|25px|link=|按下 Joy 鍵]] ) 以顯示OSD功能表。</li> | ||
<li> | <li>移動 '''Joy Key''' ( [[File:Icon_Joy_Key_Up.svg|25px|link=|上移 Joy 鍵]] ) 或 ( [[File:Icon_Joy_Key_Down.svg|25px|link=|向下移動Joy Key]] ) 選擇 '''Color Mode''。然後按 '''Joy Key'' ( [[File:Icon_Joy_Key_Press.svg|25px|link=|按下 Joy 鍵]] ) 進入 '''Color Mode'' 功能表。</li> | ||
<li> | <li>移動 '''Joy Key''' ( [[File:Icon_Joy_Key_Up.svg|25px|link=|上移 Joy 鍵]] ) 或 ( [[File:Icon_Joy_Key_Down.svg|25px|link=|向下移動Joy Key]] ) 選擇 '''HDR''。然後按 '''Joy Key'' ( [[File:Icon_Joy_Key_Press.svg|25px|link=|按下 Joy 鍵]] ) 進入其子功能表。</li> | ||
<li> | <li>移動 '''Joy Key''' ( [[File:Icon_Joy_Key_Up.svg|25px|link=|上移 Joy 鍵]] ) 或 ( [[File:Icon_Joy_Key_Down.svg|25px|link=|向下移動Joy Key]] ) 以選擇其中一個選項 。然後按 '''Joy Key'' ( [[File:Icon_Joy_Key_Press.svg|25px|link=|按下 Joy 鍵]] ) 進行確認。</li> | ||
<div class="res-img">[[File:VP2786a-4K_HDR.png|500px|HDR (High-Dynamic-Range)]]</div></ol> | <div class="res-img">[[File:VP2786a-4K_HDR.png|500px|HDR (High-Dynamic-Range)]]</div></ol> | ||
==KVM== | ==KVM== | ||
KVM 功能允許使用者通過單個鍵盤和滑鼠控制連接到同一顯示器的兩台電腦。 | |||
{{Note| | {{Note|僅適用於 PBP(畫中畫)模式。}} | ||
要將兩台電腦連接到顯示器: | |||
<ol> | <ol> | ||
<li> | <li>將 USB Type C 電纜的一端連接到顯示器的 USB Type C 連接埠。然後將電纜的另一端連接到筆記型電腦的 USB Type C 連接埠。</li> | ||
<li> | <li>將 DisplayPort 電纜的一端連接到顯示器的 DisplayPort 埠。然後將電纜的另一端連接到計算機的 DisplayPort 或 Mini DisplayPort。</li> | ||
<li> | <li>將 USB Type B 電纜的一端連接到顯示器的 USB Type B 埠。然後將電纜的另一端連接到電腦的 USB 埠。</li> | ||
<div class="res-img">[[File:VP2786a-4K_KVM_1.png|500px| | <div class="res-img">[[File:VP2786a-4K_KVM_1.png|500px|將監視器連接到電腦以進行 KVM]]</div> | ||
</li> | </li> | ||
</ol> | </ol> | ||
要開啟 PBP 模式: | |||
<ol> | <ol> | ||
<li> | <li>移動 '''Joy Key''' ( [[File:Icon_Joy_Key_Left.svg|25px|link=|向左移動 Joy Key]] ) 以顯示 Startup Menu。然後導航到 '''主功能表''' 並按下 ''Joy 鍵'' ( [[File:Icon_Joy_Key_Press.svg|25px|link=|按下 Joy 鍵]] ) 以顯示OSD功能表。</li> | ||
<li> | <li>移動 '''Joy Key''' ( [[File:Icon_Joy_Key_Up.svg|25px|link=|上移 Joy 鍵]] ) 或 ( [[File:Icon_Joy_Key_Down.svg|25px|link=|向下移動Joy Key]] ) 選擇 '''Setup Menu'' 功能表。然後按 '''Joy Key'' ( [[File:Icon_Joy_Key_Press.svg|25px|link=|按下 Joy 鍵]] ) 進入功能表。</li> | ||
<li> | <li>移動 '''Joy Key''' ( [[File:Icon_Joy_Key_Up.svg|25px|link=|上移 Joy 鍵]] ) 或 ( [[File:Icon_Joy_Key_Down.svg|25px|link=|向下移動Joy Key]] ) 選擇 '''Multi-Picture''。然後按 '''Joy Key'' ( [[File:Icon_Joy_Key_Press.svg|25px|link=|按下 Joy 鍵]] ) 進入其子功能表。</li> | ||
<li> | <li>移動 '''Joy Key''' ( [[File:Icon_Joy_Key_Up.svg|25px|link=|上移 Joy 鍵]] ) 或 ( [[File:Icon_Joy_Key_Down.svg|25px|link=|向下移動Joy Key]] ) 選擇 '''PBP Left-Right''' 。然後按 '''Joy Key'' ( [[File:Icon_Joy_Key_Press.svg|25px|link=|按下 Joy 鍵]] ) 以啟用 PBP 模式。</li> | ||
<div class="res-img">[[File:VP2786a-4K_PBP.png|500px| | <div class="res-img">[[File:VP2786a-4K_PBP.png|500px|啟用 PBP 模式]]</div> | ||
</ol> | </ol> | ||
要啟動 KVM 功能: | |||
<ol> | <ol> | ||
<li> | <li>移動並按住 '''Joy Key'' ( [[File:Icon_Joy_Key_Right.svg|25px|link=|向右移動 Joy Key]] ) 兩秒鐘以啟動 KVM 功能。</li> | ||
<li> | <li>隨後將能在兩個畫面 (左側/右側視窗) 之間,切換游標。</li> | ||
<div class="res-img">[[File:VP2786a-4K_KVM_2.png|500px| | <div class="res-img">[[File:VP2786a-4K_KVM_2.png|500px|啟動和使用 KVM]]</div> | ||
</ol> | </ol> | ||
== | ==多圖片== | ||
Multi-Picture 允許使用者進一步自定義他們的工作空間,允許來自不同輸入的最多四個拆分視窗,顯示具有不同縱橫比的高解析度內容,而不會因原始輸入源而失真。 | |||
<div class="res-img">[[File:VP2776T-4K_Multi-Picture.png|600px| | <div class="res-img">[[File:VP2776T-4K_Multi-Picture.png|600px|啟用多張圖片]]</div> | ||
要啟用多畫面模式: | |||
<ol> | <ol> | ||
<li> | <li>移動 '''Joy Key''' ( [[File:Icon_Joy_Key_Left.svg|25px|link=|向左移動 Joy Key]] ) 以顯示 '''啟動功能表''。然後導航到 '''主功能表''' 並按下 ''Joy 鍵'' ( [[File:Icon_Joy_Key_Press.svg|25px|link=|按下 Joy 鍵]] ) 以顯示OSD功能表。</li> | ||
<li> | <li>移動 '''Joy Key''' ( [[File:Icon_Joy_Key_Up.svg|25px|link=|上移 Joy 鍵]] ) 或 ( [[File:Icon_Joy_Key_Down.svg|25px|link=|向下移動Joy Key]] ) 選擇 '''Color Mode''。然後按 '''Joy Key'' ( [[File:Icon_Joy_Key_Press.svg|25px|link=|按下 Joy 鍵]] ) 進入 Color Mode 功能表。</li> | ||
<li> | <li>移動 '''Joy Key''' ( [[File:Icon_Joy_Key_Up.svg|25px|link=|上移 Joy 鍵]] ) 或 ( [[File:Icon_Joy_Key_Down.svg|25px|link=|向下移動Joy Key]] ) 選擇 '''Multi-Picture''。然後按 '''Joy Key'' ( [[File:Icon_Joy_Key_Press.svg|25px|link=|按下 Joy 鍵]] ) 進入其子功能表。</li> | ||
<li> | <li>移動 '''Joy Key''' ( [[File:Icon_Joy_Key_Up.svg|25px|link=|上移 Joy 鍵]] ) 或 ( [[File:Icon_Joy_Key_Down.svg|25px|link=|向下移動Joy Key]] ) 選擇 '''PBP Left-Right''' 或 '''PIP''' 。然後按 '''Joy Key'' ( [[File:Icon_Joy_Key_Press.svg|25px|link=|按下 Joy 鍵]] ) 進入選取模式。</li> | ||
</ol> | </ol> | ||
===PBP (Picture-by-Picture)=== | ===PBP (Picture-by-Picture)=== | ||
<div class="res-img">[[File:VP2776_PBP.png|400px|PBP (Picture-by-Picture)]]</div> | <div class="res-img">[[File:VP2776_PBP.png|400px|PBP (Picture-by-Picture)]]</div> | ||
{{Note| | {{Note|要在視窗中顯示全尺寸圖像,請將螢幕解析度調整為 1920 x 1080(PBP 左右)。}} | ||
要設定 PBP: | |||
<ol> | <ol> | ||
<li> | <li>移動 '''Joy Key''' ( [[File:Icon_Joy_Key_Left.svg|25px|link=|向左移動 Joy Key]] ) 以顯示 '''啟動功能表''。然後導航到 '''主功能表''' 並按下 ''Joy 鍵'' ( [[File:Icon_Joy_Key_Press.svg|25px|link=|按下 Joy 鍵]] ) 以顯示OSD功能表。</li> | ||
<li> | <li>移動 '''Joy Key''' ( [[File:Icon_Joy_Key_Up.svg|25px|link=|上移 Joy 鍵]] ) 或 ( [[File:Icon_Joy_Key_Down.svg|25px|link=|向下移動Joy Key]] ) 選擇 '''設置功能表''。然後按 '''Joy Key'' ( [[File:Icon_Joy_Key_Press.svg|25px|link=|按下 Joy 鍵]] ) 進入 '''設置功能表'' 功能表。</li> | ||
<li> | <li>移動 '''Joy Key''' ( [[File:Icon_Joy_Key_Up.svg|25px|link=|上移 Joy 鍵]] ) 或 ( [[File:Icon_Joy_Key_Down.svg|25px|link=|向下移動Joy Key]] ) 選擇 '''Multi-Picture''。然後按 '''Joy Key'' ( [[File:Icon_Joy_Key_Press.svg|25px|link=|按下 Joy 鍵]] ) 進入其子功能表。</li> | ||
<li> | <li>移動 '''Joy Key''' ( [[File:Icon_Joy_Key_Up.svg|25px|link=|上移 Joy 鍵]] ) 或 ( [[File:Icon_Joy_Key_Down.svg|25px|link=|向下移動Joy Key]] ) 選擇 '''PBP Left-Right''' 。然後按 '''Joy Key'' ( [[File:Icon_Joy_Key_Press.svg|25px|link=|按下 Joy 鍵]] ) 進入其子功能表。</li> | ||
<li> | <li>要更改輸入源,請選擇源位置('''左源選擇'''/'''右源選擇'''),然後按 '''Joy 鍵''' ( [[File:Icon_Joy_Key_Press.svg|25px|link=|按下 Joy 鍵]] ).</li> | ||
<li> | <li>移動 '''Joy Key''' ( [[File:Icon_Joy_Key_Up.svg|25px|link=|上移 Joy 鍵]] ) 或 ( [[File:Icon_Joy_Key_Down.svg|25px|link=|向下移動Joy Key]] ) 選擇所需的輸入源,然後按 '''Joy Key'' ( [[File:Icon_Joy_Key_Press.svg|25px|link=|按下 Joy 鍵]] ) 進行確認。</li> | ||
<li> | <li>要交換兩個視窗,請選擇 '''Swap'' 並按下 '''Joy Key''' ( [[File:Icon_Joy_Key_Press.svg|25px|link=|按下 Joy 鍵]] ) 進行確認。</li> | ||
</ol> | </ol> | ||
===PIP (Picture-in-Picture)=== | ===PIP (Picture-in-Picture)=== | ||
<div class="res-img">[[File:VP2776_PIP.png|400px|PIP (Picture-in-Picture)]]</div> | <div class="res-img">[[File:VP2776_PIP.png|400px|PIP (Picture-in-Picture)]]</div> | ||
要設定 PIP: | |||
<ol> | <ol> | ||
<li> | <li>移動 '''Joy Key''' ( [[File:Icon_Joy_Key_Left.svg|25px|link=|向左移動 Joy Key]] ) 以顯示 '''啟動功能表''。然後導航到 '''主功能表''' 並按下 ''Joy 鍵'' ( [[File:Icon_Joy_Key_Press.svg|25px|link=|按下 Joy 鍵]] ) 以顯示OSD功能表。</li> | ||
<li> | <li>移動 '''Joy Key''' ( [[File:Icon_Joy_Key_Up.svg|25px|link=|上移 Joy 鍵]] ) 或 ( [[File:Icon_Joy_Key_Down.svg|25px|link=|向下移動Joy Key]] ) 選擇 '''設置功能表''。然後按 '''Joy Key'' ( [[File:Icon_Joy_Key_Press.svg|25px|link=|按下 Joy 鍵]] ) 進入 '''設置功能表'' 功能表。</li> | ||
<li> | <li>移動 '''Joy Key''' ( [[File:Icon_Joy_Key_Up.svg|25px|link=|上移 Joy 鍵]] ) 或 ( [[File:Icon_Joy_Key_Down.svg|25px|link=|向下移動Joy Key]] ) 選擇 '''Multi-Picture''。然後按 '''Joy Key'' ( [[File:Icon_Joy_Key_Press.svg|25px|link=|按下 Joy 鍵]] ) 進入其子功能表。</li> | ||
<li> | <li>移動 '''Joy Key''' ( [[File:Icon_Joy_Key_Up.svg|25px|link=|上移 Joy 鍵]] ) 或 ( [[File:Icon_Joy_Key_Down.svg|25px|link=|向下移動Joy Key]] ) 選擇 '''PIP''' 。然後按 '''Joy Key'' ( [[File:Icon_Joy_Key_Press.svg|25px|link=|按下 Joy 鍵]] ) 進入其子功能表。</li> | ||
<li> | <li>要更改插入視窗的輸入源,請選擇 ''PIP Source Select''' 並按下 '''Joy Key'' ( [[File:Icon_Joy_Key_Press.svg|25px|link=|按下 Joy 鍵]] ). 然後移動 '''Joy Key'' ( [[File:Icon_Joy_Key_Up.svg|25px|link=|上移 Joy 鍵]] ) 或 ( [[File:Icon_Joy_Key_Down.svg|25px|link=|向下移動Joy Key]] ) 選擇所需的輸入源,然後按 '''Joy Key'' ( [[File:Icon_Joy_Key_Press.svg|25px|link=|按下 Joy 鍵]] ) 進行確認。</li> | ||
<li> | <li>要調整插入視窗的位置,請選擇 '''PIP Position''' 並按下 '''Joy Key''' ( [[File:Icon_Joy_Key_Press.svg|25px|link=|按下 Joy 鍵]] ).</li> | ||
* | *按下 '''Joy Key''' ( [[File:Icon_Joy_Key_Press.svg|25px|link=|按下 Joy 鍵]] ) 選擇 '''PIP H.Position''' 或 ''PIP V.Position''' 。 | ||
* | *移動 '''Joy Key''' ( [[File:Icon_Joy_Key_Up.svg|25px|link=|上移 Joy 鍵]] ) 或 ( [[File:Icon_Joy_Key_Down.svg|25px|link=|向下移動Joy Key]] ) 調整設置並按下 ''Joy Key'' ( [[File:Icon_Joy_Key_Press.svg|25px|link=|按下 Joy 鍵]] ) 進行確認。 | ||
<li> | <li>要調整插入視窗的大小,請選擇 '''PIP Size''' 並按 '''Joy Key''' ( [[File:Icon_Joy_Key_Press.svg|25px|link=|按下 Joy 鍵]] ). 然後移動 '''Joy Key'' ( [[File:Icon_Joy_Key_Up.svg|25px|link=|上移 Joy 鍵]] ) 或 ( [[File:Icon_Joy_Key_Down.svg|25px|link=|向下移動Joy Key]] ) 調整設置。</li> | ||
<li> | <li>要交換兩個視窗,請選擇 '''Swap'' 並按下 '''Joy Key''' ( [[File:Icon_Joy_Key_Press.svg|25px|link=|按下 Joy 鍵]] ) 進行確認。</li></ol> | ||
= | =顏色校準= | ||
== | ==什麼 Colorbration⁺?== | ||
色彩準確性是創作工作流程最重要的層面之一,確保顯示器的色彩準確呈現原始影像或數位檔案的色彩非常重要。此軟體可讓您: | |||
* | * 輕鬆快速校正和剖析顯示器。 | ||
* | * 控制白點、亮度、對比、Gamma 等設定。 | ||
== | ==在哪裡獲取 Colorbration⁺?== | ||
<p> | <p>Colorbration⁺ 軟體可以從我們的 [https://color.viewsonic.com/support/software 網站].</p> | ||
<p> | <p>下載完成後,啟動安裝檔案並依照畫面上的指示安裝軟體。</p> | ||
== | ==連接方式== | ||
除了下載軟體外,請確保您的顯示器、計算機和色度計已正確連接。 | |||
連接顯示器與電腦有兩種方式: | |||
===HDMI | ===HDMI 或 DisplayPort=== | ||
選擇 HDMI 或 DisplayPort 連接的使用者也應透過 USB Type B 轉 USB Type A 纜線連接顯示器與電腦。 | |||
<div class="res=img">[[File:VP2786a-4K_Connect_HDMI_DP.png|700px| | <div class="res=img">[[File:VP2786a-4K_Connect_HDMI_DP.png|700px|通過 DisplayPort 或 HDMI 與 USB Type B 連接以進行數據傳輸。]]</div> | ||
===Type C=== | ===Type C=== | ||
選擇 USB Type C 連接的使用者可直接連接顯示器與電腦。 | |||
<div class="res=img">[[File:VP2786a-4K_Connect_USB_Type_C.png|700px| | <div class="res=img">[[File:VP2786a-4K_Connect_USB_Type_C.png|700px|通過USB Type C連接以進行數據傳輸。]]</div> | ||
=== | ===比色計連接=== | ||
將色差計的 USB Type A 電纜連接到顯示器的 USB Type A 連接埠。 | |||
<div class="res-img">[[File:VP2786a-4K_Colorimeter_Connect.png|400px| | <div class="res-img">[[File:VP2786a-4K_Colorimeter_Connect.png|400px|連接色差計]]</div> | ||
== | ==準備色彩校正== | ||
<ol><li> | <ol><li>請確保所有連接都已建立且正確無誤。</li> | ||
<li> | <li>將顯示器向上傾斜。</li> | ||
<div class="res-img">[[File:VP2786a-4K_ColorPro_Wheel_Tilt.png|200px| | <div class="res-img">[[File:VP2786a-4K_ColorPro_Wheel_Tilt.png|200px|將顯示器向上傾斜]]</div> | ||
<li> | <li>取下鏡頭蓋(如果適用),小心地將測量設備與顯示器屏幕接觸。</li> | ||
<div class="res-img">[[File:VP2786a-4K_ColorPro_Wheel_Measurement.png|300px| | <div class="res-img">[[File:VP2786a-4K_ColorPro_Wheel_Measurement.png|300px|將色度計放在顯示器的螢幕上。]]</div> | ||
</ol> | </ol> | ||
== | ==用 Colorbration+== | ||
初次啟動 Colorbration⁺ 時,有兩種模式可供使用者選擇: | |||
* | * Basic Mode(基本模式) | ||
* | * Advanced Mode(進階模式) | ||
:<div class="res-img">[[File:CB+_Introduction_Menu.png|500px]]</div> | :<div class="res-img">[[File:CB+_Introduction_Menu.png|500px]]</div> | ||
=== | ===一般操作=== | ||
若要開始進階模式校正程序: | |||
<ol><li> | <ol><li>選擇 Device Selection(裝置選擇),然後從可用選項中選擇要校正的顯示器。</li> | ||
<li> | <li>連接並從可用選項中選擇要使用的測量裝置。</li> | ||
<li> | <li>在側邊欄選單上選擇 Calibration(校正)。</li> | ||
<li> | <li>從下拉式選單中選擇所需的校正設定,或建立自訂設定檔</li> | ||
<li> | <li>選擇校正設定後,選擇開始校正程序。</li> | ||
<li> | <li>等到色彩校正程序完成。</li></ol> | ||
{{Important| | {{Important|如果色彩校正過程中斷,可能永久損壞顯示器色彩。請勿拔除 USB 線或關閉電腦或顯示器。}} | ||
= | =附錄= | ||
== | ==產品規格== | ||
{| class="wikitable" style="background-color:#ffffff; width:auto%;" | {| class="wikitable" style="background-color:#ffffff; width:auto%;" | ||
! style="background-color:#DB0025; color:#ffffff; width:20%;" | | ! style="background-color:#DB0025; color:#ffffff; width:20%;" | 項目 | ||
! style="background-color:#DB0025; color:#ffffff; width:20%;" | | ! style="background-color:#DB0025; color:#ffffff; width:20%;" | 類別 | ||
! style="background-color:#DB0025; color:#ffffff;" | | ! style="background-color:#DB0025; color:#ffffff;" | 規格 | ||
|- | |- | ||
| rowspan="5" style="font-weight:bold; text-align:center;" | LCD | | rowspan="5" style="font-weight:bold; text-align:center;" | LCD | ||
| Line 741: | Line 728: | ||
| Anti-Glare (Haze 25%), Hard Coating (3H) | | Anti-Glare (Haze 25%), Hard Coating (3H) | ||
|- | |- | ||
| style="font-weight:bold; text-align:center;" | | | style="font-weight:bold; text-align:center;" | 輸入訊號 | ||
| style="text-align:center;"|Video Sync | | style="text-align:center;"|Video Sync | ||
| <u>TMDS digital (100 Ω)</u> | | <u>TMDS digital (100 Ω)</u> | ||
| Line 748: | Line 735: | ||
:'''Type C''': f<sub>h</sub>: 15~240 kHz, f<sub>v</sub>: 24~75 Hz | :'''Type C''': f<sub>h</sub>: 15~240 kHz, f<sub>v</sub>: 24~75 Hz | ||
|- | |- | ||
| rowspan="2" style="font-weight:bold; text-align:center;" | | | rowspan="2" style="font-weight:bold; text-align:center;" | 相容性 | ||
| style="text-align:center;"|PC | | style="text-align:center;"|PC | ||
| up to 3840 x 2160 | | up to 3840 x 2160 | ||
| Line 759: | Line 746: | ||
|3840 x 2160 @ 60 Hz | |3840 x 2160 @ 60 Hz | ||
|- | |- | ||
| style="text-align:center;"| | | style="text-align:center;"|支援 | ||
| | | | ||
* 4096 x 2160 @ 24, 25, 30, 50, 60 Hz | * 4096 x 2160 @ 24, 25, 30, 50, 60 Hz | ||
| Line 793: | Line 780: | ||
* 640 x 350 @ 70 Hz | * 640 x 350 @ 70 Hz | ||
|- | |- | ||
| style="font-weight:bold; text-align:center;" | | | style="font-weight:bold; text-align:center;" | 電源<ref>Please use the power adapter from ViewSonic® or an authorized source only.</ref> | ||
| style="text-align:center;"|Input Voltage | | style="text-align:center;"|Input Voltage | ||
| AC 100-240V, 50/60 Hz (auto switch) | | AC 100-240V, 50/60 Hz (auto switch) | ||
|- | |- | ||
| rowspan="2" style="font-weight:bold; text-align:center;" | | | rowspan="2" style="font-weight:bold; text-align:center;" | 顯示區域 | ||
| rowspan="2" style="text-align:center;" |Active Size<br />(H x V) | | rowspan="2" style="text-align:center;" |Active Size<br />(H x V) | ||
|596.74 x 335.66 mm | |596.74 x 335.66 mm | ||
| Line 803: | Line 790: | ||
|23.49” x 13.21” | |23.49” x 13.21” | ||
|- | |- | ||
| rowspan="5" style="font-weight:bold; text-align:center;" | | | rowspan="5" style="font-weight:bold; text-align:center;" | 運行條件 | ||
| rowspan="2" style="text-align:center;" |Altitude | | rowspan="2" style="text-align:center;" |Altitude | ||
| 3.048 km | | 3.048 km | ||
| Line 817: | Line 804: | ||
|32° F to 104° F | |32° F to 104° F | ||
|- | |- | ||
| rowspan="5" style="font-weight:bold; text-align:center;" | | | rowspan="5" style="font-weight:bold; text-align:center;" | 存放條件 | ||
| rowspan="2" style="text-align:center;" |Altitude | | rowspan="2" style="text-align:center;" |Altitude | ||
| 12 km | | 12 km | ||
| Line 831: | Line 818: | ||
| -4° F to 140° F | | -4° F to 140° F | ||
|- | |- | ||
| rowspan="2" style="font-weight:bold; text-align:center;" | | | rowspan="2" style="font-weight:bold; text-align:center;" | 尺寸 | ||
(with stand) | (with stand) | ||
| rowspan="2" style="text-align:center;" |Physical<br />(W x H x D) | | rowspan="2" style="text-align:center;" |Physical<br />(W x H x D) | ||
| Line 838: | Line 825: | ||
|24.14” x 22.41~17.68” x 9.15” | |24.14” x 22.41~17.68” x 9.15” | ||
|- | |- | ||
| rowspan="2" style="font-weight:bold; text-align:center;" | | | rowspan="2" style="font-weight:bold; text-align:center;" | 重量 | ||
(with stand) | (with stand) | ||
| rowspan="2" style="text-align:center;" | Physical | | rowspan="2" style="text-align:center;" | Physical | ||
| Line 845: | Line 832: | ||
|18.15 lb | |18.15 lb | ||
|- | |- | ||
| style="font-weight:bold; text-align:center;" | | | style="font-weight:bold; text-align:center;" | 壁掛式 | ||
| style="text-align:center;"|Dimensions | | style="text-align:center;"|Dimensions | ||
| 100 x 100 mm | | 100 x 100 mm | ||
|- | |- | ||
| rowspan="2" style="font-weight:bold; text-align:center;" | | | rowspan="2" style="font-weight:bold; text-align:center;" | 耗電量 | ||
| style="text-align:center;" |On<ref>The test condition follows EEI standards.</ref> | | style="text-align:center;" |On<ref>The test condition follows EEI standards.</ref> | ||
| 45W (Typical) without Audio<br />74W (Maximum) with Audio | | 45W (Typical) without Audio<br />74W (Maximum) with Audio | ||
| Line 860: | Line 847: | ||
==On-Screen Display (OSD) Menu Tree== | ==On-Screen Display (OSD) Menu Tree== | ||
<tabber> | <tabber> | ||
|-|Input Select= | |-|Input Select= | ||
| Line 1,662: | Line 1,648: | ||
</tabber> | </tabber> | ||
= | ==安全注意事項== | ||
請在使用設備前完整閱讀這些說明。 | |||
請將本使用指南放在安全的地方,以便日後參考。 | |||
請閱讀所有警告並遵守所有指示。 | |||
* 坐在距離設備至少 45 釐米(18 英寸)的地方。 | |||
* | * 在設備周圍留出至少 10 釐米(4 英寸)的間隙,以確保適當的通風。 | ||
* | 請將裝置放在通風良好的區域。請勿將任何會阻礙散熱的物品放在裝置上。 | ||
請勿在靠近水的地方使用裝置。為降低火災或觸電的風險,請勿讓裝置受潮。 | |||
請避免讓裝置受陽光直射或暴露在其他持續熱源下。 | |||
請勿安裝於接近熱源的地方,例如散熱器、暖氣機、火爐或其他可能使裝置溫度升高至危險水準的裝置(包括擴大機)。 | |||
請使用柔軟的乾布清潔外殼。有關更多資訊,請參閱本手冊的“維護”部分。 | |||
* 避免觸摸螢幕,因為如果觸摸螢幕,油可能會積聚在螢幕上。 | |||
* | * 請勿用尖銳或堅硬的物體觸摸螢幕表面,否則可能會損壞螢幕。 | ||
* | * 請勿將設備放置在可能放置在產品和支撐傢俱之間的布或其他材料上。 | ||
* | 移動裝置時,小心別讓裝置掉落或撞到任何東西。 | ||
請勿將裝置放在不平穩的平面上。裝置可能會傾倒,導致人員受傷或裝置故障。 | |||
請勿在裝置或連接線上放置任何重物。 | |||
* 始終使用設備組製造商推薦的機櫃、支架或安裝方法。 | |||
* | * 始終使用可以安全支撐設備的傢俱。 | ||
* | * 始終確保設備沒有懸垂在支撐傢具的邊緣。 | ||
* | * 請勿將設備放置在高大的傢俱上,例如櫥櫃或書櫃,除非將傢俱和設備都固定在合適的支架上。 | ||
* | * 始終教育孩子攀爬傢俱以接觸設備或相關設備的危險。 | ||
* | * 請勿將顯示器放置在可能有兒童在場的地方。 | ||
* | * 請勿將玩具和遙控器等可能誘使兒童攀爬的物品放在放置產品的設備或傢具的頂部。 | ||
* | 如果冒煙、出現異音或異味,請立即關閉裝置並聯絡經銷商或 ViewSonic®。繼續使用裝置很危險。 | ||
請勿嘗試規避極化或接地插頭的安全設計。極化插頭具有兩個寬度不一的插片。接地插頭具有兩個插片及第三支接地接腳。較寬的扁平插腳和接地插腳是確保安全之用,如果插頭無法插入插座,請取得轉接器,勿嘗試強行將插頭插入插座。 | |||
連接至電源插座時,請勿拆除接地插腳。請確保接地插腳不被拆除。 | |||
* 始終佈置和管理連接到設備的電線和電纜,以免它們被絆倒、拉扯或抓住。 | |||
* | 請避免讓電源線受到踩踏或擠壓,尤其是插頭以及電源線與設備的連接處。請確保電源插座位於設備附近,以便使用。 | ||
如果長時間不使用裝置,請將電源插頭從 AC 插座上拔下。 | |||
* 請確認建築物內安裝的配電系統。系統應提供額定電壓為 120/240V、20A 的斷路器。 | |||
* | * 僅使用製造商指定的附件/附件,例如手推車、支架、三腳架、支架或桌子。 | ||
* | 若使用推車,移動推車/設備組合時請務必小心,以免翻覆導致人員受傷。 | ||
維修作業應交由合格的專業人員執行。裝置有任何損壞時,將需要維修,例如: | |||
電源線或插頭損壞 | |||
:*液體濺到設備上或物體掉入設備。 | |||
:* | :*如果設備暴露在雨中或潮濕環境中。 | ||
:* | 裝置無法正常運作或摔落 | ||
* 使用耳式/耳機時,請將音量調節到適當的水平,否則可能會導致聽力受損。 | |||
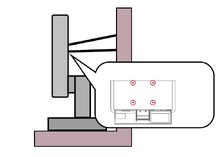
* | * 穩定性危險:顯示幕可能會掉落,從而導致嚴重的人身傷害或死亡。為防止受傷,必須按照安裝說明將此顯示器牢固地固定在地板/牆壁上。 | ||
* | * 使用繩索或其他約束裝置將顯示器固定在牆壁或固定物體上,有助於支撐顯示器的重量,以防止顯示器翻倒。 | ||
* | |||
:<div class="res-img">[[File:Monitor_Safety_Restrain.png|220px|link=]]</div> | :<div class="res-img">[[File:Monitor_Safety_Restrain.png|220px|link=]]</div> | ||
:: | :: | ||
{{Note| | {{Note| | ||
::* | ::* 約束裝置/繩索應能夠承受 100N 的力。 | ||
::* 確保繩索拉直,並消除任何鬆弛。設備背面應面向牆壁,以確保設備在外力作用下不會傾斜。 | |||
::* 確保顯示器在設備的任何高度和旋轉角度下都不會在外力作用下傾斜。 | |||
}} | }} | ||
* | * 如果要保留和重新定位現有顯示器,則應應用與上述相同的注意事項。 | ||
__TOC__ | __TOC__ | ||
Latest revision as of 09:07, 8 October 2024
簡介
包裝內容物
- 顯示器
- 電源線
- 視頻電纜
- 快速入門指南
Note: 包裝中包含的電纜可能因您所在的國家/地區而異。如需更多資訊,請聯絡當地經銷商。
產品概述
-
 前檢視
前檢視 -
 後檢視
後檢視
| 編號 | 說明 |
|---|---|
| 1 | Joy 鍵 |
| 2 | 電源按鈕 |
| 3 | I/O 連接埠 |
| 4 | 安全鎖 |
I/O 連接埠

| 編號 | 說明 |
|---|---|
| 1 | AC 輸入 |
| 2 | HDMI |
| 3 | DisplayPort |
| 4 | USB Type C |
| 5 | 音訊輸出 |
| 6 | USB 上行 |
| 7 | USB 下行 |
| 8 | Micro USB |
最初設定
安裝支架
 |
 |
- 將顯示器放在平坦、穩定的表面上,螢幕朝下。
- 將顯示器支架的上挂鉤對齊並滑入支架安裝槽。
- 將顯示器抬起到平坦、穩定的表面上的直立位置。
Note: 為了安全和確保最佳性能,請將顯示器放置在平坦、穩定的表面上。否則可能會導致顯示器掉落,從而損壞顯示器本身和/或造成人身傷害。
拆卸支架和安裝顯示器
有關安裝套件的標準尺寸,請參閱下表。
Note: 僅適用於 UL 認證的安裝套件/支架。要獲取壁掛式安裝套件或高度調節底座,請聯繫 ViewSonic® 或您當地的轉銷商。
| 最大負載 | 焊盤孔 | 螺絲規格 | 螺絲數量 |
|---|---|---|---|
| 5.2 kg | 2465.92 x 1049.56 mm | M4 x 10 毫米 | 4 顆螺絲 |
Note: 安裝套件單獨出售。
 |
 |
 |
Important: 在卸下支架之前,請關閉顯示器,斷開所有電纜,並將顯示器放在平坦、穩定的表面上,螢幕朝下。
- 按住快速釋放卡舌並小心地提起支架。
- 稍微向下拉以鬆開挂鉤並取下支架。
- 將安裝支架安裝到顯示器背面的 VESA 安裝孔中。然後用四顆螺絲 (M4 x 10 mm) 固定。
- 按照購買或可選安裝套件隨附的說明安裝顯示器。
使用安全槽

為了説明防止顯示器被盜,請使用安全槽鎖定裝置將顯示器固定在固定物體上。
此外,使用安全電纜將顯示器固定在牆壁或固定物體上有助於支撐顯示器的重量,以防止顯示器翻倒。
建立連接
連接至電源

- 將電源線連接到顯示器背面的「AC IN」插孔。
- 將電源線插頭插入電源插座。
顯示器連接
HDMI

- 將 HDMI 電纜的一端連接到顯示器的 HDMI 連接埠。
- 將電纜的另一端插入電腦的 HDMI 埠。
DisplayPort

- 將 DisplayPort 電纜的一端連接到顯示器的 DP 連接埠。
- 將電纜的另一端插入計算機的 DisplayPort 或 Mini DisplayPort 埠。
Note: 要將顯示器連接到 Thunderbolt 連接埠 (v.1 & 2)在您的Mac上,將“Mini DisplayPort至DisplayPort線”的Mini DisplayPort端連接到Mac的Thunderbolt輸出埠。然後將電纜的另一端連接到顯示器的 DisplayPort 埠。
Type C

- 將 USB Type C 電纜的一端連接到顯示器的“Type C”連接埠。
- 將電纜的另一端插入計算機的USB Type C埠。
Note: 如果是視訊輸出使用,請確保 USB Type C 輸出裝置(例如筆記型電腦)和纜線支援視訊訊號傳輸。
USB 連接
顯示器支援兩種 USB 連接埠:上游和下游。進行連接時,請遵循下列準則。

| USB 類型 | 接頭類型 | 說明 | |
|---|---|---|---|
| 上游 | Type B | 在連接至顯示器的電腦與 USB 裝置之間傳輸資料。 | |
| 下游 | Type C | 傳輸音訊、視訊和電力。啟用 KVM 功能。 | |
| 支援 5V/3A、9V/3A、12V/3A、15V/3A、20V/3.25A (LPS) 充電。 | |||
| Type A | 適用於周邊裝置(例如儲存裝置、鍵盤、滑鼠等)。 | ||
| 支援 5V/2A 充電。 | |||
| Micro USB | 僅適用於 ColorPro™ Wheel。 | ||
Note: 若要將周邊裝置與 USB Type A 連接埠搭配使用,也請將電腦連接至顯示器的 USB Type B 連接埠。
使用 USB 連接埠

- 若要使用下游 USB Type A 連接埠,請將 USB Type B 纜線的一端連接至顯示器的上游 USB Type B 連接埠。將纜線的另一端 (USB Type A) 插入電腦的 USB 連接埠。
- 將周邊裝置連接至顯示器的下游 USB Type A 連接埠。
音訊連接

將音訊設備的音訊插孔插入顯示器的 「Audio Out」 連接埠。
Note: 顯示器還配備了雙揚聲器。
使用監視器
調整視角
高度調節

將顯示器降低或升高到所需的高度(0 至 130 毫米)。
Note: 調整時,請雙手放在側面,握住顯示器,沿調節軌道用力按下。
螢幕方向調整 (Monitor Pivot)
 |
 |
 |
- 將顯示器高度調整到最高位置。然後將顯示器向後傾斜至完全傾斜位置。
- 將顯示器順時針或逆時針旋轉 90° (3) 從橫向旋轉至縱向。
Note:
- 調整時,請務必用雙手牢牢握住顯示器的兩側。
- 如果使用 Auto Pivot 功能,系統可以自動檢測螢幕方向。
旋轉調整

向左或向右旋轉顯示器以獲得所需的視角 (60°)。
傾斜調整

將顯示器向前或向後傾斜至所需的視角(-5° 至 21°)。
Note: 調整時,用一隻手牢牢支撐支架,同時用另一隻手向前或向後傾斜顯示器。
打開/關閉顯示器

- 將連接的電源介面器插入電源插座。
- 按下 電源 ( ) 按鈕打開顯示器。
- 要關閉顯示器,請按 電源 ( ) 按鈕。
Note:
- 如果OSD功能表仍在螢幕上,請按住 電源 ( ) 按鈕 3 秒以關閉電源。
- 只要電源線連接到電源插座,顯示器仍會消耗一些電量。如果長時間不使用顯示器,請從電源插座上拔下電源插頭。
使用搖桿鍵
使用 Joy Key 啟動熱鍵,導航屏幕顯示 (OSD) 功能表,並更改設置。

啟動功能表
移動 Joy Key ( ![]() ) 以啟動 Startup Menu。
) 以啟動 Startup Menu。

Note: 按照螢幕上顯示的關鍵指南選擇選項或進行調整。
主功能表
進入螢幕顯示 (OSD) 選單

色彩模式
選擇一種預設標準顏色設置。

視圖模式
選擇任一預設顯示設定。

Brightness(亮度)
調整亮度。

輸入
選擇輸入來源。

Volume(音量)
調整音量設置。

Note: 移動 Joy Key (  ) 返回上一個功能表。
熱鍵
當螢幕顯示 (OSD) 選單關閉時,您可以使用 Joy Key 快速存取特殊功能。
| 按鍵 | 說明 |
|---|---|
 |
按住該鍵 5 秒鐘可啟動/停用 LED 照明。
 |
 |
按住該鍵可鎖定/解鎖OSD功能表。 當功能表出現在螢幕上時,繼續按住該鍵 10 秒鐘以鎖定/解鎖 OSD 功能表。
 如果 OSD 選單被鎖定,螢幕上將顯示以下訊息:  |
 |
按住 鍵鎖定/解鎖 電源 ( ) 按鈕 當功能表出現在螢幕上時,繼續按住該鍵 10 秒鐘以鎖定/解鎖“電源” ( ) 按鈕  如果 Power ( ) 按鈕被鎖定,螢幕上將出現以下消息。  |
 |
按住該鍵 10 秒鐘可在設備打開時顯示/隱藏啟動螢幕。  |
 |
按住該鍵 10 秒鐘可啟動/停用 Ultra Fast。  |
配置設定
一般操作
- 移動 Joy Key ( ) 以顯示 Startup Menu。然後導航到 主功能表 並按下 Joy 鍵 (
 ) 以顯示OSD功能表。
 - 移動 Joy Key' (
 ) 或 (
) 或 (  ) 以選擇主功能表。然後按 Joy Key ( ) 進入選單。
 - 移動 Joy Key' ( ) 或 ( ) 以選擇所需的功能表選項。然後按 Joy Key ( ) 進入子功能表。
- 移動 Joy Key' ( ) 或 ( ) 調整/選擇設置。然後按 Joy Key ( ) 進行確認。
- 移動 Joy Key ( ) 返回上一個功能表。


選單選項
輸入
- 移動 Joy Key ( ) 以顯示 Startup Menu。然後導航到 主功能表 並按下 Joy 鍵 ( ) 以顯示OSD功能表。
- 移動 Joy Key' ( ) 或 ( ) 選擇 Input。然後按 Joy Key ( ) 進入 Input 功能表。
- 移動 Joy Key' ( ) 或 ( ) 以選擇所需的輸入源。然後按 Joy Key ( ) 以確認選擇。
色彩模式

- 移動 Joy Key ( ) 以顯示 Startup Menu。然後導航到 主功能表 並按下 Joy 鍵 ( 以顯示OSD功能表。
- 移動 Joy Key' ( ) 或 ( ) 選擇 Color Mode。然後按 Joy Key ( ) 進入 Color Mode 功能表。
- 移動 Joy Key' ( ) 或 ( ) 以選擇所需的選項。然後按 Joy Key ( ) 進入其子功能表。
- 移動 Joy Key ( ) 或 ( ) 調整/選擇設置,然後按 Joy Key ( ) 以確認選擇 (如果適用)。
| 選單選項 | 說明 |
|---|---|
| Adobe RGB | 精確的色域和 Adobe RGB 標準的灰度係數。 |
| DCI-P3 | DCI-P3 標準的精確色域和灰度係數。 |
| sRGB | 精確的色域和 sRGB 標準的灰度係數。 |
| REC709 | ITU-R 建議書的精確色域和伽瑪Standard(標準)(2.2) |
| DICOM-SIM | Gamma 曲線設置為 DICOM 類比。 |
| 使用者 | 自訂、使用者定義的設置。 |
| CAL1/CAL2/CAL3 | 以第 1/2/3 個使用者校準模式顯示。 |
| HDR | 降低特定場景的整體對比,更能看見亮處和暗處的細節。 |
視圖模式

- 移動 Joy Key ( ) 以顯示 Startup Menu。然後導航到 主功能表 並按下 Joy 鍵 ( ) 以顯示OSD功能表。
- 移動 Joy Key ( ) 或 ( ) 選擇 ViewMode 。然後按 Joy Key ( ) 進入 ViewMode 功能表。
- 移動 Joy Key' ( ) 或 ( ) 以選擇所需的選項。然後按 Joy Key ( ) 進入其子功能表。
| 選單選項 | 說明 |
|---|---|
| CAD/CAM | 選擇此選項可檢視圖形設計檔。 |
| 視頻編輯 | 選擇此選項可進行視頻編輯。 |
| 動畫 | 為動畫選擇此選項。 |
| 攝影師 | 選擇此選項可查看照片檔。 |
| FPS 1 | 非常適合第一人稱射擊遊戲。 |
| FPS 2 | 非常適合第一人稱射擊遊戲。 |
| RTS | 非常適合即時戰略遊戲。 |
| MOBA 在線競技遊戲 | 為 Multiplayer Online Battle Arena 遊戲選擇此選項。 |
音訊調整

- 移動 Joy Key ( ) 以顯示 Startup Menu。然後導航到 主功能表 並按下 Joy 鍵 ( ) 以顯示OSD功能表。
- 移動 Joy Key' ( ) 或 ( ) 選擇 Audio Adjust。然後按 Joy Key ( ) 進入 Audio Adjust 功能表。
- 移動 Joy Key' ( ) 或 ( ) 以選擇所需的選項。然後按 Joy Key ( ) 進入其子功能表。
- 移動 Joy Key ( ) 或 ( ) 調整/選擇設置,然後按 Joy Key ( ) 以確認選擇 (如果適用)。
| 選單選項 | 說明 |
|---|---|
| Volume(音量) | 調整顯示器的聲音位準。 |
| 靜音 | 關閉顯示器的聲音。 |
| Audio Input(音訊輸入) | 選擇音訊輸入來源。 |
設定選單

- 移動 Joy Key ( ) 以顯示 Startup Menu。然後導航到 主功能表 並按下 Joy 鍵 ( ) 以顯示OSD功能表。
- 移動 Joy Key' ( ) 或 ( ) 選擇 設置功能表。然後按 Joy Key ( ) 進入 設置功能表 功能表。
- 移動 Joy Key' ( ) 或 ( ) 以選擇所需的選項。然後按 Joy Key ( ) 進入其子功能表。
- 移動 Joy Key ( ) 或 ( ) 調整/選擇設置,然後按 Joy Key ( ) 以確認選擇 (如果適用)。
| 選單選項 | 說明 |
|---|---|
| 語言選擇 | 為 OSD 選單選擇可用語言。 |
| 自適應同步 | 排除遊戲過程中的卡頓和撕裂。 |
| 決議通知 | 啟用此選項可允許系統通知使用者目前查看解析度不是正確的原始解析度。 |
| PureXP™ | 此功能是 “Pure Experience” 的縮寫,可以提高移動對象的視覺品質,使它們不那麼模糊,視圖更清晰。 |
| 資訊 | 顯示監視器資訊。 |
| OSD 超時 | 設定 OSD 選單停留在畫面上的時間長度。 |
| OSD 背景 | 當 OSD 功能表出現在螢幕上時顯示/隱藏 OSD 背景。 |
| OSD 樞軸 | 設置OSD功能表方向。
|
| 電源指示燈 | 將電源指示燈設置為打開或關閉。如果設置設置為 On(開),則當設備打開時,電源指示燈會亮起藍色。 |
| Auto Power Off(自動關機) | 啟用此選項可允許監視器在一定時間後自動關閉。 |
| 睡眠 | 設置顯示器進入睡眠模式之前的空閒時間。 |
| 多圖片 | Off(關閉)
PBP 左右
PIP
雙色
|
| 節能模式 | 根據功耗在各種模式之間進行選擇。 |
| OverScan | 啟用此選項可自動將原始圖片水平和垂直放大到填滿螢幕的相等縱橫比。 |
| 回應時間 | 調整回應時間,創建沒有條紋、模糊或重影的平滑圖像。低回應時間非常適合圖形最密集的遊戲,並在觀看體育或動作電影時提供驚人的視覺品質。 |
| USB 充電 | 啟用/禁用USB充電。 |
| 後檯燈光 | 調整LED照明。 |
| Burn-in Eraser | 減少圖像老化。 |
| DDC/CI | 啟用此選項可允許顯示器通過顯卡進行控制。 |
| 重新命名 | 重新命名個人化自訂設定檔。 |
| 所有召回 | 將所有設定重設為預設值。 |
高級功能和設置
自動旋轉
借助自動旋轉功能,顯示器可以檢測圖像顯示,並在垂直或水平旋轉螢幕時自動調整圖像在螢幕上的方向。
Note: Auto Pivot 功能使用 DDC/CI 與監視器通信。在應用自動旋轉功能之前,請確保 DDC/CI 設置設置為 On。
要啟用 DDC/CI 設定,請執行以下操作:
- 打開 OSD 功能表並選擇 設置功能表 功能表。然後按 Joy Key ( ) 進入功能表。
- 移動 Joy Key' ( ) 或 ( ) 選擇 DDC/CI。然後按 Joy Key ( ) 進入其子功能表。
移動 Joy Key (
) 或 ( ) 選擇 On。然後按 Joy Key ( ) 進行確認。

確保 DDC/CI 為 On 後,繼續將 OSD Pivot 設置為 Auto:
- 打開 OSD 功能表並選擇 設置功能表 功能表。然後按 Joy Key ( ) 進入功能表。
- 移動 Joy Key ( ) 或 ( ) 選擇 OSD Pivot。然後按 Joy Key ( ) 進入其子功能表。
- 移動 Joy Key ( ) 或 ( ) 選擇 自動。然後按 Joy Key ( ) 進行確認。
後檯燈光
With the Backstage Lighting function, the monitor can adjust the LED brightness to the optimal settings.
To configure the Backstage Lighting settings:
- Open the OSD Menu and select the Setup Menu menu. Then press the Joy Key ( ) to enter the menu.
- Move the Joy Key ( ) or ( ) to select Backstage Lighting. Then press the Joy Key ( ) to enter its sub-menu.
- Move the Joy Key ( ) or ( ) to select Level 1, Level 2, or Level 3 to enable the function. Then press the Joy Key ( ) to confirm.
著色+
為保證長期的色彩準確度,部分特定型號支持硬體色彩校準功能。Colorbration+ 應用程式安裝檔可以在我們的 網站 找到。
標準顯示器包裝不包括顏色感測器,Colorbration+ 應用程式在校準過程中需要顏色感測器。
相容的顏色感測器包括:
- X-Rite i1 Display Pro
- X-Rite i1 Pro 2
- X-Rite i1 Studio
- Xrite Colormunki Photo
- Xrite Colormunki Design
- Datacolor SpyderX series
- ColorPro™ Wheel
雙色
顯示器帶有雙色引擎,可在 PIP(畫中畫)或 PBP(畫中畫)模式下顯示兩種不同的顏色設置。您可以在兩個視窗(主視窗和輔助視窗)中設置不同的顏色預設。
Note: 要啟用 PIP 或 PBP 模式,請參考 Multi-Picture 部分。
要設定雙色:
- 移動 Joy Key' ( ) 以顯示 啟動功能表。然後導航到 主功能表 並按下 Joy 鍵 ( ) 以顯示OSD功能表。
- 移動 Joy Key ( ) 或 ( ) 選擇 Setup Menu 功能表。然後按 Joy Key ( ) 進入功能表。
- 移動 Joy Key ( ) 或 ( ) 選擇 Multi-Picture。然後按 Joy Key ( ) 進入其子功能表。
- 移動 Joy Key' ( ) 或 ( ) 選擇 Dual Color 。然後按 Joy Key ( ) 進入其子功能表。
- 移動 Joy Key' ( ) 或 ( ) 選擇所需的顏色設置。然後按 Joy Key ( ) 進行確認。
韌體更新
為了達到最佳的顯示效能並解決任何已知問題,最好使用最新的韌體版本更新您的顯示器。您可以使用隨附的 USB 線與 vDisplayManager 應用程式,輕鬆升級顯示器的韌體。
更新韌體:
- 從我們的 網站.
- 將 USB Type B 電纜的一端連接到顯示器的 USB Type B 埠。然後將電纜的另一端連接到電腦的 USB 埠。
- 啟動 vDisplayManager。選擇側邊功能表的進階標籤。
- 按一下更新,檢查您的顯示器韌體是否有任何更新。
- 等到更新程序完成 (若適用)。

Note: 固件更新過程中的任何中斷都可能會永久損壞您的顯示器。請勿斷開 USB 電纜或關閉 PC 和顯示器。
HDR (High-Dynamic-Range)
HDR 會降低給定場景的整體對比度,以便更好地查看高光和陰影中的細節。
Note: 在顯示器上啟用 HDR 之前,請先確保您的設備上已打開 HDR 設置。
要啟用 HDR 功能:
- 移動 Joy Key ( ) 以顯示 Startup Menu。然後導航到 主功能表 並按下 Joy 鍵 ( ) 以顯示OSD功能表。
- 移動 Joy Key' ( ) 或 ( ) 選擇 Color Mode。然後按 Joy Key ( ) 進入 Color Mode 功能表。
- 移動 Joy Key ( ) 或 ( ) 選擇 HDR。然後按 Joy Key ( ) 進入其子功能表。
- 移動 Joy Key' ( ) 或 ( ) 以選擇其中一個選項 。然後按 Joy Key ( ) 進行確認。

KVM
KVM 功能允許使用者通過單個鍵盤和滑鼠控制連接到同一顯示器的兩台電腦。
Note: 僅適用於 PBP(畫中畫)模式。
要將兩台電腦連接到顯示器:
- 將 USB Type C 電纜的一端連接到顯示器的 USB Type C 連接埠。然後將電纜的另一端連接到筆記型電腦的 USB Type C 連接埠。
- 將 DisplayPort 電纜的一端連接到顯示器的 DisplayPort 埠。然後將電纜的另一端連接到計算機的 DisplayPort 或 Mini DisplayPort。
- 將 USB Type B 電纜的一端連接到顯示器的 USB Type B 埠。然後將電纜的另一端連接到電腦的 USB 埠。

要開啟 PBP 模式:
- 移動 Joy Key ( ) 以顯示 Startup Menu。然後導航到 主功能表 並按下 Joy 鍵 ( ) 以顯示OSD功能表。
- 移動 Joy Key ( ) 或 ( ) 選擇 Setup Menu 功能表。然後按 Joy Key ( ) 進入功能表。
- 移動 Joy Key ( ) 或 ( ) 選擇 Multi-Picture。然後按 Joy Key ( ) 進入其子功能表。
- 移動 Joy Key' ( ) 或 ( ) 選擇 PBP Left-Right 。然後按 Joy Key ( ) 以啟用 PBP 模式。

要啟動 KVM 功能:
- 移動並按住 'Joy Key (
 ) 兩秒鐘以啟動 KVM 功能。
 - 隨後將能在兩個畫面 (左側/右側視窗) 之間,切換游標。

多圖片
Multi-Picture 允許使用者進一步自定義他們的工作空間,允許來自不同輸入的最多四個拆分視窗,顯示具有不同縱橫比的高解析度內容,而不會因原始輸入源而失真。

要啟用多畫面模式:
- 移動 Joy Key' ( ) 以顯示 啟動功能表。然後導航到 主功能表 並按下 Joy 鍵 ( ) 以顯示OSD功能表。
- 移動 Joy Key ( ) 或 ( ) 選擇 Color Mode。然後按 Joy Key ( ) 進入 Color Mode 功能表。
- 移動 Joy Key ( ) 或 ( ) 選擇 Multi-Picture。然後按 Joy Key ( ) 進入其子功能表。
- 移動 Joy Key' ( ) 或 ( ) 選擇 PBP Left-Right 或 PIP 。然後按 Joy Key ( ) 進入選取模式。
PBP (Picture-by-Picture)

Note: 要在視窗中顯示全尺寸圖像,請將螢幕解析度調整為 1920 x 1080(PBP 左右)。
要設定 PBP:
- 移動 Joy Key' ( ) 以顯示 啟動功能表。然後導航到 主功能表 並按下 Joy 鍵 ( ) 以顯示OSD功能表。
- 移動 Joy Key' ( ) 或 ( ) 選擇 設置功能表。然後按 Joy Key ( ) 進入 設置功能表 功能表。
- 移動 Joy Key ( ) 或 ( ) 選擇 Multi-Picture。然後按 Joy Key ( ) 進入其子功能表。
- 移動 Joy Key' ( ) 或 ( ) 選擇 PBP Left-Right 。然後按 Joy Key ( ) 進入其子功能表。
- 要更改輸入源,請選擇源位置(左源選擇/右源選擇),然後按 Joy 鍵 ( ).
- 移動 Joy Key' ( ) 或 ( ) 選擇所需的輸入源,然後按 Joy Key ( ) 進行確認。
- 要交換兩個視窗,請選擇 Swap 並按下 Joy Key' ( ) 進行確認。
PIP (Picture-in-Picture)

要設定 PIP:
- 移動 Joy Key' ( ) 以顯示 啟動功能表。然後導航到 主功能表 並按下 Joy 鍵 ( ) 以顯示OSD功能表。
- 移動 Joy Key' ( ) 或 ( ) 選擇 設置功能表。然後按 Joy Key ( ) 進入 設置功能表 功能表。
- 移動 Joy Key ( ) 或 ( ) 選擇 Multi-Picture。然後按 Joy Key ( ) 進入其子功能表。
- 移動 Joy Key' ( ) 或 ( ) 選擇 PIP 。然後按 Joy Key ( ) 進入其子功能表。
- 要更改插入視窗的輸入源,請選擇 PIP Source Select 並按下 Joy Key ( ). 然後移動 Joy Key ( ) 或 ( ) 選擇所需的輸入源,然後按 Joy Key ( ) 進行確認。
- 要調整插入視窗的位置,請選擇 PIP Position 並按下 Joy Key ( ).
- 按下 Joy Key' ( ) 選擇 PIP H.Position 或 PIP V.Position 。
- 移動 Joy Key ( ) 或 ( ) 調整設置並按下 Joy Key ( ) 進行確認。
- 要調整插入視窗的大小,請選擇 PIP Size' 並按 Joy Key ( ). 然後移動 Joy Key ( ) 或 ( ) 調整設置。
- 要交換兩個視窗,請選擇 Swap 並按下 Joy Key' ( ) 進行確認。
顏色校準
什麼 Colorbration⁺?
色彩準確性是創作工作流程最重要的層面之一,確保顯示器的色彩準確呈現原始影像或數位檔案的色彩非常重要。此軟體可讓您:
- 輕鬆快速校正和剖析顯示器。
- 控制白點、亮度、對比、Gamma 等設定。
在哪裡獲取 Colorbration⁺?
Colorbration⁺ 軟體可以從我們的 網站.
下載完成後,啟動安裝檔案並依照畫面上的指示安裝軟體。
連接方式
除了下載軟體外,請確保您的顯示器、計算機和色度計已正確連接。
連接顯示器與電腦有兩種方式:
HDMI 或 DisplayPort
選擇 HDMI 或 DisplayPort 連接的使用者也應透過 USB Type B 轉 USB Type A 纜線連接顯示器與電腦。

Type C
選擇 USB Type C 連接的使用者可直接連接顯示器與電腦。

比色計連接
將色差計的 USB Type A 電纜連接到顯示器的 USB Type A 連接埠。

準備色彩校正
- 請確保所有連接都已建立且正確無誤。
- 將顯示器向上傾斜。
- 取下鏡頭蓋(如果適用),小心地將測量設備與顯示器屏幕接觸。


用 Colorbration+
初次啟動 Colorbration⁺ 時,有兩種模式可供使用者選擇:
- Basic Mode(基本模式)
- Advanced Mode(進階模式)
一般操作
若要開始進階模式校正程序:
- 選擇 Device Selection(裝置選擇),然後從可用選項中選擇要校正的顯示器。
- 連接並從可用選項中選擇要使用的測量裝置。
- 在側邊欄選單上選擇 Calibration(校正)。
- 從下拉式選單中選擇所需的校正設定,或建立自訂設定檔
- 選擇校正設定後,選擇開始校正程序。
- 等到色彩校正程序完成。
Important: 如果色彩校正過程中斷,可能永久損壞顯示器色彩。請勿拔除 USB 線或關閉電腦或顯示器。
附錄
產品規格
| 項目 | 類別 | 規格 |
|---|---|---|
| LCD | Type | IPS type, a-si TFT Active Matrix 3840 x 2160 LCD, 0.1554 (H) mm x 0.1554 (V) mm pixel pitch |
| Display Size | 68.47 cm | |
| 27" viewable | ||
| Color Filter | RGB Vertical Stripe | |
| Glass Surface | Anti-Glare (Haze 25%), Hard Coating (3H) | |
| 輸入訊號 | Video Sync | TMDS digital (100 Ω)
|
| 相容性 | PC | up to 3840 x 2160 |
| Macintosh | up to 3840 x 2160 | |
| Resolution and Timings[1] | Recommended | 3840 x 2160 @ 60 Hz |
| 支援 |
| |
| 電源[2] | Input Voltage | AC 100-240V, 50/60 Hz (auto switch) |
| 顯示區域 | Active Size (H x V) |
596.74 x 335.66 mm |
| 23.49” x 13.21” | ||
| 運行條件 | Altitude | 3.048 km |
| 10,000 ft | ||
| Relative Humidity | 20% to 90% (non-condensing) | |
| Temperature | 0° C to 40° C | |
| 32° F to 104° F | ||
| 存放條件 | Altitude | 12 km |
| 39,370.1 ft | ||
| Relative Humidity | 5% to 90% (non-condensing) | |
| Temperature | -20° C to 60° C | |
| -4° F to 140° F | ||
| 尺寸
(with stand) |
Physical (W x H x D) |
613.10 x 569.11~449.11 x 232.4 mm |
| 24.14” x 22.41~17.68” x 9.15” | ||
| 重量
(with stand) |
Physical | 8.23 kg |
| 18.15 lb | ||
| 壁掛式 | Dimensions | 100 x 100 mm |
| 耗電量 | On[3] | 45W (Typical) without Audio 74W (Maximum) with Audio |
| Off | < 0.3W (Maximum) |
| HDMI、HDMI 高畫質多媒體介面、HDMI 商業外觀及 HDMI 識別標章等詞彙均為 HDMI Licensing Administrator, Inc. 的商標或註冊商標。 |
On-Screen Display (OSD) Menu Tree
| Sub-menu | Menu Option | ||
|---|---|---|---|
| Adobe RGB | Brightness | (-/+, 0~100)/1 | |
| Color Temperature | 9300K | ||
| 7500K | |||
| 6500K | |||
| 6300K | |||
| 5000K | |||
| Gamma | 1 | ||
| 1.4 | |||
| 1.8 | |||
| 2.2 | |||
| 2.4 | |||
| 2.6 | |||
| Sharpness | (-/+, 0~100)/1 | ||
| Aspect Ratio | 1:1 | ||
| 4:3 | |||
| Full Screen | |||
| Uniformity | On | ||
| Off | |||
| Recall | |||
| DCI-P3 | Brightness | (-/+, 0~100)/1 | |
| Color Temperature | 9300K | ||
| 7500K | |||
| 6500K | |||
| 6300K | |||
| 5000K | |||
| Gamma | 1 | ||
| 1.4 | |||
| 1.8 | |||
| 2.2 | |||
| 2.4 | |||
| 2.6 | |||
| Sharpness | (-/+, 0~100)/1 | ||
| Aspect Ratio | 1:1 | ||
| 4:3 | |||
| Full Screen | |||
| Uniformity | On | ||
| Off | |||
| Recall | |||
| sRGB | Brightness | (-/+, 0~100)/1 | |
| Color Temperature | 9300K | ||
| 7500K | |||
| 6500K | |||
| 6300K | |||
| 5000K | |||
| Gamma | 1 | ||
| 1.4 | |||
| 1.8 | |||
| 2.2 | |||
| 2.4 | |||
| 2.6 | |||
| Sharpness | (-/+, 0~100)/1 | ||
| Aspect Ratio | 1:1 | ||
| 4:3 | |||
| Full Screen | |||
| Uniformity | On | ||
| Off | |||
| Recall | |||
| REC709 | Brightness | (-/+, 0~100)/1 | |
| Color Temperature | 9300K | ||
| 7500K | |||
| 6500K | |||
| 6300K | |||
| 5000K | |||
| Gamma | 1 | ||
| 1.4 | |||
| 1.8 | |||
| 2.2 | |||
| 2.4 | |||
| 2.6 | |||
| Sharpness | (-/+, 0~100)/1 | ||
| Aspect Ratio | 1:1 | ||
| 4:3 | |||
| Full Screen | |||
| Uniformity | On | ||
| Off | |||
| Recall | |||
| DICOM-SIM | Sharpness | (-/+, 0~100)/1 | |
| Aspect Ratio | 1:1 | ||
| 4:3 | |||
| Full Screen | |||
| Recall | |||
| Soft Proofing | Contrast | (-/+, 0~100)/1 | |
| Brightness | (-/+, 0~100)/1 | ||
| Color Temperature | 9300K | ||
| 7500K | |||
| 6500K | |||
| 6300K | |||
| 5000K | |||
| Gamma | 1 | ||
| 1.4 | |||
| 1.8 | |||
| 2.2 | |||
| 2.4 | |||
| 2.6 | |||
| Sharpness | (-/+, 0~100)/1 | ||
| Aspect Ratio | 1:1 | ||
| 4:3 | |||
| Full Screen | |||
| Uniformity | On | ||
| Off | |||
| Recall | |||
| User | Contrast | (-/+, 0~100)/1 | |
| Brightness | (-/+, 0~100)/1 | ||
| Color Temperature | 9300K | ||
| 7500K | |||
| 6500K | |||
| 6300K | |||
| 5000K | |||
| Gamma | 1 | ||
| 1.4 | |||
| 1.8 | |||
| 2.2 | |||
| 2.4 | |||
| 2.6 | |||
| Advanced DCR | (-/+, 0~100)/25 | ||
| Gain | Red | (-/+, 0~100) | |
| Green | (-/+, 0~100) | ||
| Blue | (-/+, 0~100) | ||
| Offset | Red | (-/+, 0~100) | |
| Green | (-/+, 0~100) | ||
| Blue | (-/+, 0~100) | ||
| Hue | Red | (-/+, 0~100) | |
| Green | (-/+, 0~100) | ||
| Blue | (-/+, 0~100) | ||
| Cyan | (-/+, 0~100) | ||
| Magenta | (-/+, 0~100) | ||
| Yellow | (-/+, 0~100) | ||
| Sharpness | (-/+, 0~100)/1 | ||
| Aspect Ratio | 1:1 | ||
| 4:3 | |||
| Full Screen | |||
| Blue Light Filter | (-/+, 0~5) | ||
| Uniformity | On | ||
| Off | |||
| Recall | |||
| CAL1/CAL2/CAL3 | Brightness | (-/+, 0~100)/1 | |
| Color Calibration Notice | Result | ||
| Remind Schedule Hour | |||
| Counter Hour | |||
| Recall | |||
| Sharpness | (-/+, 0~100)/1 | ||
| Aspect Ratio | 1:1 | ||
| 4:3 | |||
| Full Screen | |||
| Uniformity | On | ||
| Off | |||
| Recall | |||
| HDR | Standard | ||
| HDR_M | |||
| HDR_H | |||
| Smooth | |||
| Off | |||
| Sub-menu | Menu Option | |
|---|---|---|
| CAD/CAM | Ultra Clear | (-/+, 0~4) |
| Advanced-Sharpness | (-/+, 0~100) | |
| Advanced-Gamma | (-/+, 1.8~2.6) | |
| Video Edit | Ultra Clear | (-/+, 0~4) |
| Advanced-Sharpness | (-/+, 0~100) | |
| Advanced-Gamma | (-/+, 1.8~2.6) | |
| Animation | Ultra Clear | (-/+, 0~4) |
| Advanced-Sharpness | (-/+, 0~100) | |
| Black Stabilization | (-/+, 0~10) | |
| Photographer | Ultra Clear | (-/+, 0~4) |
| Advaned-Sharpness | (-/+, 0~100) | |
| Advanced-Gamma | (-/+, 1.8~2.6) | |
| FPS 1 | ||
| FPS 2 | ||
| RTS | ||
| MOBA | ||
| Sub-menu | Menu Option |
|---|---|
| Volume | (-/+, 0~100)/1 |
| Mute | On |
| Off | |
| Audio Input | DisplayPort |
| HDMI 1 | |
| HDMI 2 | |
| Type C |
| Sub-menu | Menu Option | ||
|---|---|---|---|
| Language Select | English | ||
| Français | |||
| Deutsch | |||
| Español | |||
| Italiano | |||
| Suomi | |||
| Русский | |||
| Türkçe | |||
| 日本語 | |||
| 한국어 | |||
| 繁體中文 | |||
| 简体中文 | |||
| Resolution Notice | On | ||
| Off | |||
| Information | |||
| OSD Timeout | (-/+, 5/15/30/60) | ||
| OSD Background | On | ||
| Off | |||
| OSD Pivot | Auto | ||
| 0° | |||
| +90° | |||
| -90° | |||
| 180° | |||
| Power Indicator | On | ||
| Off | |||
| Auto Power Off | On | ||
| Off | |||
| Sleep | 30 minutes | ||
| 45 minutes | |||
| 60 minutes | |||
| 120 minutes | |||
| Off | |||
| Multi-Picture | Off | ||
| PBP Left-Right | Left Source Select | DisplayPort | |
| HDMI 1 | |||
| HDMI 2 | |||
| Type C | |||
| Right Source Select | DisplayPort | ||
| HDMI 1 | |||
| HDMI 2 | |||
| Type C | |||
| Swap | |||
| PIP | PIP Source Select | DisplayPort | |
| HDMI 1 | |||
| HDMI 2 | |||
| Type C | |||
| PIP Position | PIP H. Position | ||
| PIP V. Position | |||
| PIP Size | (-/+, 0~100) | ||
| Swap | |||
| Dual Color | DCI-P3 | ||
| sRGB | |||
| REC709 | |||
| DICOM-SIM | |||
| User | |||
| CAL 1 | |||
| CAL 2 | |||
| CAL 3 | |||
| CAD/CAM | |||
| Video Edit | |||
| Animation | |||
| Photographer | |||
| FPS 1 | |||
| FPS 2 | |||
| RTS | |||
| MOBA | |||
| ECO Mode | Standard | ||
| Optimize | |||
| Conserve | |||
| Energy Saving | On | ||
| Off | |||
| Overscan | On | ||
| Off | |||
| Response Time | Standard | ||
| Advanced | |||
| Ultra Fast | |||
| USB Charging | On | ||
| Off | |||
| Backstage Lighting | Level 1 | ||
| Level 2 | |||
| Level 3 | |||
| Off | |||
| Burn-in Eraser | On | ||
| Off | |||
| DDC/CI | On | ||
| Off | |||
| Rename | |||
| All Recall | |||
安全注意事項
請在使用設備前完整閱讀這些說明。 請將本使用指南放在安全的地方,以便日後參考。 請閱讀所有警告並遵守所有指示。
- 坐在距離設備至少 45 釐米(18 英寸)的地方。
- 在設備周圍留出至少 10 釐米(4 英寸)的間隙,以確保適當的通風。
請將裝置放在通風良好的區域。請勿將任何會阻礙散熱的物品放在裝置上。 請勿在靠近水的地方使用裝置。為降低火災或觸電的風險,請勿讓裝置受潮。 請避免讓裝置受陽光直射或暴露在其他持續熱源下。 請勿安裝於接近熱源的地方,例如散熱器、暖氣機、火爐或其他可能使裝置溫度升高至危險水準的裝置(包括擴大機)。 請使用柔軟的乾布清潔外殼。有關更多資訊,請參閱本手冊的“維護”部分。
- 避免觸摸螢幕,因為如果觸摸螢幕,油可能會積聚在螢幕上。
- 請勿用尖銳或堅硬的物體觸摸螢幕表面,否則可能會損壞螢幕。
- 請勿將設備放置在可能放置在產品和支撐傢俱之間的布或其他材料上。
移動裝置時,小心別讓裝置掉落或撞到任何東西。 請勿將裝置放在不平穩的平面上。裝置可能會傾倒,導致人員受傷或裝置故障。 請勿在裝置或連接線上放置任何重物。
- 始終使用設備組製造商推薦的機櫃、支架或安裝方法。
- 始終使用可以安全支撐設備的傢俱。
- 始終確保設備沒有懸垂在支撐傢具的邊緣。
- 請勿將設備放置在高大的傢俱上,例如櫥櫃或書櫃,除非將傢俱和設備都固定在合適的支架上。
- 始終教育孩子攀爬傢俱以接觸設備或相關設備的危險。
- 請勿將顯示器放置在可能有兒童在場的地方。
- 請勿將玩具和遙控器等可能誘使兒童攀爬的物品放在放置產品的設備或傢具的頂部。
如果冒煙、出現異音或異味,請立即關閉裝置並聯絡經銷商或 ViewSonic®。繼續使用裝置很危險。 請勿嘗試規避極化或接地插頭的安全設計。極化插頭具有兩個寬度不一的插片。接地插頭具有兩個插片及第三支接地接腳。較寬的扁平插腳和接地插腳是確保安全之用,如果插頭無法插入插座,請取得轉接器,勿嘗試強行將插頭插入插座。 連接至電源插座時,請勿拆除接地插腳。請確保接地插腳不被拆除。
- 始終佈置和管理連接到設備的電線和電纜,以免它們被絆倒、拉扯或抓住。
請避免讓電源線受到踩踏或擠壓,尤其是插頭以及電源線與設備的連接處。請確保電源插座位於設備附近,以便使用。 如果長時間不使用裝置,請將電源插頭從 AC 插座上拔下。
- 請確認建築物內安裝的配電系統。系統應提供額定電壓為 120/240V、20A 的斷路器。
- 僅使用製造商指定的附件/附件,例如手推車、支架、三腳架、支架或桌子。
若使用推車,移動推車/設備組合時請務必小心,以免翻覆導致人員受傷。 維修作業應交由合格的專業人員執行。裝置有任何損壞時,將需要維修,例如: 電源線或插頭損壞
- 液體濺到設備上或物體掉入設備。
- 如果設備暴露在雨中或潮濕環境中。
裝置無法正常運作或摔落
- 使用耳式/耳機時,請將音量調節到適當的水平,否則可能會導致聽力受損。
- 穩定性危險:顯示幕可能會掉落,從而導致嚴重的人身傷害或死亡。為防止受傷,必須按照安裝說明將此顯示器牢固地固定在地板/牆壁上。
- 使用繩索或其他約束裝置將顯示器固定在牆壁或固定物體上,有助於支撐顯示器的重量,以防止顯示器翻倒。
Note:
- 約束裝置/繩索應能夠承受 100N 的力。
::* 確保繩索拉直,並消除任何鬆弛。設備背面應面向牆壁,以確保設備在外力作用下不會傾斜。 ::* 確保顯示器在設備的任何高度和旋轉角度下都不會在外力作用下傾斜。
- 如果要保留和重新定位現有顯示器,則應應用與上述相同的注意事項。