
UMB202 Initial Setup: Difference between revisions
From ViewSonic Documentation
// via Wikitext Extension for VSCode |
No edit summary |
||
| (20 intermediate revisions by one other user not shown) | |||
| Line 1: | Line 1: | ||
<noinclude> | <noinclude> | ||
{{ | <div class="noprint"> | ||
<div style="top:1px;width:auto;" class="nomobile"> | |||
<div class="grid-container"> | |||
<div class="item1" style="text-align:center; font-size:16; background-color:#DB0025; font-weight:bold; color:#ffffff;">{{PAGENAME}}</div> | |||
| | <div class="grid-item">[[UMB202_Introduction|Introduction]] </div> | ||
<div class="grid-item">[[UMB202_Initial_Setup|Installing the Camera]] </div> | |||
| | <div class="grid-item">[[UMB202_Making_Connections|Making Connections]]</div> | ||
<div class="grid-item">[[UMB202_Appendix|Appendix]]</div> | |||
<div class="grid-item">[[UMB202_Regulatory_and_Service_Information|Regulatory and Service Information]]</div> | |||
<div class="grid-item">[[UMB202_Troubleshooting|Troubleshooting]]</div> | |||
</div> | |||
</div> | |||
</div> | |||
</noinclude> | </noinclude> | ||
=Wall Mounting= | =Wall Mounting= | ||
<div class="res-img">[[File:UMB202_Wall_Mount.png|600px]]</div> | <div class="res-img">[[File:UMB202_Wall_Mount.png|600px|alt=Mounting the camera to the wall]]</div> | ||
#Pre-drill three holes into the wall and install the three wall anchors. | #Pre-drill three holes into the wall and install the three wall anchors. | ||
#Align the wall bracket with the three anchors and secure the wall bracket with the three bracket screws. | #Align the wall bracket with the three anchors and secure the wall bracket with the three bracket screws. | ||
| Line 18: | Line 23: | ||
=VB-WMK-002 Mounting= | =VB-WMK-002 Mounting= | ||
== | ==What You Need== | ||
<gallery mode=nolines> | <gallery widths=300px mode="nolines"> | ||
UMB202 Components.png |UMB202 | UMB202 Components.png |<div style="font-style:normal; text-align:center;">UMB202</div> | ||
VB-WMK-002 Components.png |VB-WMK-002 | VB-WMK-002 Components.png |<div style="font-style:normal; text-align:center;">VB-WMK-002</div> | ||
</gallery> | </gallery> | ||
{{Note|Some parts are optional accessories included in other ViewSonic products. | {{Note|Some parts are optional accessories included in other ViewSonic products.}} | ||
==Mounting the Camera onto VB-WMK-002== | ==Mounting the Camera onto VB-WMK-002== | ||
<div class="res-img">[[File:VB-WMK-002_Mount.png|600px]]</div> | <div class="res-img">[[File:VB-WMK-002_Mount.png|600px|alt=Mounting the camera to the ViewSonic's TV Mount]]</div> | ||
#Line up the mounting plate with the VB-WMK-002. | #Line up the mounting plate with the VB-WMK-002. | ||
#Attach the mounting plate to the VB-WMK-002 with the screws. | #Attach the mounting plate to the VB-WMK-002 with the screws. | ||
#Secure the camera to the mounting plate. | #Secure the camera to the mounting plate. | ||
{{Note| | {{Note|When installing the camera, please note that there is a dimensional tolerance of 3%. It’s advisable to manually measure the size and the distance between the users and the camera prior to final installation.}} | ||
=Mounting UMB202 and VB-WMK-002 onto an IFP= | =Mounting UMB202 and VB-WMK-002 onto an IFP= | ||
After installing the UMB202 onto the VB-WMK-002, it can be set on an | <p>After installing the UMB202 onto the VB-WMK-002, it can be set on the top or bottom of an ViewBoard.</p> | ||
<gallery> | <gallery widths=400px mode="nolines"> | ||
UMB202 On Top IFP.png|On the Top | UMB202 On Top IFP.png|On the Top | ||
UMB202 On Bottom IFP.png|On the Bottom | UMB202 On Bottom IFP.png|On the Bottom | ||
</gallery> | </gallery> | ||
{{Note| | {{Note|To decide which of the mounting locations is compatible with your ViewBoard, please refer to the [[UMB202_Appendix#Compatibility List|Compatibility List]] or contact our local service provider for more information.}} | ||
{{#seo: | {{#seo: | ||
Latest revision as of 02:59, 27 September 2024
Wall Mounting

- Pre-drill three holes into the wall and install the three wall anchors.
- Align the wall bracket with the three anchors and secure the wall bracket with the three bracket screws.
- Secure the camera to the mounting plate.
- Attach the mounting plate to the wall bracket to complete the installation.
Note: When installing the camera, please note that there is a dimensional tolerance of 3%. It’s advisable to manually measure the size and the distance between the users and the camera prior to final installation.
VB-WMK-002 Mounting
What You Need
-
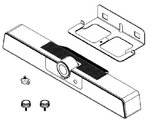 UMB202
 -
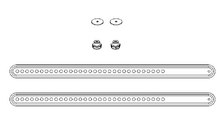 VB-WMK-002


Note: Some parts are optional accessories included in other ViewSonic products.
Mounting the Camera onto VB-WMK-002

- Line up the mounting plate with the VB-WMK-002.
- Attach the mounting plate to the VB-WMK-002 with the screws.
- Secure the camera to the mounting plate.
Note: When installing the camera, please note that there is a dimensional tolerance of 3%. It’s advisable to manually measure the size and the distance between the users and the camera prior to final installation.
Mounting UMB202 and VB-WMK-002 onto an IFP
After installing the UMB202 onto the VB-WMK-002, it can be set on the top or bottom of an ViewBoard.
-
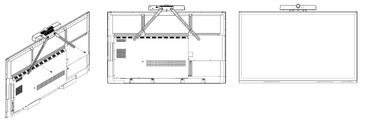 On the Top
 -
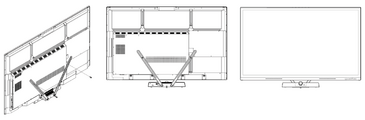 On the Bottom


Note: To decide which of the mounting locations is compatible with your ViewBoard, please refer to the Compatibility List or contact our local service provider for more information.