
XG271QG Initial Setup: Difference between revisions
From ViewSonic Documentation
Created page with "<noinclude> {{Sticky_Menu |1=XG271QG_Introduction |2=XG271QG_Initial_Setup |3=XG271QG_Connecting_Power_and_Devices |4=XG271QG_Adjusting_the_Viewing_Angle |5=XG271QG_Quick_Menu..." |
No edit summary |
||
| (2 intermediate revisions by the same user not shown) | |||
| Line 29: | Line 29: | ||
{{Note-yellow|Always place the device on a flat, stable surface. Failure to do so may cause the device to fall and damage the device and/or result in personal injury.}} | {{Note-yellow|Always place the device on a flat, stable surface. Failure to do so may cause the device to fall and damage the device and/or result in personal injury.}} | ||
= | =Using the Mouse Anchor= | ||
Included at the rear of the display, under the I/O ports, are two mouse anchors. Use these to prevent mouse cable dragging and personalize your mouse use setup. | |||
<gallery widths= | <gallery widths=300px heights=300px mode="nolines"> | ||
XG320Q_Mouse_1.png | |||
XG320Q_Mouse_2.png | |||
</gallery> | </gallery> | ||
| Line 70: | Line 66: | ||
XG270QG_Wall_Mount_2.png| VESA mounting points | XG270QG_Wall_Mount_2.png| VESA mounting points | ||
</gallery> | </gallery> | ||
<noinclude>=[[Monitor_Security_Slot| Using the Security Slot]]=</noinclude> | |||
{{#seo: | |||
|title=ViewSonic Monitor | |||
|title_mode=append | |||
|keywords=XG271QG, stand installation, wall mounting, VESA | |||
|description=How to install and uninstall the stand on the XG271QG monitor. | |||
}} | |||
[[Category:XG271QG]] | [[Category:XG271QG]] | ||
Latest revision as of 08:54, 7 January 2022
Stand Installation
- Place the monitor on a flat, stable surface with the screen facing down.
- Align and connect the two (2) points on the monitor stand’s base with the monitor stand’s neck.
- Use the captured screw in the monitor stand’s base and secure it to the monitor stand’s neck.
- Align and slide the upper hooks of the monitor stand into the stand mounting slots as shown in the illustration.
- Using the stand’s handle, lift the device into its upright position on a flat, stable surface.
-
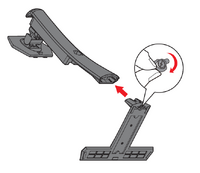 Align the base with the neck
 -
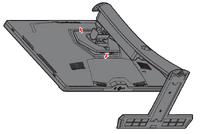 Align the hooks
 -
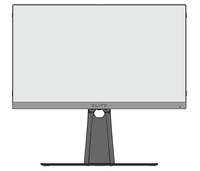 Lift into an upright position


Always place the device on a flat, stable surface. Failure to do so may cause the device to fall and damage the device and/or result in personal injury.
Using the Mouse Anchor
Included at the rear of the display, under the I/O ports, are two mouse anchors. Use these to prevent mouse cable dragging and personalize your mouse use setup.


Wall Mounting
Refer to the table below for the standard dimensions for wall mount kits.
For use only with a UL certified wall mount kit/bracket. To obtain a wall-mounting kit or height adjustment base, contact ViewSonic® or your local dealer.
| Maximum Loading | Hole Pattern (W x H) | Interface Pad (W x H x D) | Pad Hole | Screw Specification & Quantity |
|---|---|---|---|---|
| 14 kg | 100 x 100 mm | 115 x 115 x 2.6 mm | Ø 5 mm | M4 x 10 mm - 4 pieces |
- Turn off the device and disconnect all cables.
- Place the device on a flat, stable surface with the screen facing down.
- Pull down slightly to disengage the hooks. Then remove the stand.
- Attach the mounting bracket to the VESA mounting holes at the rear of the monitor. Then secure it with four (4) screws (M4 x 10 mm).
- Follow the instructions that come with the wall mounting kit to mount the monitor onto the wall.
-
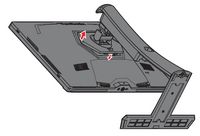 Disengage the hooks
 -
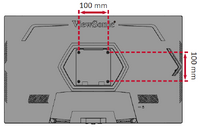 VESA mounting points

