M1 Operation
Home Screen
The Home Screen is displayed every time you start the projector. To navigate the Home Screen, simply use the directional buttons on the remote control. You can return to the main Home Screen at any time by pressing the Home button on the remote control.

| Menu | Description |
|---|---|
| HDMI | Switch to the connected HDMI source. |
| USB-C | Switch to the connected USB-C source. |
| USB Reader | Switch to the connected USB source. |
| Local Storage | Switch to locally stored files. |
| Micro SD | Switch to the connected Micro SD. |
| Wallpaper | Change the Home Screen wallpaper. |
| Settings | Adjust various settings. |
| Information | View display and projector information. |
HDMI
Project content from your media player, PC, or other HDMI compatible device.
- Connect your media player, PC, or other HDMI compatible device to the projector via an HDMI cable.
- Using the directional buttons on the remote control select HDMI, and press OK.
USB-C
Project content from your media player, PC, or other USB-C compatible device.
- Connect your media player, PC, or other USB-C compatible device to the projector via a USB-C cable.
- Using the directional buttons on the remote control select USB-C, and press OK.
USB Reader
Project content from your USB Type A device.
- Connect your USB Type A device to the projector via the USB Reader input.
- Using the directional buttons on the remote control select USB Reader, and press OK.
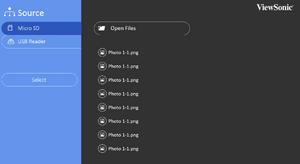
Local Storage
Easily manage locally stored files and folders.
-
 Select a single file
 -
 Select multiple files


- From the Home Screen, select Local Storage.
- To select a single file, use the directional buttons to select the desired file. Then press OK on the remote control to open the selected file.
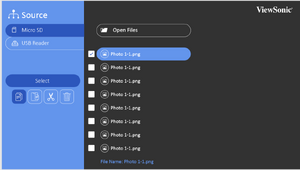
- To select multiple files, select Select then press the OK button. Boxes will then appear in front of each file. Use the up and down directional buttons to highlight files, and press OK to select them.
- Once a file is selected, you can Copy, Paste, Cut, or Delete the file.
Micro SD
Project content from your Micro SD card.
- Connect your Micro SD card to the projector via the Micro SD input.
- Using the directional buttons on the remote control select Micro SD, and press OK.
Wallpaper
Select this option to change the Home Screen wallpaper.
- From the Home Screen, select Wallpaper.
- Choose your preferred picture from the pre-installed wallpapers.
Settings
Under Setting you can adjust various projector settings.


- Using the directional buttons on the remote control select Setting, and press OK.
- Use the Up and Down buttons to select the desired setting and press OK. Then use the Left and Right buttons or the OK button to make adjustments or selections.
Information
View various details about the projector.
Media Control Bar Buttons
The Control Bar buttons will appear on screen if a video, music, or photo file are selected to be opened. Additionally, you can press OK on the remote control to show the control bar.

Tips for using USB
When using USB for reading and/or storage please keep in mind the following:
- Some USB storage devices may not be compatible.
- If you use an USB extension cable, the USB device may not recognize the USB.
- Only use USB storage devices formatted with Windows FAT32 or NTFS file system.
- Larger files will need extra time to load.
- Data on USB storage devices may be damaged or lost. Back up important files.
Supported File Formats
- Supported Office formats:

- Supported Multimedia formats:

Firmware Upgrade
Users can update the firmware by USB.
- NOTE: Do not unplug the power cord or USB during the upgrading process.
- Download the latest version from the ViewSonic website and copy the file to a USB device.
- Power on the projector and plug in the USB with the new Firmware.
- The system will display a dialog message confirming your wish to update.
- After selecting Confirm, a progress bar will appear as the update process begins.
- After reaching 100% the projector will restart. The whole process will take about five (5) minutes.
- After updating the Firmware, it will take a few minutes to restart the projector.
Using the 3D Function
This portable cinema features a 3D function which enables you to enjoy 3D movies, videos, and sporting events in a more realistic way by presenting the depth of the images. You need to wear a pair of 3D glasses to view 3D images. If the 3D signal is input from an HDMI 1.4a compatible device, the portable cinema detects the signal for 3D Sync information and once detected, it projects images in 3D format automatically.
To activate 3D functions:
- When playing videos, press OK and the video control bar will pop up.
- Select the 3D settings icon, the 3D Settings menu is displayed in the right bottom corner.
- Highlight 3D self detect and change to Auto.
- NOTE:
- When the 3D Sync function is on:
- The brightness level of the projected image will decrease.
- The Color Mode cannot be adjusted.
- If you discover the inversion of the 3D image depth, set the 3D Sync Invert function to ON to correct the problem.
- When the 3D Sync function is on:
- NOTE: