LX700-4K RGB Initial Setup
From ViewSonic Documentation
Choosing a Location - Projector Orientation
Personal preference and room layout will decide the installation location. Consider the following:
- Size and position of your screen.
- Location of a suitable power outlet.
- Location and distance between the projector and other equipment.
The projector is designed to be installed in one of the following locations:
-
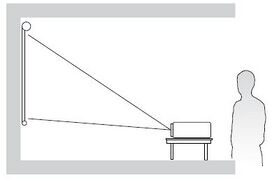 Desk Front
 -
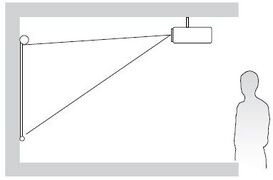 Ceiling Front
 -
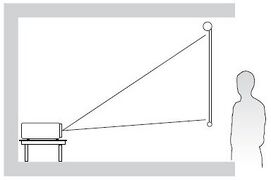 Desk Rear
 -
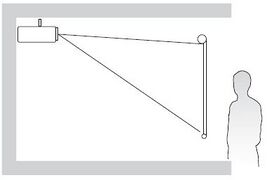 Ceiling Rear


| Location | Description |
|---|---|
| Desk Front | The projector is placed near the floor in front of the screen. |
| Ceiling Front | The projector is suspended upside-down from the ceiling in front of the screen. |
| Desk Rear[1] | The projector is placed near the floor behind the screen. |
| Ceiling Rear[1] | The projector is suspended upside-down from the ceiling behind the screen. |
Projection Dimensions
16:9 Image on a 16:9 Screen

Note: (e) = Screen / (f) = Center of Lens
| (a) Screen Size | (b) Projection Distance | (c) Image Height | (d) Vertical Offset | ||||||||
|---|---|---|---|---|---|---|---|---|---|---|---|
| min. | max. | Minimum | Maximum | ||||||||
| in. | mm | in. | mm | in. | mm | in. | mm | in. | mm | in. | mm |
| 30 | 762 | 36.61 | 930 | 58.57 | 1488 | 14.71 | 374 | 0.51 | 13 | 2.74 | 69 |
| 40 | 1016 | 48.81 | 1240 | 78.09 | 1984 | 19.61 | 498 | 0.69 | 17 | 3.65 | 93 |
| 50 | 1270 | 61.01 | 1550 | 97.62 | 2479 | 24.51 | 623 | 0.86 | 22 | 4.56 | 116 |
| 60 | 1524 | 73.21 | 1860 | 117.14 | 2975 | 29.42 | 747 | 1.03 | 26 | 5.47 | 139 |
| 70 | 1778 | 85.41 | 2170 | 136.66 | 3471 | 34.32 | 872 | 1.20 | 31 | 6.38 | 162 |
| 80 | 2032 | 97.62 | 2479 | 156.19 | 3967 | 39.22 | 996 | 1.37 | 35 | 7.30 | 185 |
| 90 | 2286 | 109.82 | 2789 | 175.71 | 4463 | 44.12 | 1121 | 1.54 | 39 | 8.21 | 208 |
| 100 | 2540 | 122.02 | 3099 | 195.23 | 4959 | 49.03 | 1245 | 1.72 | 44 | 9.12 | 232 |
| 110 | 2794 | 134.22 | 3409 | 214.76 | 5455 | 53.93 | 1370 | 1.89 | 48 | 10.03 | 255 |
| 120 | 3048 | 146.22 | 3719 | 234.28 | 5951 | 58.83 | 1494 | 2.06 | 52 | 10.94 | 278 |
| 130 | 3302 | 158.63 | 4029 | 253.80 | 6447 | 63.73 | 1619 | 2.23 | 57 | 11.85 | 301 |
| 140 | 3556 | 170.83 | 4339 | 273.33 | 6942 | 68.64 | 1743 | 2.40 | 61 | 12.77 | 324 |
| 150 | 3810 | 183.03 | 4649 | 292.85 | 7438 | 73.54 | 1868 | 2.57 | 65 | 13.68 | 347 |
| 200 | 5080 | 244.04 | 6199 | 390.47 | 9918 | 98.05 | 2491 | 3.43 | 87 | 18.24 | 463 |
| 250 | 6350 | 305.05 | 7748 | 488.08 | 12397 | 122.57 | 3113 | 4.29 | 109 | 22.80 | 579 |
| 300 | 7620 | 366.06 | 9298 | 585.70 | 14877 | 147.08 | 3736 | 5.15 | 131 | 27.36 | 695 |
Note:
- These figures are for reference purposes only. Please refer to the actual projector for the precise dimensions.
- It is recommended that if you intend to permanently install the projector to physically test the projection size and distance using the actual projector before you permanently install it.
Mounting the Projector
Note: If you buy a third party mount, please use the correct screw size. Screw size can vary depending on the thickness of the mounting plate.
- To ensure the most secure installation, please use a ViewSonic® wall or ceiling mount.
- Ensure the screws used to attach the mount to the projector meet the following specifications:
- Screw type: M4 x 8
- Maximum Screw Length: 8 mm
- Place the power adapter within the designated area and secure it with a cable strap.

CAUTION
- Avoid installing the projector near a heat source or air conditioner.
- Keep at least a 10 cm (3.9 in.) gap between the ceiling and the bottom of the projector.
Using the Security Bar
To help prevent the projector from being stolen, use a security slot locking device to secure the projector to a fixed object. The security slot can also be used as a safety anchor if the projector is mounted to the ceiling.