TD1656-2K Using the Monitor: Difference between revisions
From ViewSonic Documentation
// via Wikitext Extension for VSCode |
// via Wikitext Extension for VSCode |
||
| Line 23: | Line 23: | ||
<li>Press the '''Power <i class='fas fa-power-off' style="font-size:18px"></i> Button''' to turn on the monitor.</li> | <li>Press the '''Power <i class='fas fa-power-off' style="font-size:18px"></i> Button''' to turn on the monitor.</li> | ||
<li>To turn the monitor off, press the '''Power <i class='fas fa-power-off' style="font-size:18px"></i> Button''' again. | <li>To turn the monitor off, press the '''Power <i class='fas fa-power-off' style="font-size:18px"></i> Button''' again. | ||
<div class="res-img">[[File:TD1656-2K_Power_On.png|500px|Turning the Monitor On/Off]]</div> | <div class="res-img">[[File:TD1656-2K_Power_On.png|500px|alt=Turning the Monitor On/Off]]</div> | ||
{{Note|The monitor will still consume some power as long as the power cord is connected to the power outlet. If the monitor is not being used for a long period of time, please disconnect the power plug from the power outlet.}} | {{Note|The monitor will still consume some power as long as the power cord is connected to the power outlet. If the monitor is not being used for a long period of time, please disconnect the power plug from the power outlet.}} | ||
</li> | </li> | ||
</ol> | </ol> | ||
= | ==Quick Menu== | ||
Press '''Up''' [▲] to adjust the Brightness level, and '''Down''' [▼] to adjust the Volume level. | |||
< | <gallery> | ||
TP1656-2K_Quick_Menu-1 | Brightness Adjustments | |||
TP1656-2K_Quick_Menu-2 | Volume Adjustments | |||
</gallery> | |||
{{Note|Follow the key guide that appears on the screen to select the option or make adjustments.}} | |||
=On-Screen Display (OSD) Menu= | =On-Screen Display (OSD) Menu= | ||
Press the ''' | ==General Operation== | ||
<ol> | |||
<li>Press the '''Power <i class='fas fa-power-off' style="font-size:18px"></i> Button''' to open the On-Screen Display (OSD) Menu. | |||
<div class="res-img">[[File:TD1656-2K_OSD_Menu-1.png|400px| OSD Menu]]</div> | |||
</li> | |||
<li>Press '''Up''' [▲] or '''Down''' [▼] to select a menu option. Then press the '''Power <i class='fas fa-power-off' style="font-size:18px"></i> Button''' to enter the selected menu | |||
<div class="res-img">[[File:TD1656-2K_Power_On.png|500px|Turning the Monitor On/Off]]</div> | |||
</li> | |||
< | <li>Follow the on-screen key guide to return to the previous screen. | ||
{{Note|The OSD Menu will automatically close if there is no action after five seconds.}} | |||
</li> | |||
</ol> | |||
==On-Screen Display (OSD) Menu Tree== | |||
{| class="wikitable" width= | {| class="wikitable" width=70% style="text-align:center; background-color:#ffffff;" | ||
|+ | |||
! style=" | ! style="font-weight:bold; background-color:#DB0025; color:#ffffff; width:35%;" | Sub-menu | ||
! style=" | ! style="font-weight:bold; background-color:#DB0025; color:#ffffff; width:35%;" | Menu Option | ||
|- | |- | ||
| style="text-align: center; font-weight:bold;" | Contrast | |||
| style="text-align: center; font-weight:bold;" | | | (-/+, 0~100)/1 | ||
| | |||
|- | |- | ||
| style="text-align: center; font-weight:bold;" | Brightness | |||
| style="text-align: center; font-weight:bold;" | | | (-/+, 0~100)/1 | ||
| | |||
|- | |- | ||
| style="text-align: center; font-weight:bold;" | Volume | |||
| style="text-align: center; font-weight:bold;" | | | (-/+, 0~100)/1 | ||
| | |||
|- | |- | ||
| style="text-align: center; font-weight:bold;" | Audio Mode | |||
| style="text-align: center; font-weight:bold;" | Audio | | Standard | ||
| | |||
|- | |- | ||
| style="text-align: center; font-weight:bold;" | Information | | style="text-align: center; font-weight:bold;" | Information | ||
| | | | ||
|- | |- | ||
| style="text-align: center; font-weight:bold;" | Memory Recall | | style="text-align: center; font-weight:bold;" | Memory Recall | ||
| | | | ||
|} | |} | ||
{{#seo: | {{#seo: | ||
|title=ViewSonic Touch Monitors | |title=ViewSonic Touch Monitors | ||
Revision as of 06:16, 12 September 2024
Turning the Monitor On/Off
- Press the Power Button to turn on the monitor.
- To turn the monitor off, press the Power Button again.
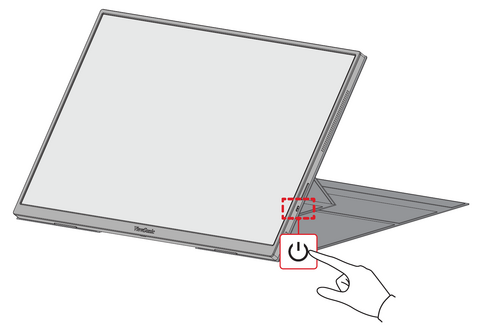 Note: The monitor will still consume some power as long as the power cord is connected to the power outlet. If the monitor is not being used for a long period of time, please disconnect the power plug from the power outlet.

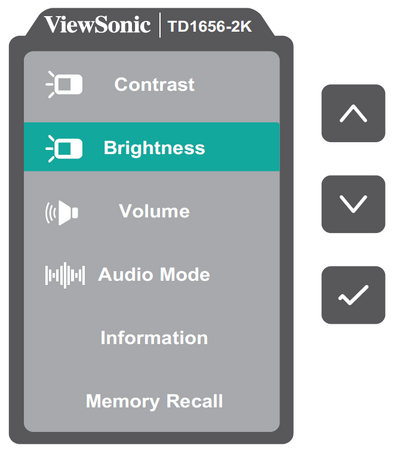
Quick Menu
Press Up [▲] to adjust the Brightness level, and Down [▼] to adjust the Volume level.
-
Brightness Adjustments
-
Volume Adjustments
Note: Follow the key guide that appears on the screen to select the option or make adjustments.
On-Screen Display (OSD) Menu
General Operation
- Press the Power Button to open the On-Screen Display (OSD) Menu.
- Press Up [▲] or Down [▼] to select a menu option. Then press the Power Button to enter the selected menu
- Follow the on-screen key guide to return to the previous screen.
Note: The OSD Menu will automatically close if there is no action after five seconds.

On-Screen Display (OSD) Menu Tree
| Sub-menu | Menu Option |
|---|---|
| Contrast | (-/+, 0~100)/1 |
| Brightness | (-/+, 0~100)/1 |
| Volume | (-/+, 0~100)/1 |
| Audio Mode | Standard |
| Information | |
| Memory Recall |