|
|
| Line 16: |
Line 16: |
| </noinclude> | | </noinclude> |
| =Package Contents= | | =Package Contents= |
| | {{Note|If anything is missing or damaged, please contact your local reseller for more information}} |
| <gallery> | | <gallery> |
| MPC310-W31-TU_Engine.svg |Conference PC<br>MPC310-W31-TU | | MPC310-W31-TU_Engine.svg |Conference PC<br>MPC310-W31-TU |
| Line 31: |
Line 32: |
|
| |
|
| ==VB-CAM-201== | | ==VB-CAM-201== |
| <div class="res-img">[[File:VB-CAM-201_Product_Overview.png|500px]]</div> | | <div class="res-img">[[File:MPC310-W31-TU_IO.svg|600px]]</div> |
| | |
| ==I/O Ports==
| |
| <div class="res-img">[[File:VB-CAM-201_IO_Ports.png|600px]]</div>
| |
|
| |
|
| {| class="wikitable" style="text-align:center; width:60%; background-color:#ffffff;" | | {| class="wikitable" style="text-align:center; width:60%; background-color:#ffffff;" |
| ! style="background-color:#c41230; color:#ffffff;" | Number !! style="background-color:#c41230; color:#ffffff;" | Item | | ! style="background-color:#c41230; color:#ffffff;" | Number !! style="background-color:#c41230; color:#ffffff;" | Item |
| |- | | |- |
| |'''1''' || DC IN | | |'''1''' || Power Button. |
| |-
| |
| |'''2''' || USB 3.0
| |
| |-
| |
| |'''3''' || Reset Button
| |
| |-
| |
| |'''4''' || HDMI
| |
| |-
| |
| |'''5''' || USB 2.0
| |
| |-
| |
| |'''6''' || RJ45
| |
| |}
| |
| :'''NOTE:'''
| |
| ::* The HDMI port only supports video output.
| |
| ::* The RJ45 port only supports parameters management.
| |
| ::* The USB 2.0 port supports 2.0 output which is only designed for external USB microphone use.
| |
| | |
| =Remote Control=
| |
| [[File:VB-CAM-201_Remote_Control.png|thumb|250px| Remote Control]]
| |
| | |
| {| class="wikitable" width=60% style="text-align:center;background-color:#ffffff;"
| |
| ! style="font-weight:bold; background-color:#c41230; color:#ffffff;" | Number
| |
| ! style="text-align: center; font-weight:bold; background-color:#c41230; color:#ffffff;" | Button
| |
| ! style="text-align: center; font-weight:bold; background-color:#c41230; color:#ffffff;" | Description
| |
| |-
| |
| | '''1'''
| |
| | Camera Disable
| |
| | Disable/Enable the video.
| |
| |-
| |
| | '''2'''
| |
| | Call
| |
| | Answer/Start call/Enter call interface<ref name="skype">For "Skype for Business" and "Microsoft Teams" only.</ref>.
| |
| |-
| |
| | '''3'''
| |
| | Control Key
| |
| | Menu Control/Camera moving direction.
| |
| |-
| |
| | '''4'''
| |
| | Volume Up/Down
| |
| | Audio volume control.
| |
| |-
| |
| | '''5'''
| |
| | Exit Tracking
| |
| | After pressing, the camera will exit the tracking mode.
| |
| |-
| |
| | '''6'''
| |
| | Speaker Tracking
| |
| | Press for voice tracking of the speaker.
| |
| |-
| |
| | '''7'''
| |
| | Preset 1
| |
| | Long press to set Preset 1; short press to call Preset 1.
| |
| |- | | |- |
| | '''8''' | | |'''2''' || Power indicator light. |
| | Preset 2 | |
| | Long press to set Preset 2; short press to call Preset 2. | |
| |- | | |- |
| | '''9''' | | |'''3''' || Audio output to an external audio device. |
| | Standby | |
| | Long press to enter Standby mode; short press to return to Normal mode. | |
| |- | | |- |
| | '''10''' | | |'''4''' || |
| | Hang Up
| | *DP Out |
| | Hang up the call/Reject to join the meeting<ref name="skype" />.
| | *USB 3.0 data transmission |
| | *Power delivery (Maximum: 20W) |
| |- | | |- |
| | '''11''' | | |'''5''' || Connection port for displays with HDMI input support. |
| | OK (Confirm) | |
| | Confirm selection/Camera returns to home position. | |
| |- | | |- |
| | '''12''' | | |'''6''' || Security lock. |
| | Microphone Mute | |
| | Disable/Enable the microphone. | |
| |- | | |- |
| | '''13''' | | |'''7''' || Connection for USB peripherial device(s) (e.g., storage device, keyboard, mouse, etc.). |
| | Zoom | |
| | Zoom In/Out. | |
| |- | | |- |
| | '''14''' | | |'''8''' || Ethernet connection. |
| | Speaker Mute<ref>Long press to disable the audio function completely. External devices will not detect the VB-CAM-201 as a speaker or microphone. If the function is disabled, a mute icon will be on screen.</ref> | |
| | Disable/Enable the speaker. | |
| |-
| |
| | '''15'''
| |
| | Participant Tracking<ref>Long press to enter “Live Mosaic View” mode.</ref>
| |
| | The camera will automatically track the participants.
| |
| |-
| |
| | '''16'''
| |
| | Menu
| |
| | Enter/Exit the OSD menu.
| |
| |-
| |
| | '''17'''
| |
| | Bluetooth
| |
| | Disable/Enable Bluetooth. Long press to switch Host and Client mode after Bluetooth is enabled.
| |
| |- | | |- |
| | |'''9''' || Power input socket. |
| |} | | |} |
| <references />
| |
|
| |
| ==Replacing the Batteries of the Remote Control==
| |
| <ol><li>Remove the cover on the rear of the remote control.</li>
| |
| <li>Insert two “AAA” batteries, ensuring the “+” symbol on the battery matches the “+” on the battery post.</li>
| |
| <li>Replace the cover by aligning it with the slot on the remote control and snapping the latch shut.</li>
| |
| '''NOTE:'''
| |
| * Avoid leaving the remote control or batteries in excessive heat or humidity.
| |
| * Always dispose of old batteries in an environmentally friendly way. Contact your local government for more information on how to dispose of batteries safely.
| |
| * Remove the batteries if the remote control will not be in use for an extended period of time.
| |
| * It is recommended that you do not mix battery types.</ol>
| |
|
| |
|
| {{#seo: | | {{#seo: |
MPC310-W31-TU Introduction
Package Contents
Note: If anything is missing or damaged, please contact your local reseller for more information
-
Conference PC
MPC310-W31-TU
-
Quick Start Quide
-
Power Cord
-
VESA Mounting Bracket
(PC side)
-
VESA Mounting Bracket
(Wall/Table/Trolley side)
-
4 x Anchor Screws
T4 x 20 mm
-
4 x Anchors
Ø6.0 x 25 mm
(for Wall/Table)
-
4 x Bracket Scrwes
M3 x 6mm
-
4 x E-type Circlips, Ø8
-
4 x Hex Nuts,
M4 x 4 mm
-
4 x M4 Screws
VB-CAM-201
| Number |
Item
|
| 1 |
Power Button.
|
| 2 |
Power indicator light.
|
| 3 |
Audio output to an external audio device.
|
| 4 |
- DP Out
- USB 3.0 data transmission
- Power delivery (Maximum: 20W)
|
| 5 |
Connection port for displays with HDMI input support.
|
| 6 |
Security lock.
|
| 7 |
Connection for USB peripherial device(s) (e.g., storage device, keyboard, mouse, etc.).
|
| 8 |
Ethernet connection.
|
| 9 |
Power input socket.
|
 Conference PC
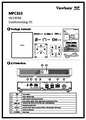 Quick Start Quide
 Power Cord
 VESA Mounting Bracket
 VESA Mounting Bracket
 4 x Anchor Screws
 4 x Anchors
 4 x Bracket Scrwes
 4 x E-type Circlips, Ø8
 4 x Hex Nuts,
 4 x M4 Screws


