
IFP62 Embedded Applications: Difference between revisions
| Line 185: | Line 185: | ||
! style="font-weight:bold; background-color:#c41230; color:#ffffff;" | Description | ! style="font-weight:bold; background-color:#c41230; color:#ffffff;" | Description | ||
|- | |- | ||
| | | <div class="res-img">[[File:Whiteboard_Icon_Floating_Toolbar_Move_Toolbar.svg|200px]]</div> | ||
| style="font-weight:bold;" | Move | | style="font-weight:bold;" | Move | ||
| style="text-align:left;" | Move the Floating Toolbar. | | style="text-align:left;" | Move the Floating Toolbar. | ||
Revision as of 03:46, 10 June 2022
Air Class
Display quiz questions on the ViewBoard and allow up to 30 mobile users to submit answers remotely. Whether deploying single or multiple choice questions, the ViewBoard will record the results for each device being used.

Network Information
- PC (Windows/Mac/Chromebook) and tablet/mobile (iOS/Android) devices, as well as the ViewBoard need to be linked to the same LAN network subnet.
- Ports: TCP 8080
To launch Air Class:
-
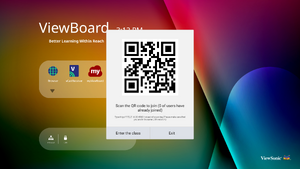 Select "Enter the class"
 -
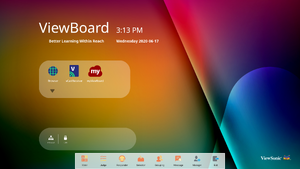 Choose a function


- Tap the tool bar trigger icon and select the more tools icon. Then select the Air Class icon.
- Select “Enter the class”.
- Choose from the available interactive functions at the bottom of the screen.
| Item | Description |
|---|---|
| Voter | Single and Multiple choice questions. |
| Judge | True/False questions. |
| Responder | Race to answer first |
| Selector | Randomly select a participant |
| Grouping | Assign participants to groups |
| Message | Allow/Deny participants to direct message the ViewBoard |
| Manager | Add participants |
| Exit | Exit Air Class |
Voter
- Select the Single choice or Multiple choice icon to select the preferred answer type.

- Tap BEGIN VOTING to let the participants start.
- After the participants are finished and press OK, the ViewBoard will show the participant‘s name on screen.
- Tap FINISH VOTING to close the quiz.
- Then the participants’ “Answer Statistics” will be displayed.
- Choose the right answer to show the correct rate.
- Click the Explain icon to further analyze the topic.


Judge
- Tap BEGIN VOTING to let the participants start a True/False questionnaire.
- After the participants are finished and press OK, the ViewBoard will show the participant‘s name on screen.
- Tap FINISH VOTING to close the quiz.
- Then the participants’ “Answer Statistics” will be displayed.
- Choose the right answer to show the correct rate.
- Click the Explain icon to further analyze the topic.


Responder
Participants race to select their answer and tap OK to submit their answer.

Selector
- Select the “Selector’ icon.
- Set the number of participants to be selected.
- NOTE: The number of participants that can be selected will be based on the total number of participants.
- Tap START to start the random selection.
- The selected participant’s name will then be displayed.
Grouping
Select the icon to assign participants to groups.
Message
-
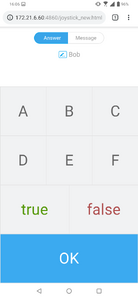 Select "Message"
 -
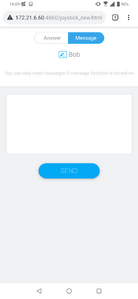 Change the interface
 -
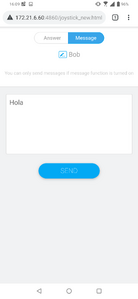 Enter your message


To allow messaging:
- Tap the “Message” icon to enable the function.
- Participants select “Message” to change to the message interface.
- Participants key in their message then select SEND.
- The message will scroll across the top of the ViewBoard.
Manager
Select the icon to let more participants join the class.
Exit
Select to exit the Air Class interface.
myViewBoard Display
Wirelessly mirror screens to a larger display.

To share a screen to a ViewBoard with myViewBoard Display:
- Open myViewBoard Display on the ViewBoard you want to share your screen to.
- On the device you want to share the screen from, go to: https://myviewboard.com/display.
- Enter the Display Code and One Time Password for the ViewBoard you wish to share to.
- NOTE: Note that the password refreshes every 30 seconds.
myViewBoard Live
Stream whiteboarding sessions.

A Stream URL and a Stream Key are needed to begin live streaming. The Stream URL is automatically shown after selecting the streaming service in myViewBoard Live.
- NOTE: The Stream Key will come from the streaming service chosen.
On myViewBoard Live:
- Launch myViewBoard Live.
- Input the required information.
- Select the Record the stream checkbox to record a copy of the stream to the ViewBoard (if applicable).
- Tap the arrow icon to start the stream.
On the dashboard of the chosen streaming service:
- Verify that it is able to successfully receive the stream.
- To stop the stream, locate and click the ‘End Stream’ button on the chosen service’s dashboard.
- NOTE: To learn more about myViewBoard Live, visit: https://wiki.myviewboard.com/MyViewBoard_Live.
myViewBoard Manager
Remotely manage multiple installations of ViewSonic devices.

Once devices are set up and have myViewBoard Manager installed, they can be added to the entity and managed remotely from the Manager web application.
- NOTE: Only available to Entity Admins from myviewboard.com after signing in.
Add a Device
On the device to manage:
- Download and install myViewBoard Manager.
- Open myViewBoard Manager and note the 6-digit PIN displayed.
In the myViewBoard Manager web application on myviewboard.com:
- Click Add Device.
- Input the 6-digit PIN obtained earlier.
- Name the device (if applicable).
- Click Add.
- NOTE: To learn more about myViewBoard Manager, visit: https://wiki.myviewboard.com/MyViewBoard_Manager.
myViewBoard Record
Capture everything that is displayed on screen in a video format.

To launch the screen recording application:
- Select the myViewBoard Record icon in the application drawer.
- Select the preferred recording configurations.
- Tap the check mark and a three (3) second countdown will begin. Screen recording will begin immediately after the countdown.
- After stopping the recording, you will be able to preview the video, save it, or discard it.
myViewBoard Whiteboard
A digital whiteboarding application.
- NOTE: To learn more about myViewBoard Whiteboard, visit: https://wiki.myviewboard.com/Whiteboard_for_Android.

Floating Toolbar
| Item | Description | |
|---|---|---|
 |
Move | Move the Floating Toolbar. |
| Present Mode | Switch between presentation and preparation modes. | |
| Paste from Clipboard | Insert the current clipboard content onto the canvas. | |
| Previous Page | Go to the previous page (if the canvas has multiple pages). | |
| Next Page | Go to the next page (if the canvas has multiple pages). | |
| New Page | Add a new canvas. | |
| Pages in Whiteboard | Create, select, rearrange, copy and delete pages. | |