
VX4381-4K Initial Setup: Difference between revisions
From ViewSonic Documentation
Created page with "<noinclude> {{Sticky_Menu_Monitor_2.1_SU |1=VX4381-4K_Introduction |2=VX4381-4K_Initial_Setup |3=VX4381-4K_Connecting_Power_and_Devices |4=VX4381-4K_Adjusting_the_Viewing_Angl..." |
No edit summary |
||
| Line 13: | Line 13: | ||
}} | }} | ||
</noinclude> | </noinclude> | ||
=Wall Mounting= | =Wall Mounting= | ||
Refer to the table below for the standard dimensions for wall mount kits. | Refer to the table below for the standard dimensions for wall mount kits. | ||
| Line 32: | Line 27: | ||
|- | |- | ||
|14 kg | |14 kg | ||
| | |200 x 100 mm | ||
|115 x 115 x 2.6 mm | |115 x 115 x 2.6 mm | ||
|Ø 5 mm | |Ø 5 mm | ||
| Line 41: | Line 36: | ||
<li>Place the device on a flat, stable surface with the screen facing down.</li> | <li>Place the device on a flat, stable surface with the screen facing down.</li> | ||
<li>Remove the stand.</li> | <li>Remove the stand.</li> | ||
:<div class="res-img">[[File: | :<div class="res-img">[[File:VX4381-4K_Wall_Mounting.png|700px]]</div> | ||
<li>Attach the mounting bracket to the VESA mounting holes at the rear of the monitor. Then secure it with four (4) screws (M4 x 10 mm).</li> | <li>Attach the mounting bracket to the VESA mounting holes at the rear of the monitor. Then secure it with four (4) screws (M4 x 10 mm).</li> | ||
:<div class="res-img">[[File: | :<div class="res-img">[[File:VX4381-4K_Wall_Mounting_VESA.png|300px]]</div> | ||
<li>Follow the instructions that come with the wall mounting kit to mount the monitor onto the wall.</li></ol> | <li>Follow the instructions that come with the wall mounting kit to mount the monitor onto the wall.</li></ol> | ||
Revision as of 05:49, 7 May 2021
Wall Mounting
Refer to the table below for the standard dimensions for wall mount kits.
For use only with a UL certified wall mount kit/bracket. To obtain a wall-mounting kit or height adjustment base, contact ViewSonic® or your local dealer.
| Maximum Loading | Hole Pattern (W x H) | Interface Pad (W x H x D) | Pad Hole | Screw Specification & Quantity |
|---|---|---|---|---|
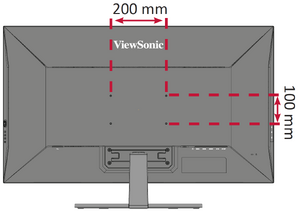
| 14 kg | 200 x 100 mm | 115 x 115 x 2.6 mm | Ø 5 mm | M4 x 10 mm - 4 pieces |
- Turn off the device and disconnect all cables.
- Place the device on a flat, stable surface with the screen facing down.
- Remove the stand.
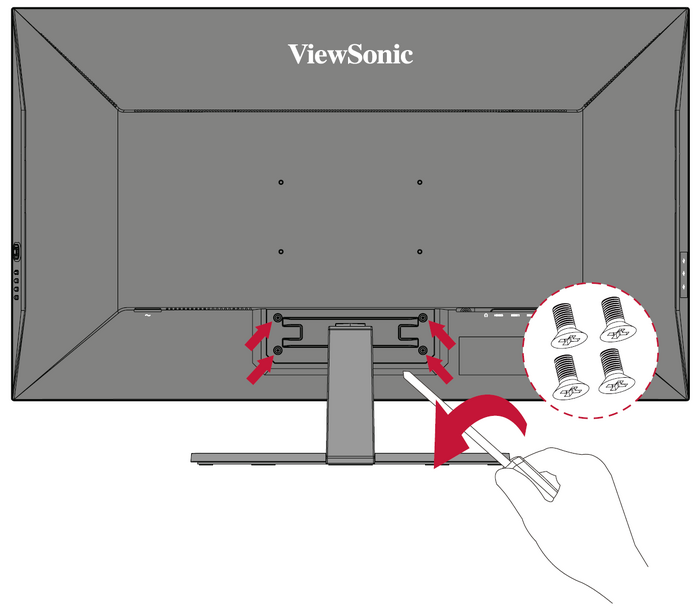
- Attach the mounting bracket to the VESA mounting holes at the rear of the monitor. Then secure it with four (4) screws (M4 x 10 mm).
- Follow the instructions that come with the wall mounting kit to mount the monitor onto the wall.

