TD1656-2K Using the Monitor: Difference between revisions
From ViewSonic Documentation
// via Wikitext Extension for VSCode |
|||
| (33 intermediate revisions by the same user not shown) | |||
| Line 21: | Line 21: | ||
=Turning the Monitor On/Off= | =Turning the Monitor On/Off= | ||
<ol> | <ol> | ||
<li>Press the '''Power <i class='fas fa-power-off' style="font-size:18px"></i> | <li>Press the '''Power <i class='fas fa-power-off' style="font-size:18px"></i>''' Button to turn on the monitor.</li> | ||
<li>To turn the monitor off, press the '''Power <i class='fas fa-power-off' style="font-size:18px"></i> | <li>To turn the monitor off, press the '''Power <i class='fas fa-power-off' style="font-size:18px"></i>''' Button again. | ||
<div class="res-img">[[File: | <div class="res-img">[[File:TD1656-2K_Power_On.png|500px|alt=Turning the Monitor On/Off]]</div> | ||
{{Note|The monitor will still consume some power as long as the power cord is connected to the power outlet. If the monitor is not being used for a long period of time, please disconnect the power plug from the power outlet.}} | {{Note|The monitor will still consume some power as long as the power cord is connected to the power outlet. If the monitor is not being used for a long period of time, please disconnect the power plug from the power outlet.}} | ||
</li> | </li> | ||
</ol> | </ol> | ||
==Using the Control Panel Keys== | |||
Use the Control Panel Keys to access the Quick Menu and navigate the On-Screen Display (OSD) Menu. | |||
<div class="res-img">[[File:TD1656-2K_Control_Panel_Keys.png|330px|alt=Close-up of the Control Panel Keys]]</div> | |||
= | ==Quick Menu== | ||
Press '''Up''' [▲] to adjust the Brightness level, and '''Down''' [▼] to adjust the Volume level. | |||
<div | <gallery widths=300px mode="nolines"> | ||
TP1656-2K_Quick_Menu-1.png | <div style="font-style:normal; font-weight: bold; text-align:center;"> Volume Adjustments</div> | |||
TP1656-2K_Quick_Menu-2.png | <div style="font-style:normal; font-weight:bold; text-align:center;"> Brightness Adjustments</div> | |||
</gallery> | |||
{{Note|Follow the key guide that appears on the screen to select the option or make adjustments.}} | |||
=On-Screen Display (OSD) Menu= | =On-Screen Display (OSD) Menu= | ||
Press the ''' | ==General Operation== | ||
<ol> | |||
<li>Press the '''Power <i class='fas fa-power-off' style="font-size:18px"></i>''' Button to open the On-Screen Display (OSD) Menu. | |||
<div class="res-img">[[File:TD1656-2K_OSD_Menu-1.png|300px|alt=OSD Menu displayed]]</div> | |||
</li> | |||
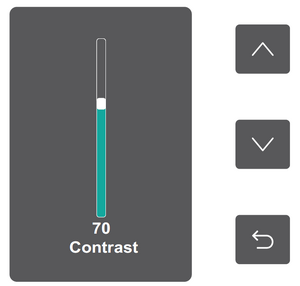
<div class="res-img">[[File: | <li>Press '''Up''' [▲] or '''Down''' [▼] to select a menu option. Then press the '''Power <i class='fas fa-power-off' style="font-size:18px"></i>''' Button to enter the selected menu | ||
<div class="res-img">[[File:TD1656-2K_OSD_Menu-2.png|300px|alt=setting adjustment]]</div> | |||
</li> | |||
<li>Follow the on-screen key guide to return to the previous screen. | |||
{{Note|The OSD Menu will automatically close if there is no action after five seconds.}} | |||
</li> | |||
</ol> | |||
==On-Screen Display (OSD) Menu Tree== | |||
{| class="wikitable" width= | {| class="wikitable" width=70% style="text-align:center; background-color:#ffffff;" | ||
! style=" | |+ | ||
! style=" | ! style="font-weight:bold; background-color:#DB0025; color:#ffffff; width:35%;" | Sub-menu | ||
! style="font-weight:bold; background-color:#DB0025; color:#ffffff; width:35%;" | Menu Option | |||
|- | |||
| style="text-align: center; font-weight:bold;" | Contrast | |||
| (-/+, 0~100)/1 | |||
|- | |- | ||
| style="text-align: center; font-weight:bold;" | Brightness | |||
| style="text-align: center; font-weight:bold;" | | | (-/+, 0~100)/1 | ||
| | |||
|- | |- | ||
| style="text-align: center; font-weight:bold;" | Volume | |||
| style="text-align: center; font-weight:bold;" | | | (-/+, 0~100)/1 | ||
| | |||
|- | |- | ||
| | | rowspan="4" style="text-align: center; font-weight:bold;" | Audio Mode | ||
| Standard | |||
| | |||
|- | |- | ||
| | |Voice | ||
|- | |- | ||
| | |Movie | ||
| | |- | ||
| | |Music | ||
|- | |- | ||
| style="text-align: center; font-weight:bold;" | Information | | style="text-align: center; font-weight:bold;" | Information | ||
| | | rowspan="2" | | ||
|- | |||
| style="text-align: center; font-weight:bold;" | Memory Recall | |||
|} | |||
==Menu Options== | |||
{| class="wikitable" width=70% style="text-align:center; background-color:#ffffff;" | |||
|+ | |||
! style="font-weight:bold; background-color:#DB0025; color:#ffffff; width:35%;" | Sub-menu | |||
! style="font-weight:bold; background-color:#DB0025; color:#ffffff;" | Menu Option | |||
|- | |||
| style="text-align: center;" | Contrast | |||
| style="text-align: left;"| Adjust the degree of difference between the lightest and darkest parts of the picture and change the amount of black and white in the image. | |||
|- | |||
| style="text-align: center;" | Brightness | |||
| style="text-align: left;"| Adjust the background black levels of the screen image. | |||
|- | |||
| style="text-align: center;" | Volume | |||
| style="text-align: left;"| Adjust the volume level. | |||
|- | |||
| style="text-align: center;" | Audio Mode | |||
| style="text-align: left;"| | |||
{| class="wikitable" style="text-align:center; background-color:#ffffff;" | |||
|+ | |||
! style="font-weight:bold; background-color:#DB0025; color:#ffffff; width:35%;" | Sub-menu | |||
! style="font-weight:bold; background-color:#DB0025; color:#ffffff;" | Menu Option | |||
|- | |||
|Standard | |||
| style="text-align: left;"| Default audio setting. | |||
|- | |- | ||
| | |Voice | ||
| style="text-align: | | style="text-align: left;"| Enhances vocal clarity. | ||
|- | |- | ||
| | |Movie | ||
| style="text-align: | | style="text-align: left;"| Enhances dialogue and sound effects for movies. | ||
|- | |- | ||
| style="text-align: | |Music | ||
| style="text-align: center; | | style="text-align: left;"| Fine-tunes sound for musical enjoyment. | ||
|} | |||
|- | |||
| style="text-align: center;" | Information | |||
| style="text-align: left;"|Display the monitor information. | |||
|- | |- | ||
| style="text-align: center;" | Memory Recall | |||
| style="text-align: left;"| Reset all settings to their default values. | |||
|} | |} | ||
{{#seo: | {{#seo: | ||
|title=ViewSonic Touch Monitors | |title=ViewSonic Touch Monitors | ||
Latest revision as of 02:05, 26 March 2026
Turning the Monitor On/Off
- Press the Power Button to turn on the monitor.
- To turn the monitor off, press the Power Button again.
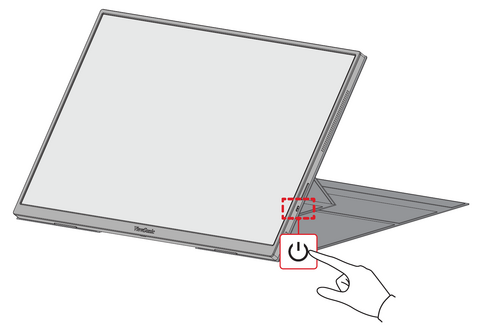 Note: The monitor will still consume some power as long as the power cord is connected to the power outlet. If the monitor is not being used for a long period of time, please disconnect the power plug from the power outlet.

Using the Control Panel Keys
Use the Control Panel Keys to access the Quick Menu and navigate the On-Screen Display (OSD) Menu.

Quick Menu
Press Up [▲] to adjust the Brightness level, and Down [▼] to adjust the Volume level.
-
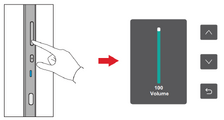 Volume Adjustments
 -
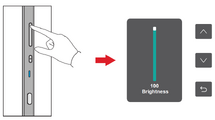 Brightness Adjustments


Note: Follow the key guide that appears on the screen to select the option or make adjustments.
On-Screen Display (OSD) Menu
General Operation
- Press the Power Button to open the On-Screen Display (OSD) Menu.
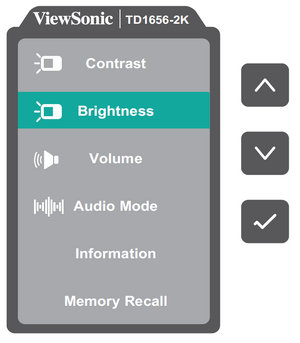
- Press Up [▲] or Down [▼] to select a menu option. Then press the Power Button to enter the selected menu
- Follow the on-screen key guide to return to the previous screen.
Note: The OSD Menu will automatically close if there is no action after five seconds.


On-Screen Display (OSD) Menu Tree
| Sub-menu | Menu Option |
|---|---|
| Contrast | (-/+, 0~100)/1 |
| Brightness | (-/+, 0~100)/1 |
| Volume | (-/+, 0~100)/1 |
| Audio Mode | Standard |
| Voice | |
| Movie | |
| Music | |
| Information | |
| Memory Recall |
Menu Options
| Sub-menu | Menu Option | ||||||||||
|---|---|---|---|---|---|---|---|---|---|---|---|
| Contrast | Adjust the degree of difference between the lightest and darkest parts of the picture and change the amount of black and white in the image. | ||||||||||
| Brightness | Adjust the background black levels of the screen image. | ||||||||||
| Volume | Adjust the volume level. | ||||||||||
| Audio Mode |
| ||||||||||
| Information | Display the monitor information. | ||||||||||
| Memory Recall | Reset all settings to their default values. |