PS502X Initial Setup
From ViewSonic Documentation
Choosing a Location - Projector Orientation
Personal preference and room layout will decide the installation location. Consider the following:
- Size and position of your screen.
- Location of a suitable power outlet.
- Location and distance between the projector and other equipment.
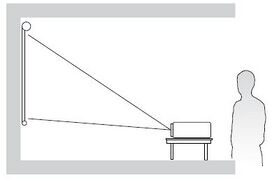
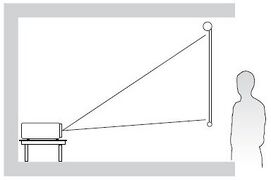
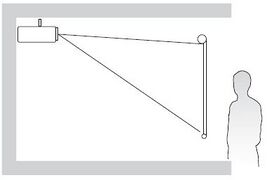
The projector is designed to be installed in one of the following locations:
-
 Front Table
 -
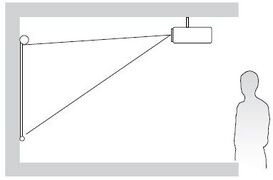 Front Ceiling
 -
 Rear Table
 -
 Rear Ceiling


| Location | Description |
|---|---|
| Front Table | The projector is placed near the floor in front of the screen. |
| Front Ceiling | The projector is suspended upside-down from the ceiling in front of the screen. |
| Rear Table[1] | The projector is placed near the floor behind the screen. |
| Rear Ceiling[1] | The projector is suspended upside-down from the ceiling behind the screen. |
Projection Dimensions
4:3 Image on a 4:3 Screen

- NOTE: (e) = Screen | (f) = Center of Lens
| (a) Screen Size | (b) Projection Distance | (c) Image Height | (d) Vertical Offset | ||||||
|---|---|---|---|---|---|---|---|---|---|
| Minimum | Maximum | ||||||||
| in. | mm | in. | mm | in. | mm | in. | mm | in. | mm |
| 40 | 1016 | 19.74 | 501 | 19.74 | 501 | 24.02 | 610 | 3.60 | 91 |
| 60 | 1524 | 29.62 | 752 | 29.62 | 752 | 35.98 | 914 | 5.40 | 137 |
| 70 | 1778 | 34.55 | 878 | 34.55 | 878 | 42.01 | 1067 | 6.30 | 160 |
| 80 | 2032 | 39.49 | 1003 | 39.49 | 1003 | 47.99 | 1219 | 7.20 | 183 |
| 100 | 2540 | 49.36 | 1254 | 49.36 | 1254 | 60 | 1524 | 9 | 229 |
| 120 | 3048 | 59.23 | 1504 | 59.23 | 1504 | 72.01 | 1829 | 10.80 | 274 |
| 150 | 3810 | 74.04 | 1881 | 74.04 | 1881 | 90 | 2286 | 13.50 | 343 |
| 200 | 5080 | 98.72 | 2507 | 98.72 | 2507 | 120 | 3048 | 18 | 457 |
| 250 | 6350 | 123.40 | 3134 | 123.40 | 3134 | 150 | 3810 | 22.50 | 572 |
| 300 | 7620 | 148.08 | 3761 | 148.08 | 3761 | 180 | 4572 | 27 | 686 |
- NOTE:
- These figures are for reference purposes only. Please refer to the actual projector for the precise dimensions.
- It is recommended that if you intend to permanently install the projector to physically test the projection size and distance using the actual projector before you permanently install it.
4:3 Image on a 16:10 Screen

| (a) Screen Size | (b) Projection Distance | (c) Image Height | (d) Vertical Offset | ||||||
|---|---|---|---|---|---|---|---|---|---|
| Minimum | Maximum | ||||||||
| in. | mm | in. | mm | in. | mm | in. | mm | in. | mm |
| 40 | 1016 | 17.44 | 443 | 17.44 | 443 | 21.20 | 538 | 3.18 | 81 |
| 60 | 1524 | 26.16 | 664 | 26.16 | 664 | 31.80 | 808 | 4.77 | 121 |
| 70 | 1778 | 30.52 | 775 | 30.52 | 775 | 37.10 | 942 | 5.56 | 141 |
| 80 | 2032 | 34.88 | 886 | 34.88 | 886 | 42.40 | 1077 | 6.36 | 162 |
| 100 | 2540 | 43.60 | 1107 | 43.60 | 1107 | 53 | 1346 | 7.95 | 202 |
| 120 | 3048 | 52.32 | 1329 | 52.32 | 1329 | 63.60 | 1615 | 9.54 | 242 |
| 150 | 3810 | 65.40 | 1661 | 65.40 | 1661 | 79.50 | 2019 | 11.92 | 303 |
| 200 | 5080 | 87.20 | 2215 | 87.20 | 2215 | 106 | 2692 | 15.90 | 404 |
| 250 | 6350 | 109 | 2769 | 109 | 2769 | 132.50 | 3365 | 19.87 | 505 |
| 300 | 7620 | 130.80 | 3322 | 130.80 | 3322 | 159 | 4039 | 23.85 | 606 |
- NOTE:
- These figures are for reference purposes only. Please refer to the actual projector for the precise dimensions.
- It is recommended that if you intend to permanently install the projector to physically test the projection size and distance using the actual projector before you permanently install it.
Mounting the Projector
- NOTE: If you buy a third party mount, please use the correct screw size. Screw size can vary depending on the thickness of the mounting plate.
- To ensure the most secure installation, please use a ViewSonic® wall or ceiling mount.
- Ensure the screws used to attach the mount to the projector meet the following specifications:
- Screw type: M4 x 7
- Maximum Screw Length: 7 mm

CAUTION
- Avoid installing the projector near a heat source or air conditioner.
- Keep at least a 10 cm (3.9 in.) gap between the ceiling and the bottom of the projector.
Using the Security Bar
To help prevent the projector from being stolen, use a security slot locking device to secure the projector to a fixed object.