
IFP55G1 Using Your ViewBoard
From ViewSonic Documentation
Powering ON/OFF your ViewBoard
-
Ensure the power cord is connected, plugged into a power outlet, and the Power Switch is in the “ON” position.
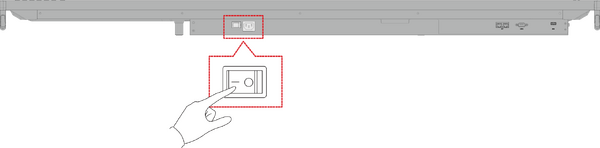 Note: The AC Power input and Power Switch are located at the bottom of the display.
 -
Press the Power button to turn ON the ViewBoard.
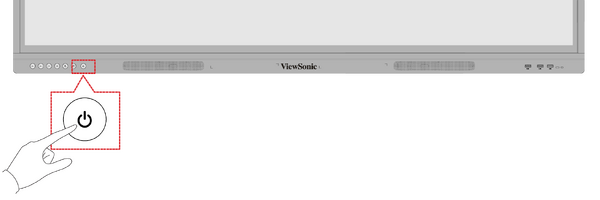
- To turn the ViewBoard OFF, press and hold the Power button.


On-Screen Display (OSD) Menu Tree
| Main Menu | Sub-menu | Menu Option | ||
|---|---|---|---|---|
| VGA | H Position | (-/+, 0~100) | ||
| V Position | (-/+, 0~100) | |||
| Clock | (-/+, 0~100) | |||
| Clock Phase | (-/+, 0~100) | |||
| Zoom Mode | Full | |||
| Normal (4:3) | ||||
| Real (1:1) | ||||
| Dynamic (16:9) | ||||
| 21:9 | ||||
| Auto Adjust | OK | |||
| Screen Reset | Cancel | |||
| Reset | ||||
| Input Source | VGA | |||
| HDMI 1 | ||||
| HDMI 2 | ||||
| HDMI 3 | ||||
| PC | ||||
| Type-C | ||||
| WriteAway | Off | |||
| Except PC (OPS) | ||||
| No Signal Input Only | ||||
| Black Board Mode
(Auto Signal Detection: Off) | ||||
| Picture | Picture Mode | Normal | ||
| Dynamic | ||||
| Soft | ||||
| User | ||||
| Contrast | (-/+, 0~100) | |||
| Brightness | (-/+, 0~100) | |||
| Color | (-/+, 0~100) | |||
| Tint | (-/+, 0~100) | |||
| Sharpness | (-/+, 0~100) | |||
| Color Temperature | Warm (7500K) | |||
| Normal (9300K) | ||||
| Cool (10000K) | ||||
| User | ||||
| Noise Reduction | Off | |||
| Low | ||||
| Medium | ||||
| High | ||||
| Overscan | off | |||
| On | ||||
| RGB Range | Full Range | |||
| Limited Range | ||||
| Auto | ||||
| Flicker Free | Off | |||
| On | ||||
| Blue Light Filter | (-/+, 0~100) | |||
| Gamma Set | Native | |||
| 2.2 | ||||
| 2.4 | ||||
| Backlight | (-/+, 0~100) | |||
| Picture Reset | Cancel | |||
| Reset | ||||
| Audio | Volume Control | Speaker | ||
| Audio Out | ||||
| Sync | ||||
| Treble | (-/+, 0~100) | |||
| Bass | (-/+, 0~100) | |||
| Balance | (-/+, 0~100) | |||
| Volume | (-/+, 0~100) | |||
| Maximum Volume | (-/+, 0~100) | |||
| Minimum Volume | (-/+, 0~100) | |||
| Mute | Off | |||
| On | ||||
| Audio Out Sync | Enable | |||
| Disable | ||||
| Audio Out Volume
(Line Out) |
(-/+, 0~100) | |||
| Audio Reset | Cancel | |||
| Reset | ||||
| Time | Off Time | Off | ||
| 1 hour~24 hours | ||||
| Date and Time | Set Date | |||
| Set Time | ||||
| Choose Time Zone | ||||
| Use 24-hour Format | ||||
| Schedule | Schedule List | |||
| Enable | ||||
| Start Time | ||||
| End Time | ||||
| Input | HDMI 1 | |||
| HDMI 2 | ||||
| HDMI 3 | ||||
| PC | ||||
| Type-C | ||||
| VGA | ||||
| Dat of the Week | ||||
| Every Week | ||||
| OSD Turn Off | Off | |||
| 5/15/30/60 seconds | ||||
| Input Information | Off | |||
| 5/10/20/30/60 seconds | ||||
| Automatic Date & Time | Off | |||
| On | ||||
| Time Reset | Cancel | |||
| Reset | ||||
| About | Display Information | Model Name | ||
| Serial No. | ||||
| Operation Hours | ||||
| SW Version | ||||
| Advanced Options | Saving | Panel Saving | Brightness | Off |
| On | ||||
| Power Save | Mode 1 | |||
| Mode 2 | ||||
| Mode 3 | ||||
| Mode 4 | ||||
| Power LED Light | Off | |||
| On | ||||
| Boot | Boot On Source | HDMI 1 | ||
| HDMI 2 | ||||
| HDMI 3 | ||||
| PC | ||||
| Type-C | ||||
| VGA | ||||
| Boot On Logo | Off | |||
| On | ||||
| Signal | Auto Signal Detection | Off | ||
| On | ||||
| No Signal Standby | off | |||
| 0 mins | ||||
| 5 mins | ||||
| 15 mins | ||||
| 30 mins | ||||
| Port | HDMI with One Wire | Off
(default) | ||
| On | ||||
| USB Cloning | Import | |||
| Export | ||||
| USB Auto Play | Off | |||
| On | ||||
| Others | Switch On State | Power Off | ||
| Forced On | ||||
| Last Status | ||||
| WOL | Off | |||
| On | ||||
| Monitor ID 1~98 | ||||
| OSD Language | ||||
| Factory Reset | Cancel | |||
| Reset | ||||
| Advanced Option Reset | Cancel | |||
| Reset | ||||
| Other Settings | Energy Start | Off | ||
| On | ||||
| Light Sensor | Off | |||
| On | ||||
| IP | ||||
| Port | ||||
| Leave OSD Menu | Leave OSD Menu | |||
On-Screen Display (OSD) Menu Operation
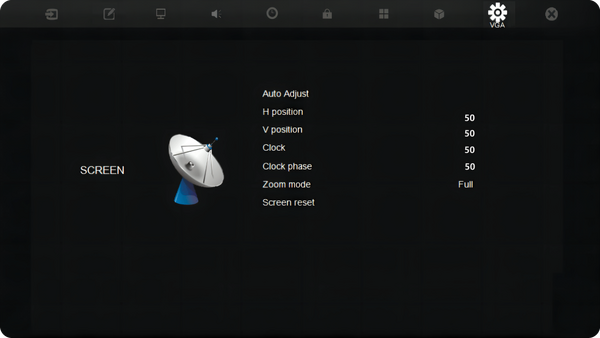
Access VGA, Input Source, WriteAway, Picture, Audio, Time, About, Advanced Options, and Other Settings settings through the OSD Menu.

Open the OSD Menu by pressing MENU on the remote control or the  Menu button on the front Control Panel.
VGA
Note: For VGA input source only.
Input Source
Select one of the available input sources.

WriteAway

Picture

Audio

Time

About

Advanced Options

Other Settings

Leave OSD Menu
Exit the OSD Menu.
