
IFP65G1 Remote Control: Difference between revisions
From ViewSonic Documentation
Created page with "<noinclude> <div class="noprint"> <div style="top:1px;width:auto;" class="nomobile"> <div class="grid-container"> <div class="item1" style="text-align:center; font-size:16; background-color:#DB0025; font-weight:bold; color:#ffffff;">{{PAGENAME}}</div> <div class="grid-item">Introduction </div> <div class="grid-item">Remote Control </div> <div class="grid-item">Using Gestures</div> <d..." |
No edit summary |
||
| Line 10: | Line 10: | ||
<div class="grid-item">[[IFP65G1_Using_the_ViewBoard|Using the ViewBoard]] </div> | <div class="grid-item">[[IFP65G1_Using_the_ViewBoard|Using the ViewBoard]] </div> | ||
<div class="grid-item">[[IFP65G1_On-Screen Display_Menu_Tree|On-Screen Display Menu Tree]] </div> | <div class="grid-item">[[IFP65G1_On-Screen Display_Menu_Tree|On-Screen Display Menu Tree]] </div> | ||
<div class="grid-item">[[IFP65G1_On-Screen_Display_Operation|On-Screen Display Operation]] </div> | <div class="grid-item">[[IFP65G1_On-Screen_Display_Operation|On-Screen Display Menu Operation]] </div> | ||
<div class="grid-item">[[IFP65G1_RS-232_Protocols|RS-232 Protocols]]</div> | <div class="grid-item">[[IFP65G1_RS-232_Protocols|RS-232 Protocols]]</div> | ||
<div class="grid-item">[[IFP65G1_Specifications|Specifications]]</div> | <div class="grid-item">[[IFP65G1_Specifications|Specifications]]</div> | ||
Revision as of 09:47, 25 June 2024
Remote Control Overview

| Number | Item | Description |
|---|---|---|
| 1 | Power ON/OFF | |
| 2 | 
|
Mute/Unmute |
| 3 | SLEEP | Sleep Mode |
| 4 | DISPLAY | For Non-Android sources; display current input source information |
| 5 | P.MODE | Blank screen |
| 6 | FREEZE | Freeze screen |
| 7 | Numeric input buttons | |
| 8 | ALT+TAB
-/-- |
Slot-in computer, space bar Alt+Tab |
| 9 | ALT+F4
|
Slot-in computer, close program window |
| 10 | INPUT | Input source selection |
| 11 | ASPECT | Back to slot-in system main interface |
| 12 | MENU | For Android, access Settings; for other sources, access Touch Menu settings |
| 13 | ALT |
Screen capture |
| 14 | TAB |
PC[1] [Tab] button |
| 15 | DESKTOP |
Switch to slot-in PC desktop |
| 1 |  |
PC[1] [Backspace] button |
| 17 | START / D.MENU | PC[1] [Windows] button |
| 18 |  / D.TITLE / D.TITLE
|
PC[1] [Menu] button |
| 19 |  / D.USB / D.USB
|
Writing software setup |
| 20 | EPG / BACK | Return button |
| 21 | ▼/▲/◄/► | Scroll up, down, left, and right |
| 22 | ENTER | Confirm selection/state |
| 23 | ESC / EXIT /
D.SETUP |
Shortcut button to exit dialogue boxes |
| 24 | CH.+ / PGUP / CH.+ / PGDN | CH+: PC previous page
CH-: PC next page |
| 25 | VOL+ / VOL- | Increase/Decrease volume |
| 26 | FAV / SPACE | PC[1] [Space] button |
| 27 | F1-F12 | Built-in computer F1~F12 function button |
Inserting Remote Control Batteries
To Insert batteries into the remote control:
- Remove the cover on the rear of the remote control.
- Insert two “AAA” batteries, ensuring the “+” symbol on the battery matches the “+” on the battery post.
- Replace the cover by aligning it with the slot on the remote control and snapping the latch shut.
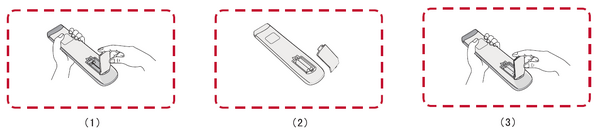

- WARNING: There is a risk of explosion if batteries are installed with incorrect polarity.
Note:
- It is recommended that you do not mix battery types.
- Always dispose of old batteries in an environmentally friendly way. Contact your local government for more information on how to dispose of batteries safely.
Remote Control Effective Range
The working range of the remote control is shown here. It has an effective range of 8 meters, 30° degrees left and right. Ensure there is nothing obstructing the remote control’s signal to the receiver.
