TD2223-2 Quick Menu: Difference between revisions
From ViewSonic Documentation
Created page with "<noinclude> {{Sticky_Menu_Monitor_2.1 |1=TD2223-2_Introduction |2=TD2223-2_Initial_Setup |3=TD2223-2_Connecting_Power_and_Devices |4=TD2223-2_Adjusting_the_Viewing_Angle |5=TD2223-2_Quick_Menu |6=TD2223-2_Hot_Keys |7=TD2223-2_On-Screen_Display_Menu |8=TD2223-2_On-Screen_Display_Menu_Tree |9=TD2223-2_Specifications |10=TD2223-2_Regulatory_and_Service_Information }} </noinclude> =Turning the Device On/Off= # Plug the power cord into a power outlet. # Press the '''Power'''..." |
|||
| Line 13: | Line 13: | ||
}} | }} | ||
</noinclude> | </noinclude> | ||
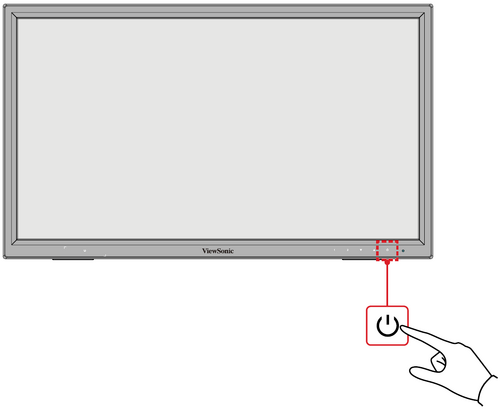
=Turning the Device | =Turning the Device ON/OFF= | ||
# Plug the power cord into a power outlet. | # Plug the power cord into a power outlet. | ||
# Press the '''Power''' key to turn on the monitor. | # Press the '''Power''' key to turn on the monitor. | ||
# To turn the monitor off, press the '''Power''' key again. | # To turn the monitor off, press the '''Power''' key again. | ||
:<div class="res-img">[[File: | :<div class="res-img">[[File:TD2223-2_Power_On.png|500px|Turning the Device ON/OFF]]</div> | ||
:'''NOTE:''' The monitor will still consume some power as long as the power cord is connected to the power outlet. If the monitor is not being used for a long period of time, please disconnect the power plug from the power outlet. | :'''NOTE:''' The monitor will still consume some power as long as the power cord is connected to the power outlet. If the monitor is not being used for a long period of time, please disconnect the power plug from the power outlet. | ||
Revision as of 05:44, 25 October 2023
Turning the Device ON/OFF
- Plug the power cord into a power outlet.
- Press the Power key to turn on the monitor.
- To turn the monitor off, press the Power key again.
- NOTE: The monitor will still consume some power as long as the power cord is connected to the power outlet. If the monitor is not being used for a long period of time, please disconnect the power plug from the power outlet.

Using the Control Panel Keys
Use the control panel keys to activate Hot Keys, navigate the On-Screen Display (OSD) Menu, and change the settings.

On-Screen Display (OSD) Menu
Press the 1 key to activate the On-Screen Display (OSD) Menu. Follow the key guide that appears on the screen to select options or make adjustments.

- NOTE: Follow the key guide that appears on the bottom of the screen to select the option, then make adjustments with the [▼] and [▲] keys.
| Icon | Name | Description |
|---|---|---|
| Auto Image Adjust | Automatically adjust the screen position. | |
| Contrast/Brightness | Adjust the contrast or brightness level. | |
| Input Select | Select the input source. | |
| Audio Adjust | Adjust the level, or mute the volume. | |
| Color Adjust | Select one of the preset color settings. | |
| Information | Displays the timing mode coming from the graphics card in the computer, the LCD model number, the serial number, and the ViewSonic® website URL. | |
| Manual Image Adjust | Manually set a variety of image quality adjustments. | |
| Setup Menu | Adjust On-Screen Display (OSD) settings. | |
| Memory Recall | Returns the adjustments back to factory settings. |