
IFP55G1 Using Your ViewBoard: Difference between revisions
| Line 460: | Line 460: | ||
|- | |- | ||
|'''H Position''' | |'''H Position''' | ||
|Adjust the screen image position horizontally. | | style="text-align:left;"|Adjust the screen image position horizontally. | ||
|- | |- | ||
|'''V Position''' | |'''V Position''' | ||
|Adjust the screen image position vertically. | | style="text-align:left;"|Adjust the screen image position vertically. | ||
|- | |- | ||
|'''Clock''' | |'''Clock''' | ||
|Adjust the frequency of the pixel clock signal. This will affect the resolution and refresh rate. | | style="text-align:left;"|Adjust the frequency of the pixel clock signal. This will affect the resolution and refresh rate. | ||
|- | |- | ||
|'''Clock Phase''' | |'''Clock Phase''' | ||
|Adjust the clock phase to improve the display’s clarity and avoid flickering. | | style="text-align:left;"|Adjust the clock phase to improve the display’s clarity and avoid flickering. | ||
|- | |- | ||
|'''Zoom Mode''' | |'''Zoom Mode''' | ||
|Select the aspect ratio of the display. | | style="text-align:left;"|Select the aspect ratio of the display. | ||
|- | |- | ||
|'''Auto Adjust''' | |'''Auto Adjust''' | ||
|Automatically adjust the position of the screen image. | | style="text-align:left;"|Automatically adjust the position of the screen image. | ||
|- | |- | ||
|'''Screen Reset''' | |'''Screen Reset''' | ||
Revision as of 02:13, 25 June 2024
Powering ON/OFF your ViewBoard
-
Ensure the power cord is connected, plugged into a power outlet, and the Power Switch is in the “ON” position.
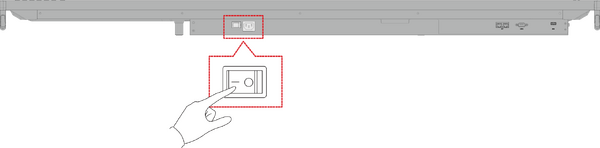 Note: The AC Power input and Power Switch are located at the bottom of the display.
 -
Press the Power button to turn ON the ViewBoard.
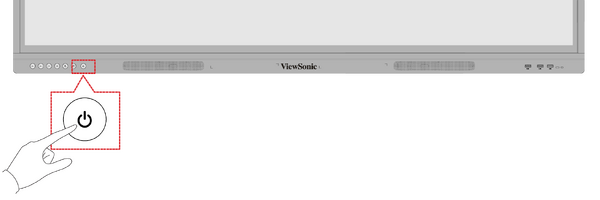
- To turn the ViewBoard OFF, press and hold the Power button.


On-Screen Display (OSD) Menu Tree
| Main Menu | Sub-menu | Menu Option | ||
|---|---|---|---|---|
| VGA | H Position | (-/+, 0~100) | ||
| V Position | (-/+, 0~100) | |||
| Clock | (-/+, 0~100) | |||
| Clock Phase | (-/+, 0~100) | |||
| Zoom Mode | Full | |||
| Normal (4:3) | ||||
| Real (1:1) | ||||
| Dynamic (16:9) | ||||
| 21:9 | ||||
| Auto Adjust | OK | |||
| Screen Reset | Cancel | |||
| Reset | ||||
| Input Source | VGA | |||
| HDMI 1 | ||||
| HDMI 2 | ||||
| HDMI 3 | ||||
| PC | ||||
| Type-C | ||||
| WriteAway | Off | |||
| Except PC (OPS) | ||||
| No Signal Input Only | ||||
| Black Board Mode
(Auto Signal Detection: Off) | ||||
| Picture | Picture Mode | Normal | ||
| Dynamic | ||||
| Soft | ||||
| User | ||||
| Contrast | (-/+, 0~100) | |||
| Brightness | (-/+, 0~100) | |||
| Color | (-/+, 0~100) | |||
| Tint | (-/+, 0~100) | |||
| Sharpness | (-/+, 0~100) | |||
| Color Temperature | Warm (7500K) | |||
| Normal (9300K) | ||||
| Cool (10000K) | ||||
| User | ||||
| Noise Reduction | Off | |||
| Low | ||||
| Medium | ||||
| High | ||||
| Overscan | off | |||
| On | ||||
| RGB Range | Full Range | |||
| Limited Range | ||||
| Auto | ||||
| Flicker Free | Off | |||
| On | ||||
| Blue Light Filter | (-/+, 0~100) | |||
| Gamma Set | Native | |||
| 2.2 | ||||
| 2.4 | ||||
| Backlight | (-/+, 0~100) | |||
| Picture Reset | Cancel | |||
| Reset | ||||
| Audio | Volume Control | Speaker | ||
| Audio Out | ||||
| Sync | ||||
| Treble | (-/+, 0~100) | |||
| Bass | (-/+, 0~100) | |||
| Balance | (-/+, 0~100) | |||
| Volume | (-/+, 0~100) | |||
| Maximum Volume | (-/+, 0~100) | |||
| Minimum Volume | (-/+, 0~100) | |||
| Mute | Off | |||
| On | ||||
| Audio Out Sync | Enable | |||
| Disable | ||||
| Audio Out Volume
(Line Out) |
(-/+, 0~100) | |||
| Audio Reset | Cancel | |||
| Reset | ||||
| Time | Off Time | Off | ||
| 1 hour~24 hours | ||||
| Date and Time | Set Date | |||
| Set Time | ||||
| Choose Time Zone | ||||
| Use 24-hour Format | ||||
| Schedule | Schedule List | |||
| Enable | ||||
| Start Time | ||||
| End Time | ||||
| Input | HDMI 1 | |||
| HDMI 2 | ||||
| HDMI 3 | ||||
| PC | ||||
| Type-C | ||||
| VGA | ||||
| Dat of the Week | ||||
| Every Week | ||||
| OSD Turn Off | Off | |||
| 5/15/30/60 seconds | ||||
| Input Information | Off | |||
| 5/10/20/30/60 seconds | ||||
| Automatic Date & Time | Off | |||
| On | ||||
| Time Reset | Cancel | |||
| Reset | ||||
| About | Display Information | Model Name | ||
| Serial No. | ||||
| Operation Hours | ||||
| SW Version | ||||
| Advanced Options | Saving | Panel Saving | Brightness | Off |
| On | ||||
| Power Save | Mode 1 | |||
| Mode 2 | ||||
| Mode 3 | ||||
| Mode 4 | ||||
| Power LED Light | Off | |||
| On | ||||
| Boot | Boot On Source | HDMI 1 | ||
| HDMI 2 | ||||
| HDMI 3 | ||||
| PC | ||||
| Type-C | ||||
| VGA | ||||
| Boot On Logo | Off | |||
| On | ||||
| Signal | Auto Signal Detection | Off | ||
| On | ||||
| No Signal Standby | off | |||
| 0 mins | ||||
| 5 mins | ||||
| 15 mins | ||||
| 30 mins | ||||
| Port | HDMI with One Wire | Off
(default) | ||
| On | ||||
| USB Cloning | Import | |||
| Export | ||||
| USB Auto Play | Off | |||
| On | ||||
| Others | Switch On State | Power Off | ||
| Forced On | ||||
| Last Status | ||||
| WOL | Off | |||
| On | ||||
| Monitor ID 1~98 | ||||
| OSD Language | ||||
| Factory Reset | Cancel | |||
| Reset | ||||
| Advanced Option Reset | Cancel | |||
| Reset | ||||
| Other Settings | Energy Start | Off | ||
| On | ||||
| Light Sensor | Off | |||
| On | ||||
| IP | ||||
| Port | ||||
| Leave OSD Menu | Leave OSD Menu | |||
On-Screen Display (OSD) Menu Operation
Access VGA, Input Source, WriteAway, Picture, Audio, Time, About, Advanced Options, and Other Settings settings through the OSD Menu.

Open the OSD Menu by pressing MENU on the remote control or the  Menu button on the front Control Panel.
VGA
| Item | Description |
|---|---|
| H Position | Adjust the screen image position horizontally. |
| V Position | Adjust the screen image position vertically. |
| Clock | Adjust the frequency of the pixel clock signal. This will affect the resolution and refresh rate. |
| Clock Phase | Adjust the clock phase to improve the display’s clarity and avoid flickering. |
| Zoom Mode | Select the aspect ratio of the display. |
| Auto Adjust | Automatically adjust the position of the screen image. |
| Screen Reset | Reset the Screen settings to their default settings. |
Input Source
Select one of the available input sources.

WriteAway

| Item | Description |
|---|---|
| Off | Turn off the WriteAway function. |
| Except PC (OPS) | Can be used for all channels, except OPS. |
| No Signal Input Only | Can be used when there is no signal input. |
| Black Board Mode
(Auto Signal Detection: Off) |
Can be used when there is no signal input; auto-detection will be disabled. |
Picture

| Item | Description | ||||||||||
|---|---|---|---|---|---|---|---|---|---|---|---|
| Picture Mode | Select a predefined picture setting.
| ||||||||||
| Contrast | Adjusts the difference between the image background (black level) and the foreground (white level). Use this to set the peak white level after you have previously adjusted the Brightness setting to suit your selected input and viewing environment. | ||||||||||
| Brightness | Adjusts background black levels of the screen image. The higher the value, the brighter the image. Lower values will result in a darker image. | ||||||||||
| Color | Adjust an image from black and white to fully saturated color. | ||||||||||
| Tint | The higher the value, the more greenish the picture becomes. The lower the value, the more reddish the picture becomes. | ||||||||||
| Sharpness | A high value results in a sharper picture; a low value softens the picture. | ||||||||||
| Color Temperature | Adjust the color temperature value.
| ||||||||||
| Noise Reduction | Reduce image noise and distortion. | ||||||||||
| Overscan | Automatically enlarge the original picture horizontally and vertically to an equal aspect ratio that fills the screen. | ||||||||||
| RGB Range | Manually change the color format options to fit the correct color format range if the colors are not displayed correctly. | ||||||||||
| Flicker Free | Reduce or eliminate screen flicker. | ||||||||||
| Blue Light Filter | Adjust the filter that blocks high-energy blue light for a more comfortable viewing experience. | ||||||||||
| Gamma Set | Reflect the relationship between input source and picture brightness. | ||||||||||
| Backlight | Adjust the backlight value. | ||||||||||
| Picture Reset | Reset the Picture settings to their default settings. |
Audio

| Item | Description | ||||||||
|---|---|---|---|---|---|---|---|---|---|
| Volume Control | Select which component has sound and controls the volume.
| ||||||||
| Treble | Increase or decrease the treble level (higher-pitched sounds). | ||||||||
| Bass | Increase or decrease the bass level (lower-pitched sounds). | ||||||||
| Balance | Adjust the left/right speaker balance. | ||||||||
| Volume | Increase or decrease the display’s volume level. | ||||||||
| Maximum Volume | Set the display’s maximum volume level. | ||||||||
| Minimum Volume | Set the display’s minimum volume level. | ||||||||
| Mute | Toggle mute on or off. | ||||||||
| Audio Out Sync | Sync the Audio Out Volume (Line Out) with the display’s speakers. | ||||||||
| Audio Out Volume
(Line Out) |
Increase or decrease the Audio Out volume level. | ||||||||
| Audio Reset | Reset the Audio settings to their default settings. |
Time

| Item | Description |
|---|---|
| Off Time | Set a time for the ViewBoard to automatically power off. |
| Date and Time | Set the ViewBoard’s system time and format. |
| Schedule | Set up to seven different time intervals for the display to be active. |
| OSD Turn Off | Set the length of time the OSD Menu remains on screen. |
| Input Information | Set the length of time the input information will be displayed on the display. |
| Automatic Date & Time | Automatically set the date and time. |
| Time Reset | Reset the Time settings to their default settings. |
About

| Item | Description |
|---|---|
| Display Information | See information about the display: Model Name, Serial No., Operation Hours, and Software Version. |
Advanced Options

| Item | Description | ||||||||||
|---|---|---|---|---|---|---|---|---|---|---|---|
| Saving | Panel Saving
When enabled, the ViewBoard display’s brightness will be limited to 40% of its maximum brightness level. Power Save Select one of the power saving modes to enable power saving.
Power LED Light Turn on/off the ViewBoard’s power indicator light. | ||||||||||
| Boot | Boot On Source
Select which input source to use when the Viewboard is powered on. Boot On Logo Select a boot up logo to display when the ViewBoard is starting. | ||||||||||
| Signal | Auto Signal Detection
Enable to automatically detect input sources and display them. No Signal Standby Enable to go to standby mode when there is no input source detected. | ||||||||||
| Port | HDMI with One Wire
When ON, HDMI CEC will be enabled. HDMI CEC synchronizes device power on/off operation via HDMI connection. USB Cloning Import/export OSD Settings to a USB storage device. USB Auto Play When on, the ViewBoard will copy media files from an external storage device (e.g., USB drive) to internal storage, then play the media files automatically. | ||||||||||
| Others | Switch On State
Select the display status for the next time the power cord is connected to a power outlet.
WOL (Wake On LAN) When on, the ViewBoard will turn ON automatically after plugging in a LAN cable when the screen is off. Monitor ID Assign a number to remote control the display by RS-232. NOTE: The number range is: 1~98; 99 is reserved for “All Displays”. OSD Language Set the preferred language for the ViewBoard. Factory Reset Reset all OSD Menu settings to their default settings. Advanced Options Reset Reset the Advanced Options settings to their default settings. |
Other Settings

| Item | Description |
|---|---|
| Energy Star | Toggle Energy Star on or off. |
| Light Sensor | Toggle the light sensor on or off. |
| IP | View the current IP address. |
| Port | View the current port number. |
Leave OSD Menu
Exit the OSD Menu.
