VPC-A31-O1
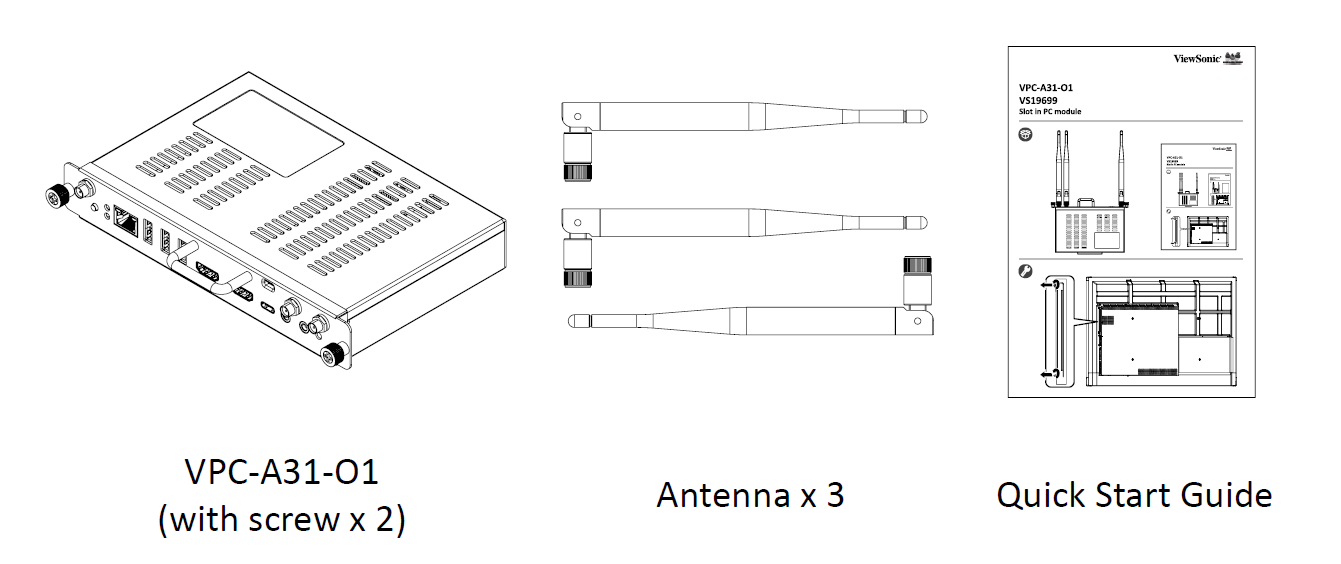
Package Contents
Please take a moment to check if all the necessary items are included in the package. If anything is missing or damaged, please contact your dealer immediately.
Product Overview
| Number | Item | Description | ||||||
|---|---|---|---|---|---|---|---|---|
| 1 | Antenna | Wi-Fi antenna interface | ||||||
| 2 | RJ45 | Standard RJ45 (10M/100M/1G) internet connection port
| ||||||
| 3 | USB 1 | USB 3.0 port | ||||||
| 4 | USB 2 | USB 3.0 port | ||||||
| 5 | USB 3 | USB 3.0 port | ||||||
| 6 | Handle | |||||||
| 7 | Security Lock | |||||||
| 8 | Antenna | 2.4G antenna interface | ||||||
| 9 | Antenna | Wi-Fi antenna interface | ||||||
| 10 | Power button | |||||||
| 11 | Status LED | Status indicator light (Green)
| ||||||
| 12 | Power LED | Power indicator light (Red)
| ||||||
| 13 | HDMI IN | HDMI input. Connect to a PC or other device with HDMI output. | ||||||
| 14 | HDMI OUT | Extend content out to another display device. | ||||||
| 15 | USB Type C input (Data only; 5V/0.9A charging) | |||||||
| 16 | LINE-OUT | Audio out for connected headphones or speakers. | ||||||
| 17 | MIC-IN | Microphone connection | ||||||
| 18 | RESET | Press and hold for six seconds when the VPC-A31-O1 is powering on to restore factory settings.
|
Installing the VPC-A31-O1
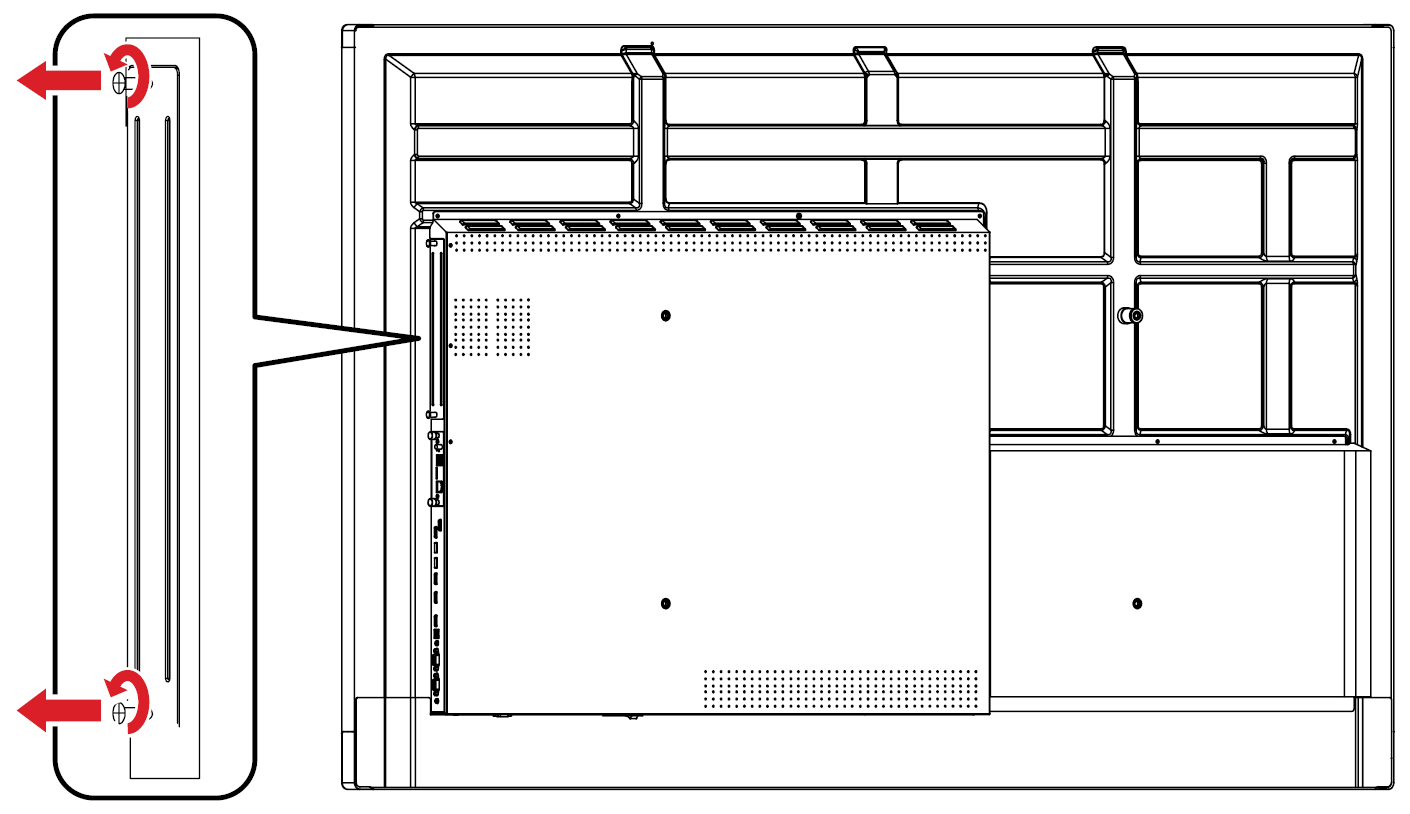
- Remove the slot-in PC cover of the display.
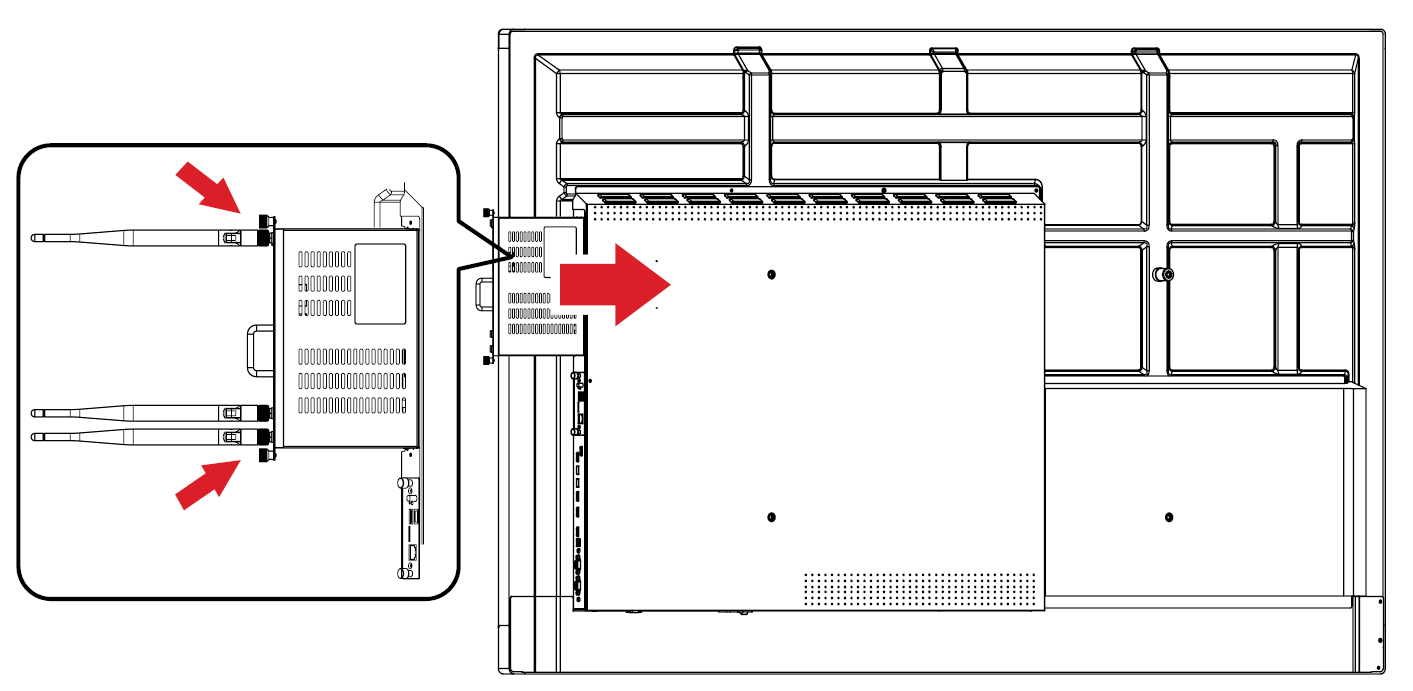
- Using the handle of the VPC-A31-O1, carefully insert it into the PC slot of the display.
- NOTE:
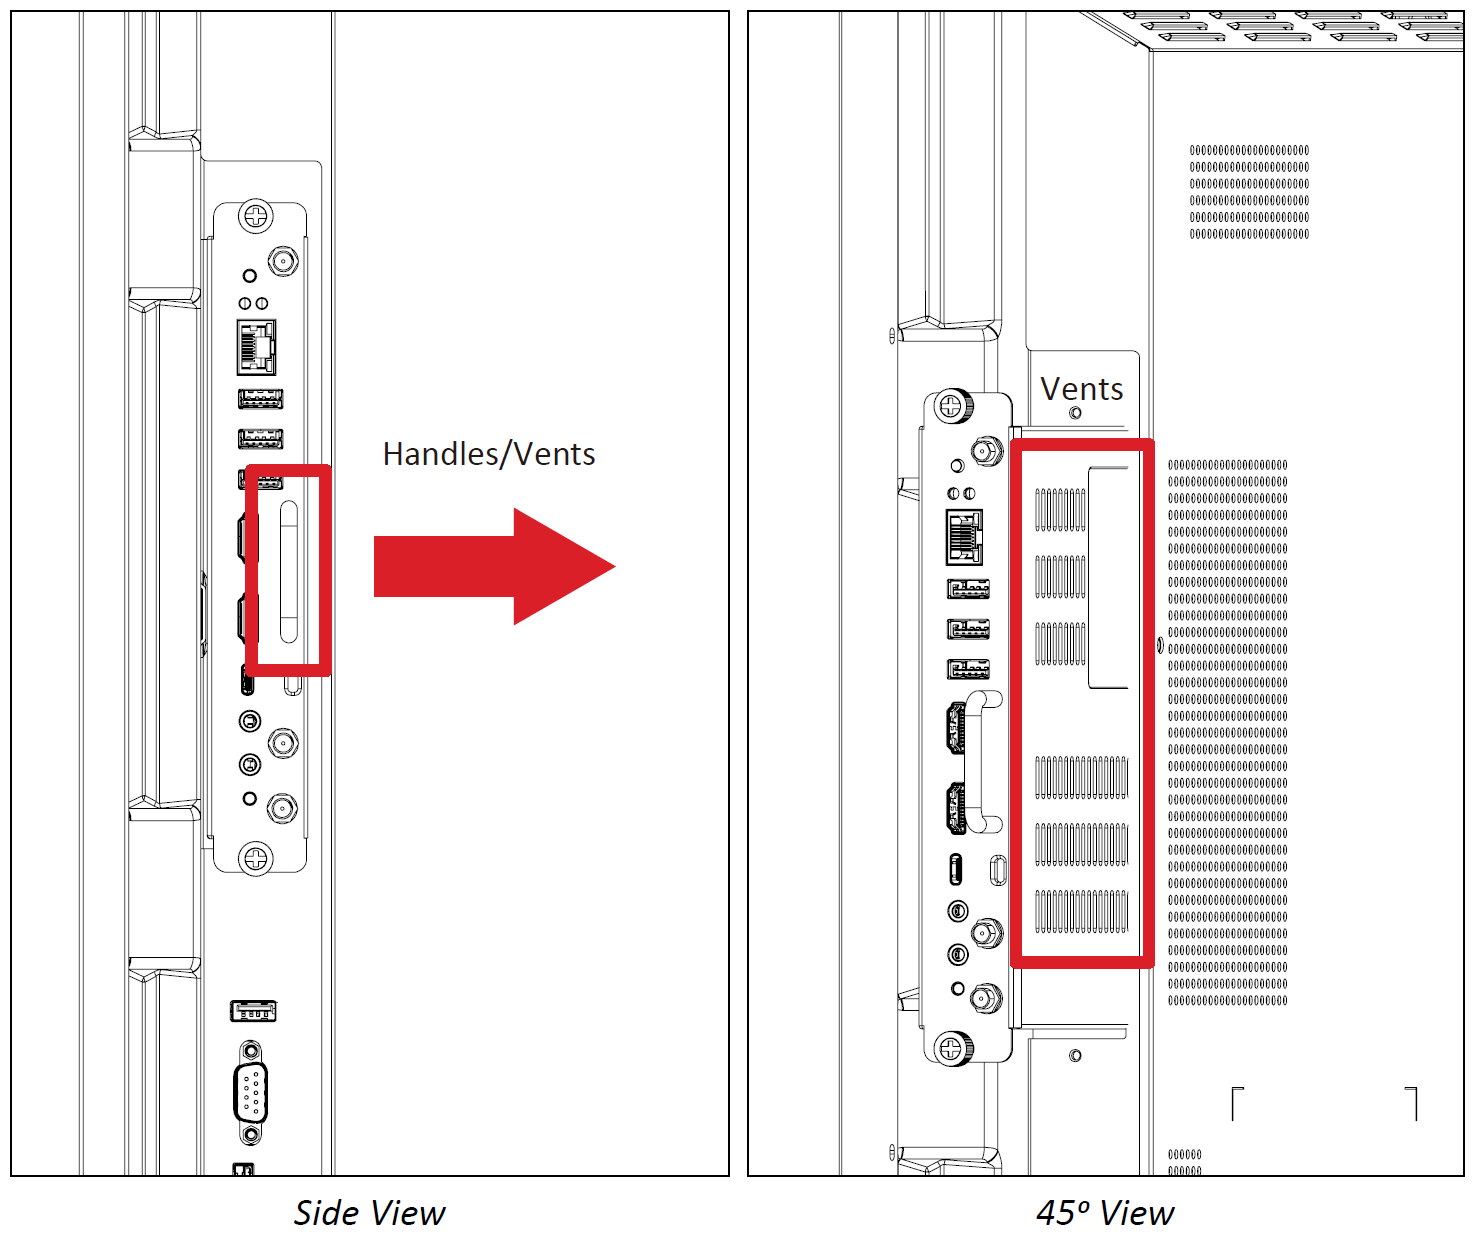
- Ensure the handle and vents of the VPC-A31-01 are facing outwards.
- The right installation direction is to avoid damage to the OPS terminal and maintain proper ventilation.
- Secure the VPC-A31-O1 to the display with the two (2) included screws.
- NOTE:
- Please note that the three (3) antennas must be installed on the VPCA31-O1.
- Please pay attention to the installation direction of the VPC-A31-O1, with the vents facing outwards to avoid damage.
- The VPC-A31-O1 does not support hot swapping. When removing the device, turn off the power supply for both the display and VPC-A31-O1 first.
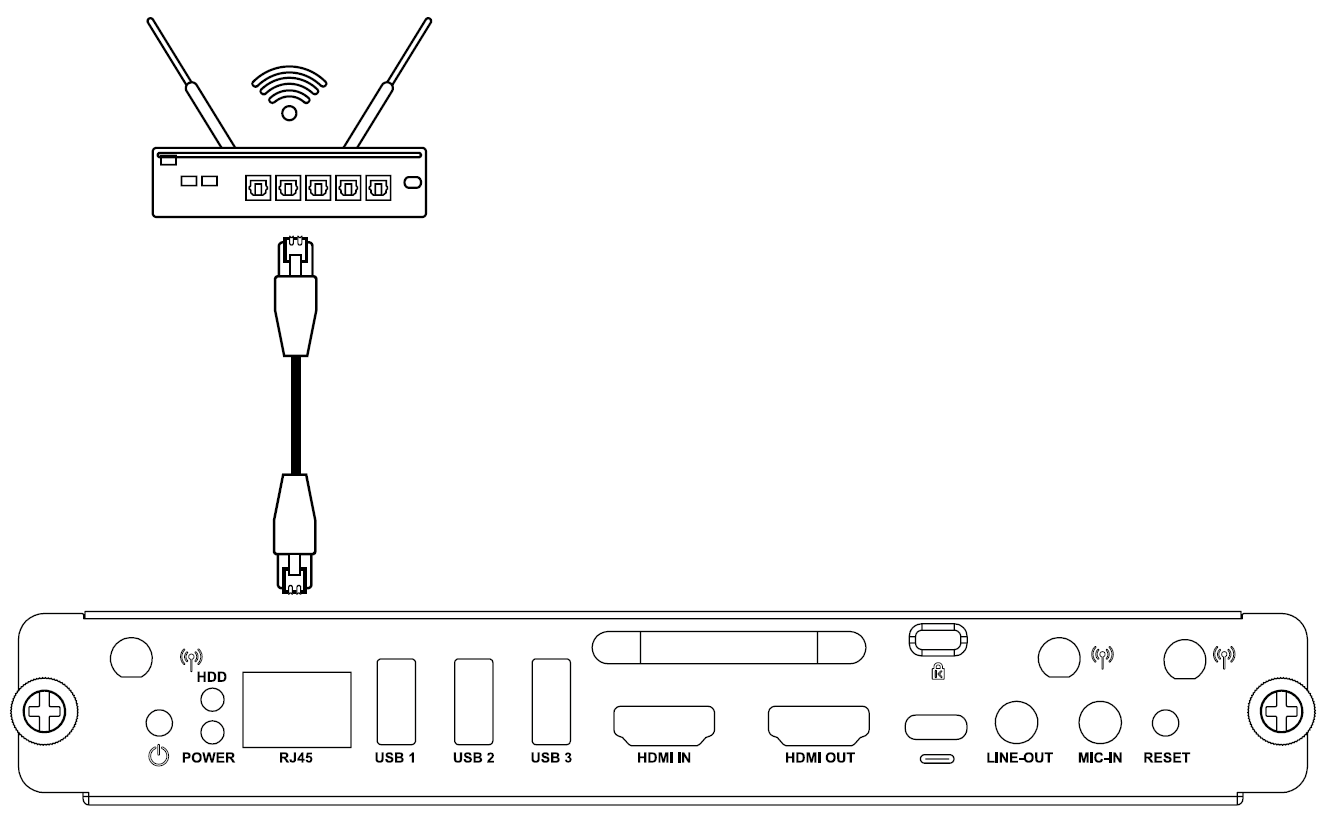
Network Connection
To connect to the Internet or a network, connect one end of a RJ45 cable to the RJ45 port of the VPC-A31-O1, then connect the other end to your network.
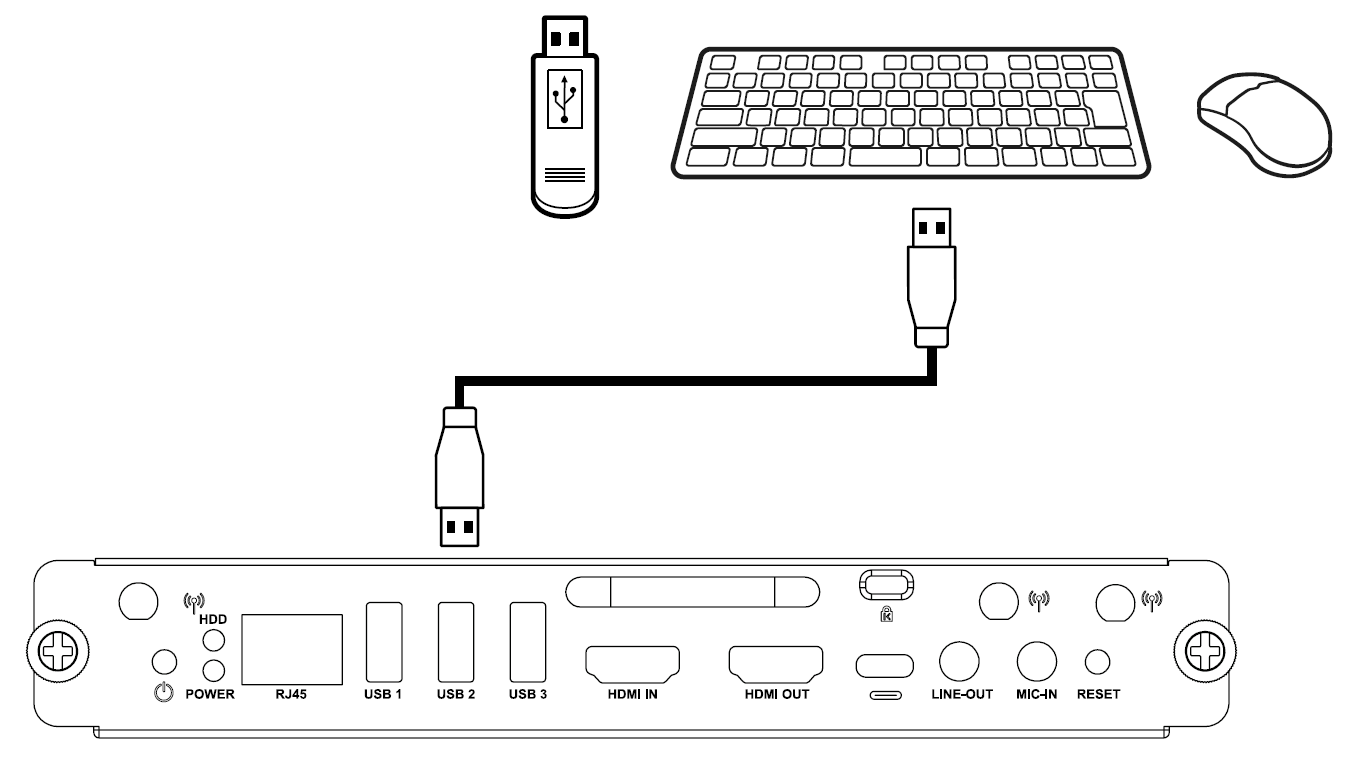
USB Connection
USB peripherals such as keyboards, mice, storage devices, etc. can be connected to the VPC-A31-O1’s USB 1, USB 2, or USB 3 port.
Selecting an Input Source
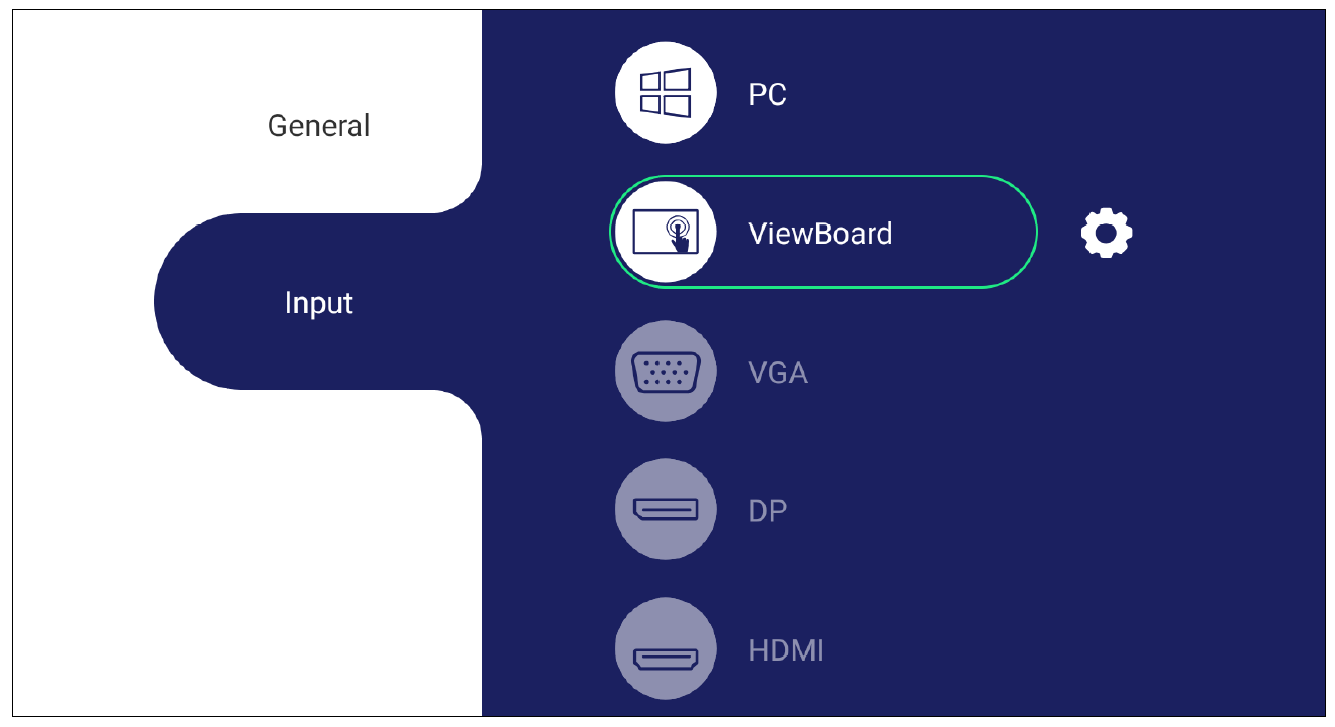
IFP Series
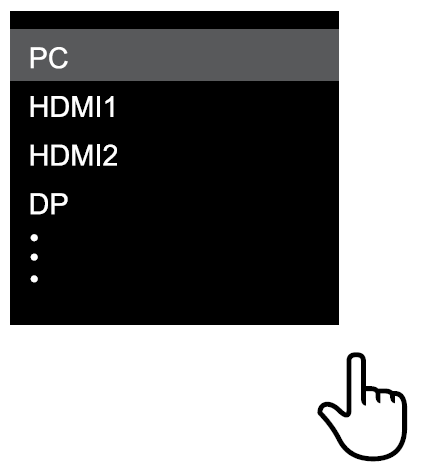
To select an input source:
- Press INPUT on the remote control, press the setting button on the front panel, or press the Settings icon from the toolbar to display the Input Settings menu.
- Press ▼/▲/◄/► on the remote control to select the PC source.
- Press OK/ENTER on the remote control, or touch the input source directly.
- Press EPG/BACK on the remote control, or touch a blank area outside of the menu to exit.
- NOTE: The above image is for reference only and is subject to change without notice.
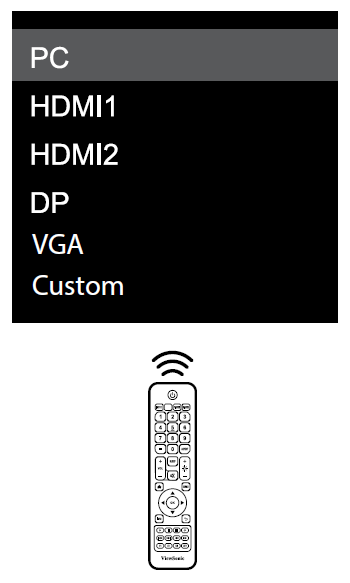
CDE Series
To select an input source:
- Press INPUT on the remote control.
- Press ▼/▲ on the remote control to select the PC source.
- Press OK/ENTER on the remote control.
- Press EPG/BACK on the remote control to exit.
- NOTE: The above image is for reference only and is subject to change without notice.
IFPG1 Series
To select an input source:
- Press INPUT on the front panel.
- In the OSD Menu, touch INPUT.
- Touch the PC input source directly.
- Touch a blank area outside of the menu to exit.
- NOTE: The above image is for reference only and is subject to change without notice.
Initial Launch Setup
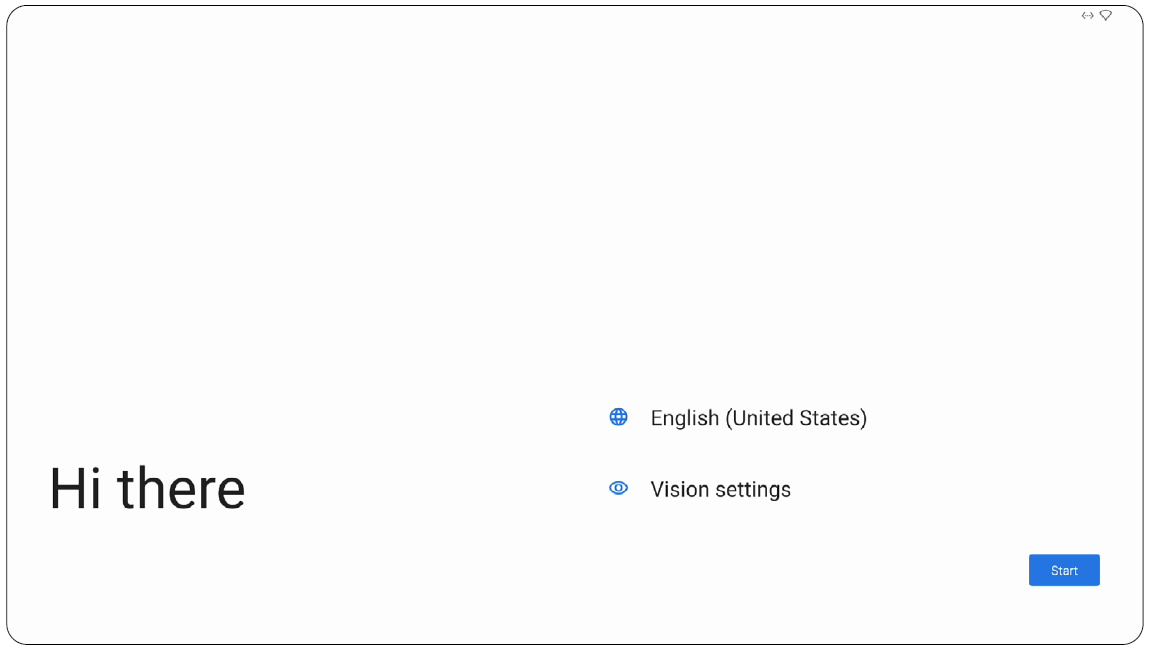
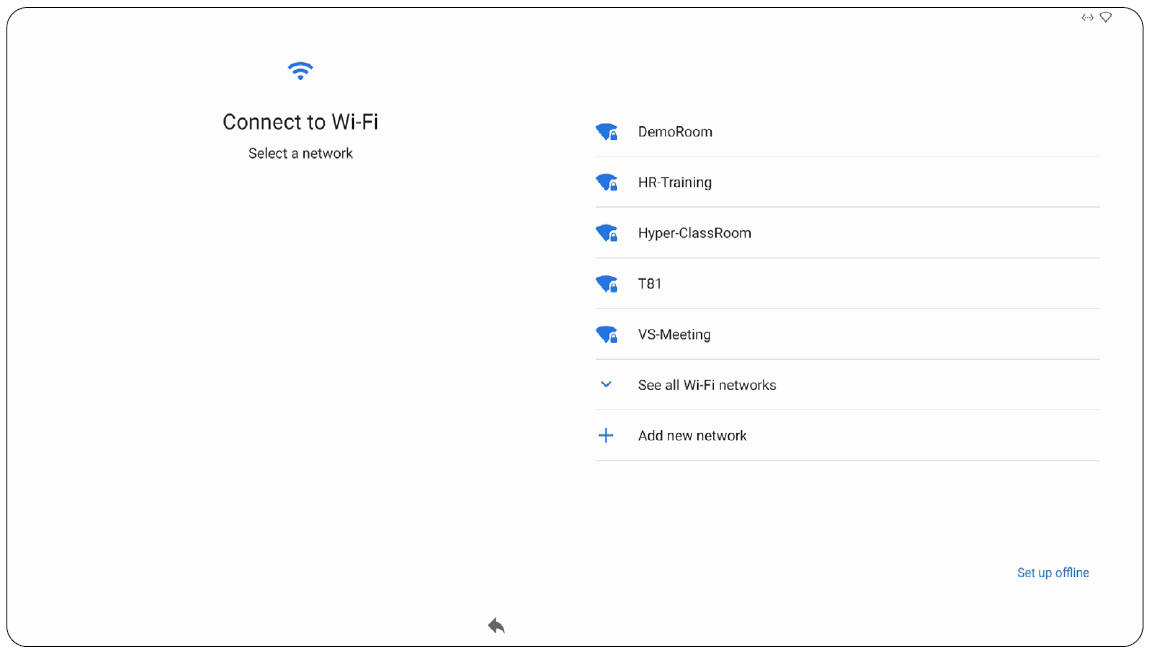
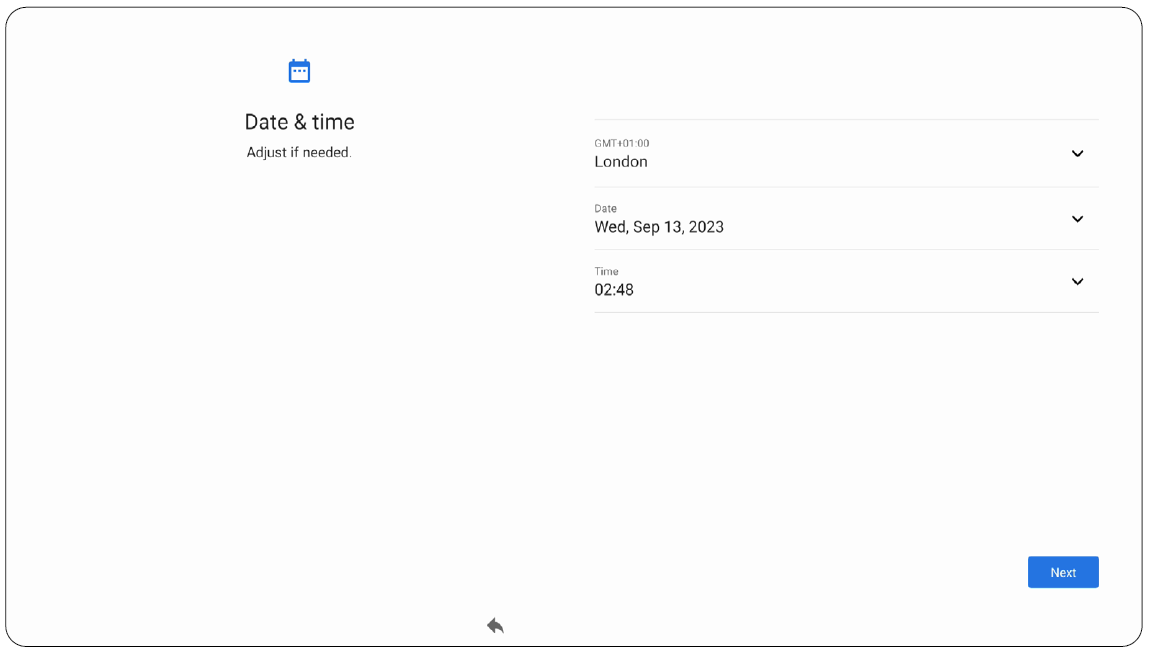
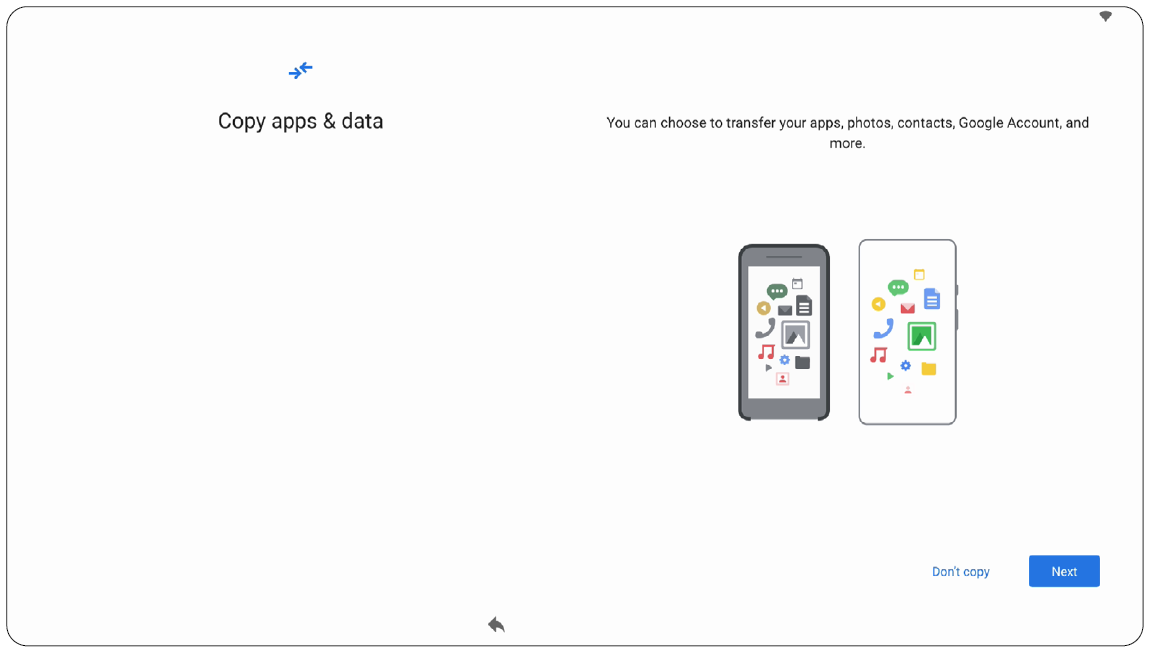
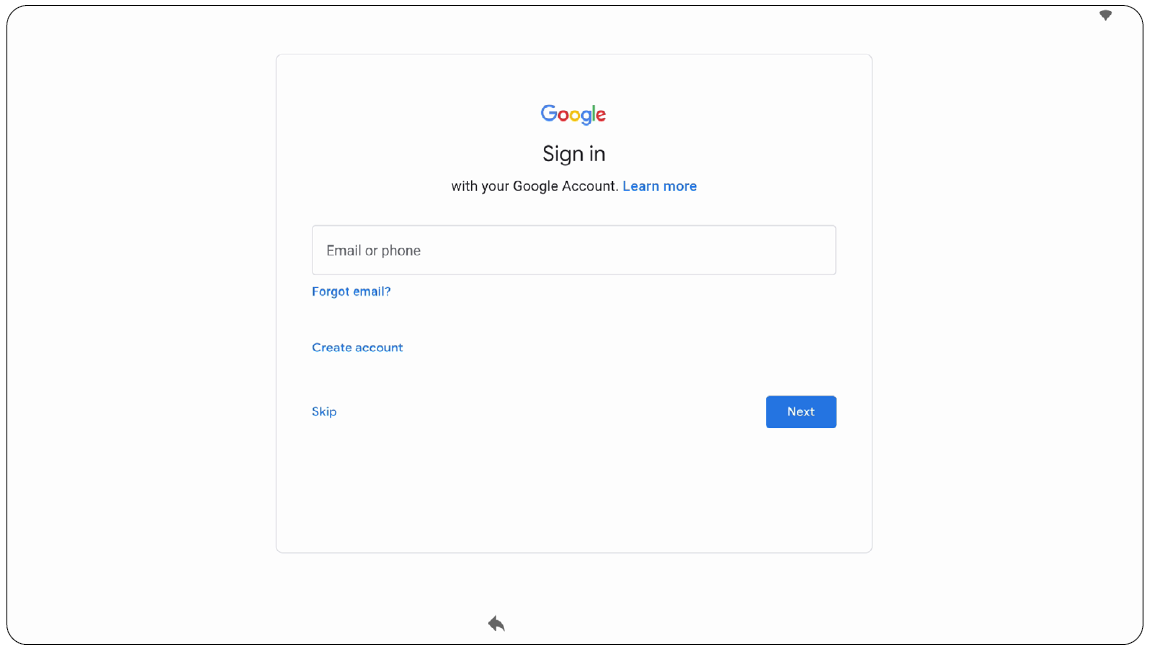
When you first turn ON your ViewBoard, an initial setup wizard will launch.
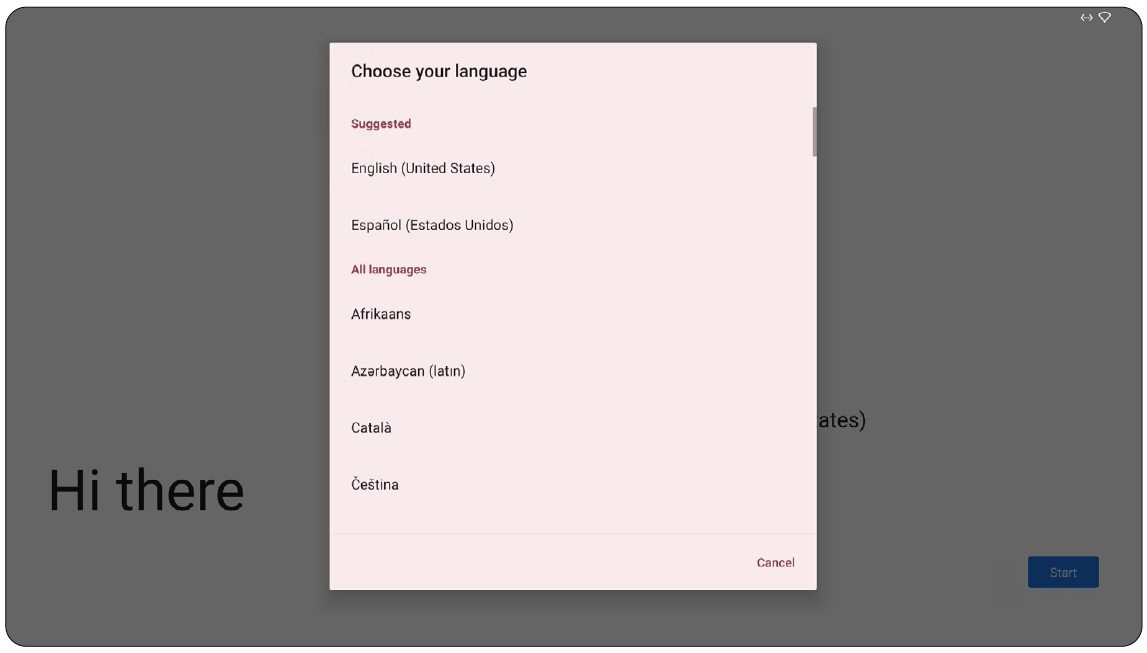
- Choose your preferred Language.
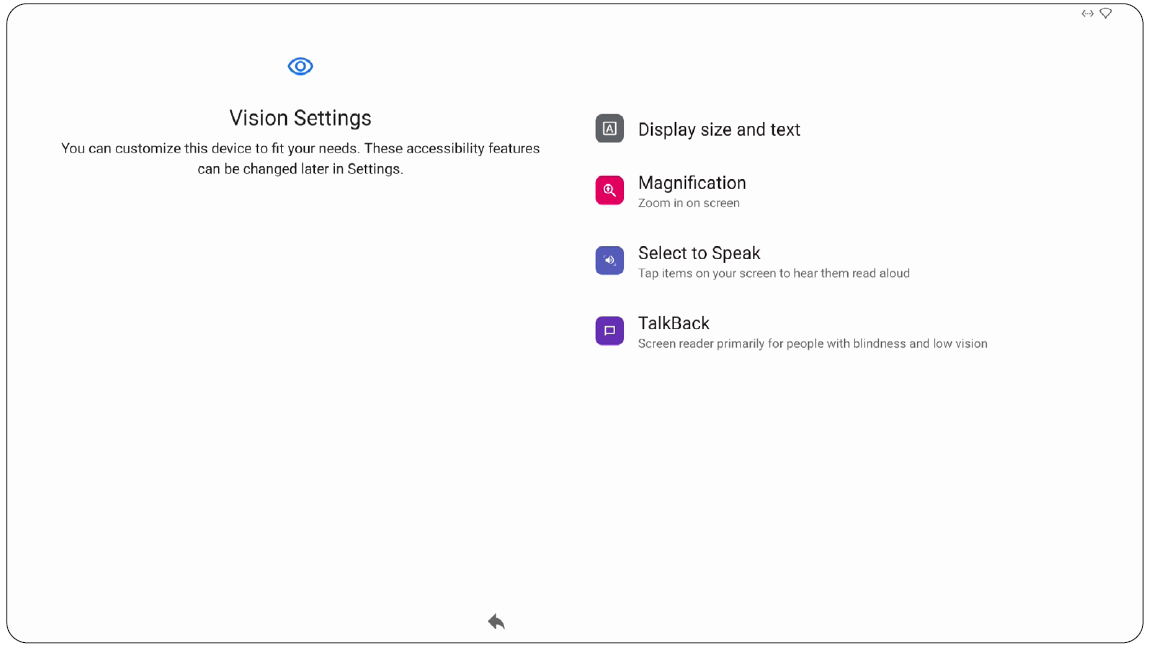
- Adjust accessibility features as needed.
- Setup and connect to a network.
- Set and adjust the Date and Time as needed.
- Copy your apps and data from another device to the ViewBoard or tap Don’t copy to continue without copying anything.
- Sign in with a Google account, or tap Skip to continue without signing in.
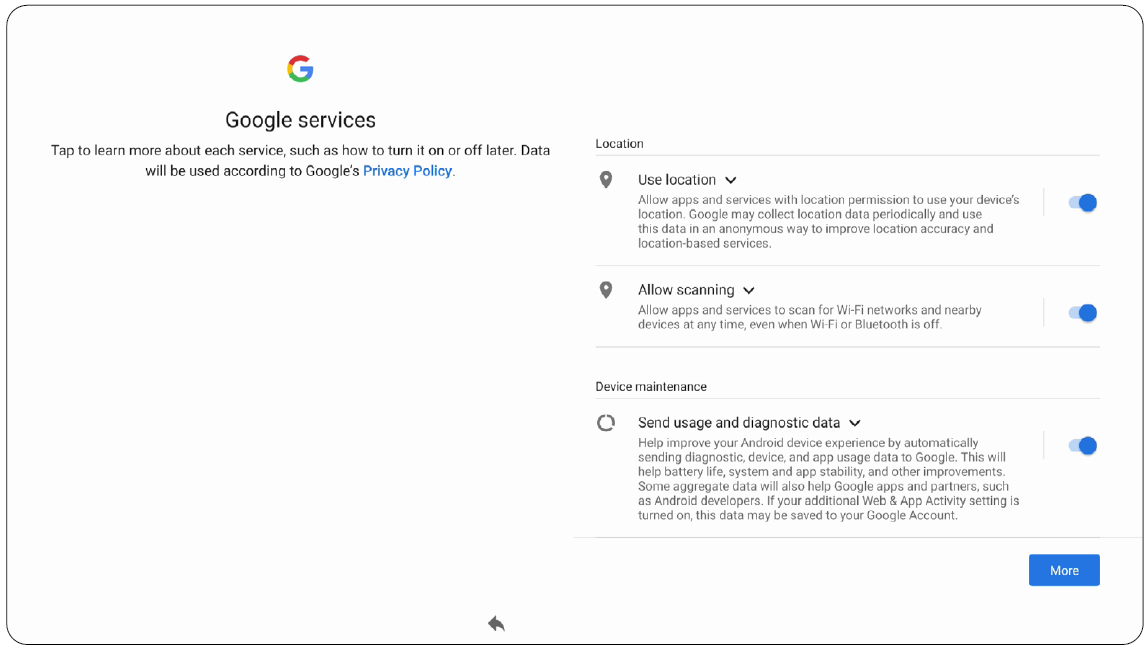
- Accept or decline the Google services.
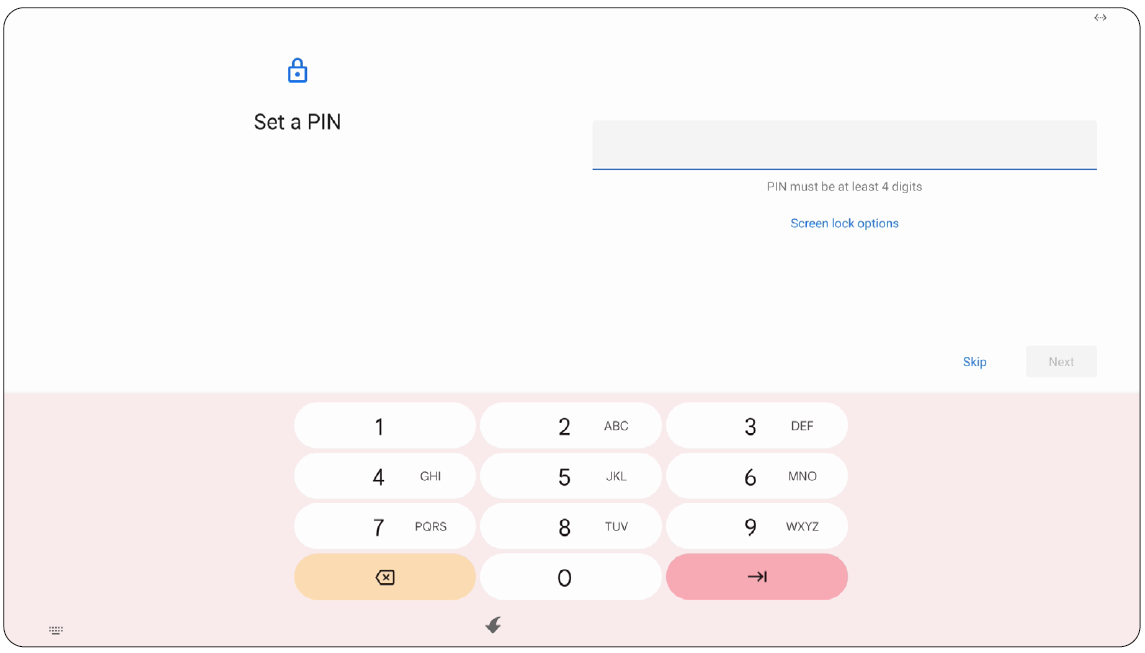
- Set a PIN to setup a Screen lock, or tap Skip to continue without setting one.
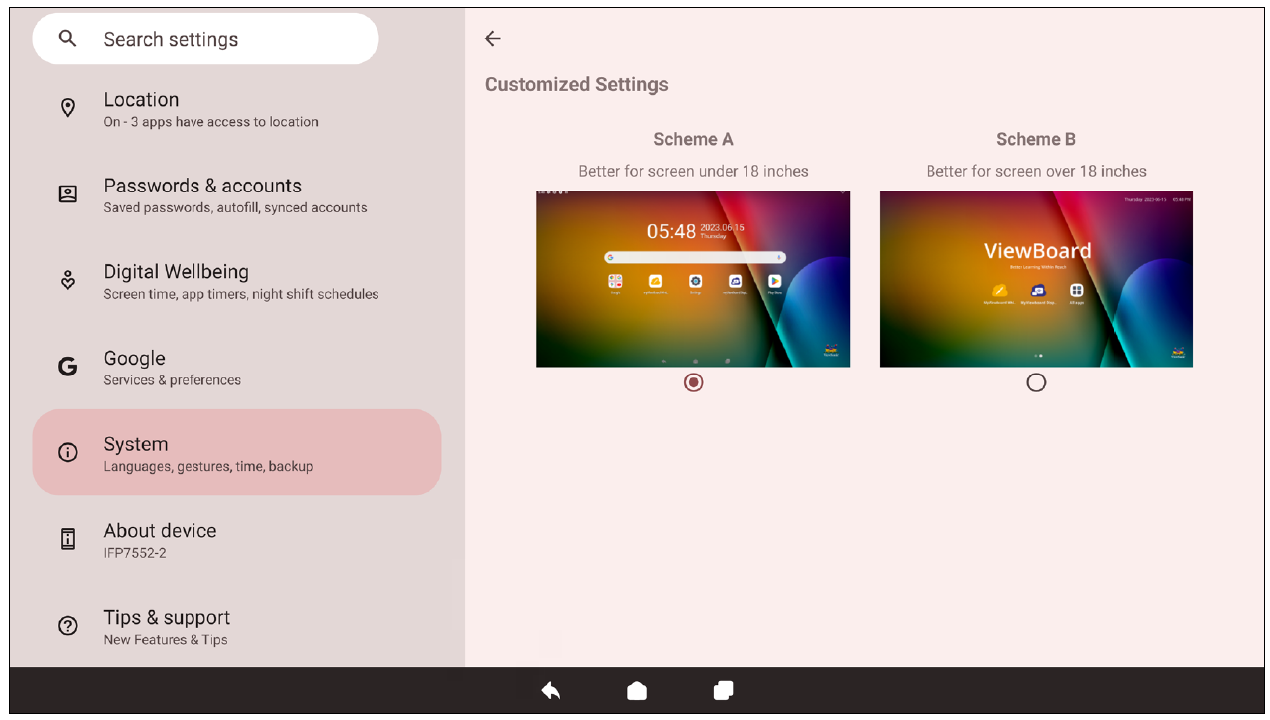
- Go to: Settings > System > Launcher Scheme
- Select either Scheme A or Scheme B.
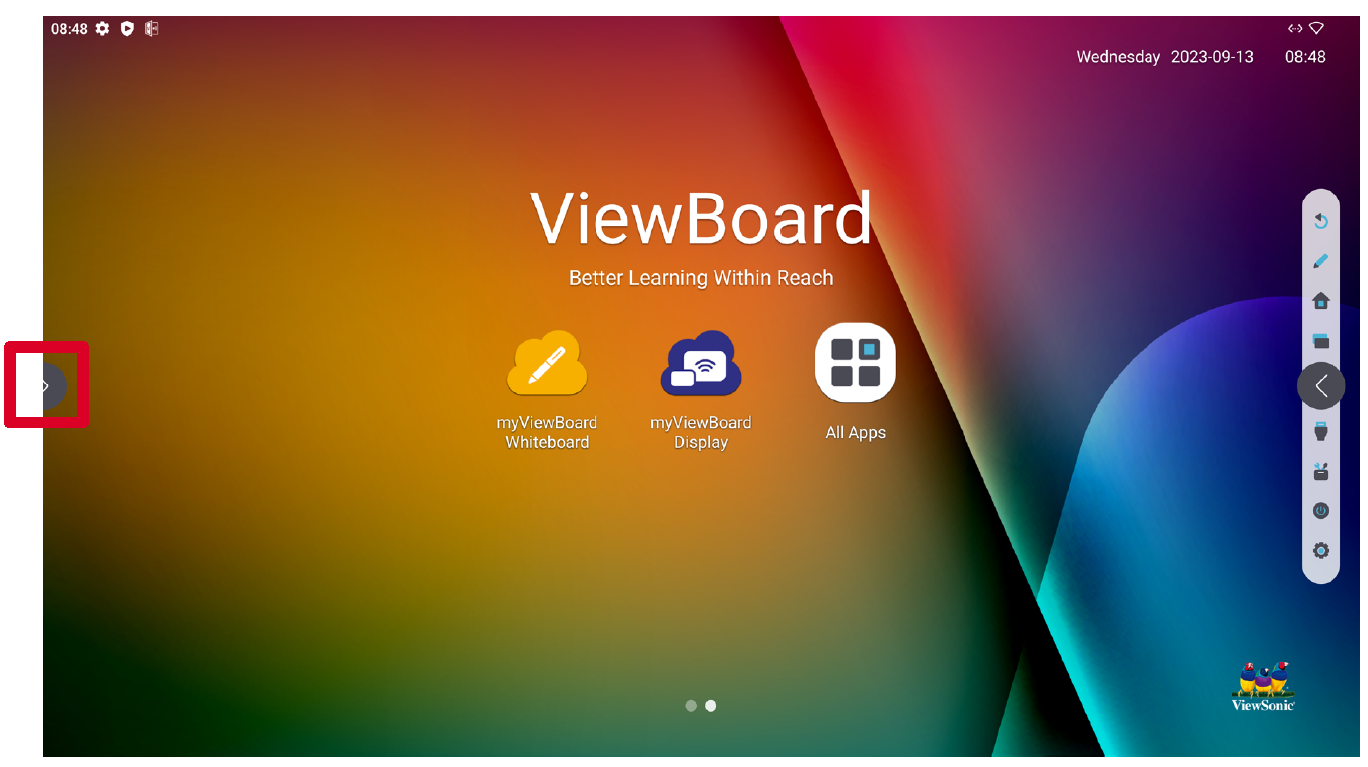
- Tap a Toolbar trigger icon.
- Tap on your desired application or tool.
- NOTE: Only for the ViewBoard OS source.
- NOTE: The following included application descriptions are not a comprehensive list and will vary by the user.
- NOTE:
- Ethernet will take priority when both Ethernet and Wi-Fi are enabled.
- The device can connect to the Internet when Hotspot is enabled.
- NOTE: Bluetooth will turn on.
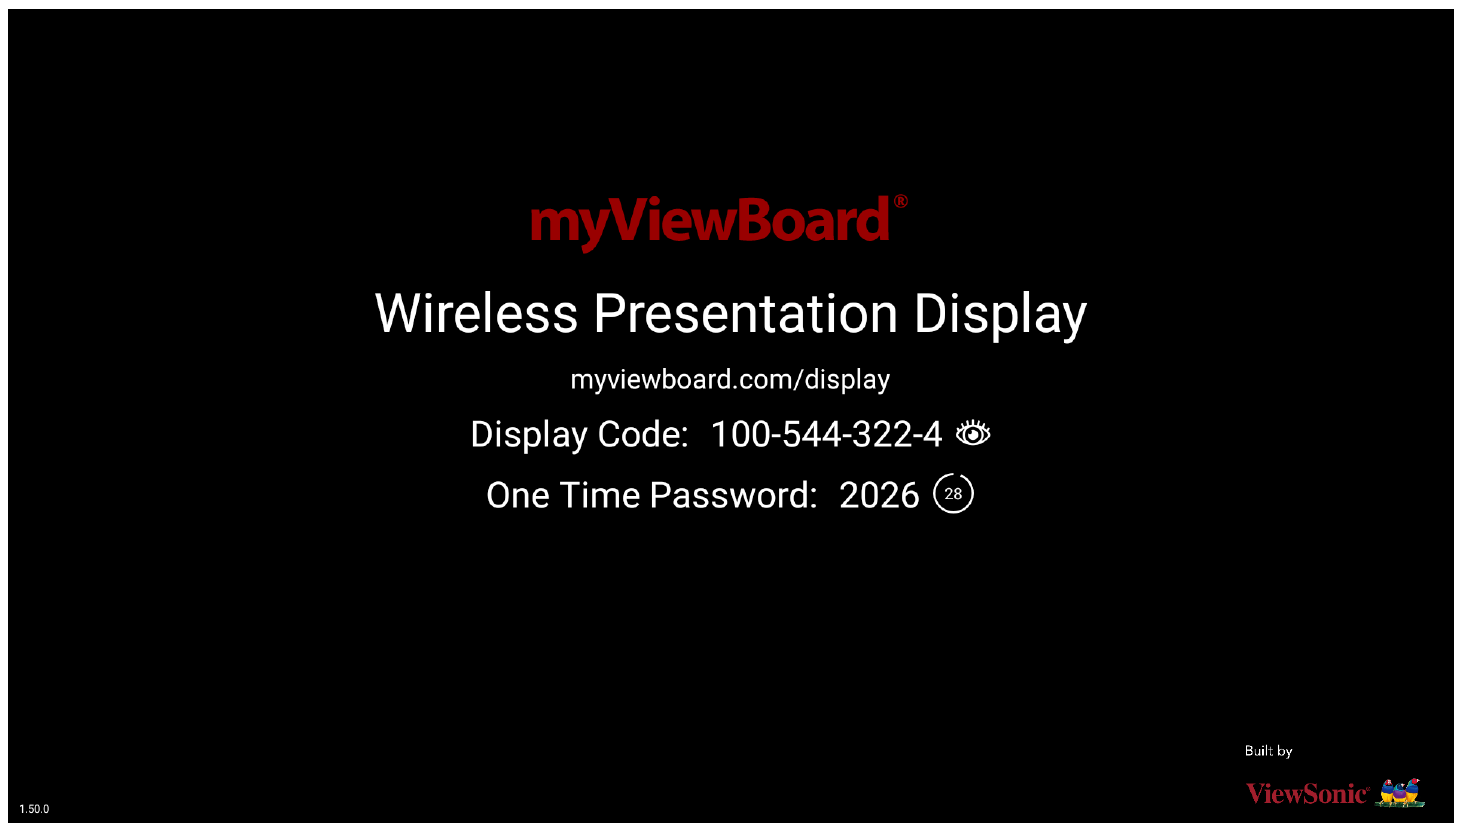
- Open myViewBoard Display on the ViewBoard you want to share your screen to.
- On the device you want to share the screen from, go to: https://myviewboard.com/display.
- Enter the Display Code and One Time Password for the ViewBoard you wish to share to.
- NOTE: Note that the password refreshes every 30 seconds.
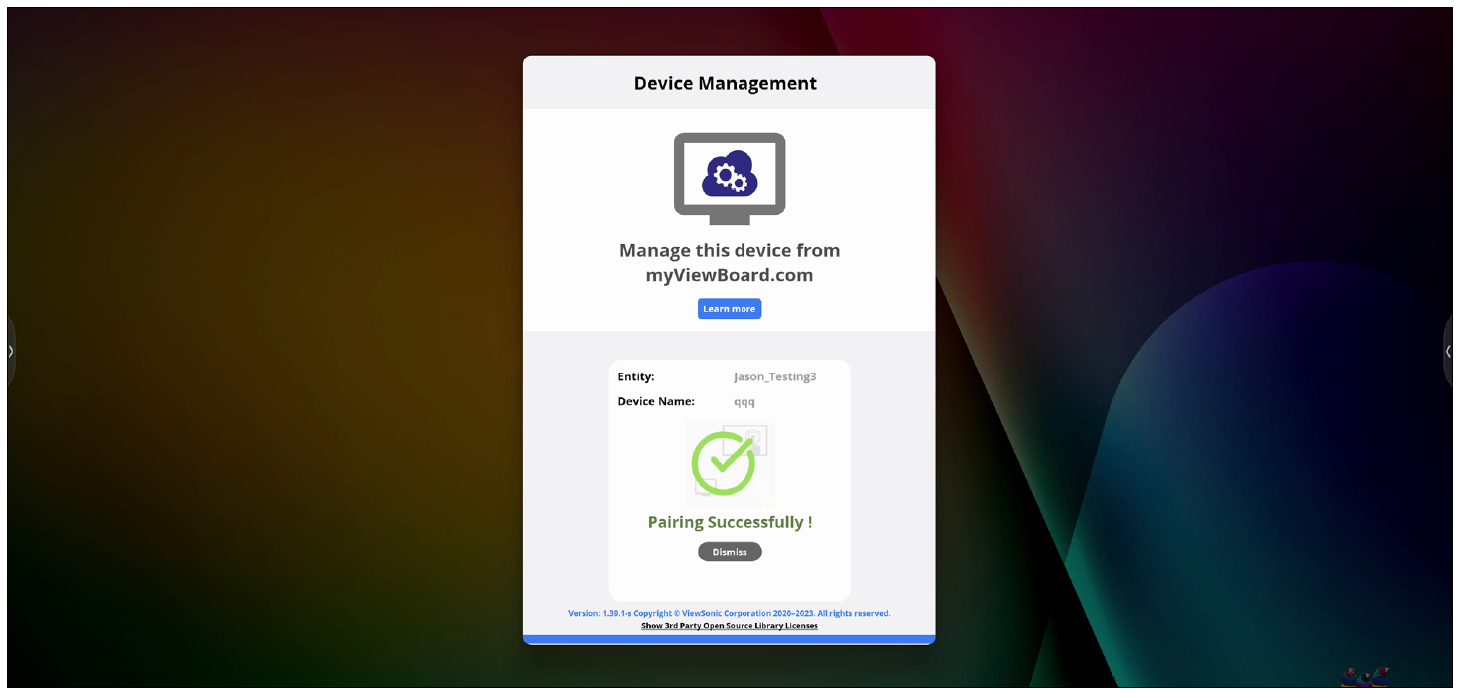
- NOTE: Only available to Entity Admins from myviewboard.com after signing in.
- Download and install myViewBoard Manager.
- Open myViewBoard Manager and note the 6-digit PIN displayed.
- Click Add Device.
- Input the 6-digit PIN obtained earlier.
- Name the device (if applicable).
- Click Add.
- NOTE: To learn more about myViewBoard Manager, visit: https://wiki.myviewboard.com/MyViewBoard_Manager.
- NOTE: To learn more about myViewBoard Whiteboard, visit: https://wiki.myviewboard.com/Whiteboard_for_Android.
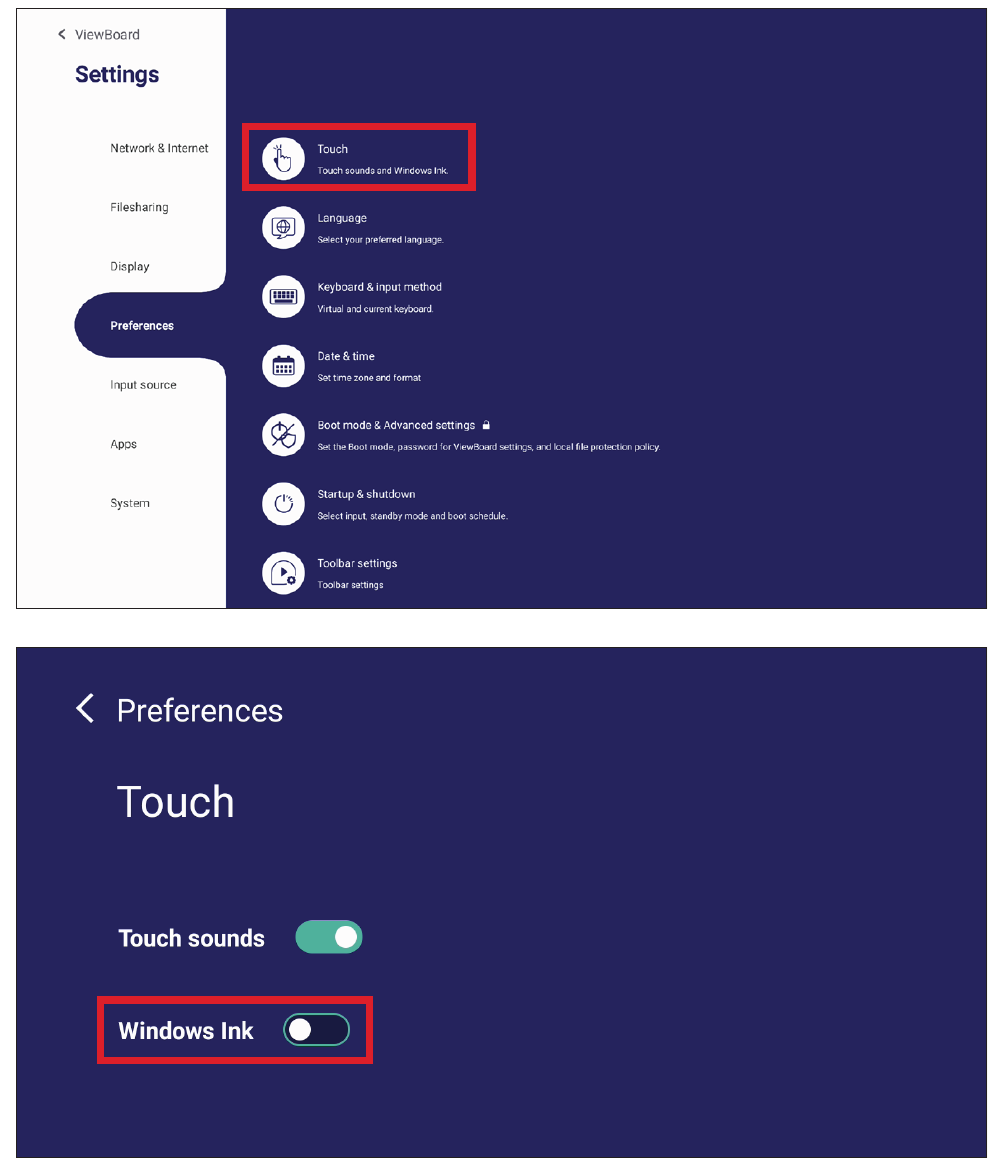
- NOTE: To ensure accurate palm erasing and dual pen recognition, go to: ViewBoard > Settings > Preferences > Touch > disable Windows Ink.
- NOTE:
- ViewBoard® Cast software, laptops, and mobile devices can connect to both the same subnet and cross subnet by entering the on-screen PIN code.
- Connected devices will show up under Device List on the same subnet connection.
- If the device does not show up under Device List, users will need to key-in the on-screen PIN code.
- Ports:
- TCP 56789, 25123, 8121 & 8000 (Controlling message port & client device audio transfer)
- TCP 8600 (BYOM)
- TCP 53000 (Request share screen)
- TCP 52020 (Reverse control)
- TCP 52025 (Reverse control for ViewBoard Cast Button)
- TCP 52030 (Status sync)
- TCP 52040 (Moderator mode)
- UDP 48689, 25123 (Device searching and broadcast & client device audio transfer)
- UDP 5353 (Multicast search device protocol)
- Port and DNS Activation:
- Port: 443
- DNS: https://vcastactivate.viewsonic.com
- OTA Service:
- Server Port: TCP443
- Server FQDN Name: https://vcastupdate.viewsonic.com
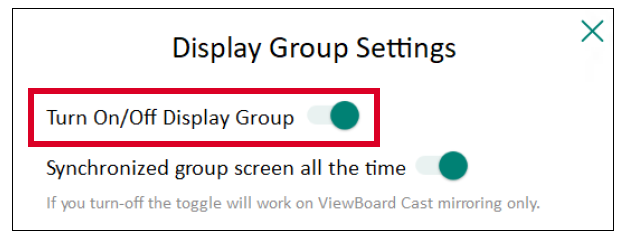
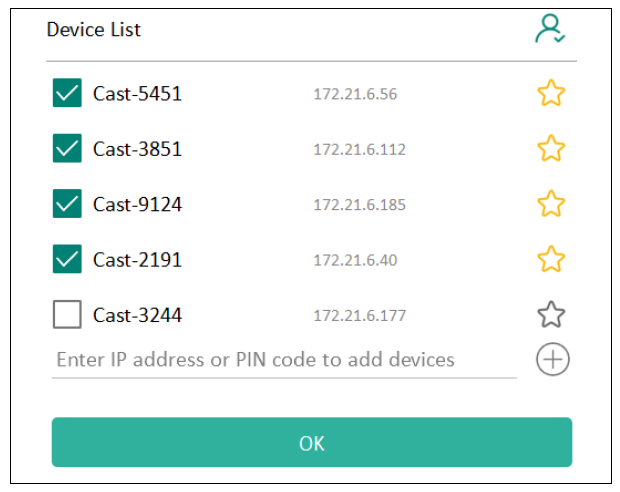
- Toggle the "Turn On/Off Display Group" ON to enable the Display Group feature.
- NOTE: Other preinstalled ViewBoard Cast devices in the same network will be listed.
- Select the devices you want to join the display group and select OK to save the settings.
- NOTE:
- If the devices you want to group are not listed, you can enter their respective IP address or connecting PIN code.
- The Display Group maximum device limit is six devices.
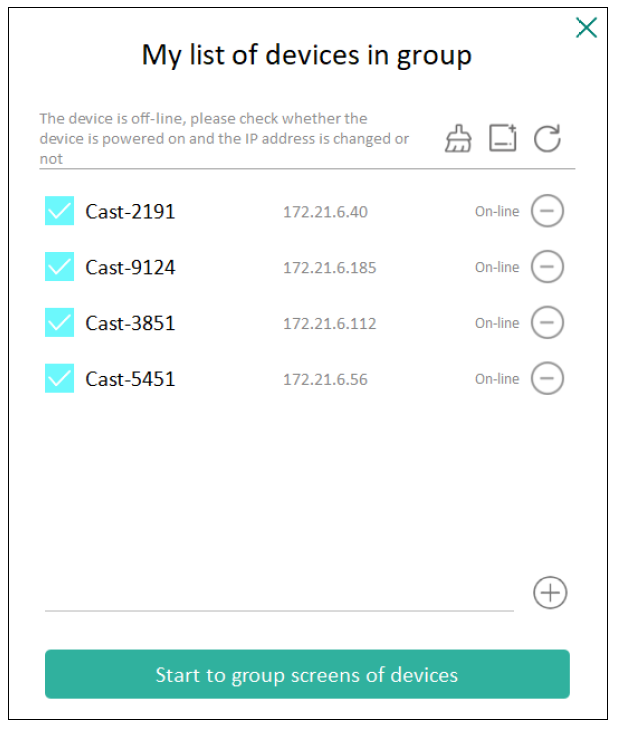
- If you frequently connect to the same device, you can select the Star icon (
) next to the device to add it to your frequently connected devices list, "My List of Devices in Group", for easier Display Group setup and management.
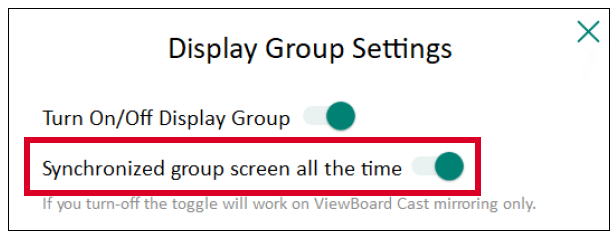
- NOTE: Select the devices to group first, then toggle the "Synchronized group screen all the time” function ON to avoid interruption.
- Moderator Mode is supported on all vCastSender and AirPlay devices, but mobile devices are limited to a "preview" function. Additionally, mobile Android devices cannot cast sound out.
- When you cast your Windows/Mac/Chrome screen to a ViewBoard, the selected full screen unit will not be broadcasted back to your device to avoid repetitive screen casting.
- The active presenter can touch each of the participant's screens to remotely control casting devices.
- The number of multi-screen presenters on-screen depends on your Windows CPU processor performance and router specifications.
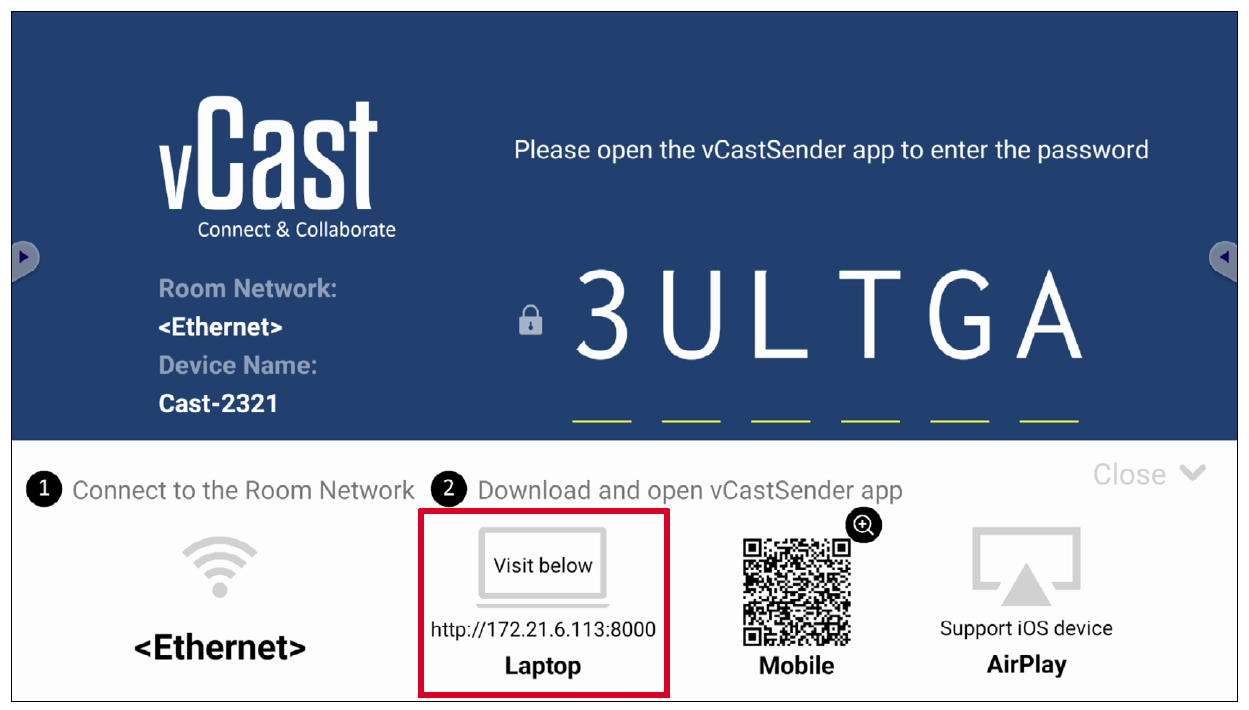
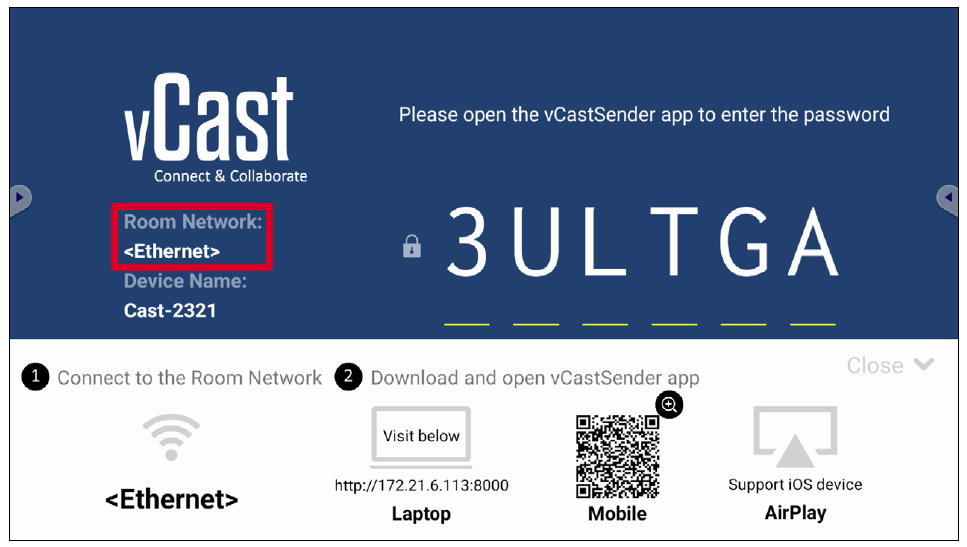
- Ensure the client device (e.g., laptop) is connected to the same network as the ViewBoard.
- NOTE: The network name can be found under Room Network.
- On the client device, visit the address that is shown on the ViewBoard to download and install the vCastSender application.
- After installing, launch the vCastSender application.
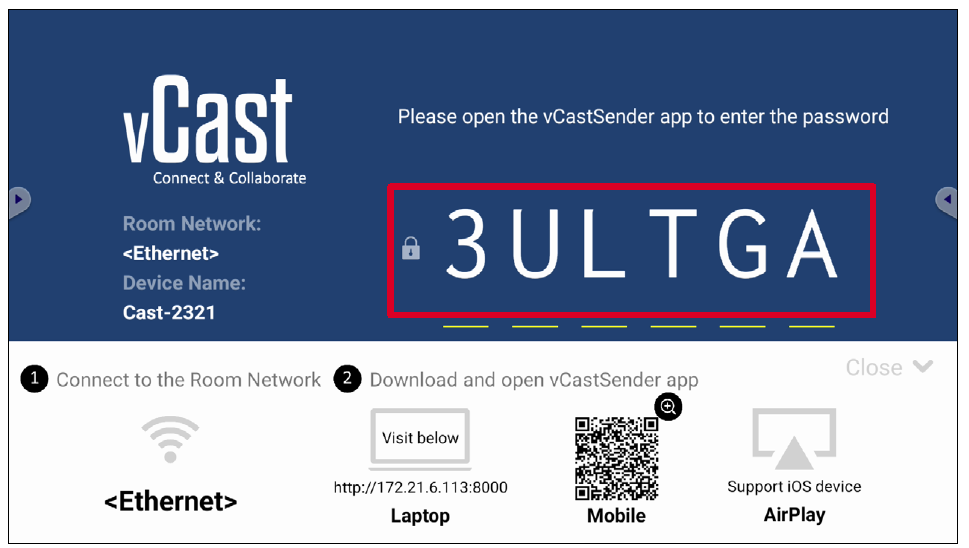
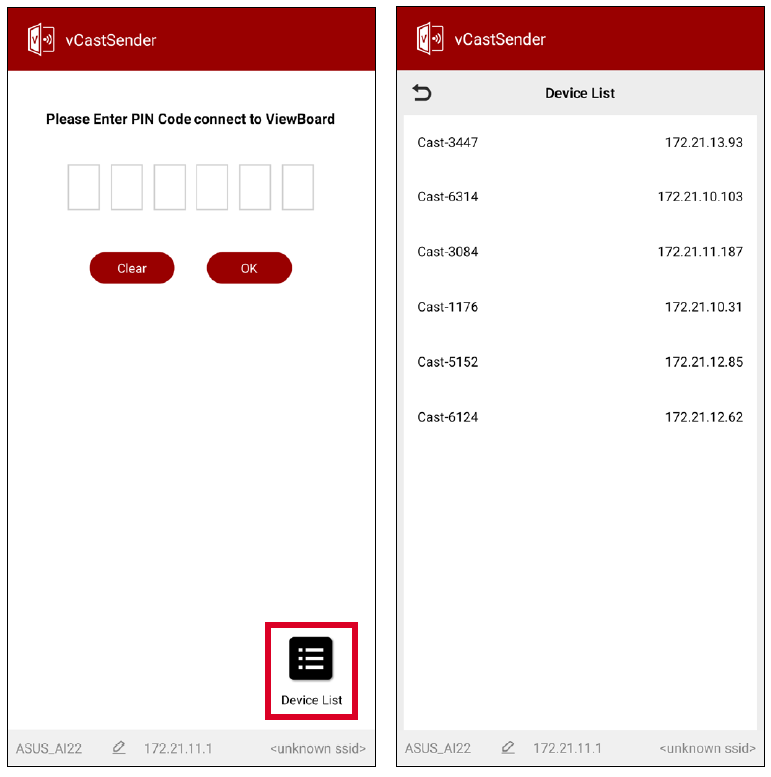
- To connect to the ViewBoard, input the PIN code and click OK.
- NOTE: The PIN code can be found as highlighted below:
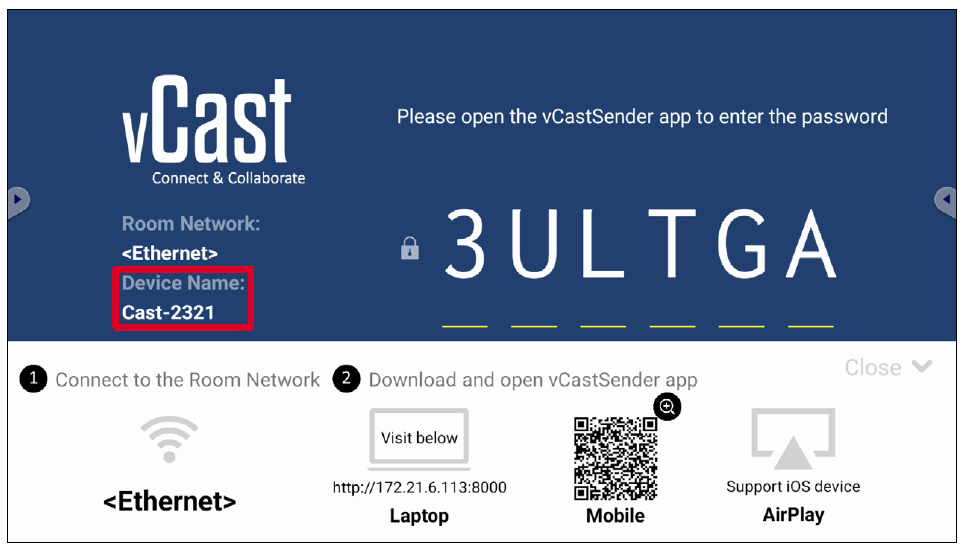
- Additionally, you can connect to the ViewBoard or display by clicking Device List then the Device Name listed.
- NOTE: The Device Name can be found as highlighted below:
- Ensure the client device (e.g., Android phone or tablet) is connected to the same network as the ViewBoard.
- NOTE: The network name can be found under Room Network.
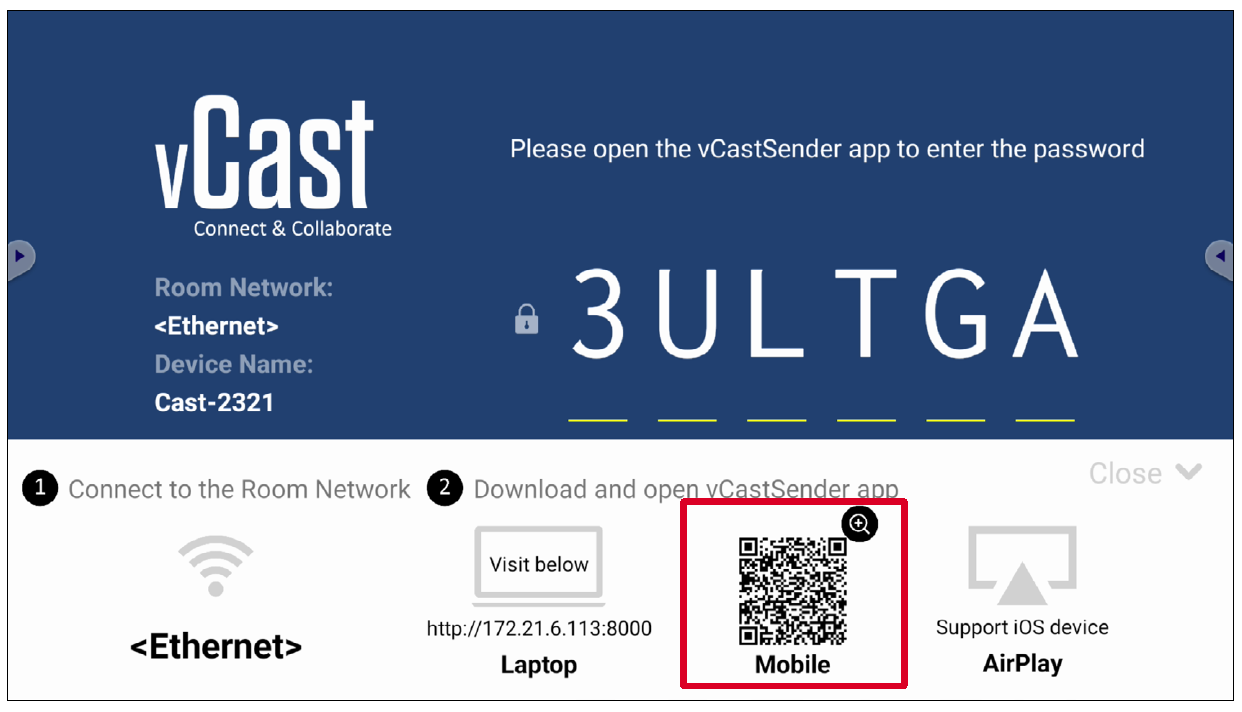
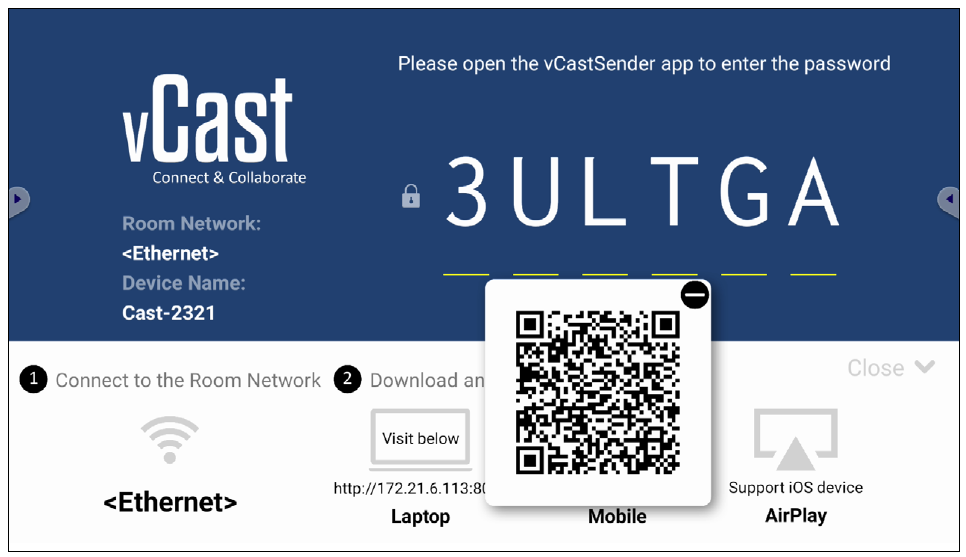
- On the Android client device, scan the QR code shown on the ViewBoard to directly download the vCastSender application, or download the application from the Google Play Store.
- After installing, launch the vCastSender application.
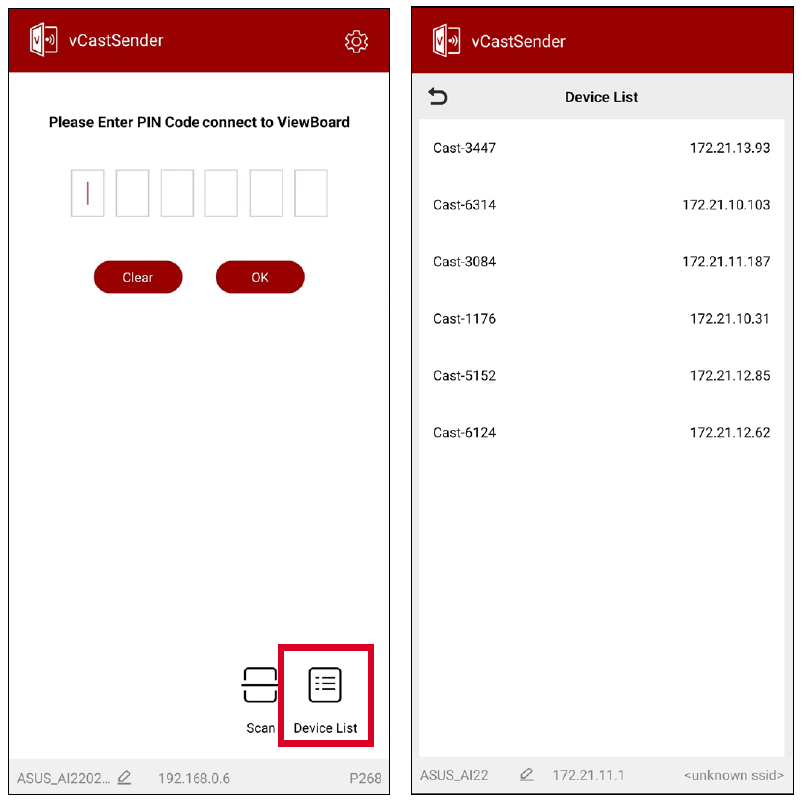
- To connect to the display, input the PIN code and select OK.
- NOTE: The PIN code can be found as highlighted below:
- You can also connect to the ViewBoard by clicking Device List then the Device Name listed.
- NOTE: The Device Name can be found as highlighted below:
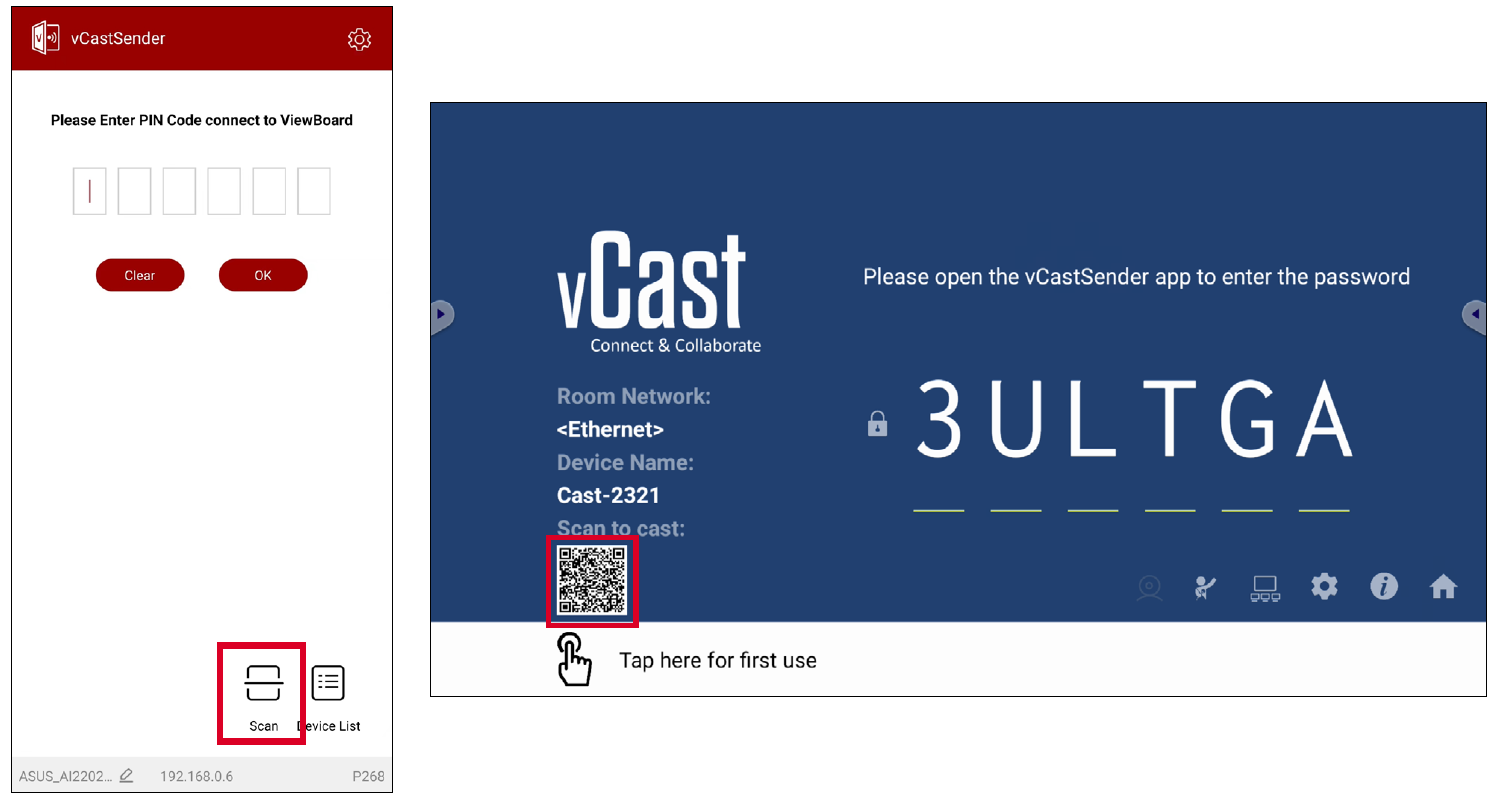
- Additionally, you can connect to the ViewBoard by selecting Scan then placing the on-screen QR code into the box to automatically connect.
- Ensure the client device (e.g., iPhone or iPad) is connected to the same network as the ViewBoard.
- NOTE: The network name can be found under Room Network.
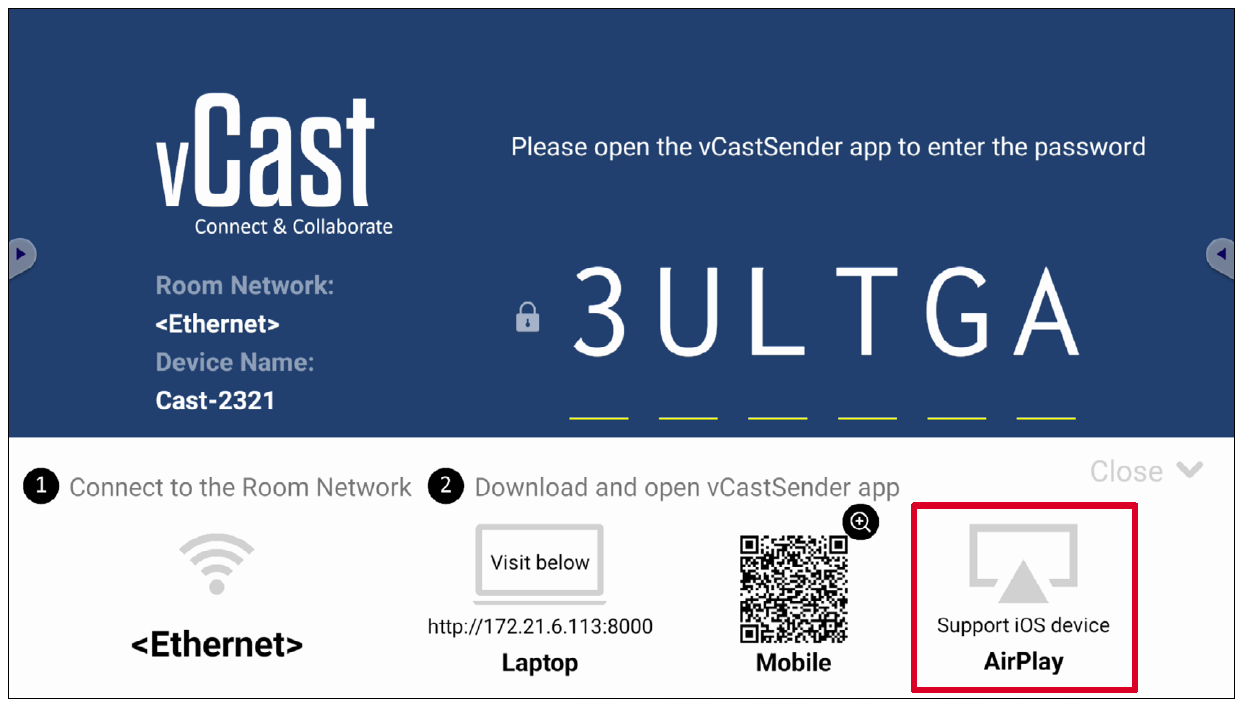
- On the iOS client device, directly open AirPlay and select the Device Name of the ViewBoard to connect.
- NOTE: The Device Name can be found as highlighted below:
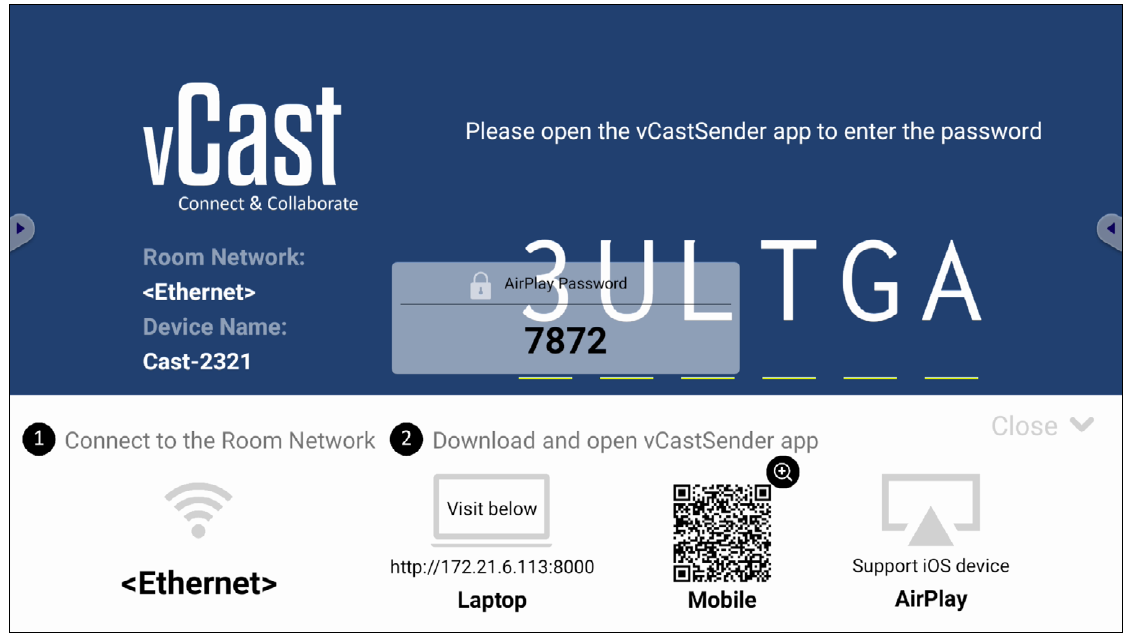
- Input the generated on-screen AirPlay Password on the client device to connect.
- NOTE: In a cross subnet environment, please download and connect with the vCastSender iOS application from the Apple App Store.
- You can also connect to the ViewBoard by selecting Scan then placing the on-screen QR code into the box to automatically connect.
- Reorient or relocate the receiving antenna.
- Increase the separation between the equipment and receiver.
- Connect the equipment into an outlet on a circuit different from that to which the receiver is connected.
- Consult the dealer or an experienced radio/TV technician for help.
- Copper alloy containing up to 4% lead by weight.
- Lead in high melting temperature type solders (i.e. lead-based alloys containing 85% by weight or more lead).
- Electrical and electronic components containing lead in a glass or ceramic other than dielectric ceramic in capacitors, e.g. piezoelectronic devices, or in a glass or ceramic matrix compound.
- Lead in dielectric ceramic in capacitors for a rated voltage of 125V AC or 250V DC or higher.
Home Screen (Launcher Scheme)
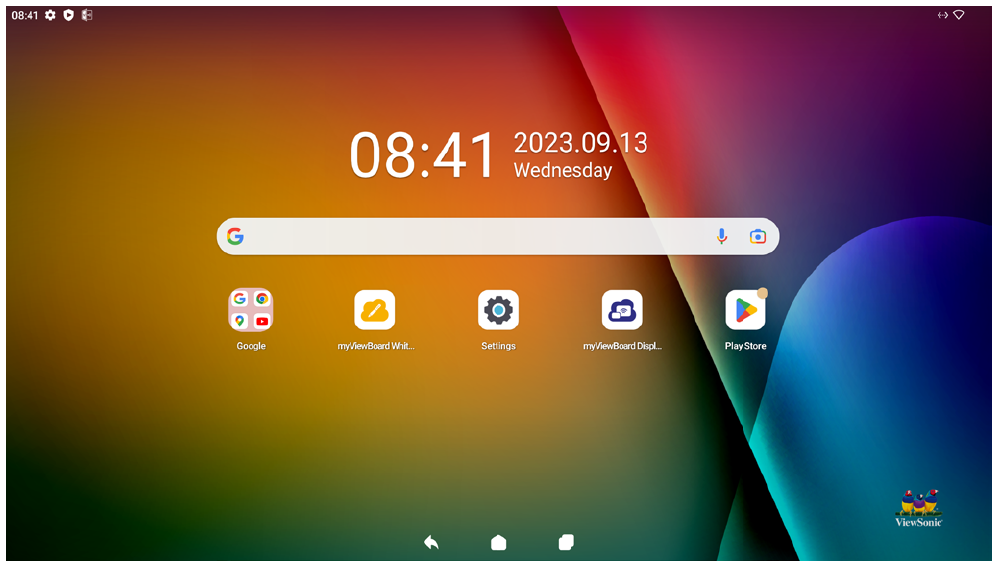
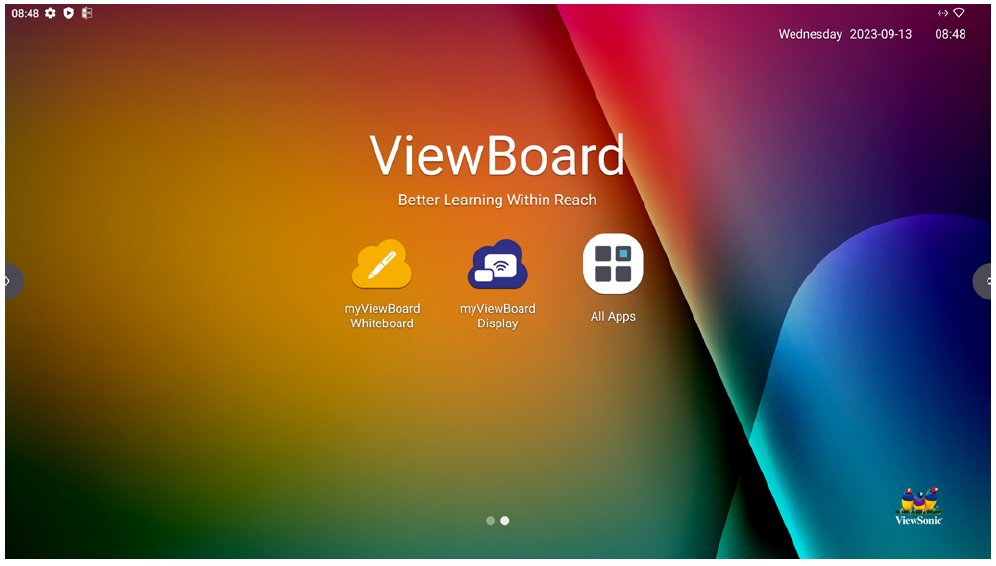
The IFP52-2 series’ Home Screen layout can be customized by selecting from Scheme A and Scheme B.
| Scheme A | Scheme B |
To change the scheme:
Toolbar
The Toolbar is where applications and tools can be found. Trigger icons are on the edge of the screen for quick access.
To launch an application or tool:
Toolbar Icons
| Icon | Description |
|---|---|
| Return to the previous operation screen.
| |
| Annotate the overlay of any input source with a pen or brush. | |
| Return to the Home Screen of the ViewBoard OS source. | |
| Display all embedded applications that are currently open. | |
| Switch to the HDMI In source. | |
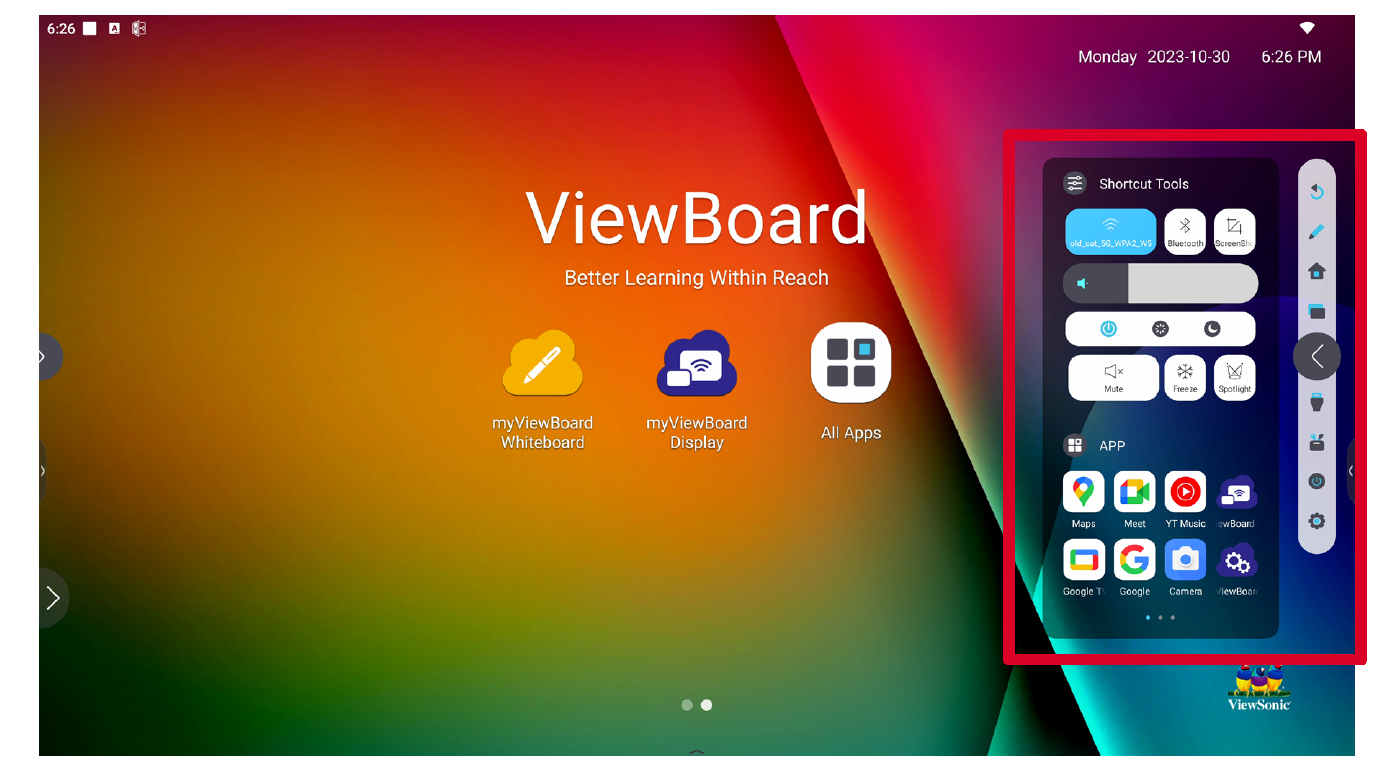
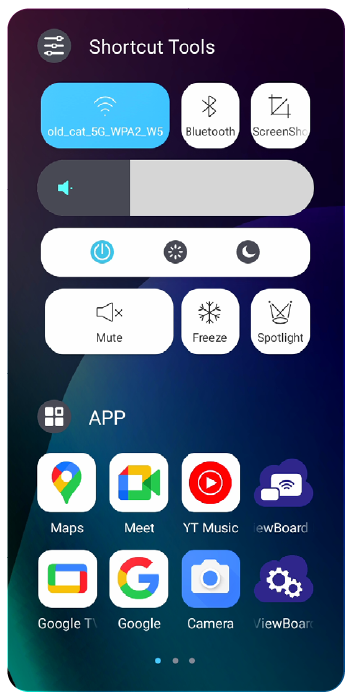
| Quickly view and adjust various frequently used tools, settings, and applications.
| |
| Access power options and settings. | |
| Access the System Settings. |
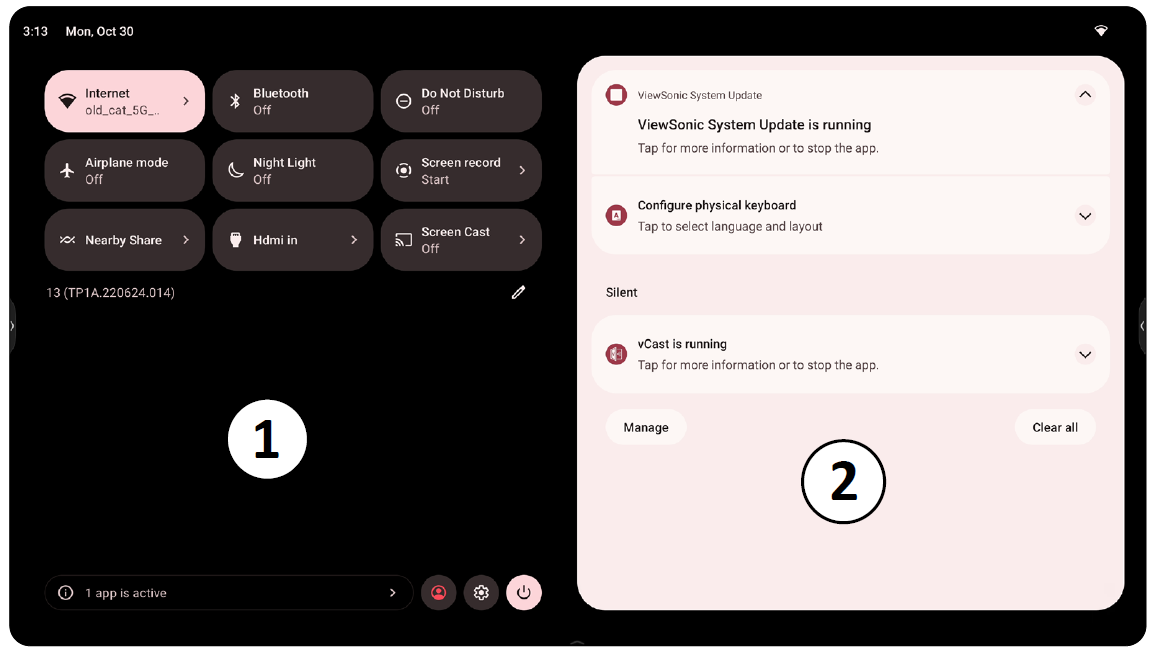
Control and Notification Panel
| Item | Description | |
|---|---|---|
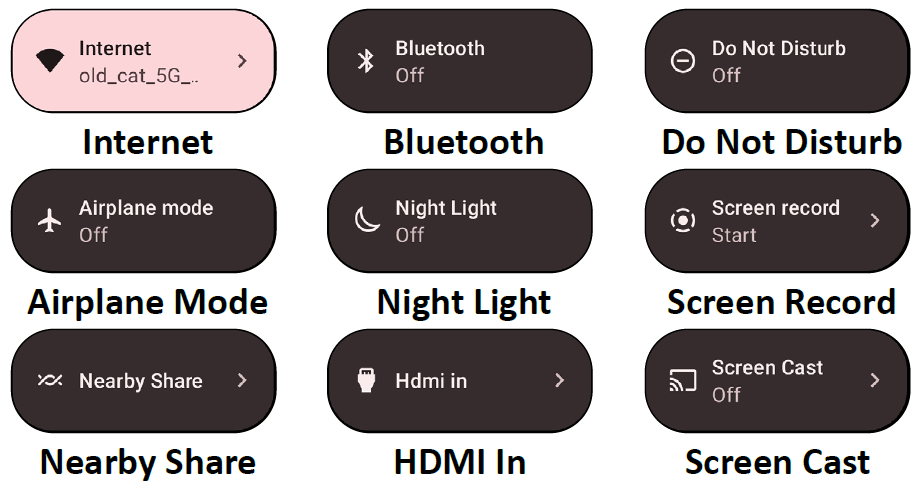
| 1 | Control Panel | Access frequently used settings and tools.
|
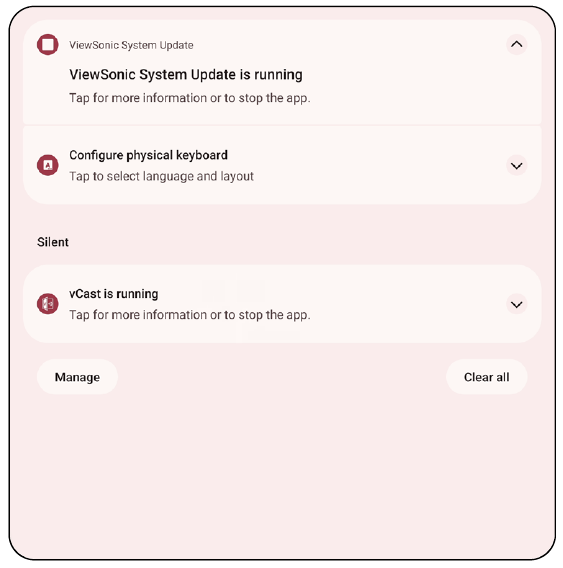
| 2 | Notification Panel | Receive and manage system and application notifications.
|
Applications
Much like any smart phone or tablet you can install several different applications from the installed Google Play Store.
Applications can be accessed from the Toolbar, directly from the Home Screen via shortcuts, or by selecting the All Apps icon (![]() ).
).
| Icon | Description |
|---|---|
| myViewBoard Display
Wirelessly mirror screens to a larger display. | |
| myViewBoard Manager
Remotely manage multiple installations of ViewSonic devices. | |
| myViewBoard Whiteboard
A digital whiteboarding application. | |
| Settings
Access the System Settings. | |
| vCast
Working with ViewBoard Cast software, receive vCastSender laptop screens (Windows/Mac/Chrome) and mobile (iOS/Android) users’ screens, photos, videos, annotations, and camera(s). |
Settings
Select the setting icon (![]() ) to enter the Settings menu.
) to enter the Settings menu.
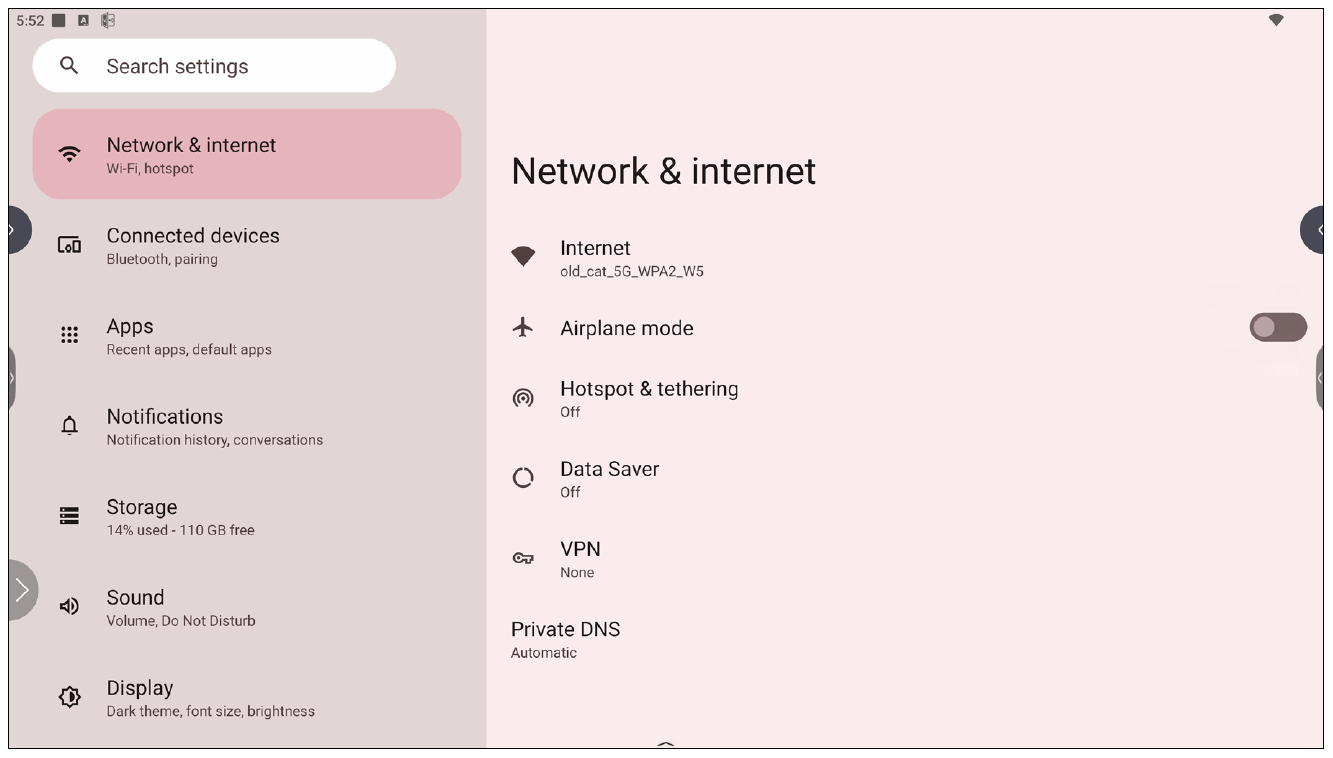
Network & Internet
Check current connection status, set up and manage Wi-Fi, Ethernet, VPN, and wireless Hotspot.
| Item | Description |
|---|---|
| Internet | Set up and manage Ethernet and Wi-Fi connection, as well as Network preferences. |
| Airplane Mode | When enabled, all wireless communication will be turned off. |
| Hotspot & Tethering | Set and share your internet connection with other devices. |
| Data Saver | When enabled, most apps and services will get background data via an internet connection. Active apps will not be affected. |
| VPN | Set up and manage Virtual Private Networks. |
| Private DNS | Maintain an Automatic Private DNS or set one up manually for security and privacy. |
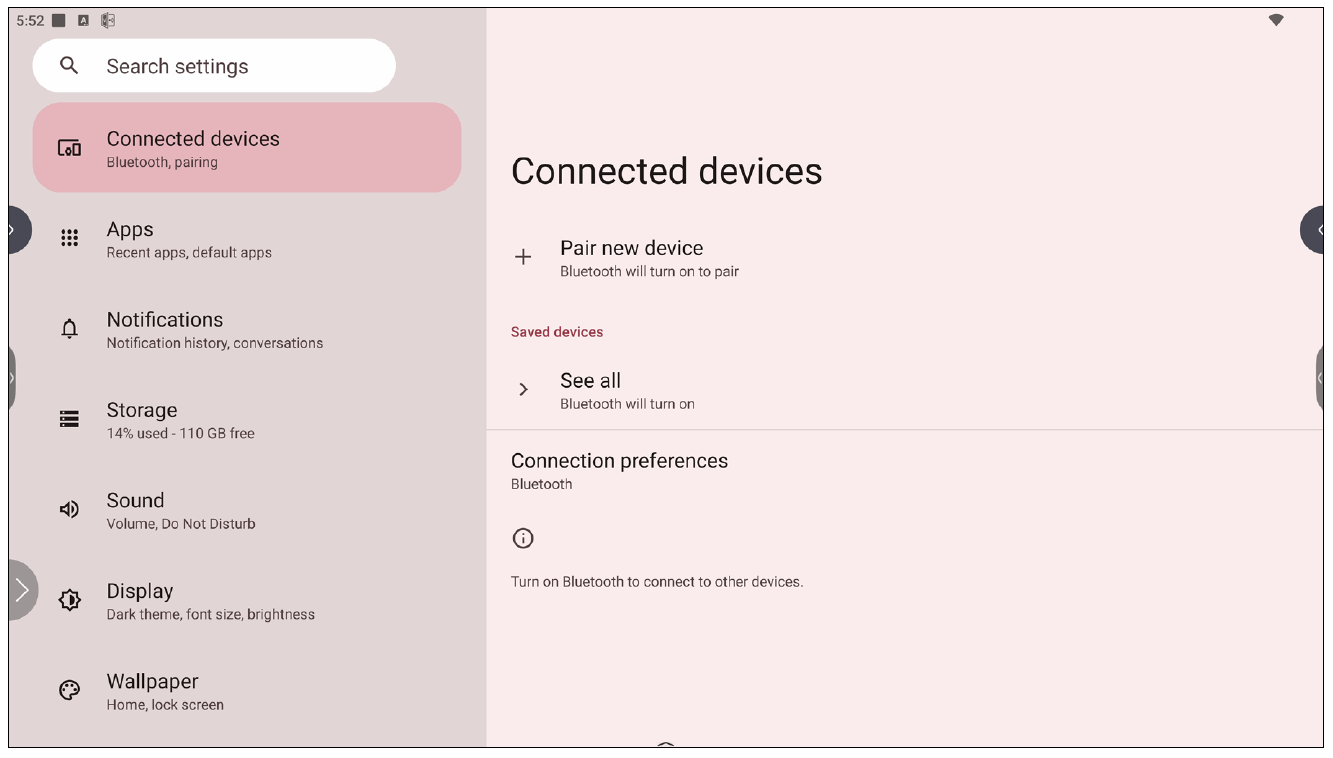
Connected Devices
Set up and manage Bluetooth connections, saved devices, and connection preferences for Bluetooth, Casting, and Print Services.
| Item | Description |
|---|---|
| Pair New Device | Enable Bluetooth to search for and connect to a Bluetooth device. |
| Saved Devices | View all previously connected Bluetooth devices.
|
| Connection Preferences | View Bluetooth, Cast, and Print Service preferences and share files with nearby devices. |
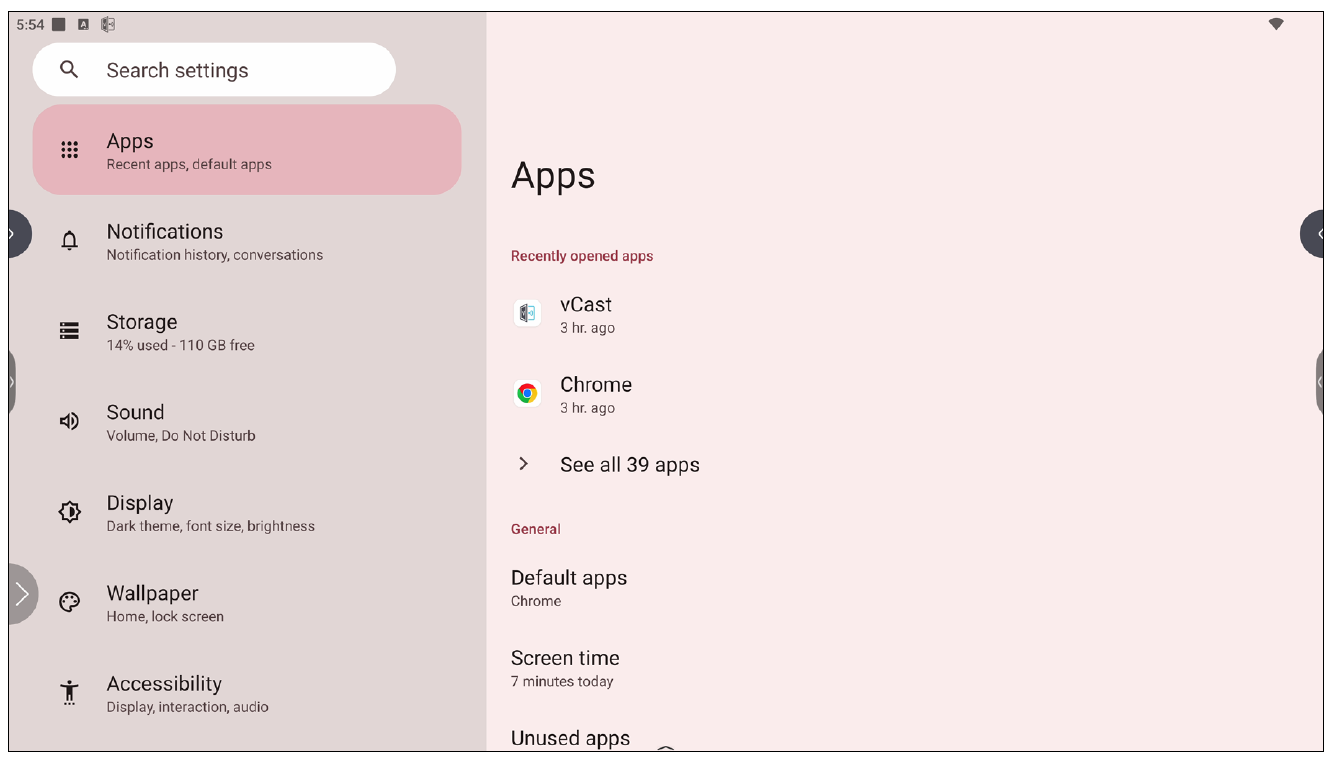
Apps
View any running or installed applications. Tap on them for more detailed information and options.
| Item | Description |
|---|---|
| Recently Opened Apps | Any recently used applications will be listed here. |
| Default Apps | Set default applications for certain uses (e.g., default browser application). |
| Screen Time | Displays the total amount of time the ViewBoard has been in use by the day. |
| Unused Apps | Applications that have not been used for a certain period of time will be listed here. |
| Special App Access | Set several access permissions for applications. |
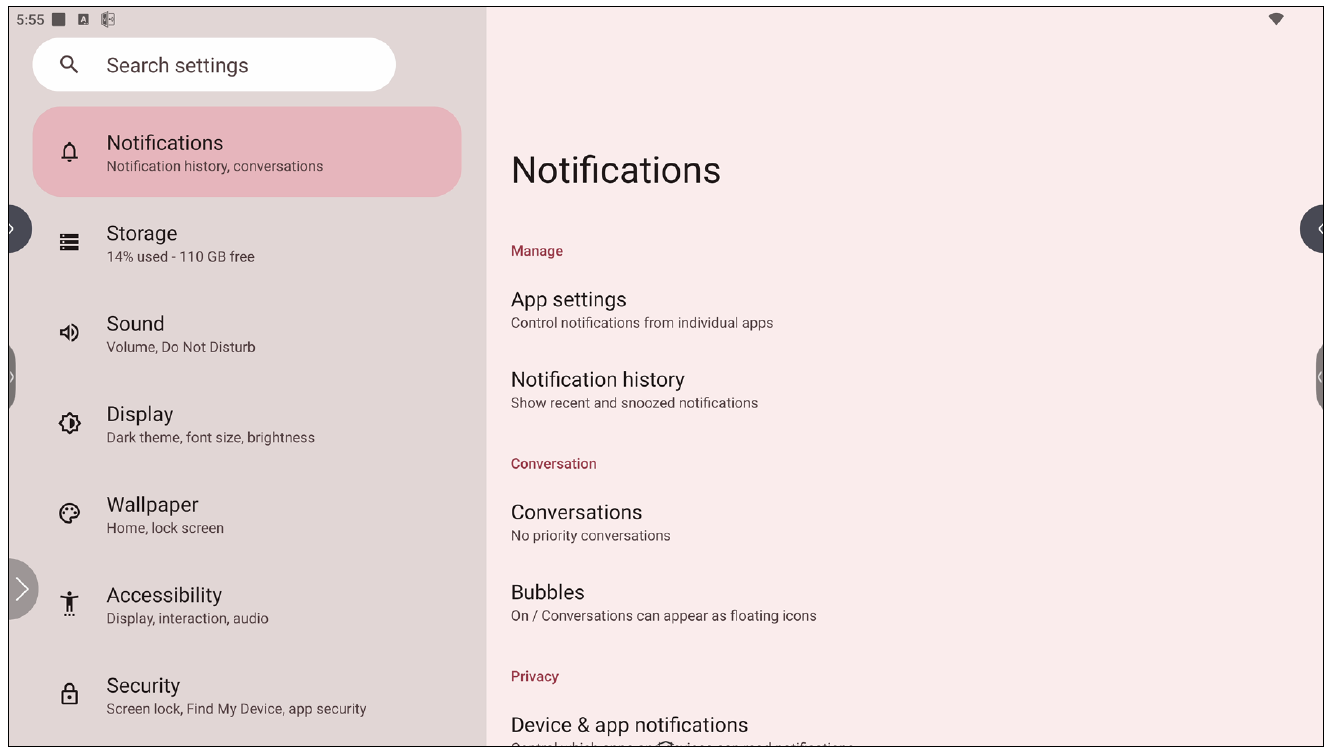
Notifications
Manage notification and conversation settings and preferences.
| Item | Description |
|---|---|
| App Settings | Set up notification settings for individual applications. |
| Notification History | View recent notifications. |
| Conversations | Set previously received notifications or messages as priority. |
| Bubbles | When enabled, conversations can appear as a floating icon on screen. |
| Device & App Notifications | Control which applications and devices can read notifications. |
| Notifications on Lock Screen | Choose to show all, some, or no conversations or notifications on the lock screen. |
| Do Not Disturb | Set notification preferences for when “Do Not Disturb” mode is turned on. |
| Wireless Emergency Alerts | Choose to receive or not receive Emergency Alerts. |
| Hide Silent Notifications in Status Bar | When enabled, notifications that have been “silenced” will no longer appear in the status bar area. |
| Allow Notification Snoozing | When enabled, notifications can be “snoozed” for a short period of time for applications. |
| Notfication Dot on App Icon | When enabled, a small dot will appear on the application icon when there is a new notification available. |
| Enhanced Notifications | When enabled, receive suggestions for actions, replies, etc. |
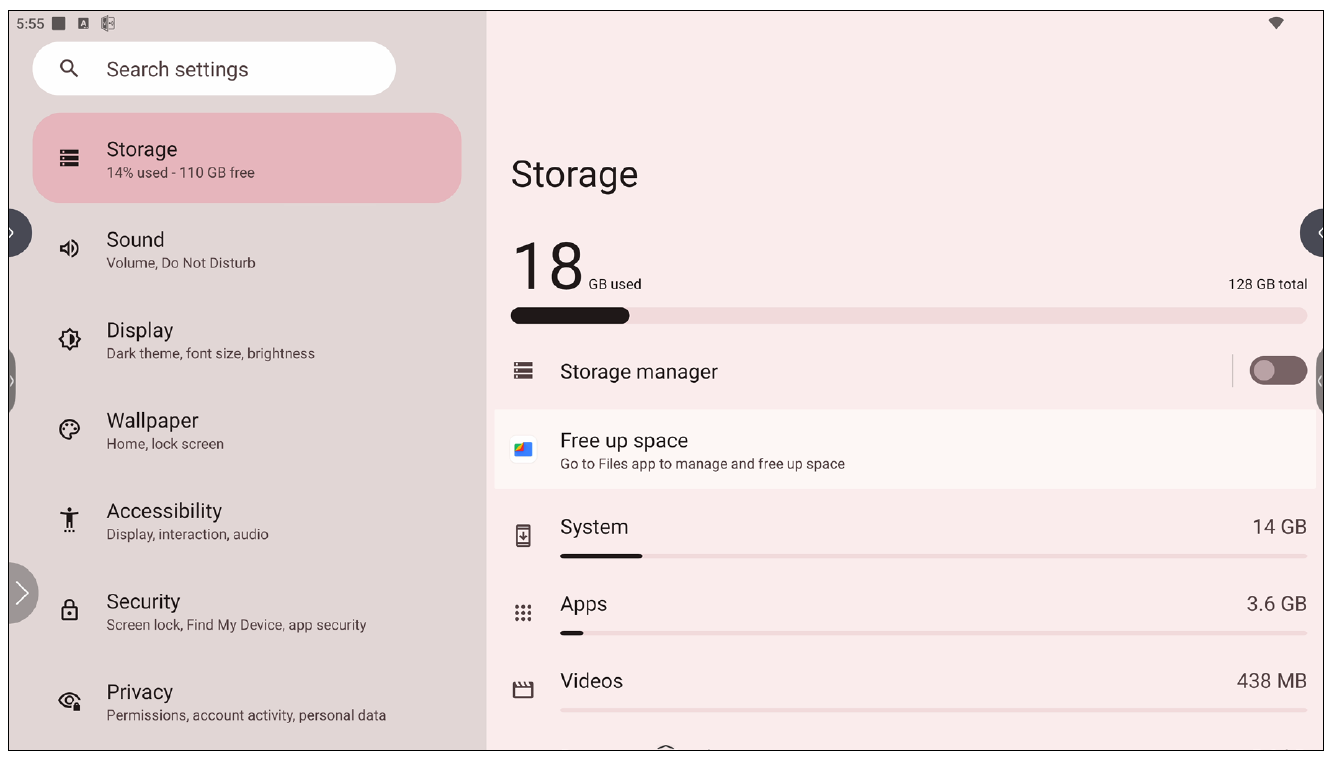
Storage
Check the storage status of the VPC-A31-O1.
| Item | Description |
|---|---|
| Storage Manager | When enabled, the storage manager will remove backed up photos and videos. |
| System | View the total storage space of system files. |
| Apps | View and manage the storage space used by applications. |
| Videos | View and manage the Video folder. |
| Images | View and manage the Images folder. |
| Documents & Other | View and manage the Documents folder. |
| Trash | View and manage files that have been moved to the Trash. |
| Games | View and manage the storage space used by gaming applications. |
| Audio | View and manage the Audio folder. |
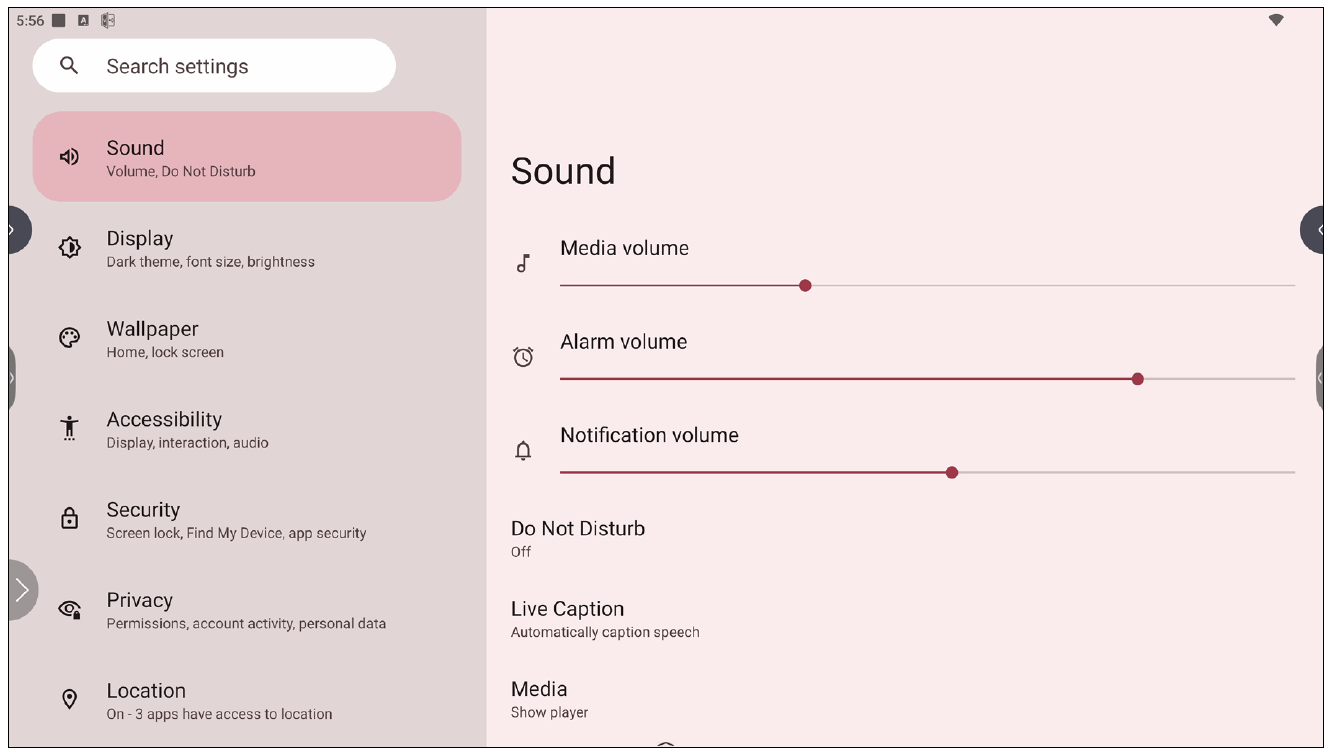
Sound
Adjust the volume level and set up varies sound preferences.
| Item | Description |
|---|---|
| Sound | Adjust the volume level. |
| Do Not Disturb | Set sound preferences for when “Do Not Disturb” mode is turned on. |
| Live Caption | When enabled, automatically caption. |
| Media | Set the media player preferences. |
| Default Notification Sound | Choose the default sound effect for notifications. |
| Default Alarm Sound | Choose the default sound for alarms. |
| Screen Locking Sound | When enabled, a sound effect will play when the ViewBoard’s screen is locked. |
| Touch Sounds | When enabled, a sound effect will play every time a touch input is received. |
| Sound Enhancement | Set the volume booster for speaker on. |
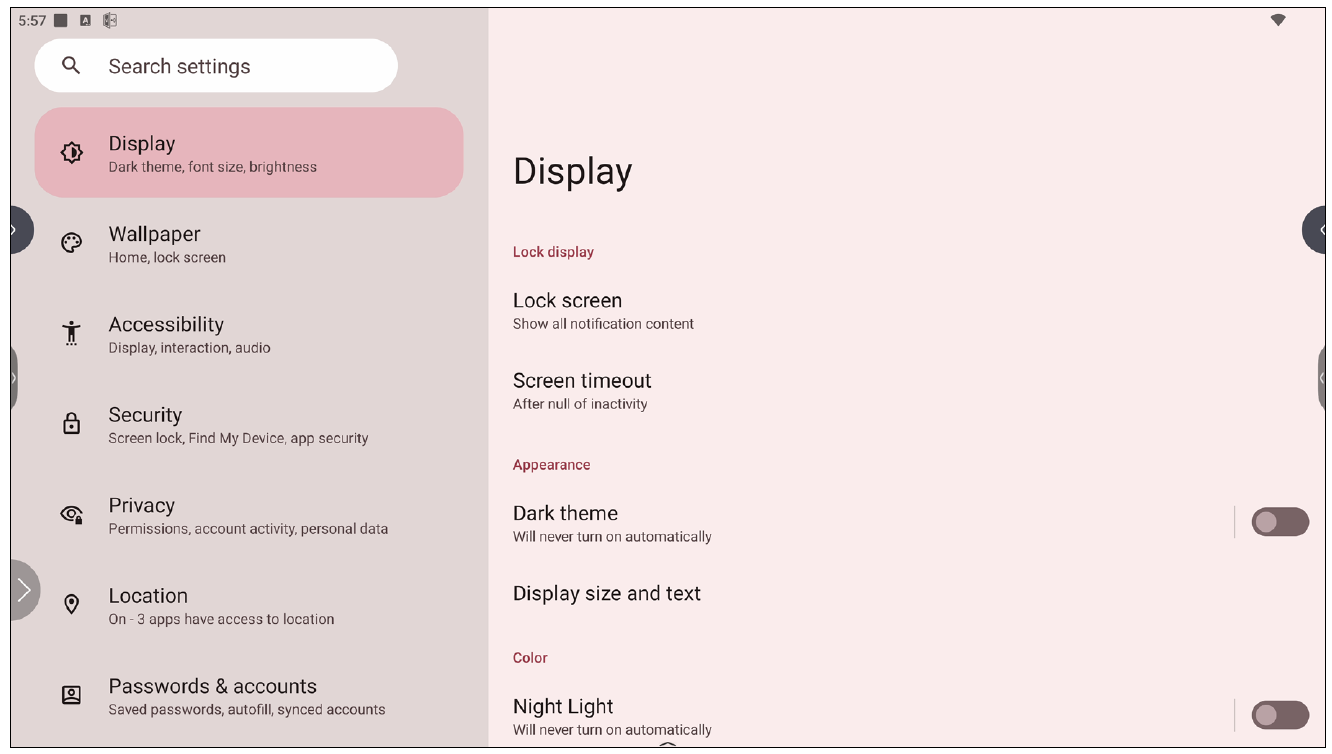
Display
Adjust Timeout, Theme, HDMI CEC, and other display related settings.
| Item | Description |
|---|---|
| Lock Screen | Set lock screen preferences. |
| Screen Timeout | Set when the screen will lock after a period of inactivity. |
| Dark Theme | When enabled, the brighter default background color will be changed to a darker one. |
| Display Size and Text | Adjust the overall display size or only the text size. |
| Night Light | Reduces the amount of blue light the screen emits and increases the warmer, amber tones. |
| Screen Saver | When enabled, a screen saver will play when the ViewBoard is not in use. |
| HDMI Settings |
Set Display |
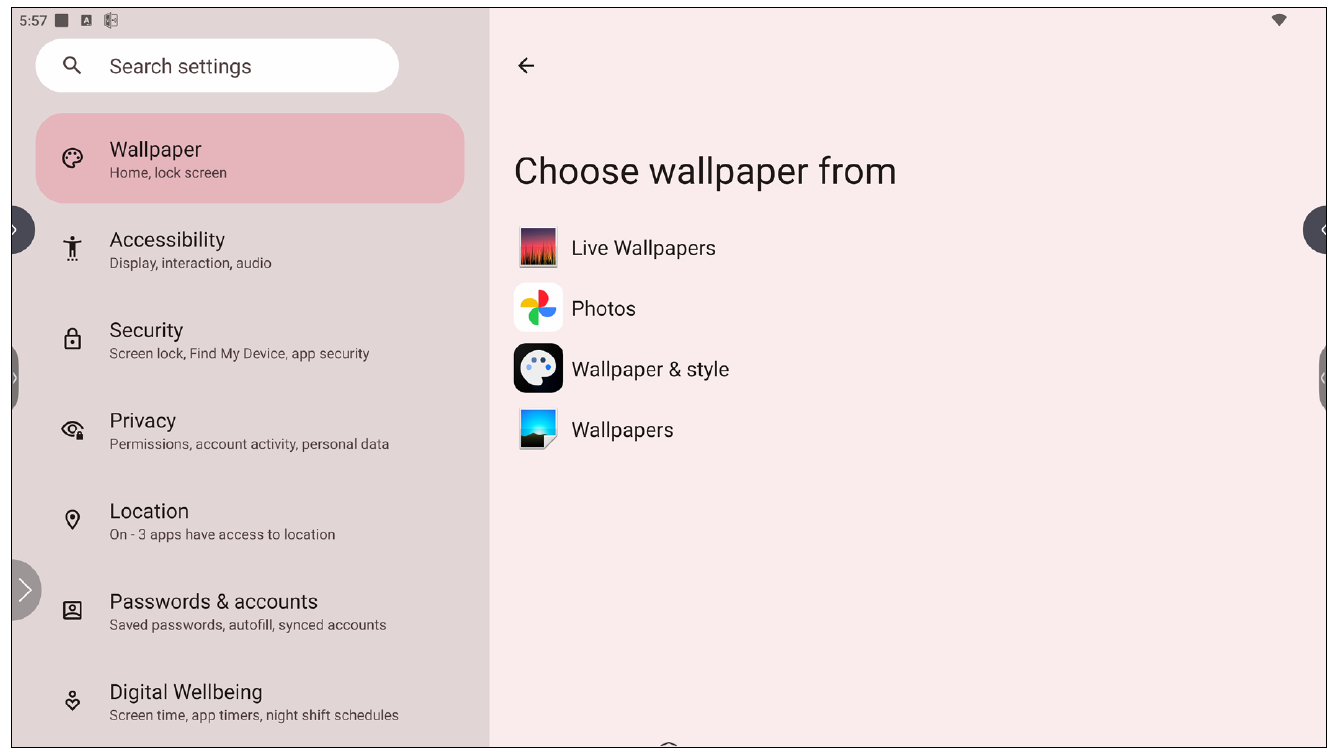
Wallpaper & Style
Adjust and personalize the Wallpaper, Colors and theme.
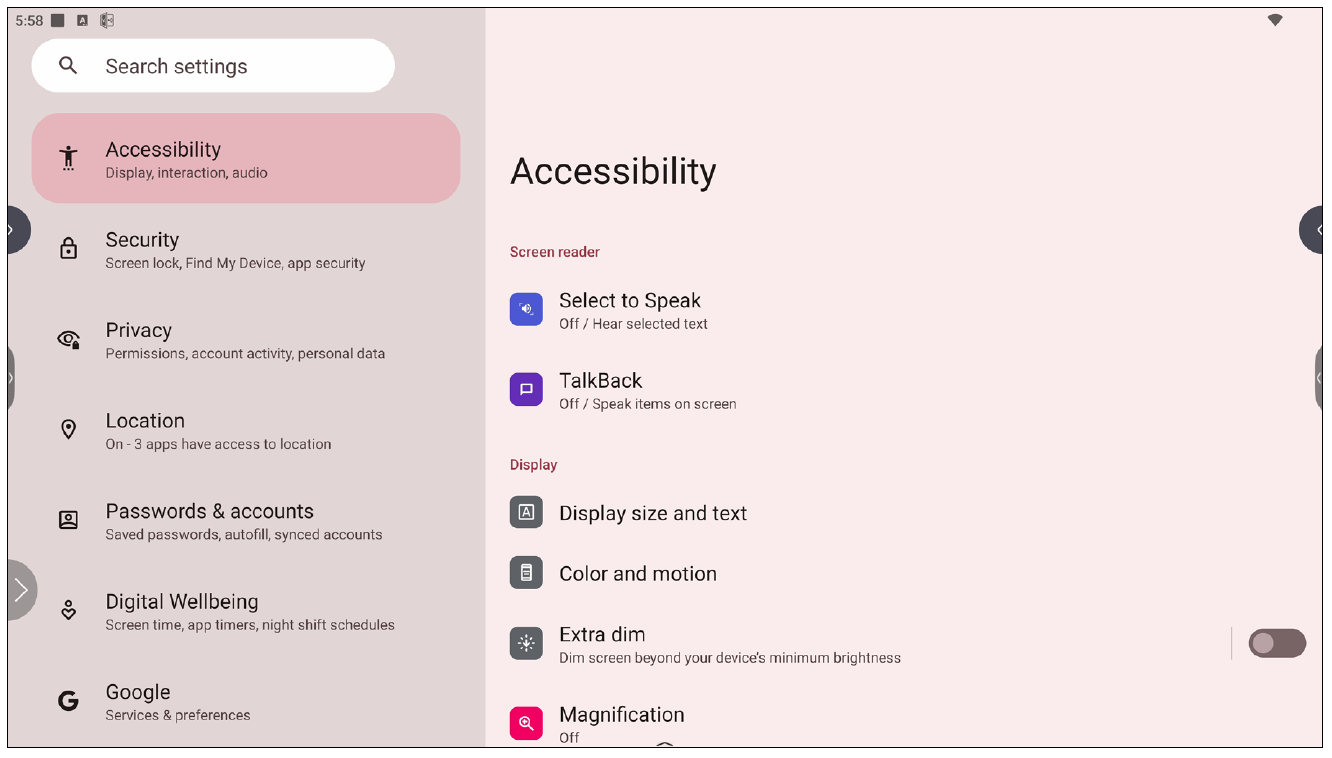
Accessibility
View and adjust various tools that can help people with visual, auditory, speech, or physical disabilities use the ViewBoard.
| Item | Description |
|---|---|
| Select to Speak | When enabled, certain on-screen items will be read or described aloud when tapped (e.g., text or image). |
| TalkBack | When enabled, device actions will be described by audio so it can be used without looking at the screen. |
| Display Size and Text | Adjust the overall display size or only the text size. |
| Color and Motion | Apply color correction and inversion and enlarge the mouse pointer. |
| Extra Dim | Make your screen dimmer for it more comfortable to read. |
| Magnification | Zoom in on the screen to enlarge the content. |
| Accessibility Menu | Add a shortcut for a enlarged on-screen menu to control the device. |
| Timing Controls | Adjust how long temporary messages that ask for an action are on screen, enable Autoclick, and adjust the touch and hold delay time. |
| System Controls | Adjust the way to navigate the system. |
| Live Caption | Set the live caption preferences. |
| Caption Preferences | Enable captions and adjust the size and style. |
| Audio Description | When enabled, an audio description of what is happening on screen in supported movies and shows will be given. |
| Audio Adjustment | Combine audio channels into a single mono channel. |
| Accessibility Shortcuts | Adjust the shortcut settings and availability on the lock screen. |
| Text-to-Speech Output | When set up, text can be read out loud. |
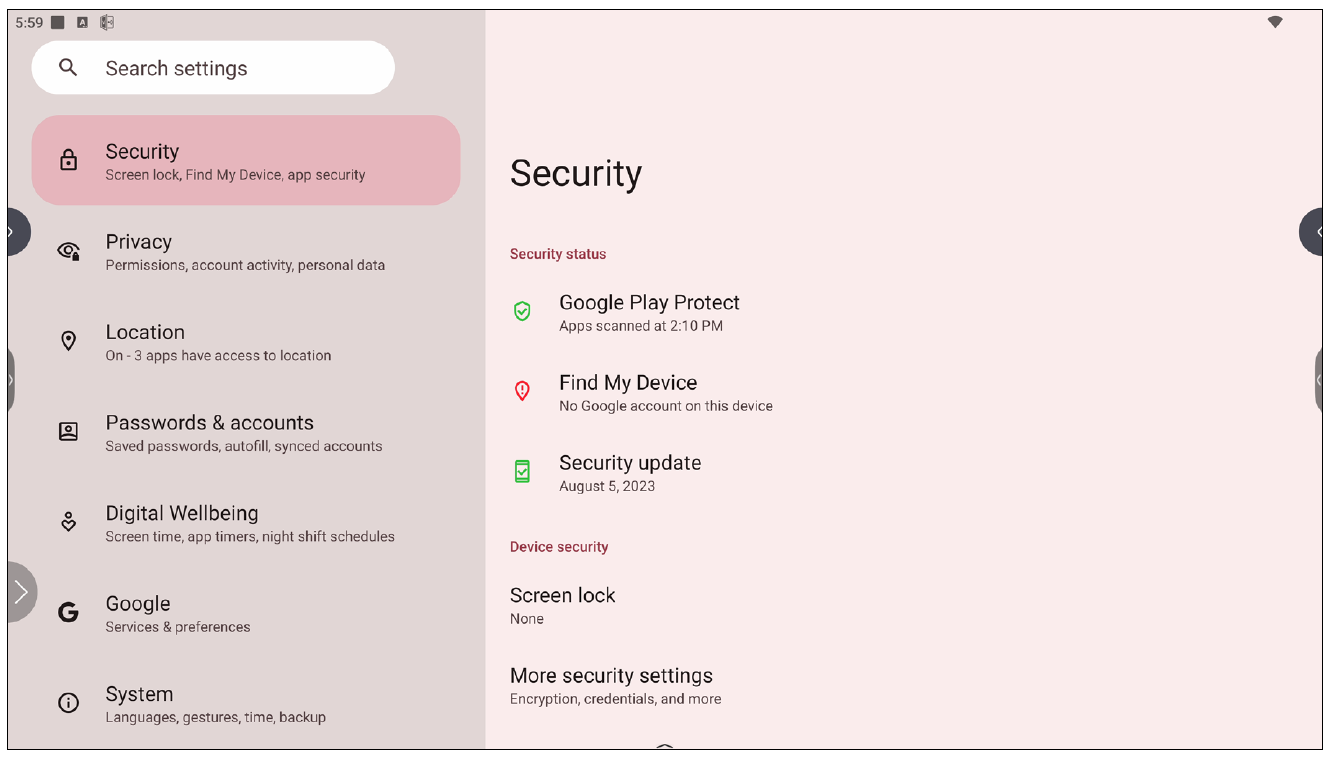
Security
Review and adjust device security settings.
| Item | Description |
|---|---|
| Google Play Protect | Regularly check the installed applications and device for any harmful behavior. |
| Find My Device | Locate the ViewBoard remotely. |
| Security Update | Check for security updates. |
| Screen Lock | Set screen lock function. Each time you turn on your device or wake up the screen, you’ll be asked to unlock your device. |
| More Security Settings | View and adjust various security related settings. |
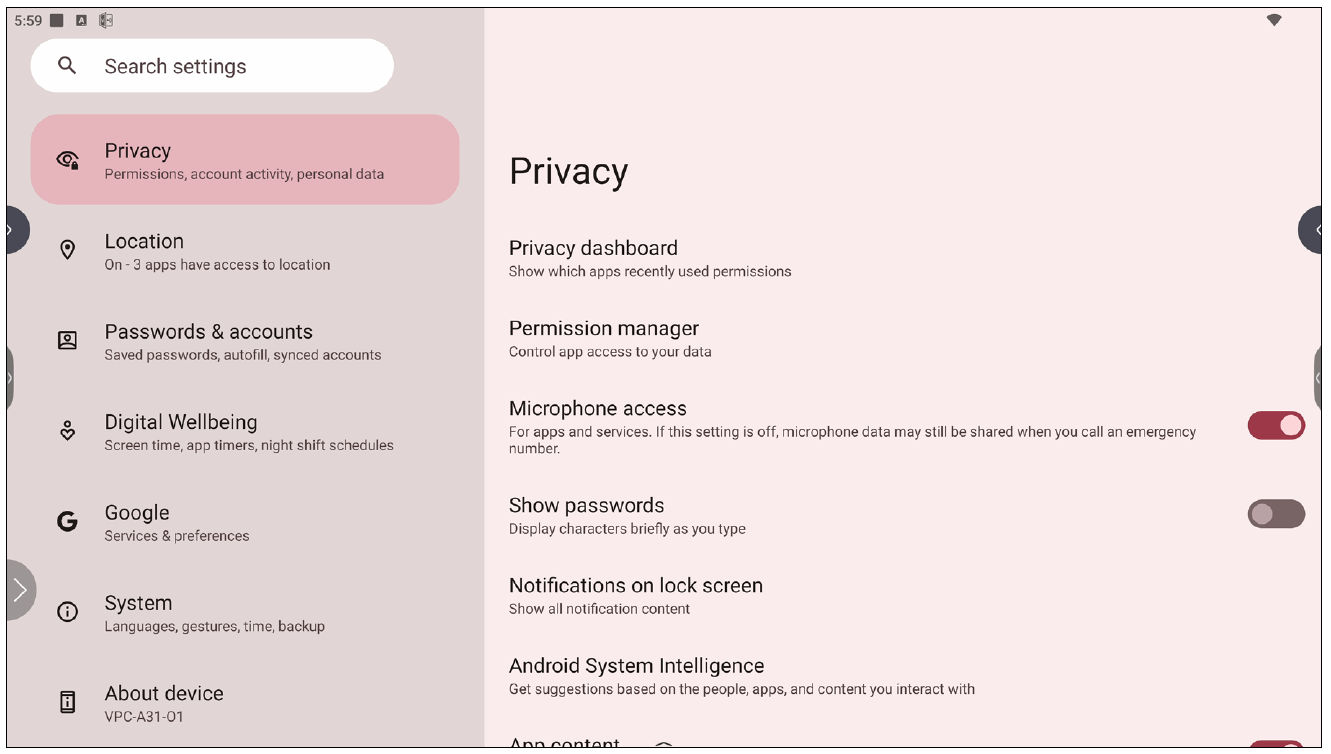
Privacy
Check and manage current privacy settings.
| Item | Description |
|---|---|
| Privacy Dashboard | View which applications recently used permissions. |
| Permission Manager | Control application access to your data. |
| Microphone Access | Allow or disallow microphone access for applications or services. |
| Show Passwords | When enabled, characters will be displayed briefly as a password is being inputted. |
| Notifications on Lock Screen | Choose to show all, some, or no conversations or notifications on the lock screen. |
| Android System Intelligence | Get suggestions based on the people, applications, and content used. |
| App Content | When enabled, applications can send content to the system. |
| Show Clipboard Access | When enabled, a message will appear when applications access something (e.g., text, image, etc.) that has been copied. |
| Autofill Service from Google | With a Google account, passwords and other information can be filled in automatically. |
| Activity Controls | Select which activities and information Google is allowed to save. |
| Ads | Manage advertisement personalization. |
| Usage & Diagnostics | Choose to share usage and diagnostic data to Google. |
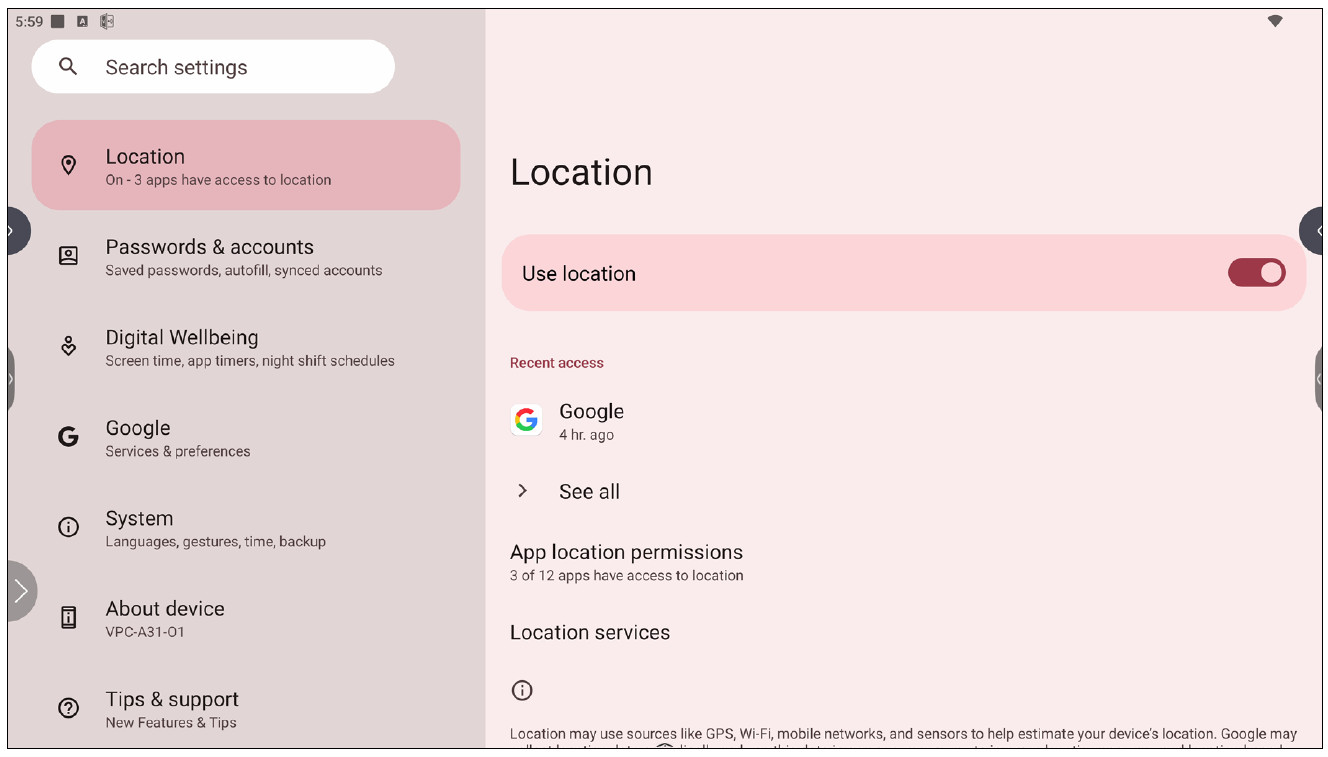
Location
View and manage location settings.
| Item | Description |
|---|---|
| Use Location | When enabled, the location of the device will be accessible to applications. |
| Recent Access | Review which applications recently accessed the device’s location. |
| App Location Permissions | Review which applications have permission to access the device’s location. |
| Location Services | Turn ON/OFF various alerts, services, and scanning related to location and location accuracy. |
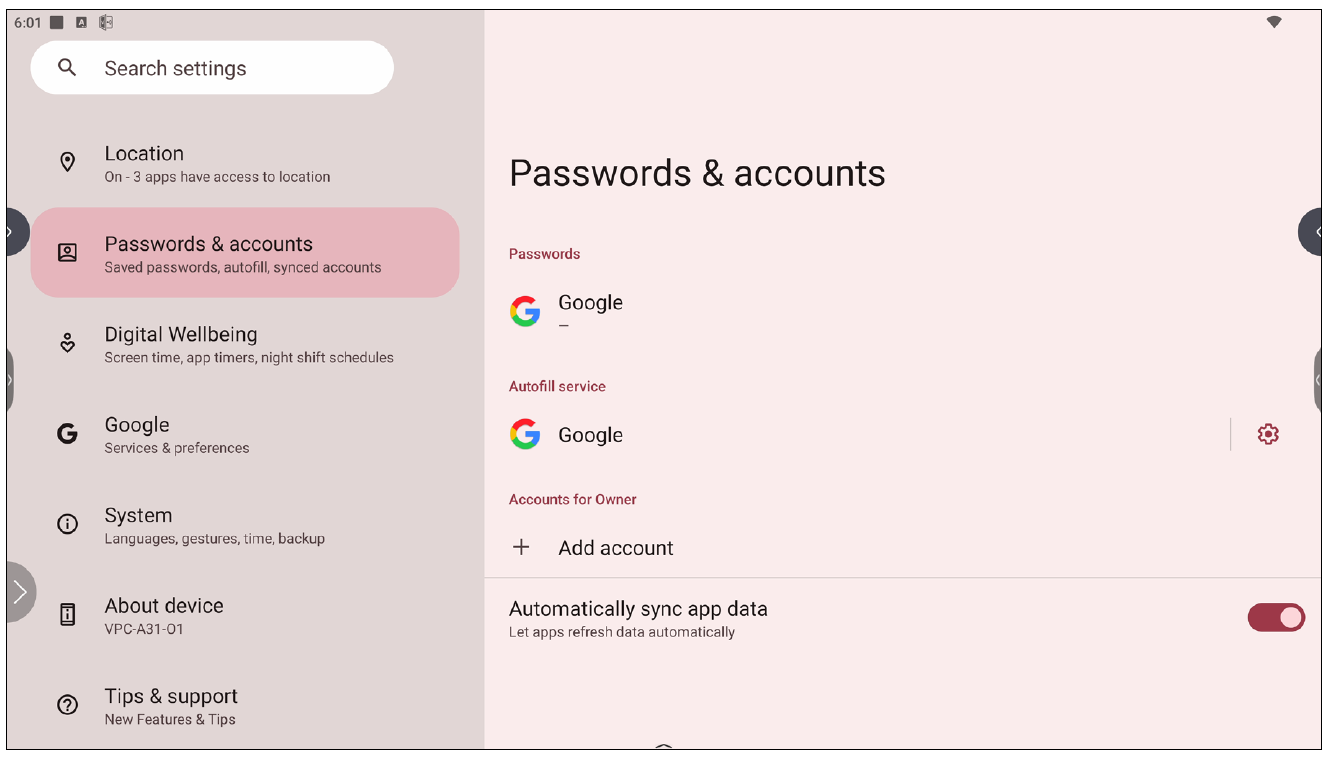
Passwords & Accounts
Review saved passwords, select autofill services, and add accounts.
| Item | Description |
|---|---|
| Passwords | Review saved passwords. |
| Autofill Service | Select which autofill service to use, if any. |
| Accounts for Owner | Add or remove accounts. |
| Automatically Sync App Data | When enabled, applications can refresh data automatically. |
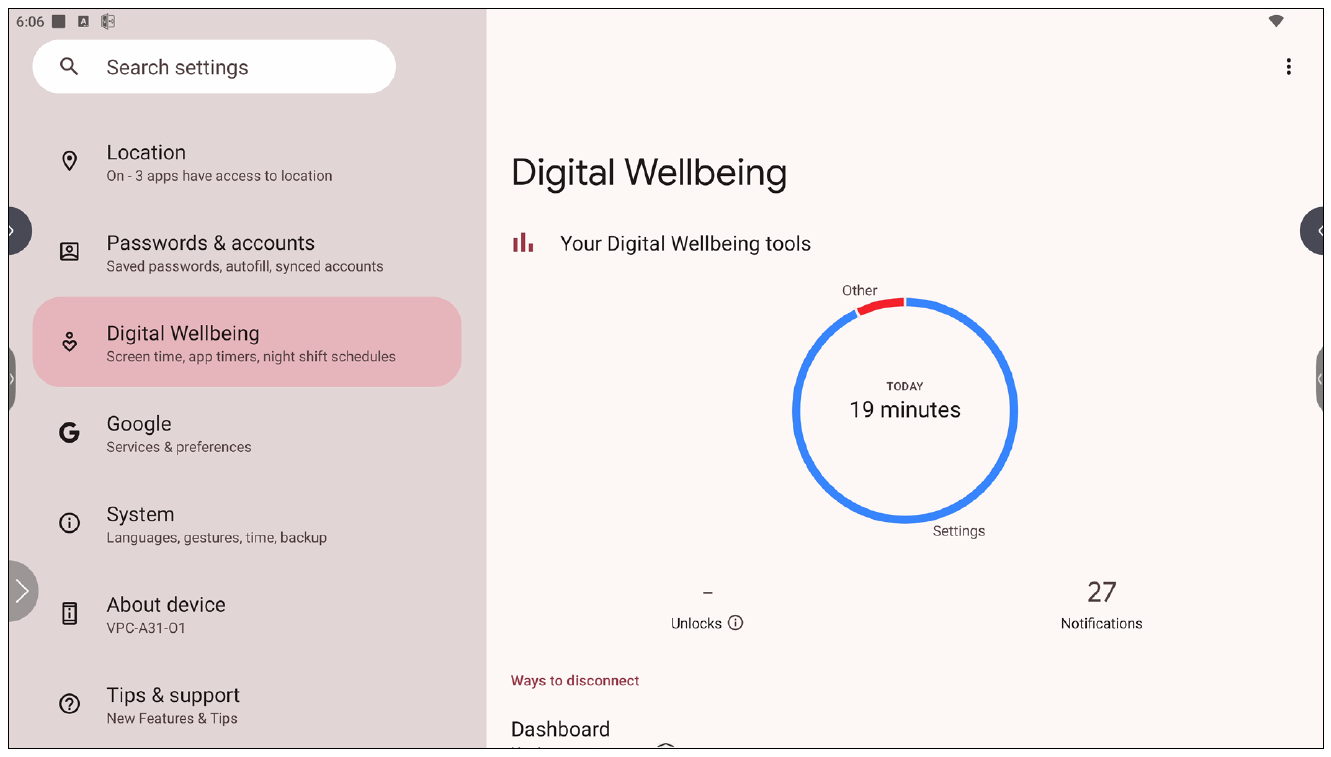
Digital Wellbeing
Review the ViewBoard’s usage time, and set up various tools to promote a better balance with the device.
| Item | Description |
|---|---|
| Your Digital Wellbeing Tools | A brief overview of device usage, unlocks, and notifications. |
| Dashboard | Review screen time, number of notifications, and number of device unlocks. |
| Night Shift | Reduce the amount of blue light emitted by the ViewBoard’s screen. |
| Focus Mode | When set up, distracting applications can be paused and their notifications hidden. |
| Manage Notifications | Review which applications can send notifications. |
| Do Not Disturb | Set notification preferences for when “Do Not Disturb” mode is turned on. |
| Heads Up | A reminder to stay alert to the surroundings when looking at your device and walking. |
| Show Icon in the App List | When enabled, a Digital Wellbeing icon will be added to the application list. |
| Parental Controls | Set up parental controls with Google’s Family Link application. |
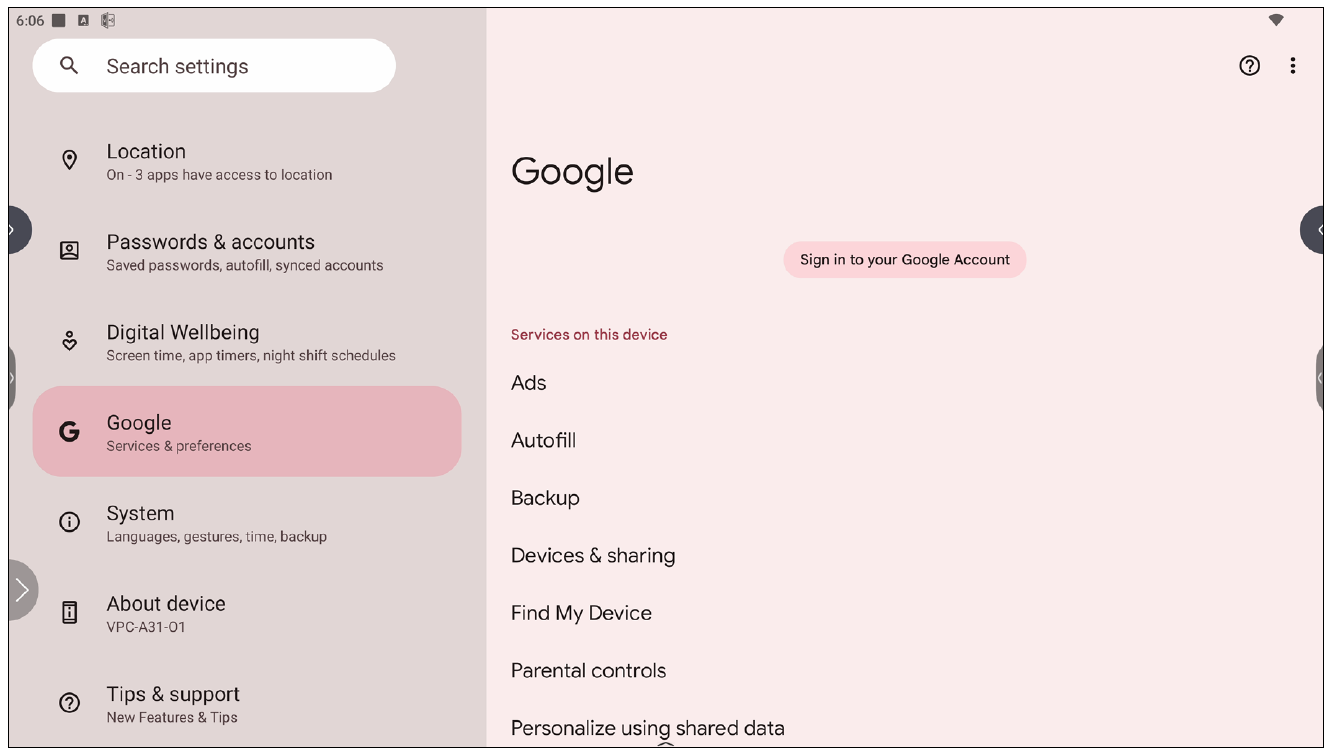
Review all of Google’s services and set up preferences.
| Item | Description |
|---|---|
| Ads | Manage advertisement personalization. |
| Autofill | With a Google account, passwords and other information can be filled in automatically. |
| Backup | With a Google account, back up the device’s data. |
| Devices & Sharing | Set Cast and device sharing options. |
| Find My Device | Locate the ViewBoard remotely. |
| Parental Controls | Set up parental controls with Google’s Family Link application. |
| Personalize Using Shared Data | Allow or disallow Google to use the installed applications’ data for diagnostics and recommendations. |
| Set Up & Restore | Set up a nearby device or a work profile. |
| Settings for Google Apps | Review settings for Google-specific applications. |
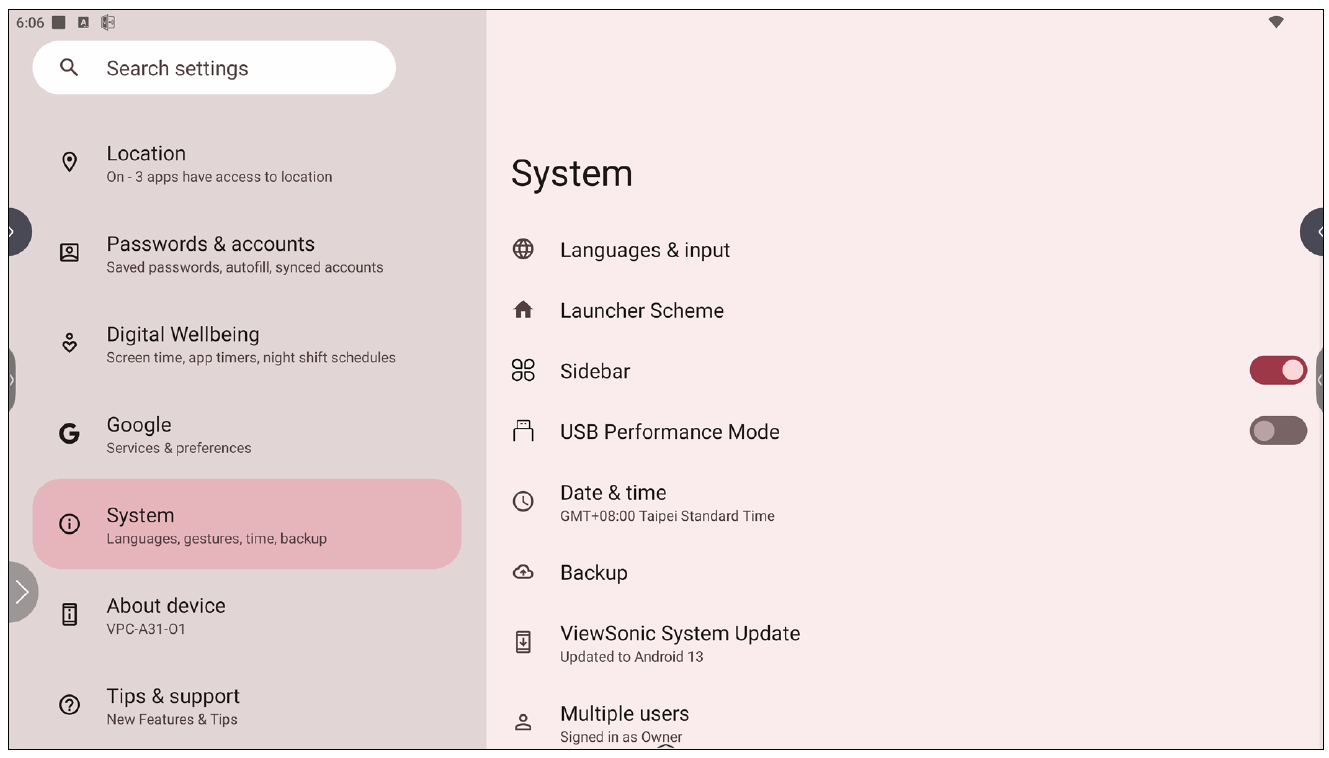
System
View and adjust various system settings.
| Item | Description |
|---|---|
| Languages & Input | Choose the preferred language and input method. |
| Launcher Scheme | Choose between Scheme A and Scheme B to set the Home Screen layout. |
| Sidebar | Adjust the side toolbar settings. |
| USB Performance Mode | Optimize USB performance. You need to restart the device to change this setting. |
| Date & Time | Set the date and time. |
| Backup | With a Google account, back up the device’s data. |
| ViewSonic System Update | Check for system updates. |
| Multiple Users | Review who is signed in and the available user logins. |
| Reset Options | Reset the ViewBoard to factory default settings. |
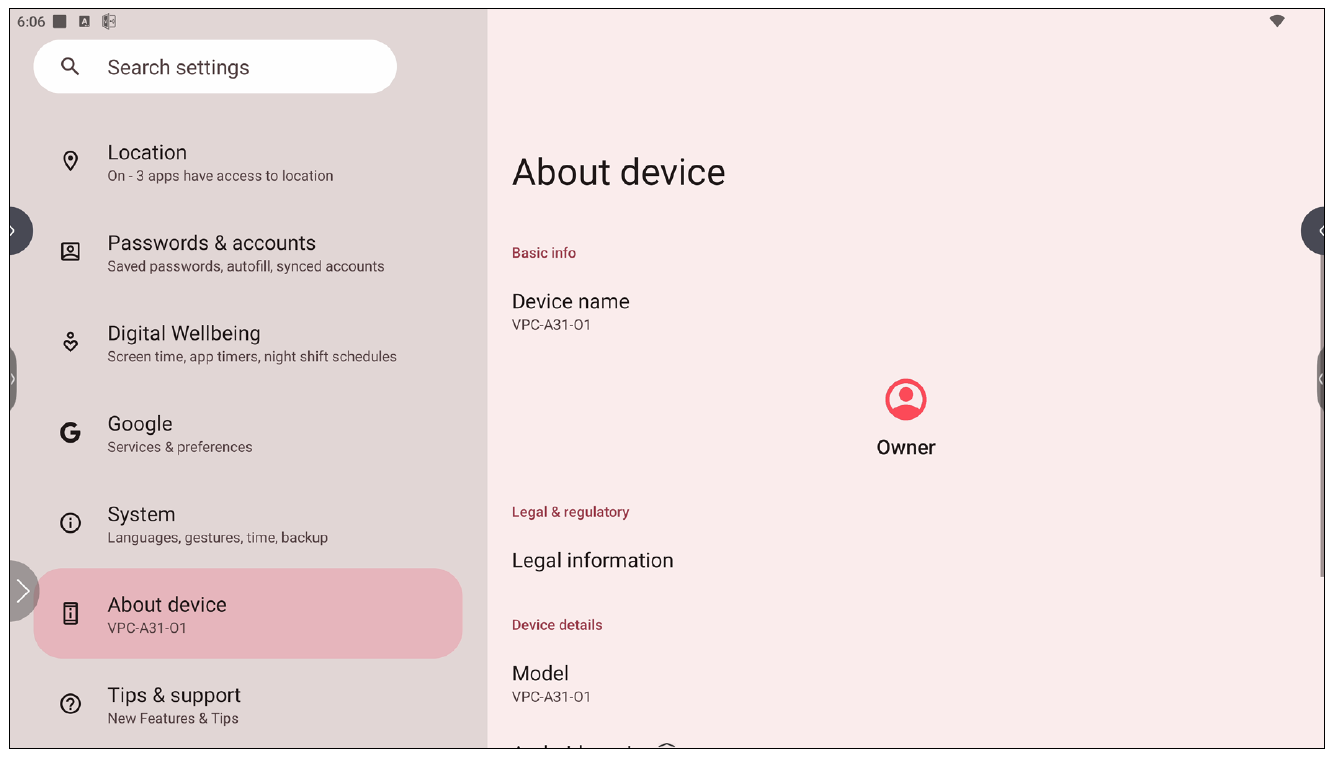
About Device
Review device information.
| Item | Description |
|---|---|
| Device Name | View the name of the device. |
| Legal Information | View the relevant legal information. |
| Model | View the model of the ViewBoard. |
| Android Version | View the installed version of Android. |
| IP Address | View the IP Address. |
| Ethernet Address | View the Ethernet Address. |
| Wi-Fi MAC Address | View the Wi-Fi MAC Address. |
| Device Wi-Fi MAC Address | View the Device Wi-Fi MAC Address. |
| Bluetooth Address | View the Bluetooth Address. |
| Up Time | View how long the device has been in operation. |
| Build Number | View the build number. |
Tips & Support
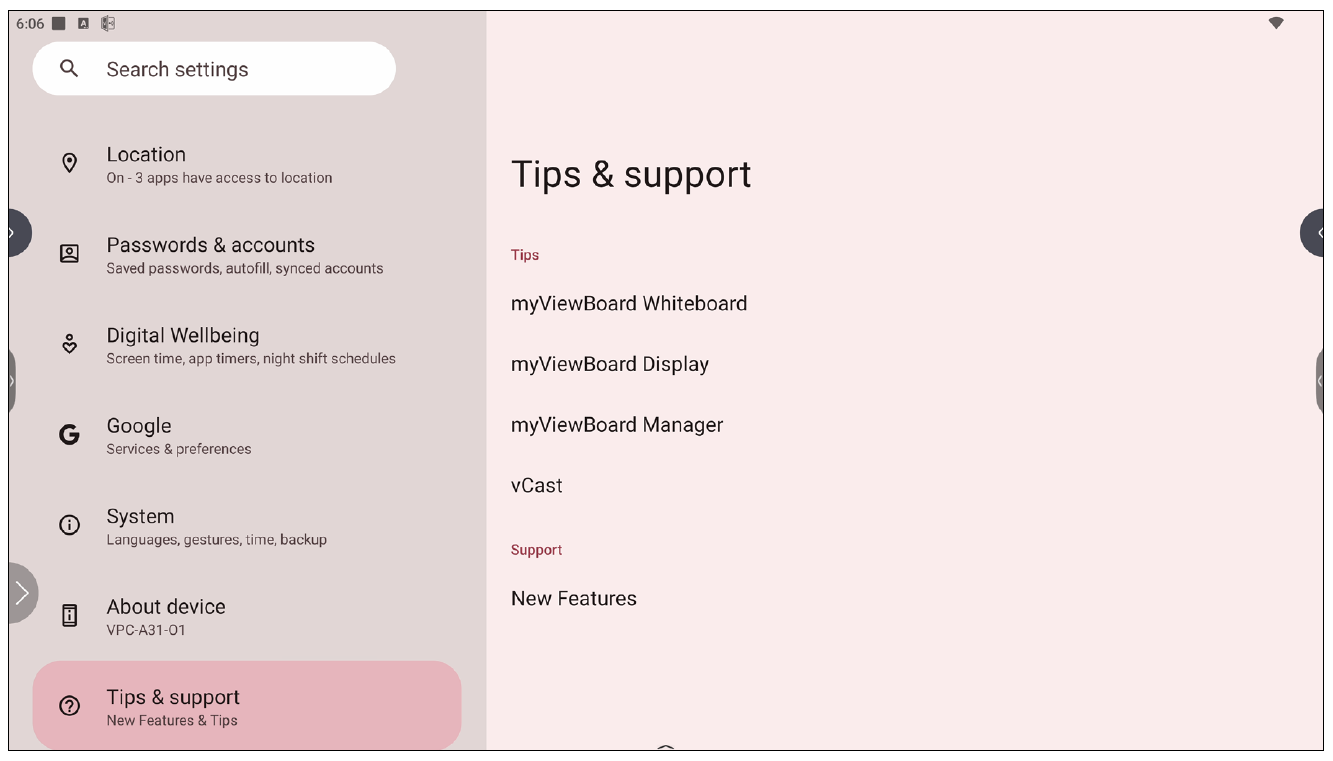
View new features, tips, and get support for the myViewBoard Whiteboard, myViewBoard Display, myViewBoard manager, and vCast applications.
Pre-installed Applications
myViewBoard Display
Wirelessly mirror screens to a larger display.
To share a screen to a ViewBoard with myViewBoard Display:
myViewBoard Manager
Remotely manage multiple installations of ViewSonic devices.
Once devices are set up and have myViewBoard Manager installed, they can be added to the entity and managed remotely from the Manager web application.
Add a Device
On the device to manage:
In the myViewBoard Manager web application on myviewboard.com:
myViewBoard Whiteboard
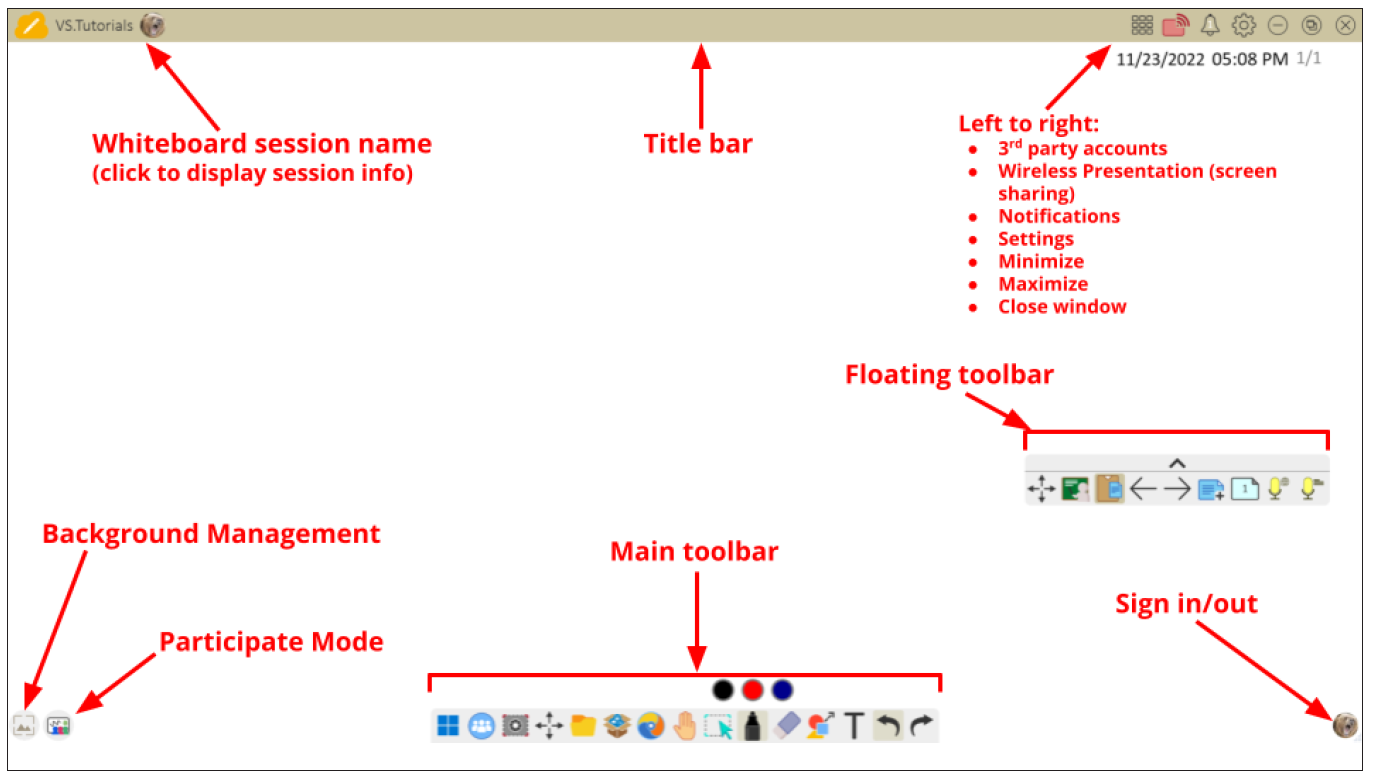
A digital whiteboarding application.
Floating Toolbar
| Item | Description | |
|---|---|---|
| Move | Move the Floating Toolbar. | |
| Present Mode | Switch between presentation and preparation modes. | |
| Paste from Clipboard | Insert the current clipboard content onto the canvas. | |
| Previous Page | Go to the previous page (if the canvas has multiple pages). | |
| Next Page | Go to the next page (if the canvas has multiple pages). | |
| New Page | Add a new canvas. | |
| Pages in Whiteboard | Create, select, rearrange, copy and delete pages. | |
Main Toolbar
| Item | Description | |
|---|---|---|
| Screen Capture | Screenshot, video, and audio recording. | |
| Move | Select and hold to move the toolbar to the left side, right side, or bottom of the screen. | |
| File | Open, save, export, and print whiteboard files. | |
| Magic Box | Import resources (image, video, audio, etc.) to the whiteboard. | |
| Embedded Browser | Open the built-in browser to access internet resources, which can be dragged onto the canvas. | |
| Infinite Canvas | Drag to move the canvas. Use two hands to zoom in/zoom out. Select again for an overview. | |
| Selection | Select objects, text, and other elements on the canvas. | |
| Pen | Writing tools and customization options. | |
| Eraser | Erase objects or clear the page. | |
| Shapes and Lines | Draw shapes, arrows, and add tables. | |
| Text and Handwriting | Add a text box. | |
| Undo | Undo the previous action. | |
| Redo | Redo the previous action. | |
Background Management
| Item | Description | |
|---|---|---|
| Sign In | Sign in to a myViewBoard account. | |
| Background Management | Change the canvas background. | |
| FollowMe Setting | Display custom images uploaded to a cloud storage account. | |
| Color Palette | Choose from solid or gradient colors as the background. | |
| Pre-installed | Choose backgrounds that come pre-installed with Whiteboard. | |
| myViewBoard Originals | Display original content created by myViewBoard. | |
| Local Hard Drive | Use images from the local hard drive. | |
vCast
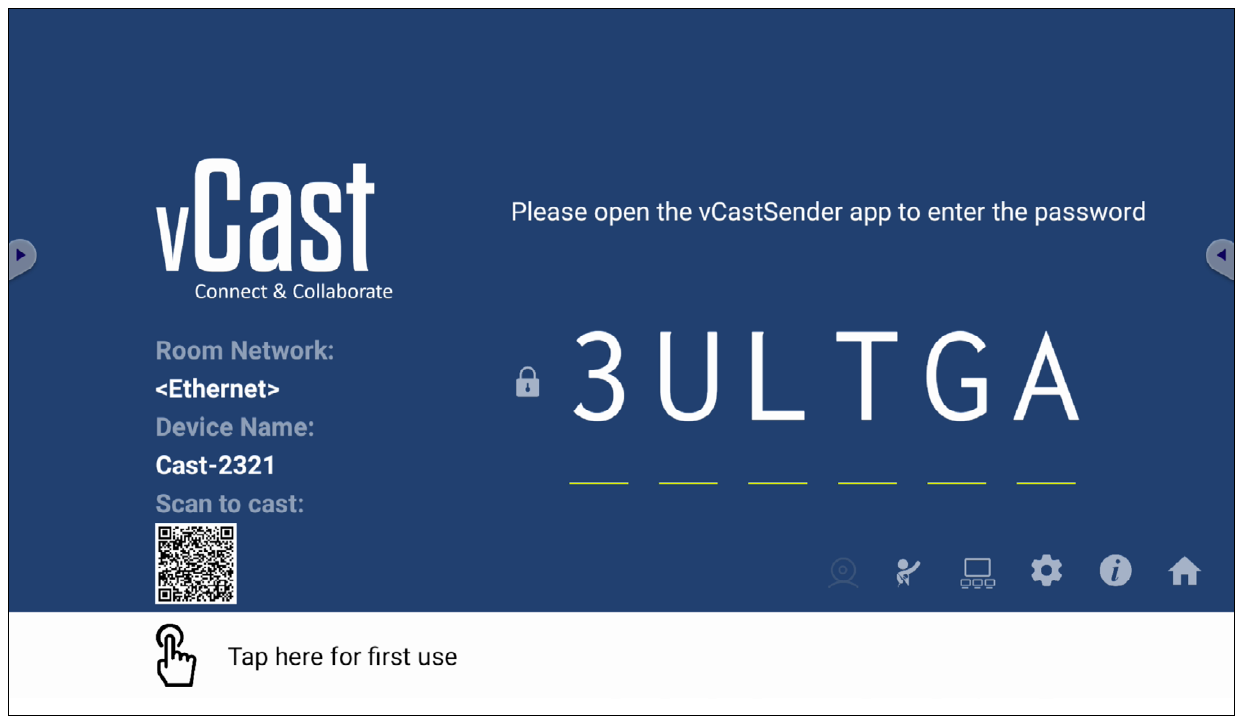
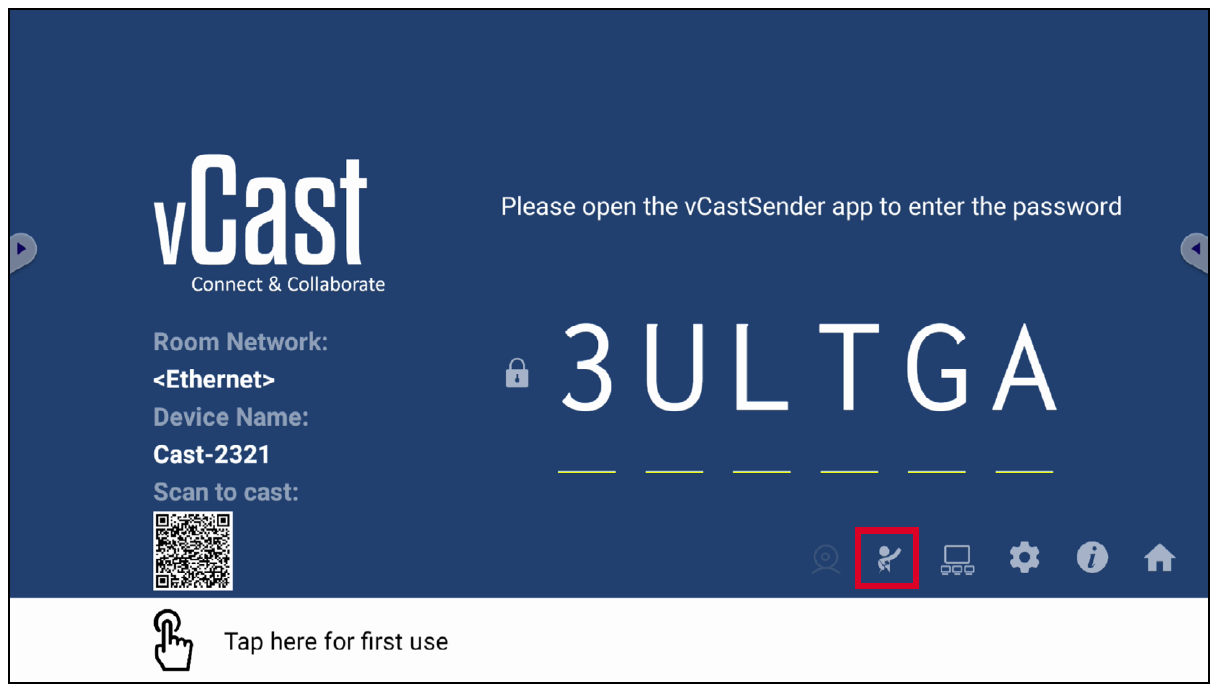
Working with ViewBoard® Cast software (vCast, vCast Pro, and vCastSender), the vCast application will allow the ViewBoard to receive laptop screens (Windows/Mac/Chrome) and mobile (iOS/Android) users’ screens, photos, videos, annotations, and camera(s) that are using the vCastSender application.
Network Information
Display Group Settings
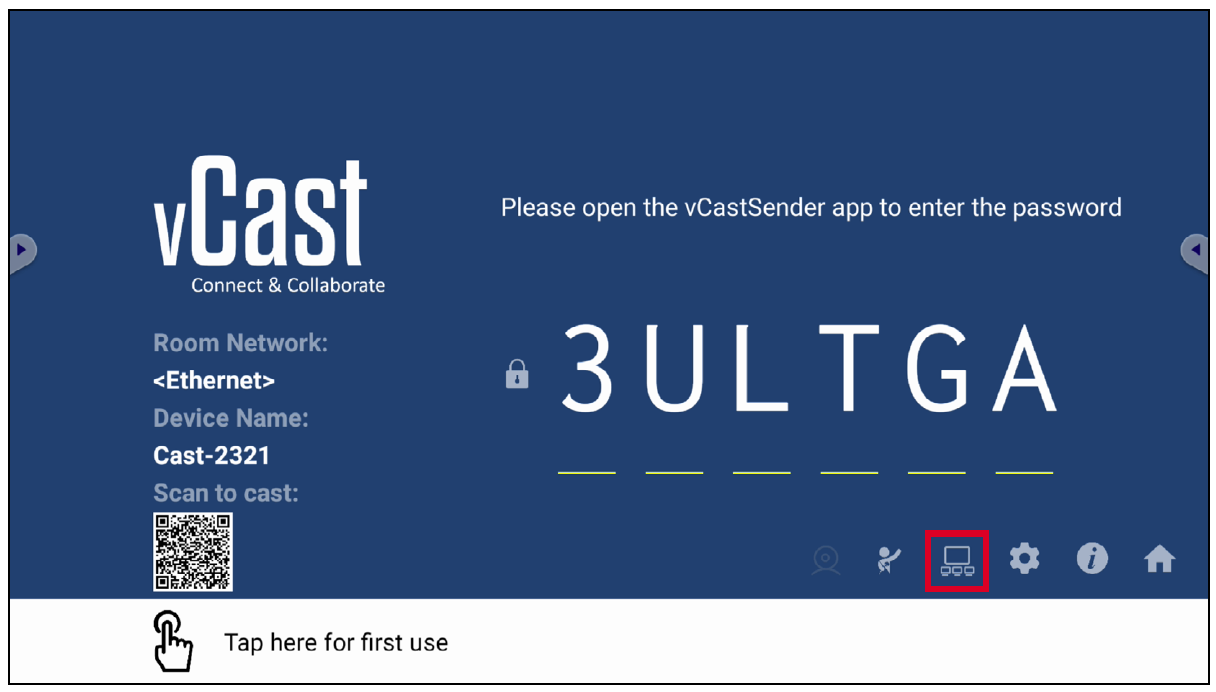
To adjust the Display Group Settings, select the Display Group icon () located in the lower-right corner of the screen.
Synchronized Group Screen All the Time
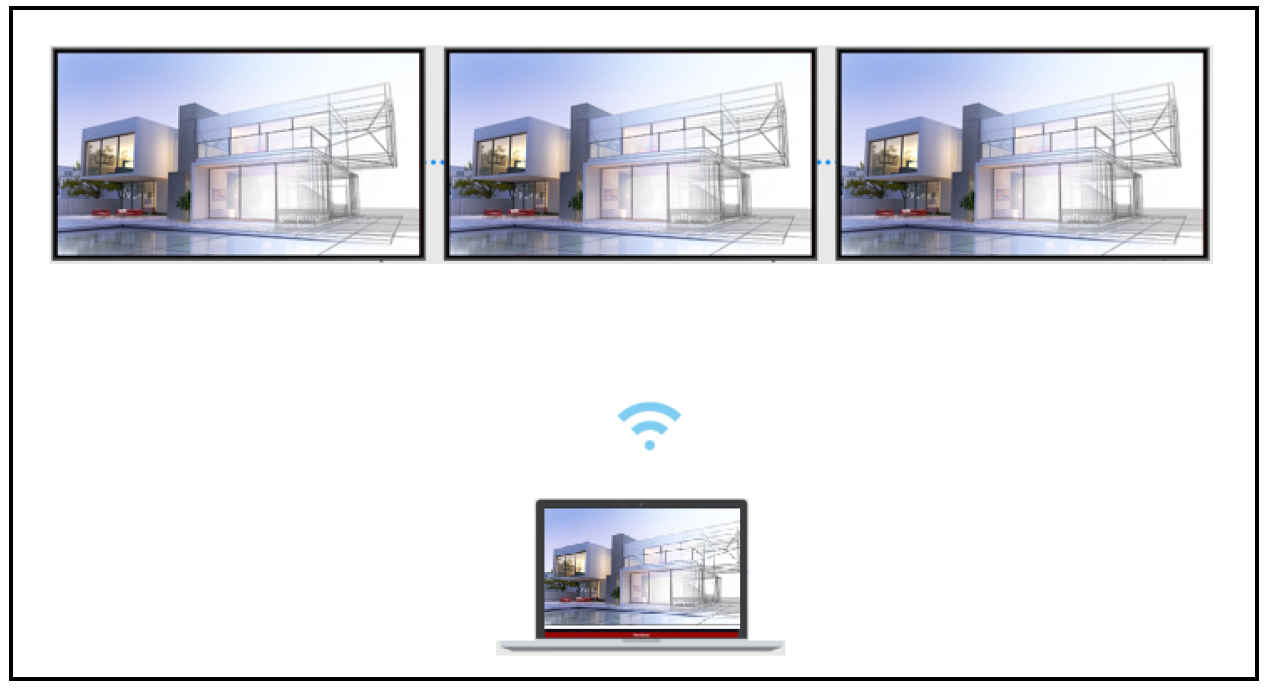
When the “Synchronized group screen all the time” function is toggled ON, it will display a synchronized group screen continuously. If it is toggled OFF, it will work on vCast mirroring only.
After confirming the above settings, you can share your screen to the main display, then the grouped client devices will be synced up to your screen.
Moderator Mode
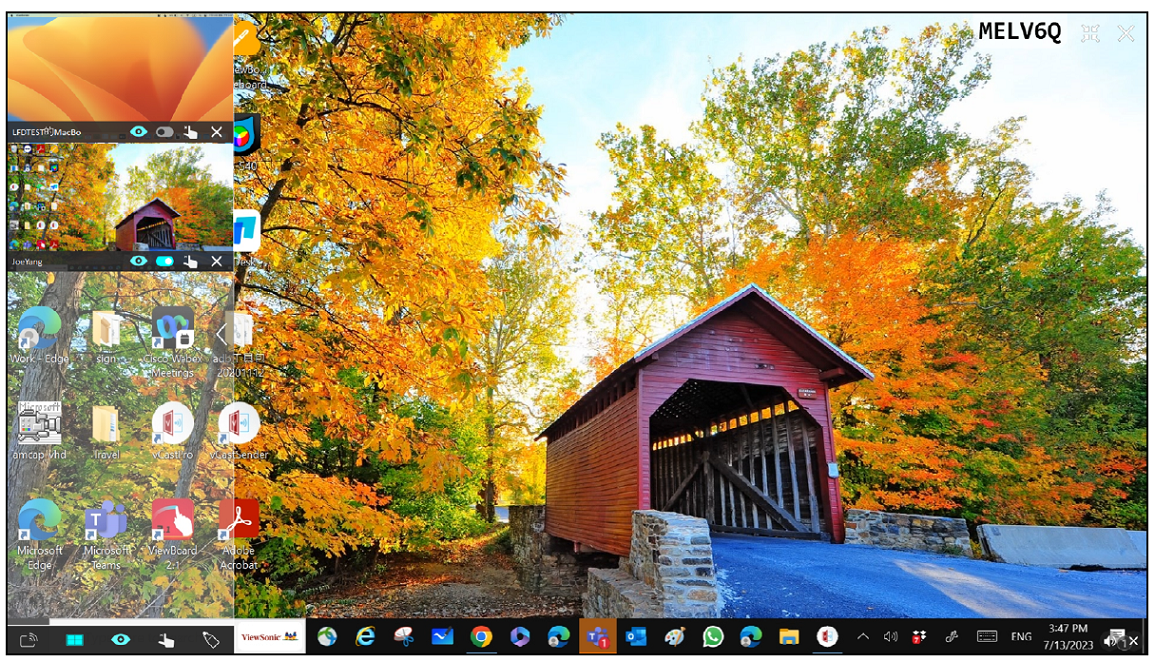
Moderator Mode allows the moderator to take control of the devices connected to the ViewBoard. To enter Moderator Mode, select the Moderator Mode icon () located in the lower-right corner of the screen.
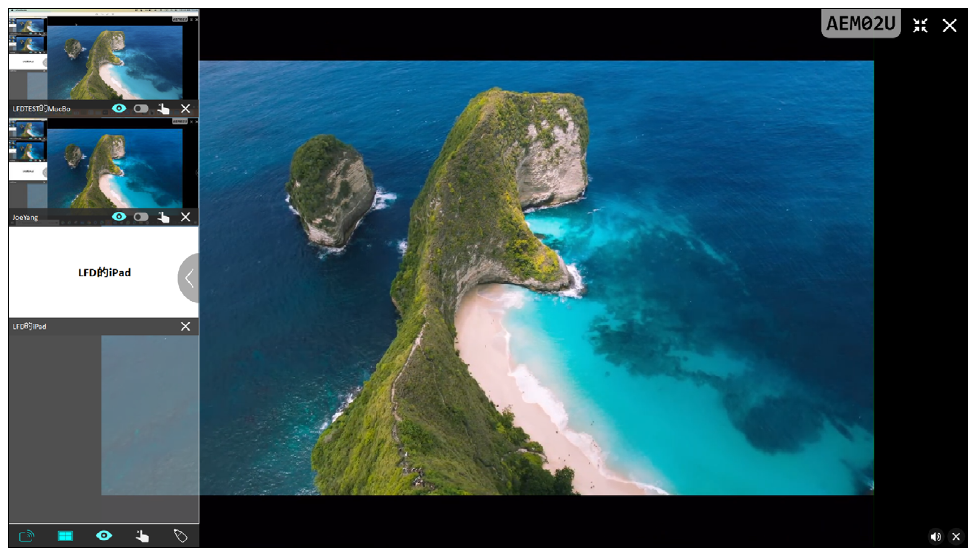
When enabled, the moderator can view a list of all connected screens in the left floating window and can preview each participant’s screen and then select any of participant’s screen and cast to the ViewBoard’s main screen for presentation. The moderator can also control each participant’s screen, annotate on the ViewBoard, and remove unwanted participants by selecting the close icon (X).
Broadcast
When enabled, the ViewBoard’s screen will be broadcasted to all of the participant’s connected screens simultaneously. The participants can only view the presentation contents until the moderator disables the Broadcast function.
Multiple Screen Sharing
By default, vCast is set to allow multiple screen sharing, but can also be set to single screen sharing. To do this, the moderator can select the Multiple Screen Sharing icon to switch to single screen sharing.
Preview Screen
By default, vCast is set to let the moderator preview the participant’s screen contents prior to sharing to the ViewBoard. Selecting the Preview Screen icon, the Moderator can switch to see the participant’s name only.
Touch
By default, participants can use touch for collaboration after connecting. The moderator can enable/disable the touch function of a participant by selecting the Touch icon in their window.
NOTE:
Casting from Windows, MacBook, and Chrome Devices
Casting from Android Devices
Casting from Apple iOS Devices
Apple AirPlay® is compatible with vCast for screen mirroring and content streaming under the same subnet environment only. An “AirPlay Password” will be generated on-screen for connection when using AirPlay to cast to a ViewBoard.
Connecting to a Display from a Mobile Device
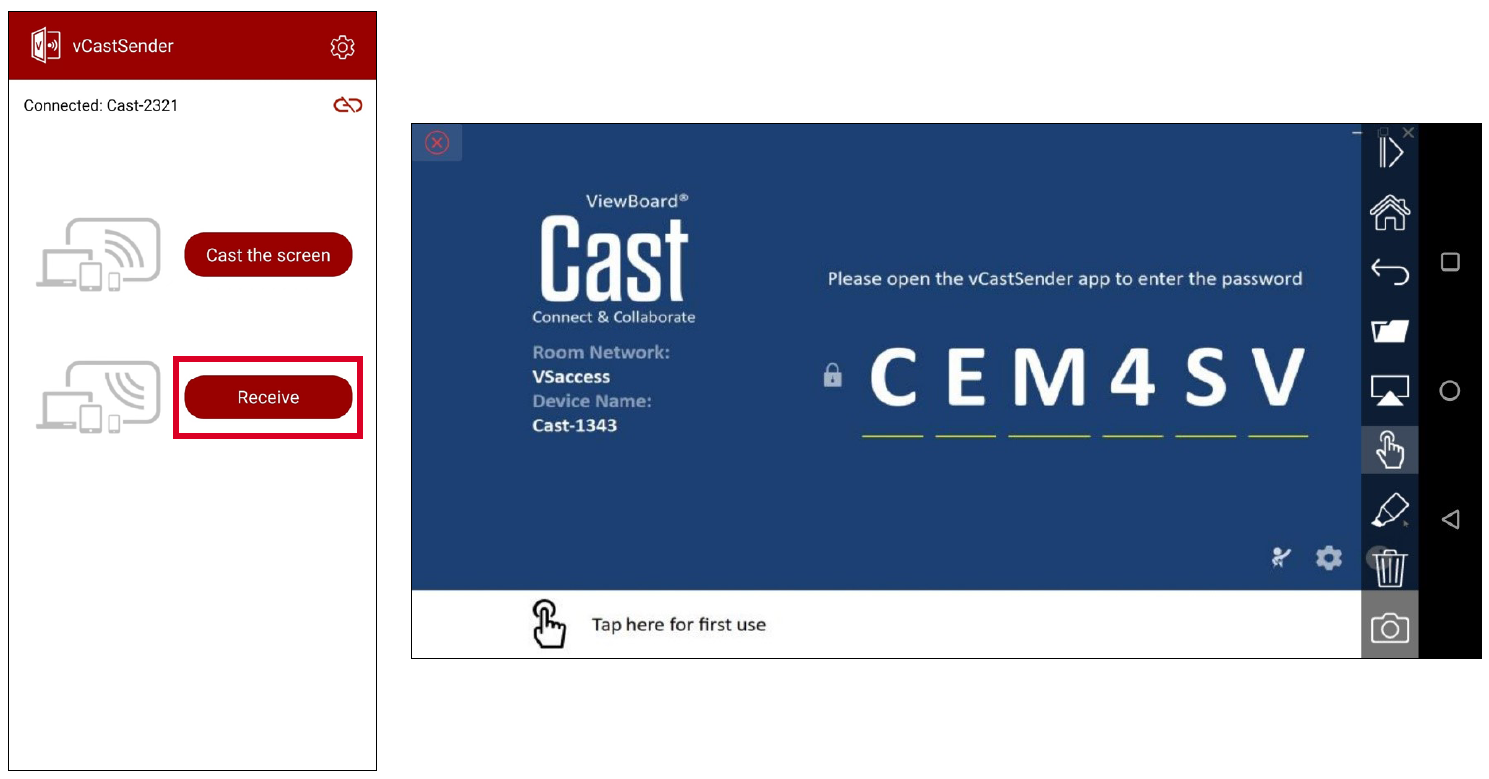
Once connected, select Receive. The ViewBoard or selected display screen will appear on the mobile device with an on-screen toolbar. Users can interact with the ViewBoard or display with annotations, file sharing, etc.
| Item | Description | |
|---|---|---|
| Toggle | Hide or display the toolbar. | |
| Home | Return to the Home interface. | |
| Return | Return to the previous operation. | |
| Folder | View or open the mobile device's files. | |
| Share | Cast the mobile device's screen to the connected ViewBoard or display. | |
| Touch | Remotely control the connected ViewBoard or display. | |
| Annotate | Make annotations, and adjust the pen color. | |
| Clear | Clear everything on screen. | |
| Camera | Send camera images to the connected ViewBoard or display. | |
Technical Specifications
| Category | Item | Specifications |
|---|---|---|
| Core | CPU | MediaTek MT8195 |
| Graphic | GPU | GPU: Mali G57 MC5 NPU: 4.8Tops |
| Memory | Memory | Slot type: LP-DDR4x Size: 8GB |
| I/O | Ports | 1 x HDMI IN (v. 2.0, 4K@60Hz)[1] 1 x HDMI OUT (v. 2.0, 4K@60Hz)[1] 1 x RJ45 (LAN) 3 x USB 3.0 Type A 1 x USB 3.0 Type C (Data only, no PD support, 5V/900mA) 1 x Analog audio-in(3.5 mm, mic-in) 1 x Analog audio-out (3.5 mm) 3 x Antenna |
| Physical | Dimensions (mm) | 200 x 118 x 30 mm |
| Dimensions (in.) | 7.87” x 4.65” x 1.18” | |
| Weight (kg) | 0.70 kg | |
| Weight (lbs.) | 1.54 lbs | |
| Operating Conditions | Temperature | 0°C ~ 40°C (32°F ~ 104°F) |
| Humidity | 10% ~ 90% (non-condensing) | |
| Altitude | < 5000 m | |
| Storage Conditions | Temperature | -20°C ~ 60°C (-4°F ~ 140°F) |
| Humidity | 10% ~ 90% (non-condensing) | |
| Altitude | < 5000 m | |
| Power | Voltage | 12~19V DC |
| Consumption | 36W | |
| Wi-Fi Module | Form Factor | Wi-Fi 6 (IEEE 802.11 a/b/g/n/ac/ax Wi-Fi 2T/2R+) |
| Bluetooth 5.2 (V2.1/4.2/5.2 USB2.0/3.0 Module) | ||
| Frequency Range and Output Power (Max.) | Typical RF Output Power at each RF chain, at a room temperature of 25°C (77°F) 2.4G • 14±2dBm VHT20 at MCS0~7 • 13±2dBm VHT20 at MCS8~9 • 14±2dBm VHT40 at MCS0~7 • 13±2dBm VHT40 at MCS8~9 5G • 14±2dBm VHT20 at MCS0~7 • 13±2dBm VHT20 at MCS8~9 • 14±2dBm VHT40 at MCS0~7 • 13±2dBm VHT40 at MCS8~9 • 13±2dBm VHT80 at MCS0~9 |
Compliance Information
This section addresses all connected requirements and statements regarding regulations. Confirmed corresponding applications shall refer to nameplate labels and relevant markings on the unit.
FCC Compliance Statement
This device complies with part 15 of FCC Rules. Operation is subject to the following two conditions: (1) this device may not cause harmful interference, and (2) this device must accept any interference received, including interference that may cause undesired operation. This equipment has been tested and found to comply with the limits for a Class B digital device, pursuant to part 15 of the FCC Rules.
These limits are designed to provide reasonable protection against harmful interference in a residential installation. This equipment generates, uses, and can radiate radio frequency energy, and if not installed and used in accordance with the instructions, may cause harmful interference to radio communications. However, there is no guarantee that interference will not occur in a particular installation. If this equipment does cause harmful interference to radio or television reception, which can be determined by turning the equipment off and on, the user is encouraged to try to correct the interference by one or more of the following measures:
FCC Radiation Exposure Statement
This device complies with FCC: radiation exposure limits set forth for an uncontrolled environment. End users must follow the specific operating instructions for satisfying RF exposure compliance.
This transmitter must not be co-located or operating in conjunction with any other antenna or transmitter. This device should be installed and operated with a minimum distance of 20 centimeters between the radiator and your body.
The user manual or instruction manual for an intentional or unintentional radiator shall caution the user that changes or modifications not expressly approved by the Party responsible for compliance could void the user’s authority to operate the equipment.
Industry Canada Statement
FCC ID: GSS-VS19699
IC ID: 4280A-VS19699
CAN ICES-003(B) / NMB-003(B)
This Class B digital apparatus complies with Canadian ICES-003. Cet appareil numérique de la classe B est conforme à la norme NMB-003 du Canada.
This device complies with Industry Canada license-exempt RSS standard(s): Operation is subject to the following Two conditions:(1) this device may not cause interference, and (2) this device must accept any interference, including interference that may cause undesired operation of the device.
Le présent appareil est conforme aux CNR d’Industrie Canada applicables aux appareils radio exempts de licence. L’exploitation est autorisée aux deux conditions suivantes : (1) l’appareil ne doit pas produire de brouillage, et (2) l’utilisateur de l’appareil doit accepter tout brouillage radioélectrique subi, même si le brouillage est susceptible d’en compromettre le fonctionnement.
Restrictions in the 5 GHz Band
Within the 5.15 to 5.25 GHz band, UNII devices will be restricted to indoor operations to reduce any potential for harmful interference to co-channel Mobile Satellite System (MSS) operations.
Restrictions Dans la Bande de 5 GHz
Dans la bande de 5,15 à 5,25 GHz, les appareils UNII seront restreints aux opérations intérieures pour réduire toute possibilité d’interférence pouvant nuire aux opérations du Système satellite mobile dans le même canal(MSS).
This radio transmitter [4280A-VS19699] has been approved by Innovation, Science and Economic Development Canada to operate with the antenna types listed below, with the maximum Permissible gain indicated. Antenna types not included in this list that have a gain greater than the maximum gain indicated for any type listed are strictly prohibited for use with this device.
— Le présent émetteur radio [4280A-VS19699] a été approuvé par Innovation, Sciences et Développement économique Canada pour fonctionner avec les types d’antenne énumérés cidessous et ayant un gain admissible maximal. Les types d’antenne non inclus dans cette liste, et dont le gain est supérieur au gain maximal indiqué pour.
Antenna Info
Antenna type : External antenna
Manufacturer : Shenzhen Huadechang Technology Co., Ltd
Model name : HDC-300
Antenna gain : 5dBi
Connector type : RP-SMA (SMA Straight Plug Reverse for RG-178)
RF Exposure
RF Radiation Exposure Statement Caution: This Transmitter must beinstalled to provide a separation distance of at least 20 cm from all persons.
Déclaration d’exposition Attention: Cet émetteur doit être installé pour fournir une distance de séparation d’au moins 20 cm de toute personne.
Country Code Statement
For product available in the USA/Canada market, only channel 1~11 can be operated. Selection of other channels is not possible.
Pour les produits disponibles aux États-Unis/Canada du marché, seul le canal 1 à 11 peuvent être exploités. Sélection d’autres canaux n’est pas possible.
IC Radiation Exposure Statement
This device complied with IC RSS-102 radiation exposure limits set forth for an uncontrolled environment. This device should be installed and operated with minimum distance 20cm between the radiator & your body. The device for the band 5150-5825 MHz is only for indoor usage to reduce potential for harmful interference to co-channel mobile satellite systems.
Cet équipement est conforme aux limits d’exposition aux rayonnements IC établies pour un environnement non contrôlê. Cet équipement do it être installé et utilize avec un minimum de 20cm de distance entre la source de rayonnement et votre corps. les dispositifs fonctionnant dans la bande 5150- 5825 MHz sont réservés uniquement pour une utilization à l’intérieur afin de réduire les risques de brouillage.
CE Conformity for European Countries
| The device complies with the EMC Directive 2014/30/EU and Low Voltage Directive 2014/35/EU. |
The following information is only for EU-member states:
| The mark shown to the right is in compliance with the Waste Electrical and Electronic Equipment Directive 2012/19/EU (WEEE). The mark indicates the requirement NOT to dispose of the equipment as unsorted municipal waste, but use the return and collection systems according to local law. |
The operating frequency bands and the maximum transmitted power limit are listed below:
2412-2472MHz (Wi-Fi 2.4GHz),
5180-5320MHz (Wi-Fi 5GHz),
5500-5700MHz (Wi-Fi 5GHz),
Max Output Power : under 20dBm
These devices comply with RF specifications when the device is used at 20 cm from your body.
| Operation in the band 5150-5250 MHz is only for indoor use to reduce the potential for harmful interference to co-channel mobile satellite systems.
La bande 5150-5250 MHz est réservés uniquement pour une utilisation à l’intérieur afin de réduire les risques de brouillage pré judiciable aux systèmes de satellites mobiles utilisant les mêmes canaux. | |||||||
| BE | BG | CZ | DK | DE | EE | IE | |
| EL | ES | FR | HR | IT | CY | LV | |
| LT | LU | HU | MT | NL | AT | PL | |
| PT | RO | SI | SK | FI | SE | NO | |
| IS | LI | CH | TR | UK(NI) | |||
Para su uso en México
“La operación de este equipo está sujeta a las siguientes dos condiciones: (1) es posible que este equipo dispositivo no cause interferencia perjudicial y (2) este equipo o dispositivo debe aceptar cualquier interferencia, incluyendo la que pueda causar su operación no deseada”.
“Este equipo ha sido diseñado para operar con antenas tipo monopolo con ganancia de 5 dBi para 2.4 GHz y 5 GHz WLAN. El uso con este equipo de antenas que tengan una ganancia mayor que 5 dBi quedan prohibidas. La antena es única y la impedancia requerida es de 50 ohms”.
Declaration of RoHS2 Compliance
This product has been designed and manufactured in compliance with Directive 2011/65/EU of the European Parliament and the Council on restriction of the use of certain hazardous substances in electrical and electronic equipment (RoHS2 Directive) and is deemed to comply with the maximum concentration values issued by the European Technical Adaptation Committee (TAC) as shown below:
| Substance | Proposed Maximum Concentration | Actual Concentration |
|---|---|---|
| Lead (Pb) | 0.1% | < 0.1% |
| Mercury (Hg) | 0.1% | < 0.1% |
| Cadmium (Cd) | 0.01% | < 0.01% |
| Hexavalent Chromium (Cr6⁺) | 0.1% | < 0.1% |
| Polybrominated biphenyls (PBB) | 0.1% | < 0.1% |
| Polybrominated diphenyl ethers (PBDE) | 0.1% | < 0.1% |
| Bis (2-ethylhexyl) phthalate (DEHP) | 0.1% | < 0.1% |
| Butyl benzyl phthalate (BBP) | 0.1% | < 0.1% |
| Dibutyl phthalate (DBP) | 0.1% | < 0.1% |
| Diisobutyl phthalate (DIBP) | 0.1% | < 0.1% |
Certain components of products as stated above are exempted under the Annex III of the RoHS2 Directives as noted below. Examples of exempted components are:
Indian Restriction of Hazardous Substances
Restriction on Hazardous Substances statement (India). This product complies with the “India E-waste Rule 2011” and prohibits use of lead, mercury, hexavalent chromium, polybrominated biphenyls or polybrominated diphenyl ethers in concentrations exceeding 0.1 weight % and 0.01 weight % for cadmium, except for the exemptions set in Schedule 2 of the Rule.
Product Disposal at End of Product Life
ViewSonic® respects the environment and is committed to working and living green. Thank you for being part of Smarter, Greener Computing. Please visit the ViewSonic® website to learn more.
USA & Canada
https://www.viewsonic.com/us/go-green-with-viewsonic
Europe
https://www.viewsonic.com/eu/environmental-social-governance/recycle
Taiwan
https://recycle.moenv.gov.tw
For EU users, please contact us for any safety/accident issue experienced with this product:
| ViewSonic Europe Limited Haaksbergweg 75 1101 BR Amsterdam Netherlands | |
| +31 (0) 650608655 | |
| EPREL@viewsoniceurope.com | |
| https://www.viewsonic.com/eu/ |
Copyright Information
Copyright© ViewSonic® Corporation, 2023. All rights reserved.
Macintosh and Power Macintosh are registered trademarks of Apple Inc.
Microsoft, Windows, and the Windows logo are registered trademarks of Microsoft Corporation in the United States and other countries.
ViewSonic® and the three birds logo are registered trademarks of ViewSonic® Corporation.
VESA is a registered trademark of the Video Electronics Standards Association. DPMS, DisplayPort, and DDC are trademarks of VESA.
Disclaimer: ViewSonic® Corporation shall not be liable for technical or editorial errors or omissions contained herein; nor for incidental or consequential damages resulting from furnishing this material, or the performance or use of this product.
In the interest of continuing product improvement, ViewSonic® Corporation reserves the right to change product specifications without notice. Information in this document may change without notice.
No part of this document may be copied, reproduced, or transmitted by any means, for any purpose without prior written permission from ViewSonic® Corporation.
VPC-A31-O1_UG_ENG_1c_20231108

