Test3
Move the Joy Key ( ![]() /
/![]() /
/![]() /
/![]() ) to activate the Quick Menu.
) to activate the Quick Menu.
![]()
![]()
![]()
![]()
![]() This image cannot be together with an apple.
This image cannot be together with an apple.
You may wonder why an apple cannot be coexist with this image? ![]()
Ask it.
Setting Up for Intelligent Sensing
The built-in intelligent sensors can detect your presence vertically and horizontally. The depth and width of the effective range are around 75 °. Observe the following guideline for a more comfortable viewing experience.
 |
 |
Sitting at Your Desk Within the Effective Range
- Adjust the monitor or your chair so that you can look directly into the intelligent sensors. We recommend the distance between the top of your head and the desk is 55 ± 5 cm (21.65 ± 2 in.).
- Position the monitor 60 cm (23.62 in.) from your eyes.
- Keep around 18 cm (7.09 in.) of distance between you and the edge of the desk.


Positioning the Monitor Within the Effective Range
When you use the monitor with a PC, we recommend the distance between the monitor and the edge of the desk is 60 cm (23.62 in.). Additionally, the monitor tilt angle is 0~20°.

When you use the monitor with a laptop as an extended monitor, we recommend the distance between the monitor and the edge of the desk should not exceed 45°. Additionally, the monitor tilt angle is 0~20°.

When using the monitor in portrait mode, observe the following guidelines.
- Before pivoting the monitor, go to OSD Menu > Setup Menu > OSD Pivot to rotate the OSD menu so it is in proper orientation for the sensitivity of the intelligent sensors.
- When the monitor is to be placed on the left side of the desk, we recommend pivoting the monitor 90°clockwise (the I/O ports are on the left).
- When the monitor is to be placed on the right side of the desk, we recommend pivoting the monitor 90° counterclockwise (the I/O ports are on the right).
- The recommended tilt angle is -5~15°.
Configuring the Settings

Auto-Dimmer
The intelligent sensors will automatically dim the backlight when the sensors have detected that you are not looking at the monitor for around 20 seconds.
Similarly, when you are looking at the screen, the intelligent sensors will automatically turn the backlight back on based on what is currently on the screen.
Privacy Alert
The intelligent sensors will alert you when the sensors detect there is someone behind you looking at your screen. The “Multiple Viewers Detected“ window will appear and automatically close after around 10 seconds.
Power Saving Mode
The intelligent sensors will automatically turn off the backlight when you have left the monitor in idle for around 45 seconds. The sensors will automatically turn the backlight back on when you return.
Break Reminder
Break Reminder will remind you to take a break after one or two hours. The “Time for a Break“ window will appear and automatically close after around 10 seconds.
Break Reminder will also remind you when time is up. If you return in the middle of the break, a confirmation window will appear. You can choose to resume or end the break.
Ambient Light Sensor
The intelligent sensors will automatically adjust the screen brightness based on the light conditions around you.
Posture Check
The intelligent sensors will remind you to adjust your posture when you have leaned to the left or right for around one minute. The “Check Your Posture“ window will appear and automatically close after around 10 seconds.
Focused Attention
Focused Attention Mode will move the mouse pointer to the screen you are looking at. This mode supports up to three monitors in total, including the laptop’s built-in screen if connected. Among these three monitors, only one can be a non-VG2748A-2K monitor. This non-VG2748A-2K monitor must either be another ViewSonic model or the laptop’s built-in screen.
Connecting a PC with VG2748A-2K Monitor

Connecting a PC with VG2748A-2K Monitors and ViewSonic Monitor

Connecting a laptop with VG2748A-2K Monitors

- This feature is only applicable when the monitor(s) are positioned on the left or right side of another screen or laptop.
- Make sure the display mode is set to “Extend” when connecting to multiple monitors.
- Before pivoting the monitor, go to OSD Menu > Setup Menu > OSD Pivot to rotate the OSD Menu so it matches the monitor's orientation. Then, restart vDisplay Manger to apply the changes.

My papa

My mama

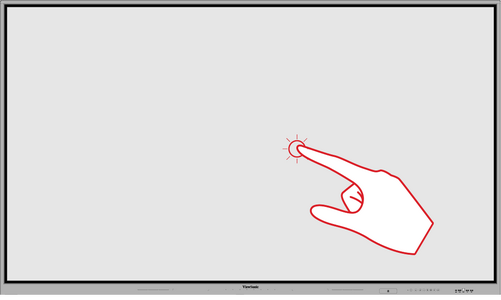
Select and Deselect an Object (Clicking)
Press and release the ViewBoard to select/deselect options or objects. This is like a single, standard left mouse click.

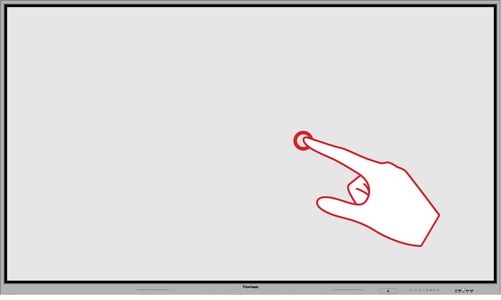
Display Menu Options (Right-Clicking)
Press and hold the ViewBoard with your finger. This is like a single, standard right mouse click.

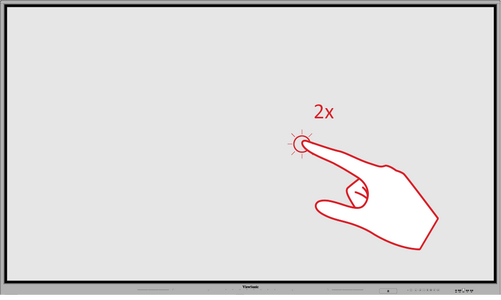
Double-Clicking
Quickly press and release twice in the same location on the ViewBoard. This is like a double, standard left mouse click.
-
 Select and Deselect an Object (Clicking)
Press and release the ViewBoard to select/deselect options or objects. This is like a single, standard left mouse click. -
 Display Menu Options (Right-Clicking)
Press and hold the ViewBoard with your finger. This is like a single, standard right mouse click. -
 Double-Clicking
Quickly press and release twice in the same location on the ViewBoard. This is like a double, standard left mouse click. -
 Moving an Object
Press and hold the object on the ViewBoard and slowly drag it with your finger to your desired location. -
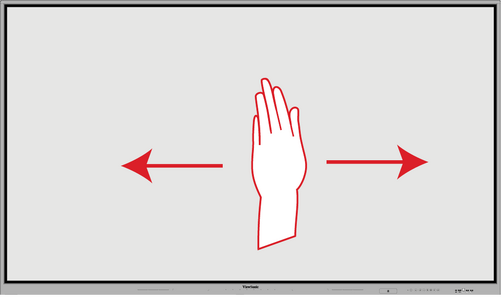 Erasing Digital Ink
Use your flattened hand, palm, or fist on the ViewBoard and move your hand across the area which you wish to erase. -
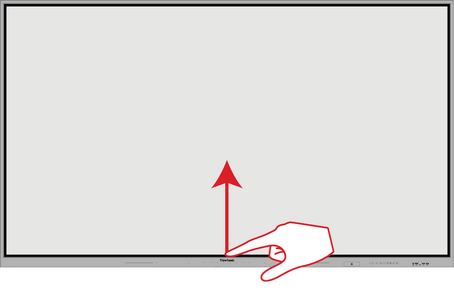 Swipe Up for General Settings
Swipe up from the bottom of the ViewBoard to launch the General Settings.


✅
❎
❌
TEMPLATE
| Sub-menu | Menu Option | |||
|---|---|---|---|---|
| Image Settings | Color Mode | Presentation | ||
| Brightest | ||||
| HDR | ||||
| HLG | ||||
| Movie | ||||
| Game | ||||
| sRGB | ||||
| Golf | ||||
| 3D | ||||
| Brightness | (-/+, -50~50)/1 | |||
| Contrast | (-/+, -50~50)/1 | |||
| Sharpness | (-/+, -50~50)/1 | |||
| Color | (-/+, -50~50)/1 | |||
| Tint | (-/+, -50~50)/1 | |||
| Gamma | Cube | |||
| 1.8 | ||||
| 2.0 | ||||
| 2.2 | ||||
| 2.35 | ||||
| 2.5 | ||||
| sRGB | ||||
| Film | ||||
| Color Setting | Brilliant Color™ | (-/+, 1~10)/1 | ||
| Color Temperature | Warm | |||
| Standard | ||||
| Cool | ||||
| Cold | ||||
| Color Management | Color | Red | ||
| Green | ||||
| Blue | ||||
| Cyan | ||||
| Yellow | ||||
| Magenta | ||||
| White | ||||
| Hue/R | (-/+, -50~50)/1 | |||
| Saturation/G | (-/+, -50~50)/1 | |||
| Gain/B | (-/+, -50~50)/1 | |||
| Reset | ||||
| Exit | ||||
| RGB Gain/Bias | Red Gain | (-/+, -50~50)/1 | ||
| Green Gain | (-/+, -50~50)/1 | |||
| Blue Gain | (-/+, -50~50)/1 | |||
| Red Bias | (-/+, -50~50)/1 | |||
| Green Bias | (-/+, -50~50)/1 | |||
| Blue Bias | (-/+, -50~50)/1 | |||
| Reset | ||||
| Exit | ||||
| Color Space | Auto | |||
| RGB (0~255) | ||||
| RGB (16~235) | ||||
| YUV | ||||
| Light Source Mode | Dynamic Black | |||
| Eco | ||||
| Light Source Power 100%~50% | ||||
| Reset | ||||
| Ultra Fast Input | Active | |||
| Inactive | ||||
| 3D | 3D Mode | Off | ||
| On | ||||
| 3D Format | Auto | |||
| SBS | ||||
| Top and Bottom | ||||
| Frame Sequential | ||||
| 3D Sync Invert | Off | |||
| On | ||||
| Aspect Ratio | 4:3 | |||
| 16:9 | ||||
| 21:9 | ||||
| Native | ||||
| Auto | ||||
| Zoom | (-/+, -5~25)/1 | |||
| Image Shift | Horizontal (H.) | (-/+, -100~100)/1 | ||
| Vertical (V.) | (-/+, -100~100)/1 | |||
| Keystone | Four Corners | Top-Left | ||
| Top-Right | ||||
| Bottom-Left | ||||
| Bottom-Right | ||||
| H. Keystone | (-/+, -30~30)/1 | |||
| V. Keystone | (-/+, -30~30)/1 | |||
| 3 x 3 Warp | ||||
| Reset | ||||
| Timing | Resolution | Refresh Rate (Hz) |
|---|---|---|
| VGA | 640 x 480 | 60/67/72/75/120 |
| 720 x 400 | 70 | |
| SVGA | 800 x 600 | 56/60/72/75/120 |
| 832 x 624 | 75 | |
| XGA | 1024 x 768 | 60/70/75/120 |
| SXGA | 1280 x 1024 | 60/75 |
| PowerBook G4 | 1152 x 870 | 75 |
| WXGA | 1280 x 720 | 60 |
| 1280 x 800 | 60/120 | |
| 1366 x 768 | 60 | |
| UXGA | 1600 x 1200 | 60 |
| WSXGA+ | 1920 x 1080 | 60 |
| WUXGA | 1920 x 1200 | 60 |
| SDTV (480p) | 720 x 480 | 60 |
| SDTV (576p) | 720 x 576 | 50 |
| HDTV (720p) | 1280 x 720 | 50/60 |
| HDTV (1080i) | 1920 x 1080 | 50/60 |
| HDTV (1080i) | 1920 x 1080 | 24/50/60 |
| 4K | 3840 x 2160 | 24/25/30/50/60 |
| 4K | 4096 x 2160 | 24/25/30/50/60 |
| Frame packing | ||
| 720p | 1280 x 720 | 50/60 |
| 1080p | 1920 x 1080 | 24 |
| Side-by-Side | ||
| 1080i | 1920 x 1080 | 50/60 |
| Top-and-Bottom | ||
| 720p | 1280 x 720 | 50/60 |
| 1080p | 1920 x 1080 | 24 |
| Sub-menu | Menu Option | ||
|---|---|---|---|
㉘
▶
◀
▲
▼
�
⓴


➋
❷
⑰
⑰
1
- To exit the OSD Menu, press the 5 key.
5
---

Bizco was founded in 1942 [2]
Template:Col-begin
Template:Col-break
Template:Lorem
Template:Col-break
Template:Lorem
Template:Col-break
Template:Lorem
Template:Col-end
| cell1 | cell2 | cell3 |
|
cell1 |
cell2 |
cell3 |
Italic and bold formatting works correctly only within a single line.
™ © ®
ViewSonic ®
Copyright©
¢ € 50; ¥ £ ¤
5≤10 and 5≥2
The wiki's MediaWiki version: 1.43.5
<style>
.city {
 background-color: tomato;
 color: white;
 border: 2px solid black;
 margin: 20px;
 padding: 20px;
} </style>
==London==
London is the capital of England.
VG3456a Connecting Power and Devices#DisplayPort Connection
| AA | CC | EE |
| BB | DD | FF |
- This is a test table here
followed by this text afterwardHELLO WORLD
This line is more text after the outer tableThis is a test table here HELLO WORLD followed by this text afterward.
Text before table...
| Vivi | Interest | Fav. Color | aspirations |
|---|---|---|---|
| The most wanted | Swimming | Green | Buying a house |
| The second most wanted | Cooking | Pink | Be remembered |
....Text after table
Level 1
Level 2
Connect one end of a DisplayPort cable to the DisplayPort port. Then connect the other end of the cable to the DisplayPort or mini DP port of your computer.
- NOTE: To connect the monitor to the Thunderbolt port (v. 1&2) on your Mac, connect the mini DP end of the “mini DP to DisplayPort cable” to the Thunderbolt output of your Mac. Then connect the other end of the cable to the DisplayPort port of the monitor.
- NOTE: To connect the monitor to the Thunderbolt port (v. 1&2) on your Mac, connect the mini DP end of the “mini DP to DisplayPort cable” to the Thunderbolt output of your Mac. Then connect the other end of the cable to the DisplayPort port of the monitor.
- NOTE: To connect the monitor to the Thunderbolt port (v. 1&2) on your Mac, connect the mini DP end of the “mini DP to DisplayPort cable” to the Thunderbolt output of your Mac. Then connect the other end of the cable to the DisplayPort port of the monitor.
- NOTE: To connect the monitor to the Thunderbolt port (v. 1&2) on your Mac, connect the mini DP end of the “mini DP to DisplayPort cable” to the Thunderbolt output of your Mac. Then connect the other end of the cable to the DisplayPort port of the monitor.
- NOTE: To connect the monitor to the Thunderbolt port (v. 1&2) on your Mac, connect the mini DP end of the “mini DP to DisplayPort cable” to the Thunderbolt output of your Mac. Then connect the other end of the cable to the DisplayPort port of the monitor.
- NOTE: To connect the monitor to the Thunderbolt port (v. 1&2) on your Mac, connect the mini DP end of the “mini DP to DisplayPort cable” to the Thunderbolt output of your Mac. Then connect the other end of the cable to the DisplayPort port of the monitor.
- NOTE: To connect the monitor to the Thunderbolt port (v. 1&2) on your Mac, connect the mini DP end of the “mini DP to DisplayPort cable” to the Thunderbolt output of your Mac. Then connect the other end of the cable to the DisplayPort port of the monitor.
- NOTE: To connect the monitor to the Thunderbolt port (v. 1&2) on your Mac, connect the mini DP end of the “mini DP to DisplayPort cable” to the Thunderbolt output of your Mac. Then connect the other end of the cable to the DisplayPort port of the monitor.
Template:Outdent return to left margin
Level 3
- Egg
- Scrambled egg with tomato
- boiled egg
- Sunny-side-up egg
- Fruit
- apple
- strawberry
- pineapple
- strawberry
- apple
- Soup
- pumpkin soup
- Chicken soup
- soup made by mom
- Rice
:plain rice
:Don't like fried rice
Level 4
<---! Wiki's orderlist cannot have any interference--->
- Rice
- Plain rice
- Can finish a couple bowls of plain rice
- No side dishes
- just all plain
- noodle
- not a fan
- My husband likes noodle
- Not me
- But my papa likes noodle
- Men like noodle(?)
Level 5
2026
June,13(Saturday), 2026
Test3
ViewSonic Documentation
This is an example of a block quotation -
Lorem ipsum dolor sit amet, consectetur adipiscing elit, sed do eiusmod tempor incididunt ut labore et dolore magna aliqua. Ut enim ad minim veniam, quis nostrud exercitation ullamco laboris nisi ut aliquip ex ea commodo consequat. Duis aute irure dolor in reprehenderit in voluptate velit esse cillum dolore eu fugiat nulla pariatur.
This text will be aligned to the right
.right-align { text-align: right; }
This text will be aligned to the right
This text will be aligned to the center
I am red and I am blue.
I am redand I am blue!!
I'm inside a div!
This is div number 2!
Level 6


text text text....
text text text....
italics
bold
both
[1]
[2]
[3]
https://www.wikipedia.org
Wikipedia
Wiki
Android
copy editors
copy editors
copy edit ors
This is a bunch of text that we might want to include in a Wikipedia page -- or in a lot of Wikipedia pages! This example is being presented by
{{{name}}}.
This is a bunch of text that we might want to include in a Wikipedia page -- or in a lot of Wikipedia pages! This example is being presented by
Pete.
This topic is notable
This is a short paragraph
This is a longer paragraph. 11
We're using page breaks
to have it display
on four lines
This is Bold text.
This is Important text.
This is Italic text.
This is Emphasized text.
This is Marked text.
This isSmall text.
This isDeleted text.
This isInserted text.
This isSubscript text.
This is Supscript text.
This is red text.
This is text using the courier font.
This is very large text.
- Eggs
- Boiled
- Scrambled
- Poached
- Fried
CRACK YOUR EGGS FIRST
- Bread
- Bananas
- Milk
- China
- India
- United States
- Indonesia
- Tage
- A mark that is used to distinguish HTML code from regular text
- Element
- A pair of tags and all the content included between them
- Head
- The element that contains information that will not be displayed in the browser
- Body
- The main element that contains information that will be displayed by the browser
| First Name | Last Name | Address |
|---|---|---|
| Mary | Smith | 123 Main Street |
| John | Green | 463 Church Street |
| Sally | Jones | 867 Park Avenue |
This is an example of a regular quote - to be or not to be.
This is an example of a block quotation -
Lorem ipsum dolor sit amet, consectetur adipiscing elit, sed do eiusmod tempor incididunt ut labore et dolore magna aliqua. Ut enim ad minim veniam, quis nostrud exercitation ullamco laboris nisi ut aliquip ex ea commodo consequat. Duis aute irure dolor [emphasis added] in reprehenderit in voluptate velit esse cillum dolore eu fugiat nulla pariatur.
- ↑ Citation on Magic words.
- ↑ https://www.nytimes.com/bizco
- ↑ Template:Cite web