


| Sub-menu | Menu Option | |||
|---|---|---|---|---|
| Image Settings | Display Mode | Presentation | ||
| Bright | ||||
| Cinema | ||||
| Gaming | ||||
| User | ||||
| 3D | ||||
| Brightness | (-/+, -50~50) | |||
| Contrast | (-/+, -50~50) | |||
| Sharpness | (-/+, 1~15) | |||
| Color | (-/+, -50~50) | |||
| Tint | (-/+, -50~50) | |||
| Gamma | Film | |||
| Video | ||||
| Graphics | ||||
| Standard (2.2) | ||||
| Color Settings | Brilliant Color™ | (-/+, 1~10) | ||
| Color Temperature | Warm | |||
| Standard | ||||
| Cool | ||||
| Cold | ||||
| Color Matching | Color | Red | ||
| Green | ||||
| Blue | ||||
| Cyan | ||||
| Yellow | ||||
| Magenta | ||||
| White | ||||
| Hue/R | (-/+, -50~50) | |||
| Saturation/G | (-/+, -50~50) | |||
| Gain/B | (-/+, -50~50) | |||
| Reset | ||||
| Exit | ||||
| Color Space | Auto | |||
| RGB (0~255) | ||||
| RGB (16~235) | ||||
| YUV | ||||
| Brightness Mode | Dynamic Black | |||
| Eco | ||||
| Power 100%~50% | ||||
| Reset | ||||
| 3D | 3D Mode | Off | ||
| On | ||||
| 3D Format | Auto | |||
| SBS | ||||
| Top and Bottom | ||||
| Frame Sequential | ||||
| 3D Sync Invert | Off | |||
| On | ||||
| Aspect Ratio | 4:3 | |||
| 16:9 | ||||
| Full | ||||
| L.BOX | ||||
| Auto | ||||
| Zoom | (-/+, -5~25) | |||
| Keystone | Four Corners | Top-Left | ||
| Top-Right | ||||
| Bottom-Left | ||||
| Bottom-Right | ||||
| H. Keystone | (-/+, -30~30) | |||
| V. Keystone | (-/+, -30~30) | |||
| Auto Keystone | ||||
| Reset | ||||
LS740HD
From ViewSonic Documentation
Package Contents

| Number | Description |
|---|---|
| 1 | Projector |
| 2 | Remote Control |
| 3 | Batteries |
| 4 | Quick Start Guide |
| 5 | Power Cord |
| 6 | Power Adapter |
Projector Overview

| Number | Description |
|---|---|
| 1 | Keypad |
| 2 | Focus Ring |
| 3 | Zoom Ring |
| 4 | Front IR |
| 5 | Top IR |
| 6 | DC IN |
| 7 | Lens |
| 8 | I/O Ports |
| 9 | Vent (inlet) |
| 10 | Vent (outlet) |
- NOTE: Do not block projector intake and exhaust vents.
I/O Ports

| Number | Port | Description |
|---|---|---|
| 1 | DC IN | DC IN socket |
| 2 | AUDIO OUT | Audio signal output socket |
| 3 | USB (5V/1.5A Out) (Service) |
USB Type A port for power and service |
| 4 | RS-232 | RS-232 control port |
| 5 | HDMI 1[1] / HDMI 2[1] | HDMI port |
Keypad

| Icon | Button | Description |
|---|---|---|
| Power | Toggles the projector between standby mode and Power On. | |
| Keystone | Manually corrects distorted images resulting from an angled projection. | |
| Navigation | Selects the desired menu items and makes adjustments when the On-Screen Display (OSD) Menu is activated. | |
| Menu/Exit | Turns on or off the On-Screen Display (OSD) Menu. | |
| Source | Displays the input source selection bar. | |
| Information | Displays the INFORMATION menu. | |
| Enter | Enacts the selected On-Screen Display (OSD) Menu item when the OSD Menu is activated. | |
| Auto | Automatically determines the best picture timings for the displayed image. |
Indicator Lights
| Indicator Light | Description |
|---|---|
| Power indicator light | |

|
Light Source indicator light |

|
Temperature indicator light |
Overview

| Number | Button | Description |
|---|---|---|
| 1 | AV Mute | Hides the screen picture and volume mute. |
| 2 | Power | Turns the projector On or Off. |
| 3 | Auto Sync | Automatically determines the best picture timings for the displayed image. |
| 4 | Source | Displays the input source selection bar. |
| 5 | Navigation Buttons | Navigates and selects the desired menu items and make adjustments. |
| 6 | Enter | Confirms the selection. |
| 7 | Menu/Exit |
|
| 8 | Brightness | Displays the brightness mode selection bar. |
| 9 | Volume Up | Increase the volume level. |
| 10 | Keystone | Manually correct distorted images. |
| 11 | Volume Down | Decrease the volume level. |
| 12 | Video | Unsupported Button |
| 13 | VGA | Unsupported Button |
| 14 | HDMI | Selects the HDMI 1 or HDMI 2 input source. |
| 15 | Aspect | Displays the aspect ratio selection bar. |
| 16 | Page Up | Unsupported Button |
| 17 | Zoom In | Increases the projected image size. |
| 18 | Freeze | Freeze the projected image. |
| 19 | Zoom Out | Reduces the projected image size. |
| 20 | Page Down | Unsupported Button |
| 21 | Display Mode | Displays the color mode selection bar. |
| 22 | Mouse Mode | Unsupported Button |
| 23 | Mute | Mute/Unmute. |
Remote Control - Receiver Range

To ensure proper function of the remote control follow the steps below:
- The remote control must be held at an angle within 30° perpendicular to the projector’s IR remote control sensor(s).
- The distance between the remote control and the sensor(s) should not exceed 8 m (26 ft.).
- NOTE: Refer to the illustration for the location of the infrared (IR) remote control sensor(s).
Replacing the Batteries
- Remove the battery cover from the bottom of the remote control by pressing the finger grip and sliding it across.
- Remove any existing batteries (if necessary) and install two AAA batteries.
- NOTE: Observe the battery’s polarities as indicated.
- Replace the battery cover by aligning it with the base and pushing it back into position.
- NOTE:
- Avoid leaving the remote control and batteries in excessive heat or a humid environment.
- Replace only with the same or equivalent type recommended by the battery manufacturer.
- If the battery is drained or if you will not be using the remote control for an extended period of time, remove the battery to avoid damage to the remote control.
- Dispose of used batteries according to the manufacturer’s instructions and local environment regulations for your region.

Choosing a Location - Projector Orientation
Personal preference and room layout will decide the installation location. Consider the following:
- Size and position of your screen.
- Location of a suitable power outlet.
- Location and distance between the projector and other equipment.
The projector is designed to be installed in one of the following locations:
-
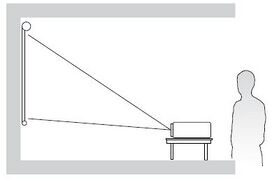 Desk Front
 -
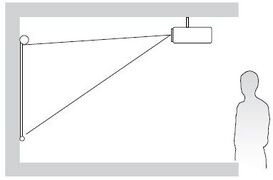 Ceiling Front
 -
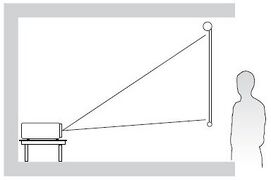 Desk Rear
 -
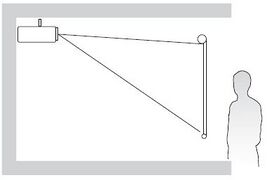 Ceiling Rear
| Location | Description |
|---|---|
| Desk Front | The projector is placed near the floor in front of the screen. |
| Ceiling Front | The projector is suspended upside-down from the ceiling in front of the screen. |
| Desk Rear[1] | The projector is placed near the floor behind the screen. |
| Ceiling Rear[1] | The projector is suspended upside-down from the ceiling behind the screen. |
Projection Dimensions
16:9 Image on a 16:9 Screen

- NOTE: (e) = Screen | (f) = Center of Lens
| (a) Screen Size | (b) Projection Distance | (c) Image Height | (d) Vertical Offset | ||||||
|---|---|---|---|---|---|---|---|---|---|
| min. | max. | ||||||||
| in. | mm | in. | mm | in. | mm | in. | mm | in. | mm |
| 30 | 762 | 29.55 | 750 | 38.44 | 976 | 14.71 | 374 | 2.35 | 60 |
| 40 | 1016 | 39.40 | 1001 | 51.25 | 1302 | 19.61 | 498 | 3.14 | 80 |
| 50 | 1270 | 49.24 | 1251 | 64.06 | 1627 | 24.51 | 623 | 3.92 | 100 |
| 60 | 1524 | 59.09 | 1501 | 76.87 | 1953 | 29.42 | 747 | 4.71 | 120 |
| 70 | 1778 | 68.94 | 1751 | 89.69 | 2278 | 34.32 | 872 | 5.49 | 139 |
| 80 | 2032 | 78.79 | 2001 | 102.50 | 2603 | 39.22 | 996 | 6.28 | 159 |
| 90 | 2286 | 88.64 | 2251 | 115.31 | 2929 | 44.12 | 1121 | 7.06 | 179 |
| 100 | 2540 | 98.49 | 2502 | 128.12 | 3254 | 49.03 | 1245 | 7.84 | 199 |
| 110 | 2794 | 108.34 | 2752 | 140.93 | 3580 | 53.93 | 1370 | 8.63 | 219 |
| 120 | 3048 | 118.19 | 3002 | 153.75 | 3905 | 58.83 | 1494 | 9.41 | 239 |
| 130 | 3302 | 128.03 | 3252 | 166.56 | 4231 | 63.73 | 1619 | 10.20 | 259 |
| 140 | 3556 | 137.88 | 3502 | 179.37 | 4556 | 68.64 | 1743 | 10.98 | 279 |
| 150 | 3810 | 147.73 | 3752 | 192.18 | 4881 | 73.54 | 1868 | 11.77 | 299 |
| 200 | 5080 | 196.98 | 5003 | 256.24 | 6509 | 98.05 | 2491 | 15.69 | 398 |
| 250 | 6350 | 246.22 | 6254 | 320.30 | 8136 | 122.57 | 3113 | 19.61 | 498 |
| 300 | 7620 | 295.46 | 7505 | 384.36 | 9763 | 147.08 | 3736 | 23.53 | 598 |
- NOTE:
- These figures are for reference purposes only. Please refer to the actual projector for the precise dimensions.
- It is recommended that if you intend to permanently install the projector to physically test the projection size and distance using the actual projector before you permanently install it.
16:9 Image on a 4:3 Screen

- NOTE: (e) = Screen | (f) = Center of Lens
| (a) Screen Size | (b) Projection Distance | (c) Image Height | (d) Vertical Offset | ||||||
|---|---|---|---|---|---|---|---|---|---|
| min. | max. | ||||||||
| in. | mm | in. | mm | in. | mm | in. | mm | in. | mm |
| 30 | 762 | 27.12 | 689 | 35.28 | 896 | 13.50 | 343 | 2.16 | 55 |
| 40 | 1016 | 36.16 | 918 | 47.04 | 1195 | 18.00 | 457 | 2.88 | 73 |
| 50 | 1270 | 45.20 | 1148 | 58.80 | 1494 | 22.50 | 572 | 3.60 | 91 |
| 60 | 1524 | 54.24 | 1378 | 70.56 | 1792 | 27.00 | 686 | 4.32 | 110 |
| 70 | 1778 | 63.28 | 1607 | 82.32 | 2091 | 31.50 | 800 | 5.04 | 128 |
| 80 | 2032 | 72.32 | 1837 | 94.08 | 2390 | 36.00 | 914 | 5.76 | 146 |
| 90 | 2286 | 81.36 | 2067 | 105.84 | 2688 | 40.50 | 1029 | 6.48 | 165 |
| 100 | 2540 | 90.40 | 2296 | 117.60 | 2987 | 45.00 | 1143 | 7.20 | 183 |
| 110 | 2794 | 99.44 | 2526 | 129.36 | 3286 | 49.50 | 1257 | 7.92 | 201 |
| 120 | 3048 | 108.48 | 2755 | 141.12 | 3584 | 54.00 | 1372 | 8.64 | 219 |
| 130 | 3302 | 117.52 | 2985 | 152.88 | 3883 | 58.50 | 1486 | 9.36 | 238 |
| 140 | 3556 | 126.56 | 3215 | 164.64 | 4182 | 63.00 | 1600 | 10.08 | 256 |
| 150 | 3810 | 135.60 | 3444 | 176.40 | 4481 | 67.50 | 1715 | 10.80 | 274 |
| 200 | 5080 | 180.80 | 4592 | 235.20 | 5974 | 90.00 | 2286 | 14.40 | 366 |
| 250 | 6350 | 226.00 | 5740 | 294.00 | 7468 | 112.50 | 2858 | 18.00 | 457 |
| 300 | 7620 | 271.20 | 6888 | 352.80 | 8961 | 135.00 | 3429 | 21.60 | 549 |
- NOTE:
- These figures are for reference purposes only. Please refer to the actual projector for the precise dimensions.
- It is recommended that if you intend to permanently install the projector to physically test the projection size and distance using the actual projector before you permanently install it.
Mounting the Projector
- NOTE: If you buy a third party mount, please use the correct screw size. Screw size can vary depending on the thickness of the mounting plate.
- To ensure the most secure installation, please use a ViewSonic® wall or ceiling mount.
- Ensure the screws used to attach the mount to the projector meet the following specifications:
- Screw type: M4 x 8
- Maximum Screw Length: 8 mm

CAUTION
- Avoid installing the projector near a heat source or air conditioner.
- Keep at least a 10 cm (3.9 in.) gap between the ceiling and the bottom of the projector.
Using the Security Bar
To help prevent the projector from being stolen, use a security slot locking device to secure the projector to a fixed object.
Connecting to Power
|
 |
- NOTE: When installing the projector, incorporate a readily accessible disconnect device in the fixed wiring, or connect the power plug to an easily accessible outlet near the unit. If a fault should occur during operation of the projector, use the disconnect device to switch off the power supply, or disconnect the power plug.
Connecting to External Devices
HDMI Connection
Connect one end of an HDMI cable to the HDMI port of your video device. Then connect the other end of the cable to the HDMI 1/2 port of your projector.

Audio Connection
To play audio from the projector through an external speaker, connect one end of an audio cable to the external speaker, and the other end to the projector’s AUDIO OUT port.

USB Connection
USB Type A Connection
The USB port is for supplying power (e.g., dongles) and service needs.
- NOTE: The USB port does not supply power when the projector is in standby mode.

RS-232 Connection
When you use a RS-232 serial port cable to connect the projector to an external computer certain functions can be controlled remotely by the PC, including Power On/Off, Volume adjustment, Input select, Brightness, and more.

Starting the Projector
|
 |
Selecting an Input Source
The projector can be connected to multiple devices at the same time. However, it can only display one full screen at a time.

When Auto Source is On, the projector will automatically search for input sources. If multiple sources are connected, press the Source button on the projector or remote control to select the desired input.
- NOTE: Ensure the connected sources are also turned on.
Adjusting the Projected Image
Adjusting the Projector’s Height and Projection Angle
The projector is equipped with three (3) adjustment feet. Adjusting the feet will change the projector’s height and the vertical projection angle.

Adjusting the Focus, Keystone, and Zoom
You can improve and adjust the clarity and position of the image by adjusting the Focus Ring, Keystone Keys, or Zoom Ring.

Shutting Down the Projector
- Press the Power button on the projector or remote control and a “power off message” will appear.
- Press the Power button again to confirm and shut down the projector.
- The Power Indicator Light will turn solid red and enter standby mode.
On-Screen Display (OSD) Menu
The projector has multilingual on-screen display menus that allow you to make image adjustments and change a variety of settings.

| Menu | Description | |
|---|---|---|
| Display | Adjust Image, 3D, Aspect Ratio, Zoom, and Keystone settings. | |
| Audio | Adjust the volume level or mute. | |
| Setup | Adjust Projection, Power, Security, Language, Input Source, etc. settings. | |
| Information |  |
View projector information. |
The projector has multilingual on-screen display menus that allow for image and settings adjustment.
- To open the On-Screen Display (OSD) Menu, press the Menu/Exit button on the projector or the remote control.
- When the OSD is displayed, use the Navigation buttons to select any item in the main menu. While making a selection on a particular page, press the Enter button on the projector or the remote control to enter a sub-menu.
- Use the Navigation buttons to select the desired item in the sub-menu and then press Enter to view further settings. Adjust the settings by using the Navigation buttons.
- Select the next item to be adjusted in the sub-menu and adjust as described above.
- Press Enter to confirm, and the screen will return to the main menu.
- To exit, press the Menu/Exit button again. The OSD menu will close and the projector will automatically save the new settings.
On-Screen Display (OSD) Menu Tree
| Sub-menu | Menu Option |
|---|---|
| Mute | Off |
| On | |
| Volume | (-/+, 0~10) |
| Sub-menu | Menu Option | ||
|---|---|---|---|
| Projection | Desk Front | ||
| Desk Rear | |||
| Ceiling Front | |||
| Ceiling Rear | |||
| Power Settings | Direct Power On | Off | |
| On | |||
| Signal Power On | Off | ||
| On | |||
| Auto Power Off | (-/+, 0~180) minutes | ||
| Security | Security | Off | |
| On | |||
| Security Timer | Month | (-/+, 0~12) | |
| Day | (-/+, 0~30) | ||
| Hour | (-/+, 0~24) | ||
| Change Password | |||
| HDMI CEC | HDMI CEC | Off | |
| On | |||
| Test Pattern | Test Pattern | Off | |
| Green Grid | |||
| Magenta Grid | |||
| White Grid | |||
| White | |||
| Test Card | |||
| Options | Language | English | |
| Deutsch | |||
| Français | |||
| Italiano | |||
| Español | |||
| Português | |||
| Polski | |||
| Nederlands | |||
| Svenska | |||
| Norsk/Dansk | |||
| Suomi | |||
| ελληνικά | |||
| 繁體中文 | |||
| 簡体中文 | |||
| 日本語 | |||
| 한국어 | |||
| Русский | |||
| Magyar | |||
| Čeština | |||
| يبرع | |||
| ไทย | |||
| Türkçe | |||
| یسراف | |||
| Tiếng Việt | |||
| Bahasa | |||
| Indonesia | |||
| Română | |||
| Slovenčina | |||
| Auto Source | Off | ||
| On | |||
| High Altitude | Off | ||
| On | |||
| Keypad Lock | Off | ||
| On | |||
| Logo | Default | ||
| User | |||
| Reset | Reset to Default | ||
| Sub-menu | Menu Option |
|---|---|
| Serial Number | |
| Source | |
| Resolution | |
| Refresh Rate | |
| Display Mode | |
| Light Source Hours | |
| Brightness Mode | |
| Firmware Version | System |
| MCU |
Display Menu

| Menu | Description | ||||||||||||||
|---|---|---|---|---|---|---|---|---|---|---|---|---|---|---|---|
| Image Settings | Display Mode
| ||||||||||||||
Brightness
| |||||||||||||||
Contrast
| |||||||||||||||
Sharpness
| |||||||||||||||
Color
| |||||||||||||||
Tint
| |||||||||||||||
Gamma
| |||||||||||||||
Color Settings
| |||||||||||||||
Brightness Mode
| |||||||||||||||
Reset
| |||||||||||||||
| 3D[1] | 3D Mode
| ||||||||||||||
3D Format
| |||||||||||||||
3D Sync Invert
| |||||||||||||||
| Aspect Ratio | Select the aspect ratio of the projected image.
| ||||||||||||||
| Zoom | Reduce or magnify the projected image. | ||||||||||||||
| Keystone |
|
- ↑ This projector is a 3D ready projector with DLP-Link 3D solution. Please make sure your 3D glasses are for DLP-Link 3D. This projector supports frame sequential (page-flip) 3D via the HDMI 1/HDMI 2 ports. For the best performance, 1920 x 1080 resolution is recommended. Please note that 4K (3840 x 2160) resolution is not supported in 3D mode.
Audio Menu

| Menu | Description |
|---|---|
| Mute | Temporarily turn off the sound. |
| Volume | Adjust the volume level. |
Setup Menu

| Menu | Description |
|---|---|
| Projection | Select the preferred projection: Front, Rear, Ceiling-Top, and Rear-Top. |
| Power Settings | Direct Power On Automatically power on the projector when AC power is supplied, without pressing the Power button on the projector or the remote control. |
| Signal Power On Automatically power on the projector when a signal is detected, without pressing the Power button on the projector or on the remote control. | |
| Auto Power Off A countdown timer will start when there is no signal being sent to the projector. The projector will automatically power off when the countdown has finished (in minutes). | |
| Security | Security Enable or disable a password prompt before using the projector.
|
| Security Timer Set the amount of time the projector can be used. Once this time has elapsed you will be requested to enter your password again. | |
| Change Password Set or modify the password. | |
| HDMI CEC | When you connect HDMI CEC-compatible devices to the projector with HDMI cables, you can control them on the same power on or power off status using the HDMI CEC control feature in the projector’s OSD. This lets one device or multiple devices in a group power on or power off via HDMI CEC in a typical configuration.
|
| Test Pattern | Select the test pattern from green grid, magenta grid, white grid, white, or disable this function (off). |
| Options | Language Select the On-Screen Display (OSD) Menu language. |
| Auto Source Automatically find an available input source. | |
| High Altitude When On, the fans will spin faster for better cooling and performance. This is useful for high altitude environments where the air is thin. | |
| Keypad Lock Lock all keypad buttons, except for the Power key.
| |
| Logo Set the “startup screen”. If changes are made, they will take effect the next time the projector is powered on. | |
| Reset | Return the settings to default.
|
Information Menu
View Serial Number, Source, Resolution, Refresh Rate, Display Mode, Light Source Hours, Brightness Mode, and Firmware Version information.

Technical Specifications
| Item | Category | Specifications |
|---|---|---|
| Model | P/N. | LS740HD |
| No. | VS19579 | |
| Projector | Type | Laser |
| Display Size | 30”~300” | |
| Throw Ratio | 1.13~1.47 (100”@2.50m) | |
| Lens | F=2.43~2.78, f=16.901~21.6076 mm | |
| Display System | 1-CHIP DMD | |
| Input Signal | HDMI | fh: 15~102 kHz, fv:23~120 Hz, Pixel rate: 165 MHz |
| Resolution | Native | 1920 x 1080 |
| Power | Input Voltage | DC IN 100-240V, 50/60 Hz (auto switch) |
| Operating Conditions | Temperature | 0°C to 40°C (32°F to 104°F) |
| Humidity | 10% to 80% (non-condensing) | |
| Altitude | 0 to 760 m (0 to 2,500 ft.) at 0°C to 40°C (32°F to 104°F) 760 to 1,520 m (2,500 to 5,000 ft.) at 0°C to 35°C (32°F to 95°F) 1,520 to 3,660 m (5,000 to 12,000 ft.) at 0°C to 30°C (32°F to 86°F) | |
| Storage Conditions | Temperature | -20°C to 60°C (-4°F to 140°F) |
| Humidity | 0% to 90% (non-condensing) | |
| Altitude | 0 to 12,100 m (0 to 40,000 ft.) | |
| Dimensions | Physical (W x H x D) |
286 x 216 x 129 mm (11.26” x 8.50” x 5.08”) |
| Weight | Physical | 3.0 kg (6.61 lbs) |
| Power Consumption | On[1] | 210W (Typical) |
| Off | < 0.5W (Standby) |
- ↑ The test condition follows EEI standards.
Projector Dimensions
286 mm (W) x 129 mm (H) x 216 mm (D)

Timing Chart
HDMI Video Timing
| Timing | Resolution | Refresh Rate (Hz) |
|---|---|---|
| SDTV | 640 x 480 | 60 |
| SDTV (480i) | 720 x 480 | 60 |
| SDTV (480p) | 720 x 480 | 60 |
| SDTV (576i) | 720 x 576 | 50 |
| SDTV (576p) | 720 x 576 | 50 |
| HDTV (720p) | 1280 x 720 | 50 / 60 |
| HDTV (1080i) | 1920 x 1080 | 50 / 60 |
| HDTV (1080p) | 1920 x 1080 | 24 / 50 / 60 |
HDMI PC Timing
| Signal | Resolution | Refresh Rate (Hz) |
|---|---|---|
| VGA | 640 x 480 | 60 / 67 / 72 / 75 |
| 720 x 400 | 70 | |
| SVGA | 800 x 600 | 56 / 60 / 72 / 75 |
| 832 x 624 | 75 | |
| XGA | 1024 x 768 | 60 / 70 / 75 |
| 1152 x 864 | 75 | |
| Quad-VGA | 1280 x 960 | 60 |
| SXGA | 1280 x 1024 | 60 / 75 |
| WXGA+ | 1440 x 900 | 60 |
| WSXGA+ | 1680 x 1050 | 60 |
| WUXGA | 1920 x 1200-RB2 | 59.95 |
| HD | 1280 x 720 | 50 / 60 / 120 |
| 1080P | 1920 x 1080 | 50 / 60 |
| MAC 13" | 640 x 480 | 60 |
| MAC 19" | 1024 x 768 | 75 |
| MAC 21" | 1152 x 870 | 75 |
3D Support Timing
| HDMI 3D | ||
|---|---|---|
| Frame Packing Format | ||
| Timing | Resolution | Refresh Rate (Hz) |
| 1080p | 1920 x 1080 | 24 |
| 720p | 1280 x 720 | 50 / 60 |
| Side by Side Format | ||
| Timing | Resolution | Refresh Rate (Hz) |
| 1080i | 1920 x 1080 | 50 / 60 |
| Top and Bottom Format | ||
| Timing | Resolution | Refresh Rate (Hz) |
| 1080p | 1920 x 1080 | 24 |
LED Indicators
| Status and Description | Power Indicator Light | Temperature Indicator Light | Light Source Indicator Light | |
|---|---|---|---|---|
| Red | Blue | Red | Red | |
| Standby State (Power cord input) |
Steady Light | |||
| Power On (Warming) |
Flashing Light (0.5 sec off/0.5 sec on) |
|||
| Power On and Lamp Lighting | Steady Light | |||
| Power Off (Cooling) |
Flashing Light (0.5 sec off/0.5 sec on) Back to red steady light when the cooling fan turns off. |
|||
| Error (Lamp Failure) |
Steady Light | |||
| Error (Fan Failure) |
Flashing | |||
| Error (Overheat) |
Steady Light | |||
Compliance Information
This section addresses all connected requirements and statements regarding regulations. Confirmed corresponding applications shall refer to nameplate labels and relevant markings on the unit.
FCC Compliant Statement
This device complies with part 15 of FCC Rules. Operation is subject to the following two conditions: (1) this device may not cause harmful interference, and (2) this device must accept any interference received, including interference that may cause undesired operation. This equipment has been tested and found to comply with the limits for a Class B digital device, pursuant to part 15 of the FCC Rules.
These limits are designed to provide reasonable protection against harmful interference in a residential installation. This equipment generates, uses, and can radiate radio frequency energy, and if not installed and used in accordance with the instructions, may cause harmful interference to radio communications. However, there is no guarantee that interference will not occur in a particular installation. If this equipment does cause harmful interference to radio or television reception, which can be determined by turning the equipment off and on, the user is encouraged to try to correct the interference by one or more of the following measures:
- Reorient or relocate the receiving antenna.
- Increase the separation between the equipment and receiver.
- Connect the equipment into an outlet on a circuit different from that to which the receiver is connected.
- Consult the dealer or an experienced radio/TV technician for help.
Warning: You are cautioned that changes or modifications not expressly approved by the party responsible for compliance could void your authority to operate the equipment.
Industry Canada Statement
This Class B digital apparatus complies with Canadian ICES-003.
Cet appareil numérique de classe B est conforme à la norme NMB-003 du Canada.
CAN ICES-003(B)/NMB-003(B)
CE Conformity for European Countries

The device complies with the EMC Directive 2014/30/EU and Low Voltage Directive 2014/35/EU. Ecodesign Directive 2009/125/EC and Radio Equipment Directive 2014/53/EU. (Frequency Range:2400~2483.5 MHz, 5150~5250 MHz) (Max Output Power: under 20 dBm)
The following information is only for EU-member states:
The mark shown to the right is in compliance with the Waste Electrical and Electronic Equipment Directive 2012/19/EU (WEEE). The mark indicates the requirement NOT to dispose of the equipment as unsorted municipal waste, but use the return and collection systems according to local law.
Declaration of RoHS2 Compliance
This product has been designed and manufactured in compliance with Directive 2011/65/EU of the European Parliament and the Council on restriction of the use of certain hazardous substances in electrical and electronic equipment (RoHS2 Directive) and is deemed to comply with the maximum concentration values issued by the European Technical Adaptation Committee (TAC) as shown below.
| Substance | Proposed Maximum Concentration | Actual Concentration |
|---|---|---|
| Lead (Pb) | 0.1% | < 0.1% |
| Mercury (Hg) | 0.1% | < 0.1% |
| Cadmium (Cd) | 0.01% | < 0.01% |
| Hexavalent Chromium (Cr6⁺) | 0.1% | < 0.1% |
| Polybrominated biphenyls (PBB) | 0.1% | < 0.1% |
| Polybrominated diphenyl ethers (PBDE) | 0.1% | < 0.1% |
| Bis (2-ethylhexyl) phthalate (DEHP) | 0.1% | < 0.1% |
| Butyl benzyl phthalate (BBP) | 0.1% | < 0.1% |
| Dibutyl phthalate (DBP) | 0.1% | < 0.1% |
| Diisobutyl phthalate (DIBP) | 0.1% | < 0.1% |
Certain components of products as stated above are exempted under the Annex III of the RoHS2 Directives as noted below. Examples of exempted components are:
- Copper alloy containing up to 4% lead by weight.
- Lead in high melting temperature type solders (i.e. lead-based alloys containing 85% by weight or more lead).
- Electrical and electronic components containing lead in a glass or ceramic other than dielectric ceramic in capacitors, e.g. piezoelectronic devices, or in a glass or ceramic matrix compound.
- Lead in dielectric ceramic in capacitors for a rated voltage of 125 V AC or 250 V DC or higher.
Indian Restriction of Hazardous Substances
Restriction on Hazardous Substances statement (India). This product complies with the “India E-waste Rule 2011” and prohibits use of lead, mercury, hexavalent chromium, polybrominated biphenyls or polybrominated diphenyl ethers in concentrations exceeding 0.1 weight % and 0.01 weight % for cadmium, except for the exemptions set in Schedule 2 of the Rule.
Product Disposal at End of Product Life
ViewSonic® respects the environment and is committed to working and living green. Thank you for being part of Smarter, Greener Computing. Please visit the ViewSonic® website to learn more.
USA & Canada:
https://www.viewsonic.com/us/go-green-with-viewsonic
Europe:
https://www.viewsonic.com/eu/environmental-social-governance/recycle
Taiwan:
https://recycle.moenv.gov.tw/
For EU users, please contact us for any safety/accident issue experienced with this product:
| ViewSonic Europe Limited Flevolaan 38, 1382JZ, Weesp the Netherlands | |
| +31 08000232999 | |
| EPREL@viewsoniceurope.com | |
| https://www.viewsonic.com/eu/ |
Copyright Information
Copyright© ViewSonic® Corporation, 2023. All rights reserved.
Macintosh and Power Macintosh are registered trademarks of Apple Inc.
Microsoft, Windows, and the Windows logo are registered trademarks of Microsoft Corporation in the United States and other countries.
ViewSonic®, the three birds logo, OnView, ViewMatch, and ViewMeter are registered trademarks of ViewSonic® Corporation.
VESA is a registered trademark of the Video Electronics Standards Association. DPMS, DisplayPort, and DDC are trademarks of VESA.
ENERGY STAR® is a registered trademark of the U.S. Environmental Protection Agency (EPA).
As an ENERGY STAR® partner, ViewSonic® Corporation has determined that this product meets the ENERGY STAR® guidelines for energy efficiency.
Disclaimer: ViewSonic® Corporation shall not be liable for technical or editorial errors or omissions contained herein; nor for incidental or consequential damages resulting from furnishing this material, or the performance or use of this product.
In the interest of continuing product improvement, ViewSonic® Corporation reserves the right to change product specifications without notice. Information in this document may change without notice.
No part of this document may be copied, reproduced, or transmitted by any means, for any purpose without prior written permission from ViewSonic® Corporation.
LS740HD_UG_ENG_1a_20230627