

| Sub-menu |
|---|
| HDMI 1 |
| HDMI 2 |
| DisplayPort |
VG3208-4K Full Guide
From ViewSonic Documentation
Introduction
Package Contents
- Monitor
- Power Cord
- Power Adapter
- Video Cable
- Quick Start Guide
Note: The cables included in your package may vary depending on your country. Please contact your local reseller for more information.
Product Overview
-
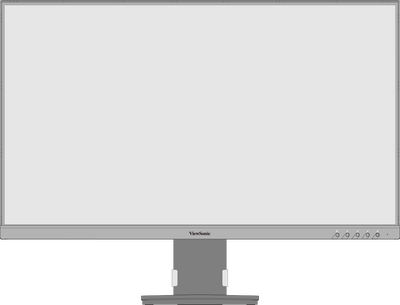 Front View
 -
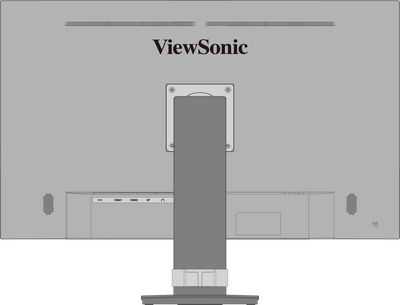 Rear View
I/O Ports

| Number | Description |
|---|---|
| 1 | DC IN |
| 2 | HDMI |
| 3 | DP (DisplayPort) |
| 4 | Audio Out |
Note: For more information about the 1 ★ / 2 / 3 / 4 / 5  key and its functions, refer to Hot Keys.
Initial Setup
Installing the Stand

Note: For safety and to ensure optimal performance, please position the monitor on a flat, stable surface. Failure to do so may lead to the monitor falling, causing damage to the monitor itself and/or posing a risk of personal injury.
Removing the Stand and Mounting the Monitor
Refer to the table below for the standard dimensions for mounting kits.
Note: For use only with a UL certified mounting kit/bracket. To obtain a wall mounting kit or height adjustment base, contact ViewSonic® or your local dealer.
| Maximum Loading | Pad Patten (W x H) |
Pad Hole | Screw Specification | Screw Quantity |
|---|---|---|---|---|
| 14 kg | 100 x 100 mm | Ø 5 mm | M4 x 10 mm | 4 screws |
Note: Mounting kits are sold separately.

Important: Before removing the stand, please turn off the monitor, disconnect all cables, and place the monitor on a flat, stable surface with the screen facing down.
- Remove the stand.
- Attach the mounting bracket to the VESA mounting holes at the rear of the monitor. Then secure it with four screws (M4 x 10 mm).
- Follow the instructions that come with the purchased mounting kit to mount the monitor.
Using the Security Slot

To help prevent the monitor from being stolen, use a security slot locking device to secure the monitor to a fixed object.
Additionally, fastening the monitor to a wall or fixed object using a security cable can help support the weight of the monitor in order to prevent the monitor from falling over.
Making Connections
Connecting to Power

- Connect the power adapter to the DC IN jack at the rear of the monitor.
- Plug the power cord plug into a power outlet.
Connecting to External Devices

Using the Monitor
Adjusting the Viewing Angle
Height Adjustment

Lower or raise the monitor to the desired height (0 to 90 mm).
Note: When adjusting, press down firmly along the adjustment track.
Swivel Adjustment

Swivel the monitor to the left or right for the desired viewing angle (± 360˚).
Tilt Adjustment

Tilt the monitor forwards or backwards to the desired viewing angle (-4˚ to 20˚).
Note:
- When adjusting, support the stand firmly with one hand while tilting the monitor forwards or backwards with the other hand.
- The monitor must be lifted to the highest position, then it can support 40° tilt.
Turning the Monitor On/Off

- Plug the connected power adapter into a power outlet.
- Press the Power button to turn on the monitor.
- To turn the monitor off, press the Power button again.
Note: The monitor will still consume some power as long as the power cord is connected to the power outlet. If the monitor is not being used for a long period of time, please disconnect the power plug from the power outlet.
Using the Control Panel Keys
Use the Control Panel Keys ( 1 ★ / 2 / 3 / 4 / 5 ) to access the Quick Menu, activate Hot Keys, navigate the On-Screen Display (OSD) Menu, and change the settings.

Quick Menu
Press the 1 ★ key to activate the Quick Menu.

Note: Follow the key guide that appears on the screen to select the option or make adjustments.
| Menu | Description | |
|---|---|---|
| ViewMode | Select one of the preset color settings. | |
| Volume | Adjust the level, or mute the volume. | |
| Contrast/Brightness | Adjust the contrast or brightness level. | |
| Input Select | Select the input source. | |
| Exit | Exit the Quick Menu. | |
Hot Keys
When the On-Screen Display (OSD) Menu is off, you can quickly access special functions by using the Control Panel Keys.
| Key | Description |
|---|---|
| 1 ★ + 2 | Press and hold the keys to lock/unlock the OSD Menu. When the menu appears on the screen, continue holding both keys for 10 seconds to lock/unlock the OSD Menu  If the OSD Menu is locked, the below message will appear on the screen:  |
| 1 ★ + 4 | Press and hold the keys to lock/unlock the Power button. When the menu appears on the screen, continue holding the key for 10 seconds to lock/unlock the Power button.  If the Power button is locked, the below message will appear on the screen.  |
| 3 + 4 | Press and hold the keys to display/hide the boot up screen when the device is turned on.  |
Configuring the Settings
General Operations
- Press the 2 / 3 / 4 key to display the On-Screen Display (OSD) Menu.
- Press the 1 ★ or 2 key to select the main menu. Then press the 3 key to enter the selected menu.
- Press the 1 ★ or 2 key to select the desired menu option. Then press the 3 key to enter the sub-menu.
- Press the 1 ★ or 2 key to adjust/select the setting. Then press the 3 key to confirm.
- Press the 4 key to return to the previous menu.


Note: Certain menu option adjustments do not require the user to press the 3 key to confirm the selection. Follow the key guide that appears on the screen to select the option or make adjustments.
Note: To exit the OSD menu, Press the 5 key.
Appendix
Product Specifications
| Item | Category | Specifications |
|---|---|---|
| LCD | Type | VA, Color a-Si TFT Active Matrix 3840 x 2160 (UHD)
LCD; 0.18159 (H)mm x 0.18159 (V)mm pixel pitch |
| Display Size | 80 cm | |
| 31.5” | ||
| Color Filter | RGB Vertical Stripe | |
| Glass Surface | Anti-Glare (Haze 25%), Hard Coating (3H) | |
| Input Signal | Video Sync | TMDS digital (100 Ω)
|
| Compatibility | PC | up to 3840 x 2160 |
| Macintosh | up to 3840 x 2160 | |
| Resolution and Timings[1] | Recommended | 3840 x 2160 @ 60 Hz |
| Supported |
| |
| Power[2] | Input Voltage | AC 100-240V, 50/60 Hz (auto switch) |
| Display Area | Active Size (H x V) |
697.31 x 392.23 mm |
| 27.45” x 15.44” | ||
| Operating Conditons | Altitude | 5 km |
| 16,404.2 ft | ||
| Relative Humidity | 20% to 90% (non-condensing) | |
| Temperature | 0° C to 40° C | |
| 32° F to 104° F | ||
| Storage Conditions | Altitude | 12 km |
| 39,370.1 ft | ||
| Relative Humidity | 5% to 90% (non-condensing) | |
| Temperature | -20° C to 60° C | |
| -4° F to 140° F | ||
| Dimensions
(with stand) |
Physical (W x H x D) |
714.3 x 546 x 213 mm |
| 28.1” x 21.5” x 8.4” | ||
| Weight
(with stand) |
Physical | 7.9 kg |
| 17.4 lb | ||
| Wall Mount | Dimensions | 100 x 100 mm |
| Power Consumption | On[3] | 185W (Typical) without audio |
| Standby/Sleep | < 0.5W | |
| Off | < 0.3W (Maximum) |
On-Screen Display (OSD) Menu Tree
| Sub-menu | Menu Option |
|---|---|
| Volume | (-/+, 0~100) |
| Mute | On |
| Off |
| Sub-menu |
|---|
| Standard |
| Game |
| Movie |
| Web |
| Text |
| MAC |
| Mono |
| Sub-menu | Menu Option | ||
|---|---|---|---|
| Contrast/Brightness | Contrast | (-/+, 0~100) | |
| Brightness | (-/+, 0~100) | ||
| Color Temperature | sRGB | ||
| Bluish | |||
| Cool | |||
| Native | |||
| Warm | |||
| User Color | Red | (-/+, 0~100) | |
| Green | (-/+, 0~100) | ||
| Blue | (-/+, 0~100) | ||
| Color Space | Auto | ||
| RGB | |||
| YUV | |||
| Color Range | Auto | ||
| Full Range | |||
| Limited Range | |||
| HDR | Auto | ||
| Off | |||
| Sub-menu | Menu Option |
|---|---|
| Sharpness | (-/+, 0/25/50/75/100) |
| Blue Light Filter | (-/+, 0~100) |
| Aspect Ratio | 4:3 |
| 5:4 | |
| 16:9 | |
| 16:10 | |
| Overscan | On |
| Off | |
| Black Stabilization | (-/+, 0/10/20/30/40/50/60/70/80/90/100) |
| Advanced DCR | (-/+, 0/25/50/75/100) |
| Response Time | Standard |
| Advanced | |
| Ultra Fast |
| Sub-menu | Menu Option | |
|---|---|---|
| Language | English | |
| Français | ||
| Deutsch | ||
| Español | ||
| Italiano | ||
| Suomi | ||
| Русский | ||
| Türkçe | ||
| Česká | ||
| Tiếng Việt | ||
| 日本語 | ||
| 한국어 | ||
| 繁體中文 | ||
| 简体中文 | ||
| Information | ||
| OSD Size | Native | |
| Large | ||
| OSD Timeout | (-/+, 5/15/30/60) | |
| OSD Background | On | |
| Off | ||
| Power Indicator | On | |
| Off | ||
| Auto Power Off | On | |
| Off | ||
| Sleep | 30 minutes | |
| 45 minutes | ||
| 60 minutes | ||
| 120 minutes | ||
| Off | ||
| ECO Mode | Standard | |
| Optimize | ||
| Conserve | ||
| Auto Detect | On | |
| Off | ||
| DDC/CI | On | |
| Off | ||
| Memory Recall | ||
Safety Precautions
Please read these instructions completely before using the equipment.
- Keep this user guide in a safe place for later reference.
- Read all warnings and follow all instructions.
- Sit at least 18" (45 cm) away from the device.
- Allow at least 4" (10 cm) clearance around the device to ensure proper ventilation.
- Place the device in a well-ventilated area. Do not place anything on the device that prevents heat dissipation.
- Do not use the device near water. To reduce the risk of fire or electric shock, do not expose the device to moisture.
- Avoid exposing the device to direct sunlight or other sources of sustained heat.
- Do not install near any heat sources such as radiators, heat registers, stoves, or other devices (including amplifiers) that may increase the temperature of the device to dangerous levels.
- Use a soft, dry cloth to clean the external housing. For more information, refer to the "Maintenance" section of this manual.
- Avoid touching the screen, as oil may collect on the screen if you touch it.
- Do not touch the screen surface with sharp or hard objects, as it may cause damage to the screen.
- Do not place the device on cloth or other materials that may be placed between the product and supporting furniture.
- When moving the device, be careful not to drop or bump the device on anything.
- Do not place the device on an uneven or unstable surface. The device may fall over resulting in an injury or a malfunction.
- Do not place any heavy objects on the device or connection cables.
- Always use cabinets, stands, or installation methods recommended by the manufacturer of the device set.
- Always use furniture that can safely support the device.
- Always ensure the device is not overhanging the edge of the supporting furniture.
- Do not place the device on tall furniture, such as cupboards or bookcases, without anchoring both the furniture and the device to a suitable support.
- Always educate children about the dangers of climbing on furniture to reach the device or related equipment.
- Do not place the monitor where children are likely to be present.
- Do not place items that might tempt children to climb, such as toys and remote controls, on the top of the device or furniture on which the product is placed.
- If smoke, an abnormal noise, or a strange odor is present, immediately turn the device off and call your dealer or ViewSonic®. It is dangerous to continue using the device.
- Do not attempt to circumvent the safety provisions of the polarized or grounding-type plug. A polarized plug has two blades with one wider than the other. A grounding-type plug has two blades and a third grounding prong. The wide blade and the third prong are provided for your safety. If the plug does not fit into your outlet, obtain an adapter and do not attempt to force the plug into the outlet.
- When connecting to a power outlet, Do not remove the grounding prong. Please ensure grounding prongs are never removed.
- Always route and manage cords and cables connected to your device so they cannot be tripped over, pulled, or grabbed.
- Protect the power cord from being treaded upon or pinched, particularly at the plug, and at the point where it emerges from the equipment. Ensure that the power outlet is located near the equipment so that it is easily accessible.
- Disconnect the power plug from the power outlet if the device is not being used for a long period of time.
- Please confirm the distribution system installed in the building. The system should provide a circuit breaker rated at 120/240V, 20A.
- Only use attachments/accessories, such as carts, stands, tripods, brackets or tables, specified by the manufacturer.
- When a cart is used, use with caution when moving the cart/equipment combination to avoid injury from tipping over.
- Refer all servicing to qualified service personnel. Service will be required when the unit has been damaged in any way, such as:
- if the power-supply cord or plug is damaged.
- if liquid is spilled onto or objects fall into the unit.
- if the unit is exposed to rain or moisture.
- if the unit does not operate normally or has been dropped.
- When using ear-/headphones, adjust the volume to appropriate levels, or hearing damage may result.
- Stability Hazard: The display may fall, causing serious personal injury or death. To prevent injury, this display must be securely attached to the floor/wall in accordance with the installation instructions.
- Fastening the display to a wall or fixed object using cordage or other restraining devices can help support the weight of the display in order to prevent the display from falling over.
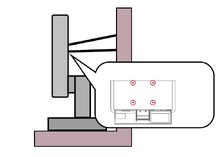
Note:
- Restraining device/cordage should be able to withstand 100N force.
- Make sure the cordage is straightened, and any slack is removed. The back of the device shall face the wall to ensure the device cannot tilt under external force.
- Make sure the display does not tilt under external force at any height and rotation angle of the device.
- If the existing display is going to be retained and relocated, the same considerations as above should be applied.
VG3208-4K_UG_ENG_1a_20240830