CDE4312 Introduction: Difference between revisions
From ViewSonic Documentation
No edit summary |
|||
| (27 intermediate revisions by the same user not shown) | |||
| Line 1: | Line 1: | ||
<noinclude> | <noinclude> | ||
{{ | {{Sticky_Menu_Commercial_Display | ||
|1=CDE4312_Introduction | |1=CDE4312_Introduction | ||
|2=CDE4312_Remote_Control | |2=CDE4312_Remote_Control | ||
|3= | |3=CDE4312_Connecting_Devices | ||
|4= | |4=CDE4312_Using_the_Display | ||
|5= | |5=CDE4312_General_Settings | ||
|6=CDE4312_On-Screen_Display_Menu | |6=CDE4312_On-Screen_Display_Menu | ||
|7= | |7=CDE4312_Embedded_Applications | ||
|8 | |8=CDE4312_RS-232_Protocols | ||
|9=CDE4312_Specifications | |||
| | |10=CDE4312_Regulatory_and_Service_Information | ||
| | |||
}} | }} | ||
</noinclude> | </noinclude> | ||
=Package Contents= | =Package Contents= | ||
{{Two_Columns | |||
<ol style="list-style-type:square | |1=<ol style="list-style-type:square;"> | ||
<li>HDMI Cable (1.8 m/5.9 ft)</li> | <li>HDMI Cable (1.8 m/5.9 ft)</li> | ||
<li>Power Cable (1.8 m/5.9 ft)</li> | <li>Power Cable (1.8 m/5.9 ft)</li> | ||
| Line 27: | Line 25: | ||
<li>Wall Mount Screw x 4</li> | <li>Wall Mount Screw x 4</li> | ||
<li>LCD Display</li></ol> | <li>LCD Display</li></ol> | ||
|2=CDE12_Package_Contents.png | |||
}} | |||
{{Note|The cables included in your package may vary depending on your country. Please contact your local reseller for more information.}} | |||
=Wall Mount Kit Specifications (VESA)= | =Wall Mount Kit Specifications (VESA)= | ||
Please follow the instructions in the wall mount installation guide to install your wall mount or mobile mount bracket. If attaching to other building materials, please contact your nearest dealer. | Please follow the instructions in the wall mount installation guide to install your wall mount or mobile mount bracket. If attaching to other building materials, please contact your nearest dealer. | ||
<div class="res-img">[[File: | <div class="res-img">[[File:CDE4312_VESA.png|600px| Wall Mount Kit Specifications]]</div> | ||
{| class="wikitable" style="text-align:center; | {| class="wikitable" style="text-align:center; width:60%; background-color:#ffffff;" | ||
! style="font-weight:bold; background-color:# | ! style="font-weight:bold; background-color:#c8102e; color:#ffffff;"| Model | ||
! style="font-weight:bold; background-color:# | ! style="font-weight:bold; background-color:#c8102e; color:#ffffff;"| VESA Spec. (A x B) | ||
! style="font-weight:bold; background-color:# | ! style="font-weight:bold; background-color:#c8102e; color:#ffffff;"| Standard Screw (C x D) | ||
! style="font-weight:bold; background-color:# | ! style="font-weight:bold; background-color:#c8102e; color:#ffffff;"| Quantity | ||
|- | |- | ||
| | | CDE4312 | ||
| | | 200 x 200 mm | ||
| | | M6 x 10 mm | ||
| 4 | | 4 | ||
|} | |} | ||
{{ | {{Important| | ||
:*Do not use screws that are longer than the standard dimension, as they may cause damage to the inside of the display. | |||
:*Only mount the display in landscape orientation. Never mount in a portrait orientation. | |||
}} | |||
:<div class="res-img">[[File:LFD_Safety_Screen_Orientation_Notice.png|Screen Orientation Safety Notice|500px|link=]]</div> | |||
=Product Overview= | =Product Overview= | ||
===Front Control Panel=== | ===Front Panel=== | ||
<div class="res-img">[[File: | <div class="res-img">[[File:CDE4312_Front_Panel.png|CDE4312 Front Panel|500px]]</div> | ||
{| class="wikitable" style="text-align:center; | |||
===Rear Panel=== | |||
<div class="res-img">[[File:CDE4312_Rear_Panel.png|CDE4312 Rear Panel|500px]]</div> | |||
===Control Panel=== | |||
<div class="res-img">[[File:CDE4312_Control_Panel.png|CDE4312 Control Panel|200px]]</div> | |||
{| class="wikitable" style="text-align:center; width:60%; background-color:#ffffff;" | |||
|- | |- | ||
! style="font-weight:bold; background-color:# | ! style="font-weight:bold; background-color:#c8102e; color:#ffffff;"| Number | ||
! style="font-weight:bold; background-color:# | ! style="font-weight:bold; background-color:#c8102e; color:#ffffff;"| Button | ||
! style="font-weight:bold; background-color:#c8102e; color:#ffffff;"| Description | |||
|- | |- | ||
| style="font-weight:bold;" | 1 | | style="font-weight:bold;" | 1 | ||
| style="text-align:left;" | | | Power | ||
| style="text-align:left;"| | |||
* Press to turn ON/OFF the display. | |||
*Press to turn | |||
|- | |- | ||
| style="font-weight:bold;" | 2 | | style="font-weight:bold;" | 2 | ||
| style="text-align:left;" | | | Volume | ||
| style="text-align:left;"| | |||
* In the OSD menu, press the '''VOL+/VOL-''' key to adjust the value of the selected item. | |||
* Adjust the volume level. | |||
|- | |- | ||
| style="font-weight:bold;" | 3 | | style="font-weight:bold;" | 3 | ||
| style="text-align:left;"| | | Channel | ||
| style="text-align:left;"| | |||
* Press the '''SOURCE''' key to enter the input source menu, and press '''CH+/CH-''' to select the signal source. | |||
* Press the '''CH+/CH-''' key to select an item in the OSD menu. | |||
|- | |- | ||
| style="font-weight:bold;" | 4 | | style="font-weight:bold;" | 4 | ||
| | | Source/Menu | ||
| style="text-align:left;"| | |||
* Press the '''MENU''' key to enter the main menu. | |||
* Press the '''SOURCE''' key to confirm the operation under the OSD menu operations. | |||
* Confirm the operation in the input source menu. | |||
| style="text-align:left;" | | |||
* | |||
* | |||
* | |||
|- | |- | ||
|} | |} | ||
===I/O Panels=== | ===I/O Panels=== | ||
<div class="res-img">[[File: | <div class="res-img">[[File:CDE4312_IO_Panel.png|CDE4312 I/O Panel|600px]]</div> | ||
{| class="wikitable" style="text-align:center; | {| class="wikitable" style="text-align:center; width:60%; background-color:#ffffff;" | ||
|- | |- | ||
! style="font-weight:bold; background-color:# | ! style="font-weight:bold; background-color:#c8102e; color:#ffffff;"| Number | ||
! style="font-weight:bold; background-color:# | ! style="font-weight:bold; background-color:#c8102e; color:#ffffff;"| Port | ||
! style="font-weight:bold; background-color:# | ! style="font-weight:bold; background-color:#c8102e; color:#ffffff;"| Description | ||
|- | |- | ||
| style="font-weight:bold;" | 1 | | style="font-weight:bold;" | 1 | ||
| | | AC IN | ||
| style="text-align:left;" | | | style="text-align:left;" | AC power input. | ||
|- | |- | ||
| style="font-weight:bold;" | 2 | | style="font-weight:bold;" | 2 | ||
| | | Audio Out | ||
| style="text-align:left;" | | | style="text-align:left;" | Audio output to an external speaker. | ||
|- | |- | ||
| style="font-weight:bold;" | 3 | | style="font-weight:bold;" | 3 | ||
| | | LAN | ||
| style="text-align:left;" | | | style="text-align:left;" | Standard RJ45 (10M/100M) Internet connection interface. | ||
|- | |- | ||
| style="font-weight:bold;" | 4 | | style="font-weight:bold;" | 4 | ||
| | | SPDIF | ||
| style="text-align:left;" | | | style="text-align:left;" | Multichannel sound via optical signals. | ||
|- | |- | ||
| style="font-weight:bold;" | 5 | | style="font-weight:bold;" | 5 | ||
| | | RS-232 | ||
| style="text-align:left;" | | | style="text-align:left;" | Serial interface; used for mutual transfer of data between devices. | ||
|- | |- | ||
| style="font-weight:bold;" | 6 | | style="font-weight:bold;" | 6 | ||
| | | Audio/Video | ||
| style="text-align:left;" | | | style="text-align:left;" | Audio and video input; connect with a media device. | ||
|- | |- | ||
| style="font-weight:bold;" | 7 | | style="font-weight:bold;" | 7 | ||
| | | USB 2.0 | ||
| style="text-align:left;" | | | style="text-align:left;" | Connect USB devices such as hard disks, keyboard, mouse, etc. (Output rating: 5Vdc/500mA). | ||
|- | |- | ||
| style="font-weight:bold;" | 8 | | style="font-weight:bold;" | 8 | ||
| | | USB Type-C | ||
| style="text-align:left;" | | | style="text-align:left;" | USB Type-C input; connect to a PC with USB Type-C output. (Output rating: 5Vdc/3.0A). | ||
|- | |- | ||
| style="font-weight:bold;" | 9 | | style="font-weight:bold;" | 9 | ||
| | | HDMI 1 | ||
| style="text-align:left;" | | | style="text-align:left;" | High definition input; connect to a PC with HDMI output, set-top box, or other video device. | ||
|- | |- | ||
| style="font-weight:bold;" | 10 | | style="font-weight:bold;" | 10 | ||
| | | HDMI 2 (ARC) | ||
| style="text-align:left;" | | | style="text-align:left;" | High definition input; connect to a PC with HDMI output, set-top box, or other video device. | ||
|- | |- | ||
|} | |} | ||
{{#seo: | {{#seo: | ||
|title=ViewSonic | |title=ViewSonic Commercial Display | ||
|title_mode=append | |title_mode=append | ||
|keywords=ViewSonic, ViewBoard, CDE4312, Introduction | |keywords=ViewSonic, ViewBoard, CDE4312, Introduction | ||
Latest revision as of 06:07, 23 January 2026
Package Contents
|
 |
Note: The cables included in your package may vary depending on your country. Please contact your local reseller for more information.
Wall Mount Kit Specifications (VESA)
Please follow the instructions in the wall mount installation guide to install your wall mount or mobile mount bracket. If attaching to other building materials, please contact your nearest dealer.

| Model | VESA Spec. (A x B) | Standard Screw (C x D) | Quantity |
|---|---|---|---|
| CDE4312 | 200 x 200 mm | M6 x 10 mm | 4 |
Important:
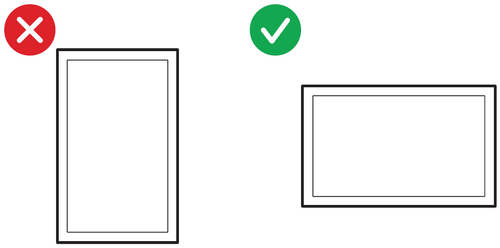
- Do not use screws that are longer than the standard dimension, as they may cause damage to the inside of the display.
- Only mount the display in landscape orientation. Never mount in a portrait orientation.
Product Overview
Front Panel

Rear Panel

Control Panel

| Number | Button | Description |
|---|---|---|
| 1 | Power |
|
| 2 | Volume |
|
| 3 | Channel |
|
| 4 | Source/Menu |
|
I/O Panels

| Number | Port | Description |
|---|---|---|
| 1 | AC IN | AC power input. |
| 2 | Audio Out | Audio output to an external speaker. |
| 3 | LAN | Standard RJ45 (10M/100M) Internet connection interface. |
| 4 | SPDIF | Multichannel sound via optical signals. |
| 5 | RS-232 | Serial interface; used for mutual transfer of data between devices. |
| 6 | Audio/Video | Audio and video input; connect with a media device. |
| 7 | USB 2.0 | Connect USB devices such as hard disks, keyboard, mouse, etc. (Output rating: 5Vdc/500mA). |
| 8 | USB Type-C | USB Type-C input; connect to a PC with USB Type-C output. (Output rating: 5Vdc/3.0A). |
| 9 | HDMI 1 | High definition input; connect to a PC with HDMI output, set-top box, or other video device. |
| 10 | HDMI 2 (ARC) | High definition input; connect to a PC with HDMI output, set-top box, or other video device. |