ViewSign Desktop Advanced Guide Options Menu
Options Menu
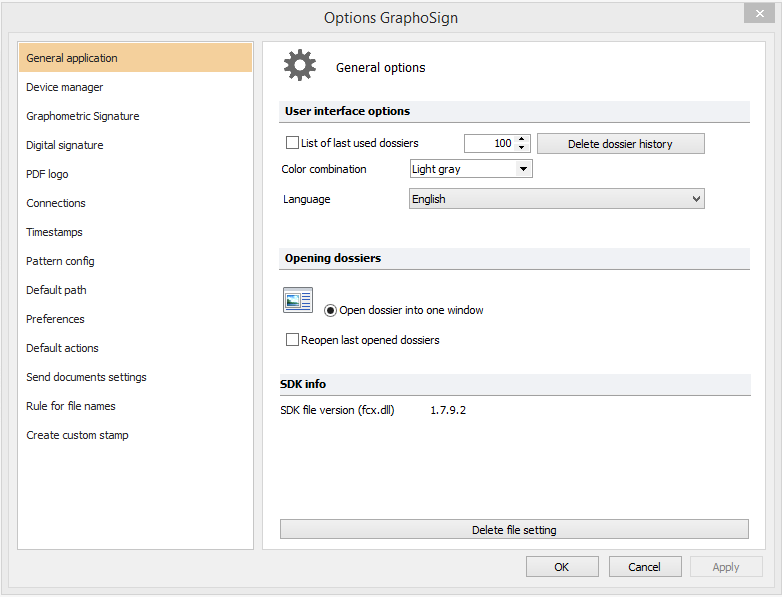
By choosing File > Options the following window will appear with 14 configuration sections available.
After any change in user options, the "Apply" button is enabled and you will need to click it and then click OK to confirm the changes. Options are saved in an .ini file in the path:
C:\Users\[User]\AppData\Roaming\Namirial\ViewSign Desktop 1\settings.ini
where [USER] represents the current Windows user profile. There isn't a function that allows you to automatically replicate the options for all of the available user profiles on your PC.
Changing one or more options across the various functions available provides a customized software configuration for your specific needs, saved in your user profile on the PC.
General Application
The application’s General section consists of three groups of options:
- User Interface Options
- Opening Dossiers
- SDK Info
User Interface Options
This group allows you to enable the history of saved files, as well as the overall theme and language settings of the application.
- Latest dossier used list:
- When selected this check box allows you to store a list of the last "N" opened dossiers. The number "N" is a user defined number that is entered in the Next box by the user. In the example it is set to 100.
- Clear History dossier:
- This button deletes all the items described in the preceding paragraph.
- Color scheme:
- Allows you to customize the combination of menu color and the initial screen of the program. Three options are available: Light gray, White, Dark gray.
- Language:
- Sets the language of the menu items, labels, buttons, and user messages.
Opening Dossiers
This group specifies the program's startup options.
- Open dossier in the same window:
- ViewSign Desktop cannot run more than one session/instance at a time. You must close an existing session in order to start a new instance of the application.
- Reopen the last open dossier at program startup:
- This checkbox, if checked, allows you to re-open the last file saved in your history list when you start the program.
SDK Info
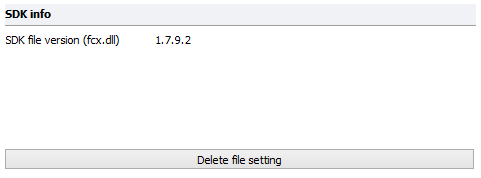
In this group you can read the SDK version of signature. The differences between the various versions can be read in the "ChangeLog" section of online help.
With this button user can delete any saved user settings and restore the software default values.
Device Manager
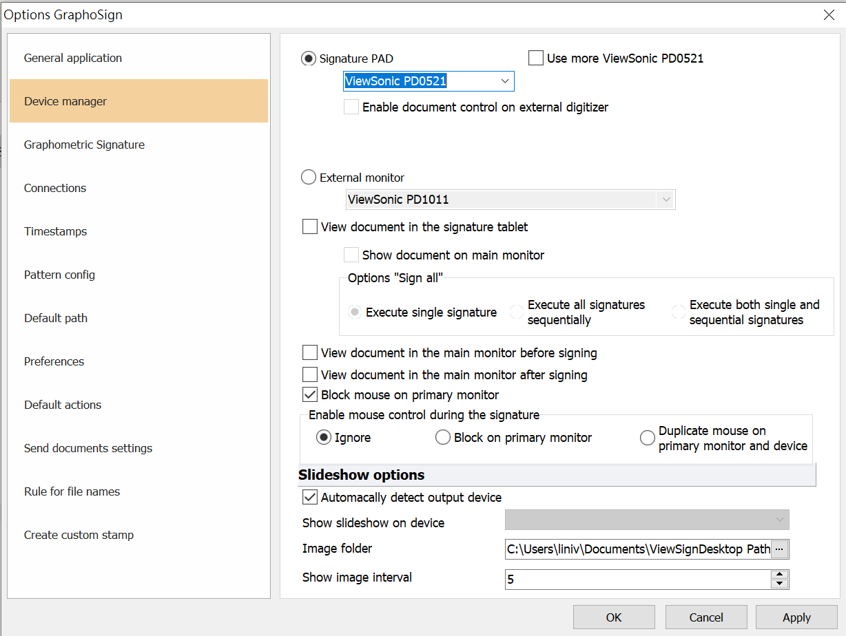
The Device Management section allows you to specify which device to use for graphometric signing and other document signing options.
Graphometric Signature Devices
The signing devices are divided into three main categories: eSignature Pads, Tablet PC’s with integrated digitizers and external tablets that can also be used as an External Monitor (Signature Display).
- Signature Pad
- If you choose this option, the signature will be captured and displayed on a Signature Pad connected to a USB port on your PC. These tablets aren't additional monitor so you cannot see the entire document in the tablet display, but only the signature area. The checkbox "Enable document control on external digitizer" will show a series of buttons on the signature pad that allow browsing the document directly from the signature pad.
- Table PC (with integrated digitizer)
- This option applies to all Tablet PC devices with built-in digitizer that have been certified by Namirial SPA. If you use ViewSign Desktop with one of these tablets you can choose this option, so the capture window of signature will be shown directly on the Tablet PC screen.
- External Monitor (Signature Display)
- You can specify from many certified devices that can be used as a combination external monitor and signature capture device.
View Document in the Primary Monitor or Table Signature
When the checkbox is enabled this option allows you to preview the document directly on the connected Signature Display. In the absence of a suitable signature capture device you could also specify a secondary monitor.
Project Secondary Monitor on the Primary Monitor
When enabled this option allows you to see what is shown in the second monitor or in the configured signature tablet simultaneously on the main monitor. The preview of the second monitor is also displayed when you choose the "edit document on secondary monitor" or "fill the document on secondary monitor" or during a signing session.
Options "Sign all"
These options are available when you run a signature process using a signature template.
- Run single signature
- If selected forces the user to select one single field from the document. After selecting with a single click, signature process starts.
- Run sequentially all the signatures
- If selected allows you to sign in sequence all signature areas and signature fields without selecting. In the case of a document with many signature fields to be signed, if the user does not need to individually select the fields, then user can choose this option in order to have a unique signature process.
- Run the signatures individually or sequentially
- If selected, this mode of signing leaves the user free to select a single field to sign, or to sign all the fields into a single signature flow.
View Document in the Primary Monitor Before the Signing
If you select this option allows you to preview your document before starting a signature process.
View Document in the Primary Monitor After the Signing
If selected this option enables you to view the signed document after the signature process end. This allows the user to review and confirm the signatures affixed, or repeat them if necessary.
Lock Mouse in the Main Monitor
Selecting this option while using an External Monitor/Signature Display will lock the mouse cursor on the primary monitor while the pen is signing on the Signature Display.
Enable Mouse Control During the Signing
This group of options allows you to manage mouse control and cursor locking during signature capture when you use a Signature Display, or when there are at least two monitors connected to the same PC.
- Ignore, no blocking.
- Block on the main monitor, mouse cursor is blocked during the signature process.
- Duplicate mouse on primary monitor and Signature Display. Unlock the mouse and allows mouse cursor to be controlled either by the PC mouse or the pen on the Signature Display.
You can display photos, looping as digital signage, a screensaver or advertisement on the secondary screen when using a multiple monitor configuration or when connected to an external device or Signature Display.
The option "Automatically detect" device allows the automatic detection of the output device for the slideshow/signage/advertising images. If not specified, you can force the presentation onto a device selected in "Show images into device" choice. ViewSign Desktop reads images from the specified folder "images folder" every n seconds, and displays the images sequentially from the “images folder”. The frequency can be specified in "Show image every (sec)".
Graphometric Signature
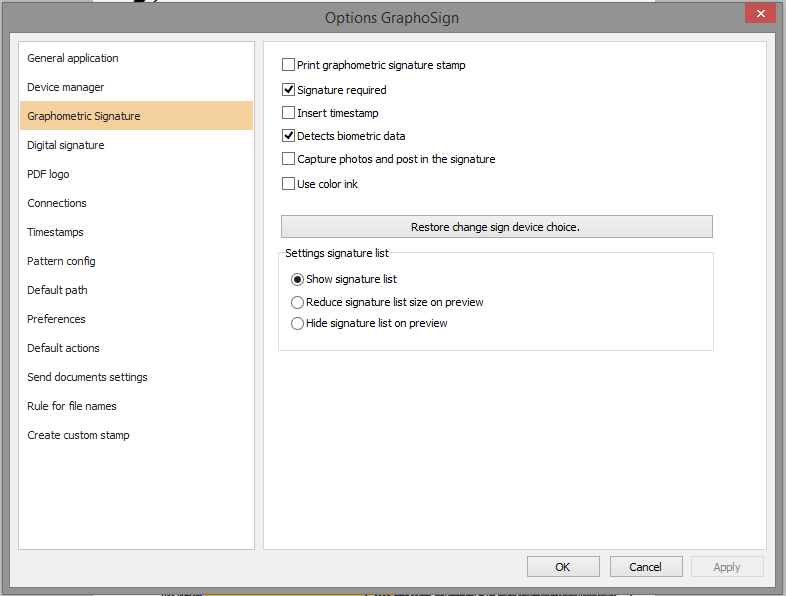
This group of options allows you to specify the properties of the signature fields that are created by ViewSign Desktop and other options related to the graphometric signature.
Print the Signature Stamp Graphometric
If selected, ViewSign Desktop will affix a default logo in the signed document at the bottom right. This logo gives evidence that the output is a digitally signed, complete and original document.
Signature Required
If selected when a user creates a signature area or a signature field, the signature of this field is mandatory.
Append Timestamp
If selected, a timestamp will be captured and written into the pdf during signature capture.
Detect Biometric Data
If selected a user's biometric signature data (acceleration, pressure, and pen strokes) are captured and included in the signature. Biometric data are encrypted and embedded in the pdf.
Capture Photos and Insert in the Signature
If selected with the data listed above, ViewSign Desktop will add a picture that will be captured during the signing process. Use color ink , if selected allows you to choose between blue, green and red as the color of ink used for handwritten signature on the document.
Use Color Ink
If selected allows you to choose between blue, green and red as the color of ink used for handwritten signature on the document.
Reset Choice of Signing
The "Restore chosen signature device" button allows you to reset the choice of digital certificate to use prior to signing. The button it's disabled when no certificate info are stored or used in capturing signatures.
Settings Signature List
These options affect the signing of the document preview area, and respectively, if selected, allow you to: View the list of signatures to be signed, reduce the width of this list so that you have more space to show the preview of the document, or completely hide the list.
Digital Signature
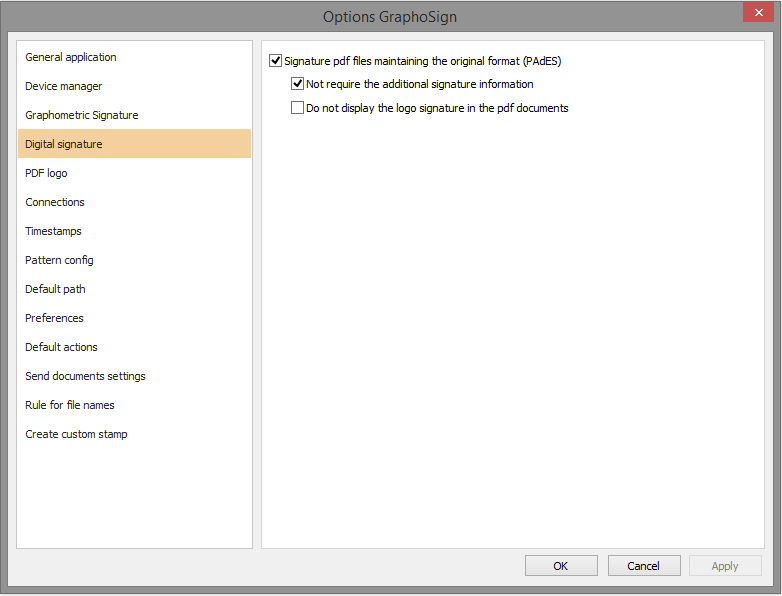
This group of options applies to digitally signing PDF documents. ViewSign Desktop supports only the kind of PAdES signature. When you affix a digital signature using the appropriate menu "DIGITAL SIGNATURE" it's possible to request additional information and allow the user the ability 'to place the digital signature logo in where they choose.
Signature Files Keeping the Original Format (PAdES)
This option is 'read-only, non-editable' because ViewSign Desktop only handles either signing in PAdES format or digitally signing PDF documents. See this link for more information: http://www.agid.gov.it/sites/default/files/repository_files/linee_guida/firme_multiple.pdf
Not Require the Additional Signing Information
If you check this item, ViewSign Desktop does not show the following screen.
Do Not Show the Signature in PDF Documents Logo
If you check this item, ViewSign Desktop does not print the default logo Namirial, or custom logo, in a digitally signed document.
Connections
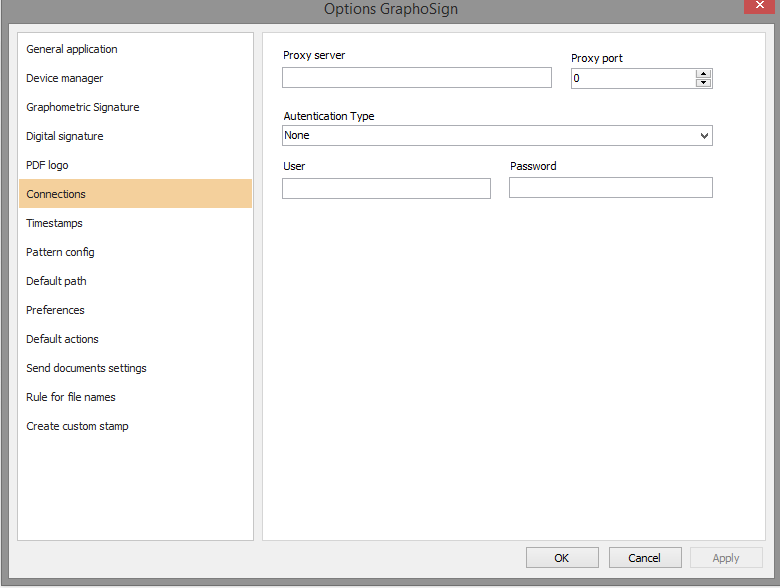
To perform certain operations, such as signature verification or request for the license confirmation, ViewSign Desktop connects to public web services. In certain IT configurations, internet browsing is only allowed through a proxy server. The connection settings with proxy servers can be specified in this section.
The planned connection options are:
Proxy Server and Proxy Port
These options must specify the URL of the proxy server and any port to connect to.
Authentication Type
This option specifies the type of protocol to be used for client authentication.
User and Password
If required by proxy connection need to specify the parameters for the Authentication.
Timestamps
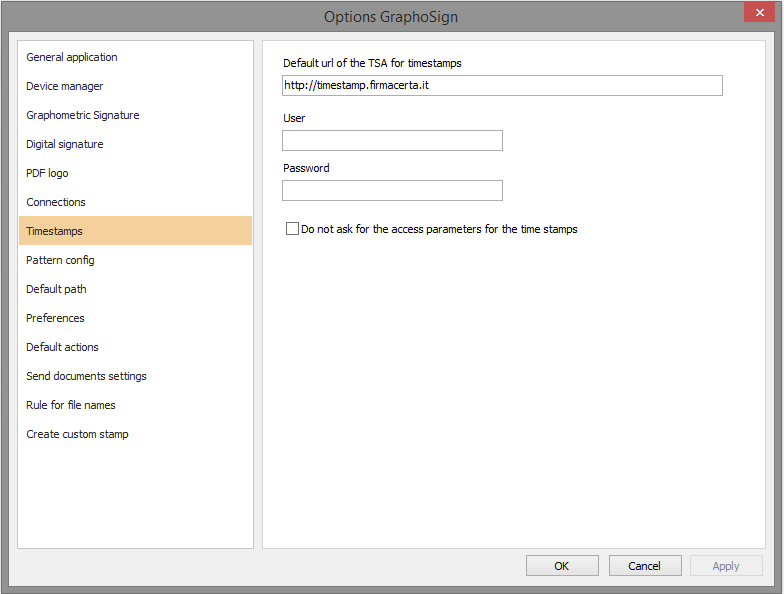
ViewSign Desktop enables affixing a time stamp to a PDF document. The Namirial server for time stamps is timestamp.firmacerta.it. To connect to this server credentials are needed: username and password.
The "Do not require a login parameters for timestamps" allows you to store credentials for subsequent logins.
Pattern Configuration
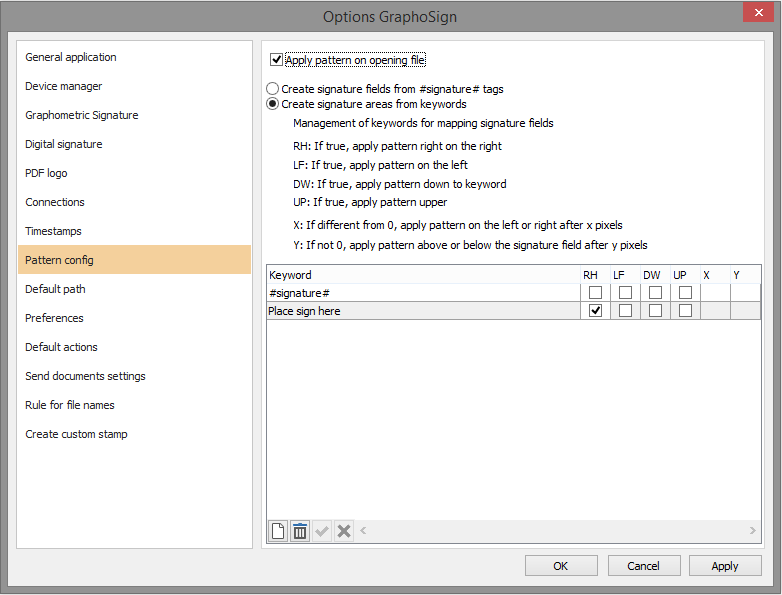
For some PDF documents is not possible to create a signature template because the content of the document is dynamic, so you do not know the position of the signature in the document. In order to speed up the process of signing a document, ViewSign Desktop has the pattern search function.
A pattern or string is a sequence of one or more words that occur in the PDF document. Applying a mapping function will create a signature of the dimensions of the selected signature device in the vicinity 'of every occurrence of that word.
The options for this functionality are:
Apply mapping at the opening of the file
With this option, ViewSign Desktop automatically executes the search and mapping of keyword process or pattern when first opening the document and places signatures accordingly.
Create tag signature fields #signature#
This option allows you to create a signature field for each occurrence of the word "#signature#" within the document. In addition to the #signature# text you can also specify a range of parameters. An example of tag signature is signature # # @ ep [key1 = value1 | key2 = value2].
The keys and the possible values are listed below:
- fid = (use a double colon [::] to indicate space)
- des = (use a double colon [::] to indicate space)
- req =<[0,1]: =1 if required field>
- ndb =<[0,1]: =1 if the field without biometric data>
- nts =<[0,1]: =1 if the field without timestamp>
- nph =<[0,1]: =1 if no picture field>
- nbg =<[0,1]: =1 if the field without signature background>
- hei =<[integer> 0]: Field height>
- wid =<[integer> 0]: field width>
- ksp =<[TL (Top-Left), ML (Middle-Left), BL (Bottom-Left), BC (Bottom-Center), BR (Bottom-Right), MR (Middle-Right), TR (Top Right), TC (Top Center), MC (Middle-Center)]: field position relative to the found text (default TL)>
- x <=[integer<> 0]: Field translation along the axis x>
- y =<[integer<> 0]: Field translation along the y axis>
- ppi = <[integer> = 96]: pixels per inch reference in considering the width and / or height as may be indicated>
Example: Given the tag #signature#@ep[fid=Signature::of::Jonh::Smith|req=1|hei=100|wid=200], the option "Create tag signature fields #signature#" will create a signature field named "Signature of John Smith", with compulsory signature attribute, 100 pixels high and 200 pixels wide, for every occurrence of the word #signature# into the document.
Create signature areas by keywords
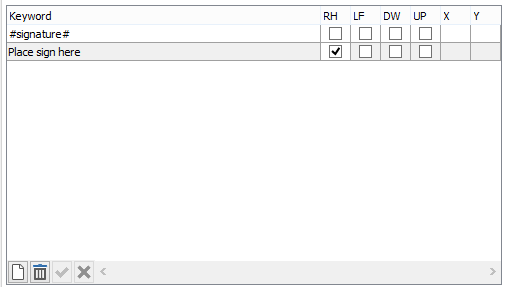
If there aren't words #signature# in the document it's possible to create areas signatures for each occurrence of a customizable text. All keyword customizable keys are defined in the grid.
The creation of the signature areas do not follow the rules of the tag syntax #signature# . The position of the signature and the keyword found follow the rule specified in the grid.
Buttons on bottom are used to:
| Create a New Line | |
| Delete the Current Line | |
| Confirm Your Changes | |
| Undo Changes |
Default Path
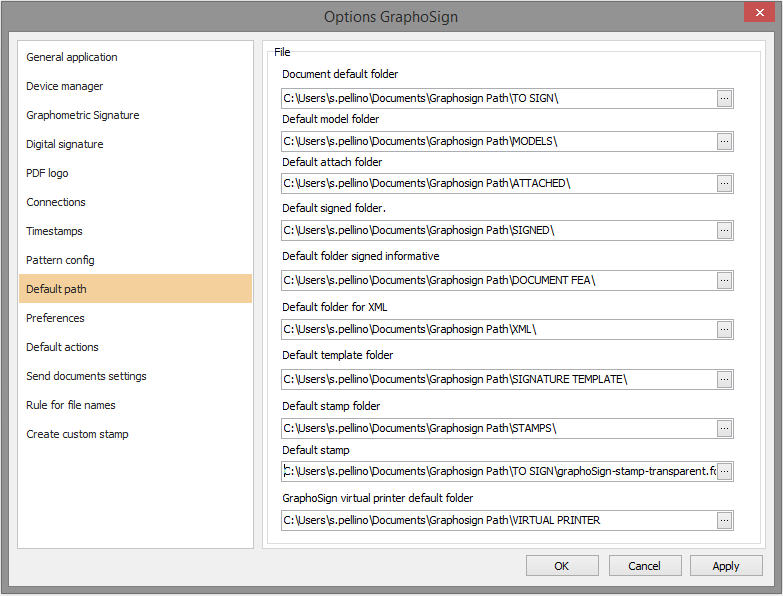
This section allows you to customize the default locations of relevant files source folders to improve automation of file creation, modification and signature capture. During installation the user is asked whether to adopt the default locations.
If so, the software will create 'in the "User \ My Documents" folder "ViewSign Desktop Path". This folder will create subfolders. If not, the user can always set the folders later
Default Folder Documents to be Signed
The folder containing all the pdf documents that have not been digitally signed and / or in Graphometric mode.
Default Model Folder for Document Creation
The folder where the user has retained all the pdf files to use as a templates.
Default Attachment Folder
The folder containing all files to be used as attachments. It could be the output folder of a network scanner or a local location on the PC.
Default Folder Signed and Signed Informative File
If these folders are specified, files that are signed will be moved from their home to these folders, including FEA (Advanced Electronic) signatures.
Default Save Folder Information
If this folder is specified all documents will be read and written from / into this folder.
Default XML File Export
If this folder it's specified all the XML files generated by ViewSign Desktop containing metadata for acrofields will create PDF documents in this location using XML templates.
Default Signature Template Folder
If this folder is specified it will be used by default to load the signature templates.
Default Stamps Folder
If this folder is specified this path will be used whenever stamps are placed in a document.
Path Preset Stamp
If this path is specified, clicking the "Insert stamp" button will automatically load the specified stamp. Clicking on this stamp will apply the stamp to the document.
Default Bailout Virtual Printer Documents Folder
if the virtual printer is installed this folder will contain all PDF files generated by ViewSign Desktop virtual printer.
Preferences
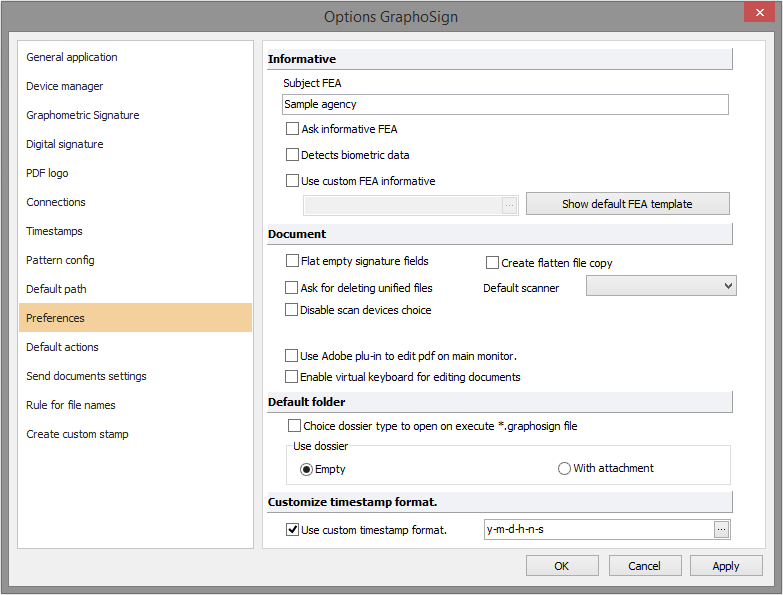
The preferences section allows you to specify additional options for several special features of ViewSign Desktop. These options refer to the authorization signature for processing personal data or information, FEA (Advanced Electronic Signatures) authorization, options used by the HOME tab functions, opening files with .ViewSign Desktop extension and finally, customize the timestamp format used to name the PDF file.
Privacy
This group of options is applied during the signature authorization process to the processing personal data, also called informative FEA (Advanced Electronic Signatures).
- Subject adopting the solution to dematerialize documents.
- The "Subject" is the company or organization that adopts the graphometric signature solution. This subject is used to compel consent to sign the "Information FEA" document before completing graphometric signature capture from customers.
- Request to sign disclosure FEA
- If selected, will require completing and signing the document "Information ViewSign Desktop ' at every signing session.
- Detect biometric data
- If selected, the ‘Information FEA’ will acquire the customer's biometric data when completing and signing the document ‘Information ViewSign Desktop'.
- Use custom FEA information
- If selected this option allows you to specify a PDF template to use as for FEA information collection. The PDF template can be customized for content, the number of pages, etc. The only constraints are that the custom FEA document must contain editable acrofields named according to the model available from the button "Show informative standard template". The expected acrofield are:
Document
This group of options are generic and refer to some operations that can be performed on the single document, or merge operations on the files.
- Flatten empty signature fields
- When enabled this option affects the flattening process of the file. In the flattening procedure all the interactive fields of the document are removed. If a document contains acrofields, the flattening will save only the value(s) of these acrofields preventing further editing of them. If not selected , ‘Flatten empty signature fields’ will smooth all acrofields except empty signature fields. If it is selected, the procedure will eliminate flattening all acrofields. The flattening process is not reversible, so once removed the interactive fields cannot be restored.
- Create Copy compressed files
- If you enable this option PDF files will be flattened. Before the flattening process, the current software will prompt whether to make a copy or not, providing an option to maintain the unaltered original file
- Ask whether to delete merged files
- This option has no effect on the Files procedure. If active, ViewSign Desktop will prompt the user whether to delete the source files and only keep the unified document, or to maintain the original files. The elimination of the source files has no effect on physical files, but only in the dossier. A file removed from the current set can be imported because is not physically removed from the storage media, but only from the dossier.
- Default Scanner
- If you choose a default scanner, the procedure "capture documents from scanners" will use the scanner indicated as the default. However, the user may still choose a scanner during the acquisition of documents from a scanner.
- Disable choice of scanner during document acquisition
- When activated, prevents the user from a choice of scanner during the procedure set out above.
- Use Adobe plug-in for editing the document on the primary monitor
- If enabled, will use the Adobe Acrobat Reader plug-in to fill out the document acrofields. If not enabled, it will use a native integrated Namirial tool to compile the document. When this choice is turned on it disables the next choice, as the Adobe plug-in does not support the virtual keyboard on the screen.
- Enable virtual keyboard for editing documents
- When activated, enables the virtual keyboard in the popup window for the compilation of acrofield data entry.
Default Dossier
The ViewSign Desktop setup registers two proprietary file extensions in the host system, .namsign and .ViewSign Desktop .
- The .namsign files are virtual files.
- When a simple file or attachment is saved to disk, a file is created with.namsign extension. This file, when opened with a double-click or from the menu 'File-> Open, opens the ViewSign Desktop software and loads the file and all imported files.
- The ViewSign Desktop files are compressed folders.
- When you double click on a file with.ViewSign Desktop extension, ViewSign Desktop decompresses the zipped folder and imports the files into a new dossier. The user can choose what type of file to create during import. After this decision, the files within the compressed folder will be imported. This file type is used in some workflows, such as initiate a print job from a downloaded document through a browser.
Customize Timestamp Format
ViewSign Desktop allows you to generate a string of characters using the current date / time. These strings are then used to rename the pdf files. E can define a custom timestamp format with the appropriate tool.
Default Actions
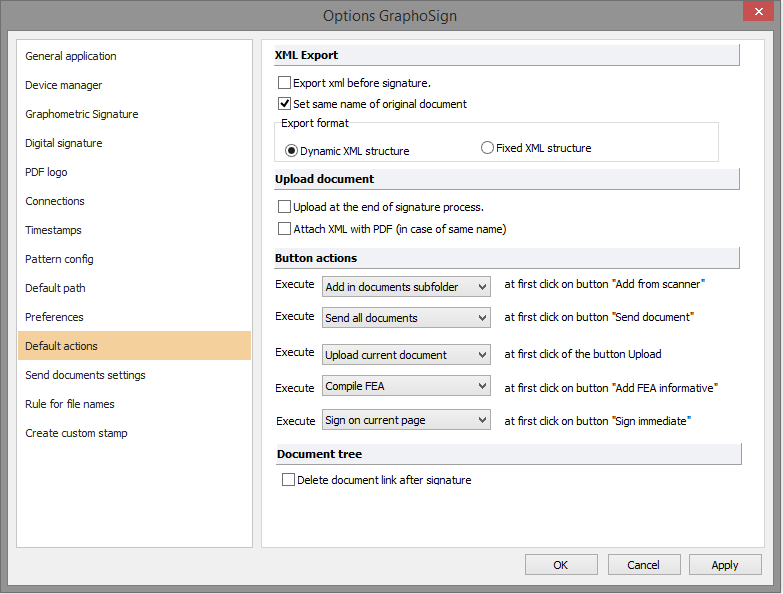
The default actions section is used to configure some automation functions of the software.
XML export
These options affect the export procedure of PDF acrofields in an editable XML file.
- Export XML automatically before signing
- If enabled, the data contained in acrofields will be exported in XML format before digitally signing occurs. The path and file name can be defined in the "Default paths" and the group "Export Format" box below.
- Keep the same name of the original document
- If enabled, this option disables the application of the rule on the name of the exported XML file, and automatically assigns the xml file name as the name of the source PDF file.
- Export format
- There are two types of format for the xml file, Dynamic and Fixed.
- Dynamic XML
- Every xml file will have 'a different structure according to the acrofields present in the pdf. An XML document will be created with this structure.
 <DocumentRoot>
   <Field1>Value1</Field1>
   <Field2>Value2</Field2>
   <Field3>Value3</Field3>
 </DocumentRoot>
So for example, if a PDF document containing the personal data of another person, such as name, surname, date of birth and place of birth. Exporting the document into an xml file with dynamic structure you will get a file of this type:
 <PersonalDatas>
   <Name>John</Name>
   <Surname>Smith</Surname>
   <PlaceOfBirth>London</PlaceOfBirth>
   <DateOfBirth>1980-01-01</DateOfBirth>
 </PersonalDatas>
- Fixed XML
- Each XML file will have the same structure regardless of acrofields in the pdf document. In the above example, the resulting XML file will be a document like this:
 <DocumentAcrofields>
   <Field1>
     <FieldName>Name</FieldName>
     <FieldValue>John</FieldValue>
   </Field1>
   <Field2>
     <FieldName>Surname</FieldName>
     <FieldValue>Smith</FieldValue>
   </Field2>
   <Field3>
     <FieldName>PlaceOfBirth</FieldName>
     <FieldValue>London</FieldValue>
   </Field3>
   <Field4>
     <FieldName>DateOfBirth</FieldName>
     <FieldValue>1980-01-01</FieldValue>
   </Field4>
 </DocumentAcrofields>
Upload Document
This option is applied to the Uploading functions.
- Upload at the end of the signing procedure with the default action
- If enabled, this performs the upload action, according to the current settings, immediately after signing the document.
- Attach associated XML (if it exists with the same name)
- If enabled, performs the upload, according to the current settings, to include signed PDF files and the related XML files.
Button Actions
Several ViewSign Desktop buttons are different from those with a single action, because when you click on one of them a menu appears with various item to choose selections from. The planned actions are:
- Add from scanners
- Send documents
- Upload with FTP
- Add information FEA (Advanced Electronic Signatures)
- Immediate Signature
Document Tree
In some application scenarios, the user needs to import dozens of documents to be digitally signed / graphometrically signed by n possible different subjects. In such scenarios, in order to optimize the use of the software, the possibility to delete files from the collection that are signed from time to time. To enable this feature, select the "Delete from the document after signing" option.
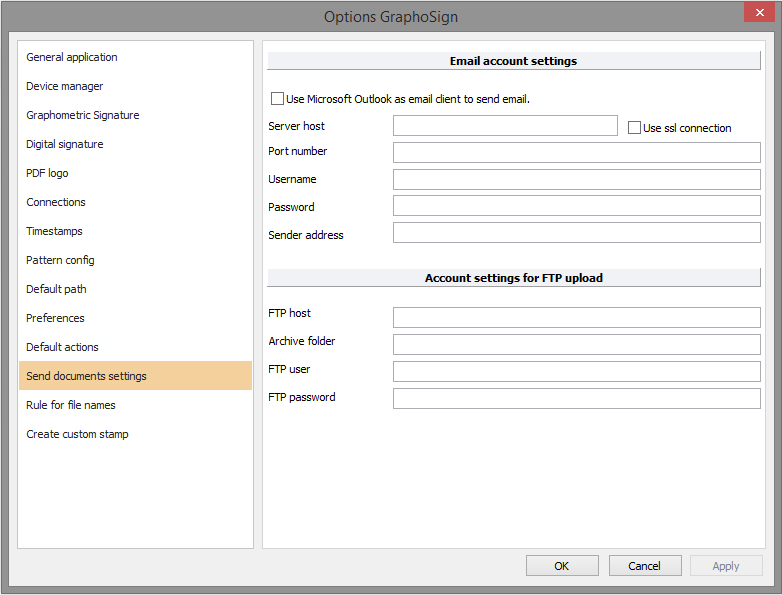
Send Documents Settings
The settings on this tab apply to the procedures for sending documents by e-mail and upload with FTP protocol.
Account Settings to Send Documents via Email
ViewSign Desktop can send signed documents as e-mail attachments. The email template is fixed and not be changed. If the PC in use has "Microsoft Outlook" as the email client, ViewSign Desktop can use the client to send an email with a PDF attachment. To use Outlook you need to select the "Use Microsoft Outlook to send email". You can also send e-mails by connecting directly to your mail server. To use this method you will enter specific account-related fields to use.
Account Settings FTP Upload Document
This section can be enhanced with the data necessary to connect to an FTP server.
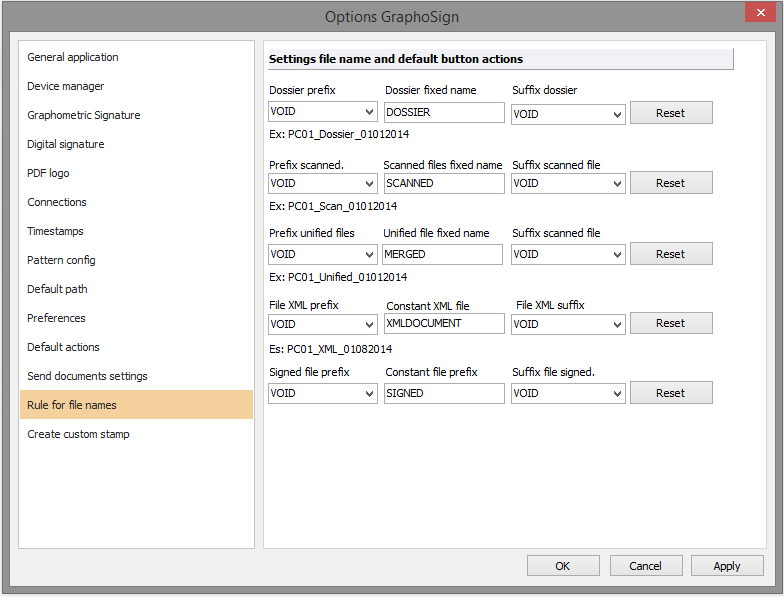
Rule for File Names
This tab allows you to define the rules of the names automatically assign to:
- Folder
- File scanned and imported into dossier
- Unified File
- XML File
- Digitally signed files
The file names rule follows this logic:
- Prefix name consisting of one of the following values
- PC Name (NOMEPC)
- User Name connected (USERNAME)
- Timestamp (DATETIME)
- The datetime format can 'be customized.
- File name (FILENAME)
- If you use this rule, in case of simple dossier it will be 'used as a prefix of the current file name. If you use this rule with a dossier with attachments, it will be 'used as a prefix of the name of the first document.
- No value (VOID)
- Constant: the user can define a value that will be always used to the appending prefix.
- Suffix: it's possible to define the last part of the name in the same manner of the prefix naming convention.
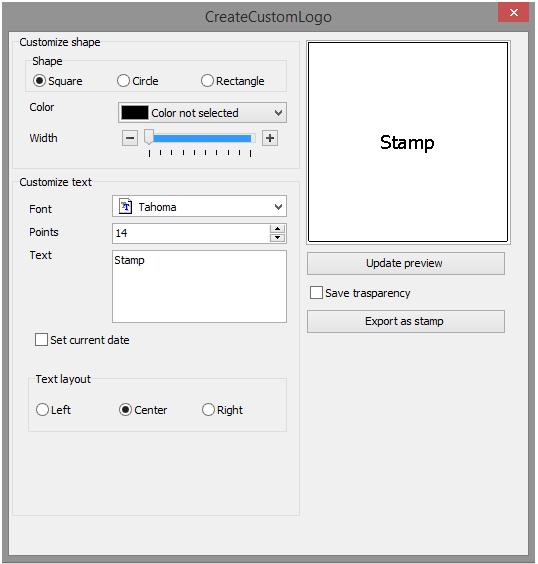
Create Custom Stamp
This tab allows you to create a simple "stamp" file to use as a stamp.
The "CreateCustomLogo" tool allows you to create a Square, Circular or Rectangular shape in which you can add text. It's possible to customize the text font, size and color. You can choose how to place the text inside of the shape by aligning it to the left, center or right.
Once you create the desired logo you can export the image displayed in the preview as a file stamp using the "Export button as stamp".

