VG2709-2K-MHD-2
Introduction
Package Contents
- Monitor
- Power cord
- Video cable
- Quick start guide
Product Overview
Front View

- Display
- Power Button
- Control Panel Keys
Rear View

- Security Slot
I/O Ports

| # | Description |
|---|---|
| 1 | HDMI |
| 2 | DisplayPort |
| 3 | Audio Out |
| 4 | AC IN |
Initial Setup
Installing the Stand
1

2

3

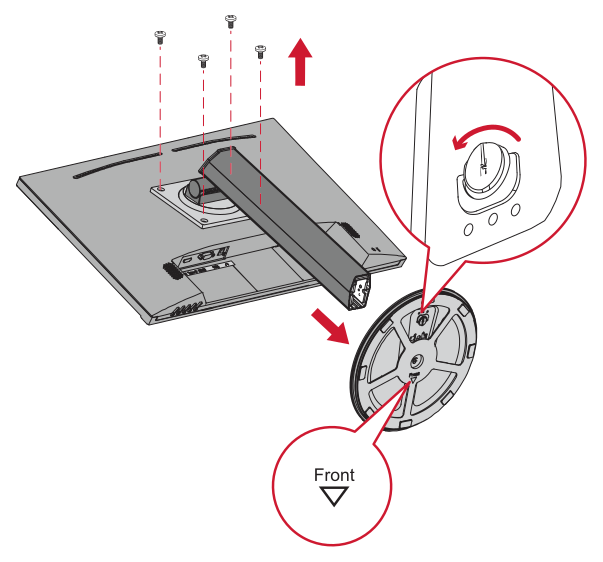
Removing the Stand
- Turn off the monitor and disconnect all cables.
- Place the monitor on a flat, stable surface with the screen facing down.
- Remove the stand.

Mounting the Monitor
After removing the stand, the monitor can be mounted using an optional mounting kit.

| Maximum Loading | Hole Pattern (W × H) | Screw Specification | Screw Quantity |
|---|---|---|---|
| 14 kg | 100 × 100 mm | M4 × 10 mm | 4 |
- Attach the mounting bracket to the VESA mounting holes at the rear of the monitor, securing it with screws.
- Follow the mounting kit instructions to mount the monitor.
- For use only with a UL certified mounting kit/bracket. To obtain a wall mounting kit or height adjustment base, contact ViewSonic® or your local dealer.
- Mounting kits are sold separately.
Using the Security Slot

To prevent theft and minimize damage, use a security slot locking device to secure the monitor to a fixed object.
Additionally, fastening the monitor to a wall or fixed object using a security cable can help support the weight of the monitor in order to prevent the monitor from falling over.
Making Connections
Connecting to Power

- Connect the power cord to the AC IN jack at the rear of the device.
- Plug in the power cord to a power outlet.
Connecting to External Devices

Using the Monitor
Adjusting the Viewing Angle
Height Adjustment
Lower or raise the monitor to the desired height (0 to 130 mm).

Screen Orientation Adjustment (Pivot)
1

2

- Raise the monitor height to its maximum height and then tilt it back fully.
- Rotate the monitor 90 degrees clockwise or counterclockwise from landscape to portrait orientation.
- When adjusting, hold the monitor firmly on both sides.
- To rotate the screen, change the system’s display orientation settings.
Swivel Adjustment
Swivel the monitor to the left or right for the desired viewing angle (360°).

Tilt Angle Adjustment
Tilt the monitor forwards or backwards to the desired viewing angle (−3.5° to 28°).

Turning the Monitor On/Off

- Make sure the monitor is connected to power.
- Press the Power button to turn on the monitor.
- To turn the monitor off, press the Power button again.
Using the Control Panel Keys
Use the control panel keys to access the Quick Menu, activate Hot Keys, navigate the On-Screen Display (OSD) Menu, and change the settings.

Quick Menu
Press the 1 key to activate the Quick Menu.

| Menu | Description |
|---|---|
| ViewMode | Select one of the preset color settings. |
| Volume | Adjust the level, or mute the volume. |
| Contrast/Brightness | Adjust the contrast or brightness level. |
| Input Select | Select the input source. |
| Exit | Exit the Quick Menu. |
Configuring the Settings
General Operations


- Certain menu option adjustments do not require the user to press the 3 key to confirm the selection. Follow the key guide that appears on the screen to select the option or make adjustments.
- Press the 4 key to return to the previous menu. To exit the OSD Menu, press the 5 (Power) key.
On-Screen Display (OSD) Menu Tree
Input Select
| Menu Option |
|---|
| HDMI 1 · HDMI 2 · DisplayPort |
Audio Adjust
| Sub-menu | Menu Option | |
|---|---|---|
| Volume | On | 0–100 |
| Mute | — | |
ViewMode
| Menu Option |
|---|
| Standard · Game · Movie · Web · Text · MAC · Mono |
Color Adjust
| Sub-menu | Menu Option | ||
|---|---|---|---|
| Contrast/Brightness | Contrast | 0–100 | |
| Brightness | 0–100 | ||
| Color Temperature | sRGB · Bluish · Cool · Native · Warm | ||
| User Color | Red | 0–100 | |
| Green | 0–100 | ||
| Blue | 0–100 | ||
| Color Space | Auto · RGB · YUV | ||
| Color Range | Auto · Full Range · Limited Range | ||
| HDR10 | Auto · Off | ||
Manual Image Adjust
| Sub-menu | Menu Option |
|---|---|
| Sharpness | 0–100/25 |
| Blue Light Filter | 0–100 |
| Aspect Ratio | 4:3 · 5:4 · 16:9 · 16:10 |
| Overscan | On · Off |
| Black Stabilization | (-/+, 0/10/20/30/4 0/50/60/70/80/90 /100) |
| Advanced DCR | 0–100/25 |
| Response Time | Standard · Advanced · Ultra Fast |
Setup Menu
| Sub-menu | Menu Option |
|---|---|
| Language | English · Français · Deutsch · Español · Italiano · Suomi · Svenska · Русский · Türkçe · Česká · Tiếng Việt · 日本語 · 한국어 · 繁體中文 · 简体中文 |
| Variable Refresh Rate | On · Off |
| Information | — |
| OSD Timeout | 5 · 15 · 30 · 60 |
| OSD Background | On · Off |
| OSD Pivot | 0° · 90° · −90° |
| Power Indicator | On · Off |
| Auto Power Off | On · Off |
| Sleep | 30 minutes · 45 minutes · 60 minutes · 120 minutes · Off |
| ECO Mode | Standard · Optimize · Conserve |
| Auto Detect | On · Off |
| DDC/CI | On · Off |
| Memory Recall | — |

Appendix
Specifications
| Category | Specification | Value | |
|---|---|---|---|
| Display | Type | Color a-Si TFT Active Matrix 2560 × 1440 LCD; 0.2331 (H) mm × 0.2331 (V) mm pixel pitch | |
| Display Size | 68.6 cm / 27 in. (viewable) | ||
| Color Filter | RGB Vertical Stripe | ||
| Glass Surface | Anti-Glare (Haze 25%), Hard Coating (3H) | ||
| Input Signal | Frequency | HDMI 1 | fh: 30–150 kHz; fv: 48–100 Hz |
| HDMI 2 | fh: 30–150 kHz; fv: 48–100 Hz |
||
| DisplayPort | fh: 30–150 kHz; fv: 48–100 Hz |
||
| Version | HDMI 1 | 1.4 | |
| HDMI 2 | 1.4 | ||
| DisplayPort | 1.4 | ||
| Compatibility | PC | up to 2560 × 1440 | |
| Macintosh | up to 2560 × 1440 | ||
| Resolution and Timings[1] | Preset | 2560 × 1440 @ 60 Hz | |
| Supported |
|
||
| Power[2] | Input Voltage | AC 100–240V, 50/60Hz (auto switch) | |
| Display Area | Active Size (H × V) | 596.74 × 335.66 mm 23.49 × 13.21 in. |
|
| Operating Conditions | Altitude | 5 km (16,404.2 ft) | |
| Relative Humidity | 20% to 90% (non-condensing) | ||
| Temperature | 0° C to 40° C 32° F to 104° F |
||
| Storage Conditions | Altitude | 12 km (39,370.1 ft) | |
| Relative Humidity | 5% to 90% (non-condensing) | ||
| Temperature | -20° C to 60° C -4° F to 140° F |
||
| Weight (with stand) | Physical | 6.7 kg (14.8 lb) | |
| Wall Mount | Dimensions | 100 × 100 mm | |
| Power Consumption | On[3] | 23W (Typical) without audio 26W (Typical) with 50% audio |
|
| Off | ≤ 0.3 W (Maximum) | ||
Hot Keys
When the On-Screen Display (OSD) Menu is off, you can quickly access special functions by using the Control Panel Keys.
| Key | Description |
|---|---|
| 2 + 1 | Press and hold the keys to lock/unlock the OSD Menu. When the menu appears on the screen, continue holding both keys for 10 seconds to lock/unlock the OSD Menu. If the OSD Menu is locked, a message appears on the screen. |
| 2 + 3 | Press and hold the keys to lock/unlock the Power button. When the menu appears on the screen, continue holding both keys for 10 seconds to lock/unlock the Power button. If the Power button is locked, a message appears on the screen. |
| 2 + 4 | Press the keys to display/hide the Boot up Screen or Message OSD when the device is turned on. |
Regulatory and Service Information
Compliance Information
This section addresses all connected requirements and statements regarding regulations. Confirmed corresponding applications shall refer to nameplate labels and relevant markings on the unit.
FCC Compliance Statement
This device complies with part 15 of FCC Rules. Operation is subject to the following two conditions: (1) this device may not cause harmful interference, and (2) this device must accept any interference received, including interference that may cause undesired operation. This equipment has been tested and found to comply with the limits for a Class B digital device, pursuant to part 15 of the FCC Rules.
These limits are designed to provide reasonable protection against harmful interference in a residential installation. This equipment generates, uses, and can radiate radio frequency energy, and if not installed and used in accordance with the instructions, may cause harmful interference to radio communications. However, there is no guarantee that interference will not occur in a particular installation. If this equipment does cause harmful interference to radio or television reception, which can be determined by turning the equipment off and on, the user is encouraged to try to correct the interference by one or more of the following measures:
- Reorient or relocate the receiving antenna.
- Increase the separation between the equipment and receiver.
- Connect the equipment into an outlet on a circuit different from that to which the receiver is connected.
- Consult the dealer or an experienced radio/TV technician for help.
Warning: You are cautioned that changes or modifications not expressly approved by the party responsible for compliance could void your authority to operate the equipment.
Industry Canada Statement
CAN ICES (B) / NMB (B)
CE Conformity for European Countries

The device complies with the EMC Directive 2014/30/EU and Low Voltage Directive 2014/35/EU.
The following information is only for EU-member states:
The mark shown to the right is in compliance with the Waste Electrical and Electronic Equipment Directive 2012/19/EU (WEEE). The mark indicates the requirement NOT to dispose of the equipment as unsorted municipal waste, but use the return and collection systems according to local law.

Declaration of RoHS2 Compliance
This product has been designed and manufactured in compliance with Directive 2011/65/EU of the European Parliament and the Council on restriction of the use of certain hazardous substances in electrical and electronic equipment (RoHS2 Directive) and is deemed to comply with the maximum concentration values issued by the European Technical Adaptation Committee (TAC) as shown below.
| Substance | Proposed Maximum Concentration | Actual Concentration |
|---|---|---|
| Lead (Pb) | 0.1% | < 0.1% |
| Mercury (Hg) | 0.1% | < 0.1% |
| Cadmium (Cd) | 0.01% | < 0.01% |
| Hexavalent Chromium (Cr6+) | 0.1% | < 0.1% |
| Polybrominated biphenyls (PBB) | 0.1% | < 0.1% |
| Polybrominated diphenyl ethers (PBDE) | 0.1% | < 0.1% |
| Bis (2-ethylhexyl) phthalate (DEHP) | 0.1% | < 0.1% |
| Butyl benzyl phthalate (BBP) | 0.1% | < 0.1% |
| Dibutyl phthalate (DBP) | 0.1% | < 0.1% |
| Diisobutyl phthalate (DIBP) | 0.1% | < 0.1% |
Certain components of products as stated above are exempted under the Annex III of the RoHS2 Directives as noted below. Examples of exempted components are:
- Copper alloy containing up to 4% lead by weight.
- Lead in high melting temperature type solders (i.e. lead-based alloys containing 85% by weight or more lead).
- Electrical and electronic components containing lead in a glass or ceramic other than dielectric ceramic in capacitors, e.g. piezoelectronic devices, or in a glass or ceramic matrix compound.
- Lead in dielectric ceramic in capacitors for a rated voltage of 125 V AC or 250 V DC or higher.
Indian Restriction of Hazardous Substances
Restriction on Hazardous Substances statement (India). This product complies with the “India E-waste Rule 2011” and prohibits use of lead, mercury, hexavalent chromium, polybrominated biphenyls or polybrominated diphenyl ethers in concentrations exceeding 0.1 weight % and 0.01 weight % for cadmium, except for the exemptions set in Schedule 2 of the Rule.
Product Disposal at End of Product Life
ViewSonic® respects the environment and is committed to working and living green. Thank you for being part of Smarter, Greener Computing. Please visit the ViewSonic® website to learn more.
- USA & Canada: Go Green with ViewSonic
- Europe: Environmental, Social & Governance — Recycle
- Taiwan: Taiwan Recycling Information
For EU users, please contact us for any safety/accident issue experienced with this product:

Flevolaan 38, 1382JZ, Weesp,
the Netherlands


Copyright Information
Copyright © 2024 ViewSonic® Corporation. All rights reserved.
Macintosh and Power Macintosh are registered trademarks of Apple Inc.
Microsoft, Windows, and the Windows logo are registered trademarks of Microsoft Corporation in the United States and other countries.
ViewSonic® and the three birds logo are registered trademarks of ViewSonic® Corporation.
VESA is a registered trademark of the Video Electronics Standards Association. DPMS, DisplayPort, and DDC are trademarks of VESA.
ENERGY STAR® is a registered trademark of the U.S. Environmental Protection Agency (EPA).
As an ENERGY STAR® partner, ViewSonic® Corporation has determined that this product meets the ENERGY STAR® guidelines for energy efficiency.
Noto Sans Font. Copyright 2018 The Noto Project Authors. This Font Software is licensed under the SIL Open Font License, Version 1.1.
Disclaimer: ViewSonic® Corporation shall not be liable for technical or editorial errors or omissions contained herein; nor for incidental or consequential damages resulting from furnishing this material, or the performance or use of this product.
In the interest of continuing product improvement, ViewSonic® Corporation reserves the right to change product specifications without notice. Information in this document may change without notice.
No part of this document may be copied, reproduced, or transmitted by any means, for any purpose without prior written permission from ViewSonic® Corporation.
This Copyright Information may be translated into multiple languages. All translated versions are provided for reference only. In the event of any discrepancy or inconsistency among different language versions, the English version shall prevail.
Version
VG2709-2K-MHD-2_UG_ENG_1d_20260511