VBS200-A
Package Contents
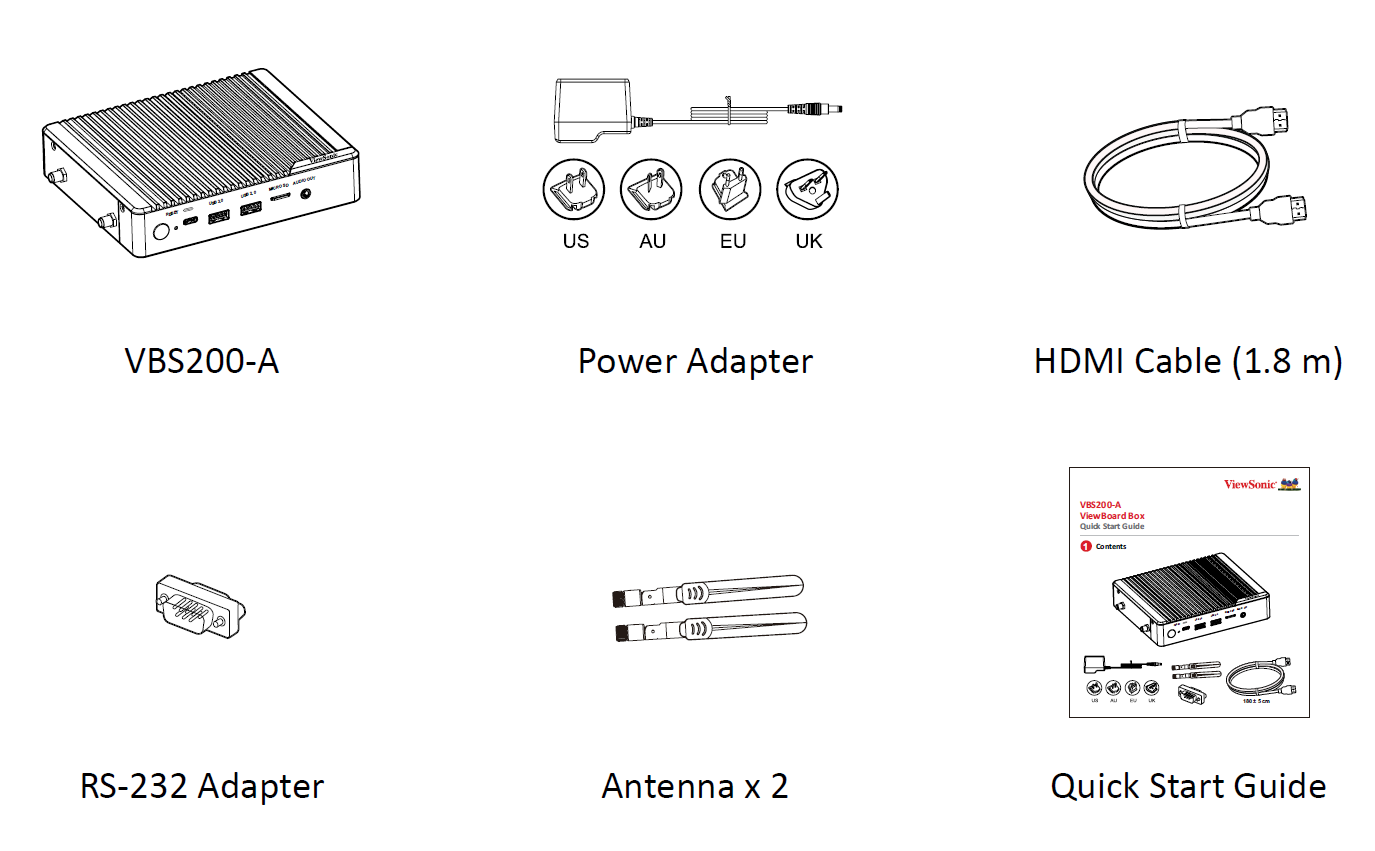
Please take a moment to check if all the necessary items are included in the package. If anything is missing or damaged, please contact your local reseller immediately.
Product Overview
Front View
| Number | Item | Description |
|---|---|---|
| 1 | Power Button |
|
| 2 | Reset | Hardware reset of the device. |
| 3 | USB 2.0 C Port | USB 2.0, 500mA[1] |
| 4 | USB 3.0 A Port | USB 3.0, 900mA[1] |
| 5 | USB 2.0 A Port | USB 2.0, 500mA[1] |
| 6 | MicroSD | Read/Write MicroSD card |
| 7 | AUDIO OUT | Audio signal output (3.5 mm DAC) |
Rear View
| Number | Item | Description | ||||||||||||
|---|---|---|---|---|---|---|---|---|---|---|---|---|---|---|
| 1 | DC IN | 12V, system power input connector | ||||||||||||
| 2 | GB-LAN (RJ45) |
| ||||||||||||
| 3 | HDMI OUT | Version 2.0; output video to an external display via HDMI. | ||||||||||||
| 4 | HDMI IN | Version 1.4; connect to a video device with HDMI output. | ||||||||||||
| 5 | MINI DP | Output video to an external display via DisplayPort. | ||||||||||||
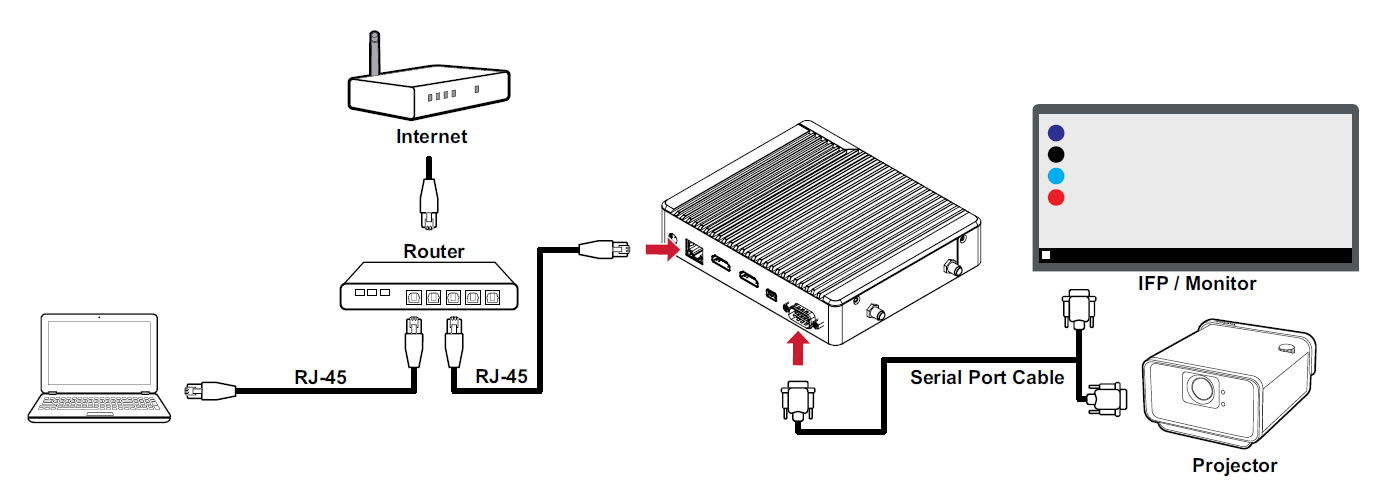
| 6 | RS-232 | Connects the display (IFP or Projector) to an external computer. Certain functions can be controlled remotely by the computer, including power on/off, volume adjustment and more. |
Side View
| Number | Item | Description |
|---|---|---|
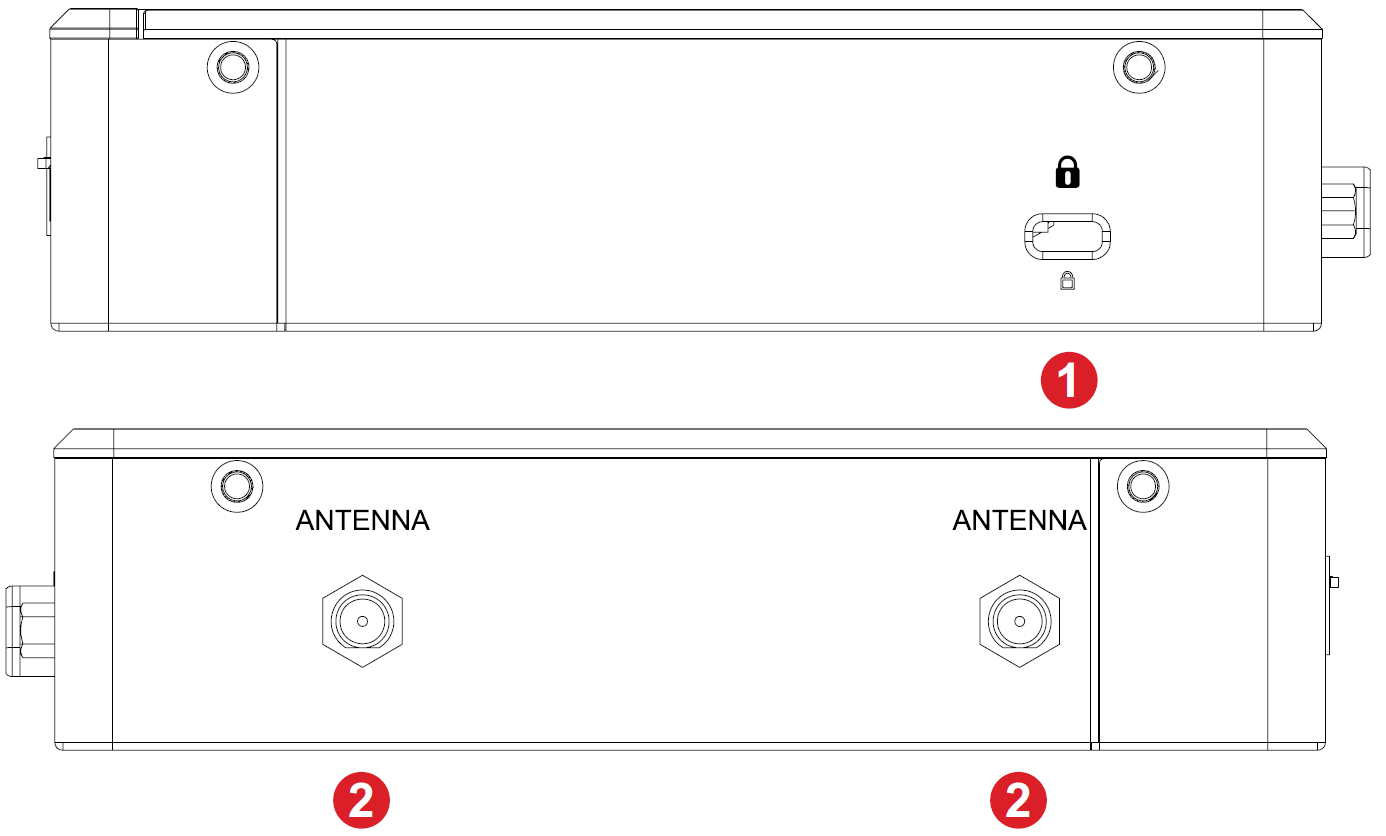
| 1 | Security Slot | Secure the device to a fixed object for increased security and safety. |
| 2 | Antenna | Connect the included antennas to increase signal strength. |
Mount Kit Specifications
NOTE:
- Please follow the instructions in the ViewSonic wall mount installation guide to install your wall mount or mobile mount bracket.
- If attaching to other building materials, please make sure the bracket mounting pattern matches the mounting pattern on the VBS200-A. Please contact your nearest dealer for more details.
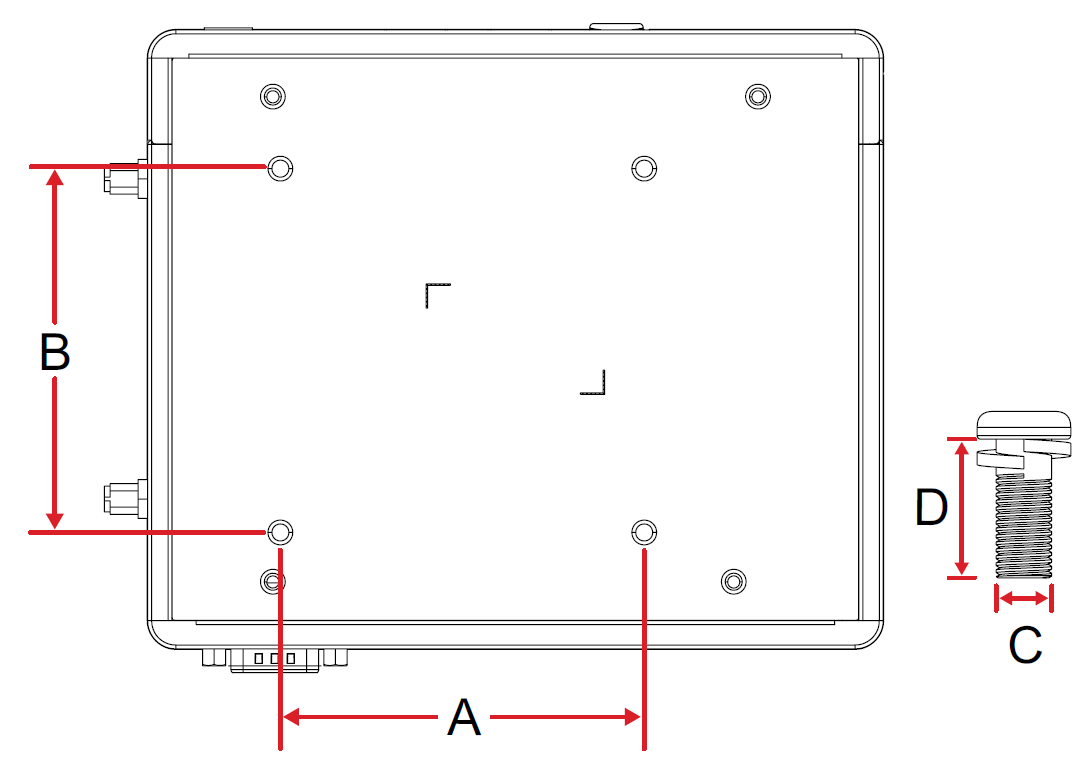
| Model | Mounting Spec. (A x B) | Standard Screw (C x D) | Quantity |
|---|---|---|---|
| VBS200-A | 75 mm x 75 mm | M4 x 8 mm | 4 |
NOTE: Do not use screws longer than the standard dimensions listed, as they may cause damage to the inside of the device.
Mounting the VBS200-A (optional)
Using the VB-WMK-001/VB-STND-001
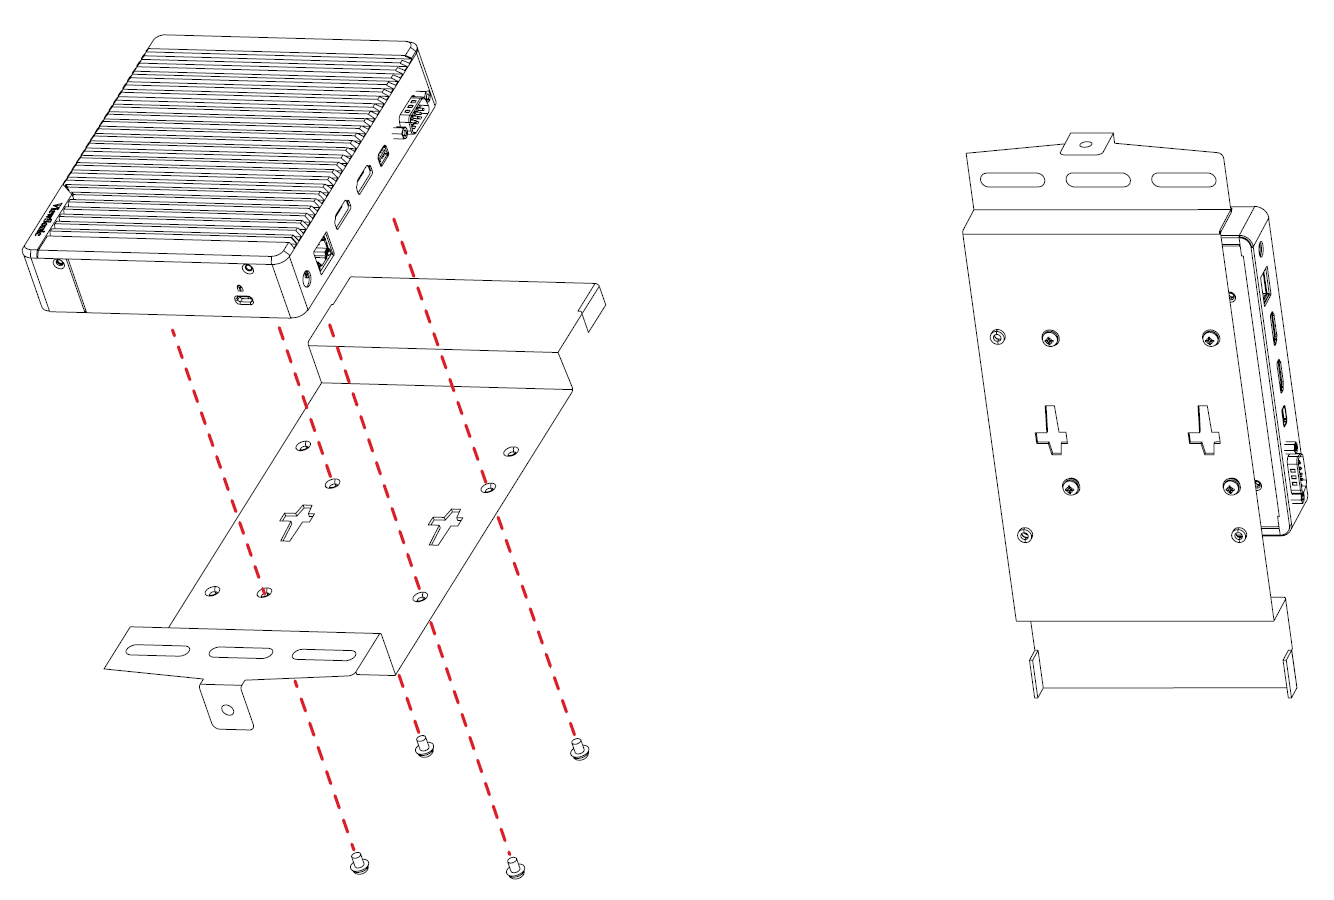
The VBS200-A can be mounted to the rear of your display accessory using the slideon mini PC bracket as shown below:
Connecting to Power
AC Adapter
- Connect the power cord to the POWER jack at the rear of the VBS200-A.
- Plug the AC adapter into a power outlet.
PoE (Power over Ethernet)
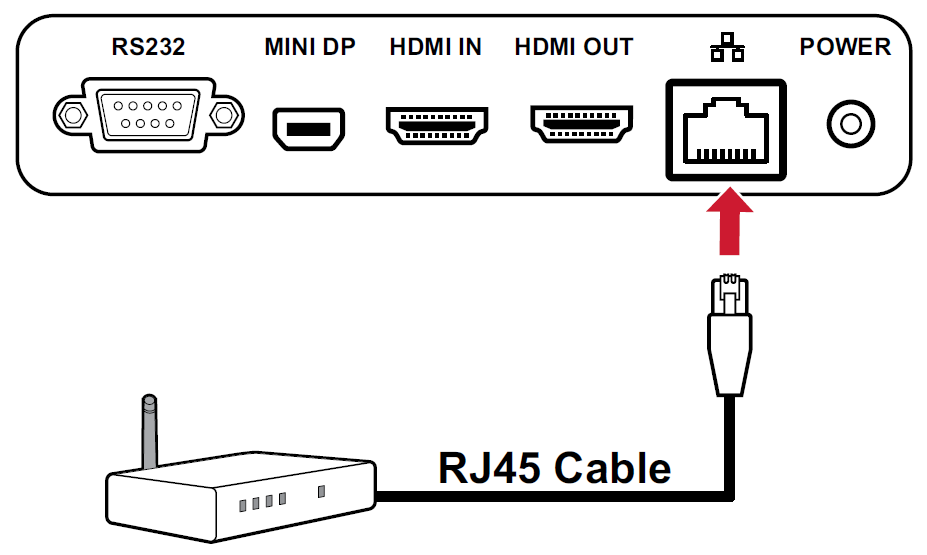
The VBS200-A supports PoE (Power over Ethernet) when connected to a Power Device (PD) or Power Source Equipment (PSE) and can power itself via the LAN port.
- Connect a Power Device (PD) or Power Source Equipment (PSE) to a power outlet.
- Connect one end of a RJ45 cable to the Power Device (PD)/Power Source Equipment (PSE).
- Connect the other end of the RJ45 cable to the LAN port of the VBS200-A.
- NOTE: If both AC Adapter and PoE power sources are available, the VBS200-A will use the AC adapter as the main power source.
Connecting to External Devices
Display Device Connection
The VBS200-A can connect to an external display via HDMI or DisplayPort.
HDMI Out Connection
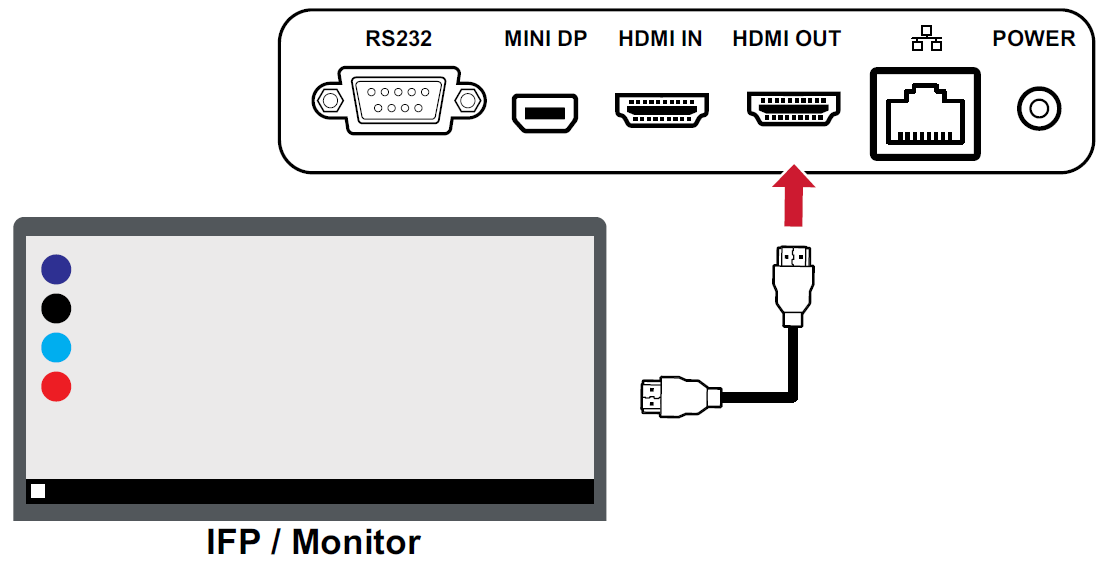
To display content from the VBS200-A, connect one end of an HDMI cable to the HDMI port of your display device. Then connect the other end of the cable to the HDMI OUT port of the VBS200-A.
- Note: Connect the HDMI cable between the IFP/Monitor and VBS200-A before plugging in the power adapter. Otherwise, the IFP/Monitor can only output FHD and not 4K resolution.
Mini DP Connection
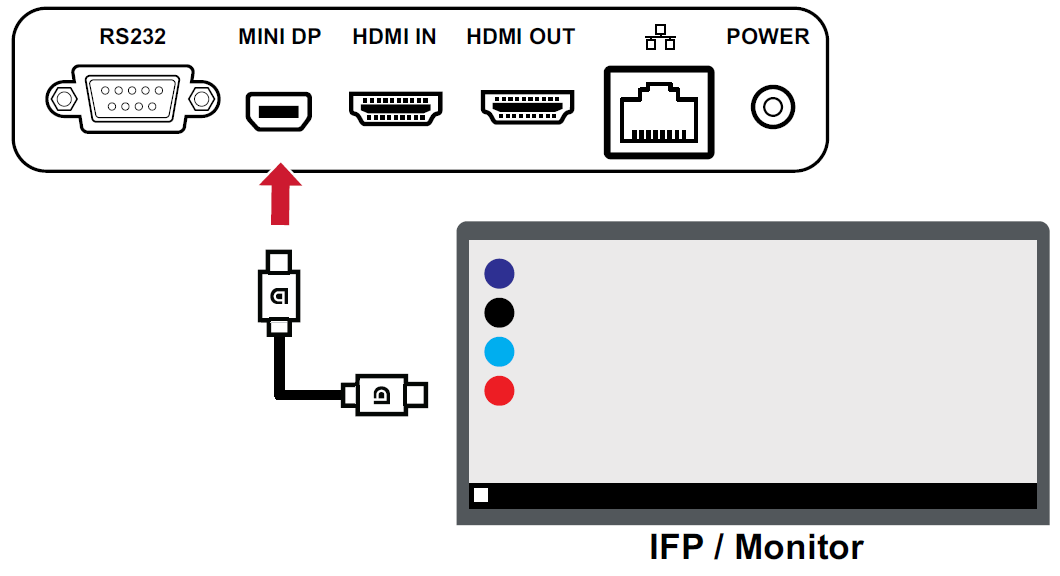
To display content from the VBS200-A, connect one end of a DisplayPort cable to the DisplayPort port of your display device. Then connect the other end of the cable to the MINI DP port of the VBS200-A.
HDMI In Connection
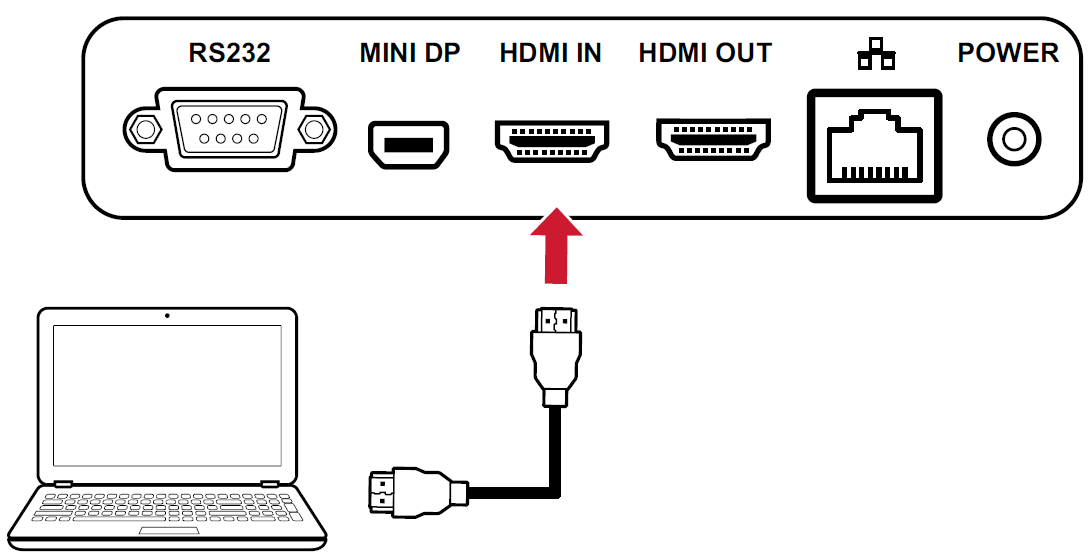
To display content from an external device through the VBS200-A, connect an HDMI cable from the external device to the HDMI IN port of the VBS200-A.
Network Connection (Local Area Network)
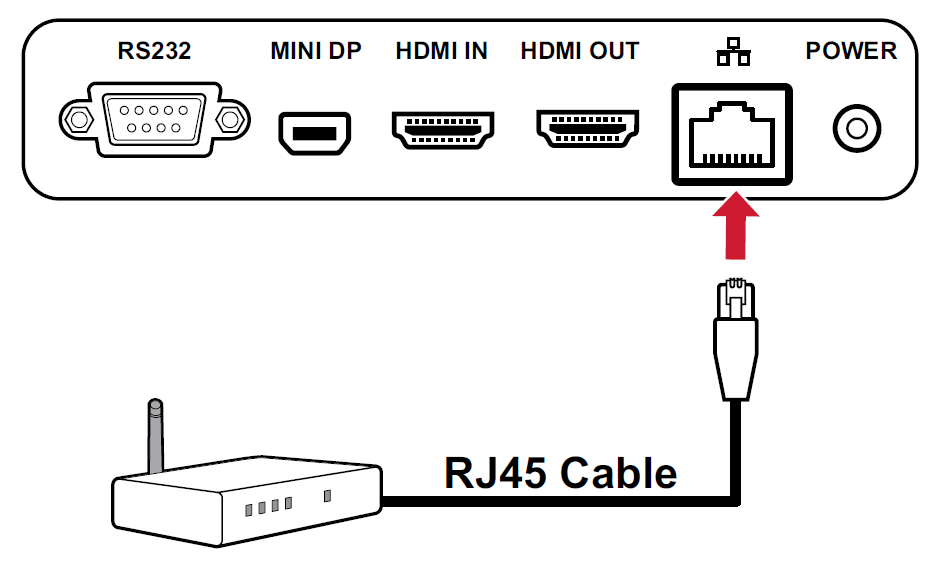
To connect to the Internet or a network, connect one end of a RJ45 cable to the LAN port of the VBS200-A, then connect the other end to your network.
USB Connection (Keyboard, Mouse, Storage Device, etc.)
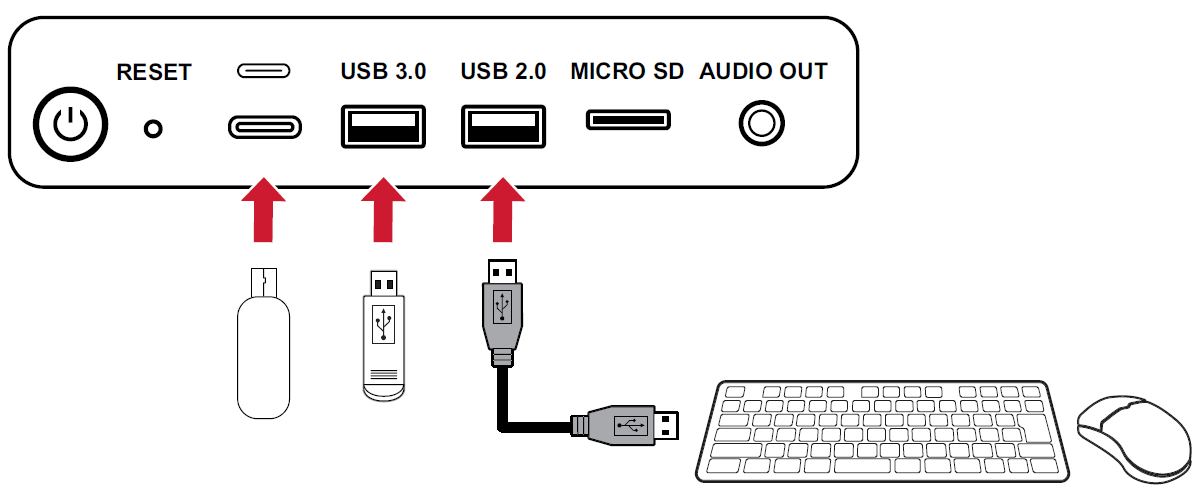
USB peripherals such as keyboards, mice, storage devices, etc. can be connected to the VBS200-A’s USB ports.
RS-232 Connection
When you use a RS-232 serial port cable to connect the VBS200-A to an external computer, certain functions can be controlled remotely by the PC, including power on/off, volume adjustment, and input source selection.
- NOTE: Set the baud rate of all control devices to 9600 bps.
Audio Connection
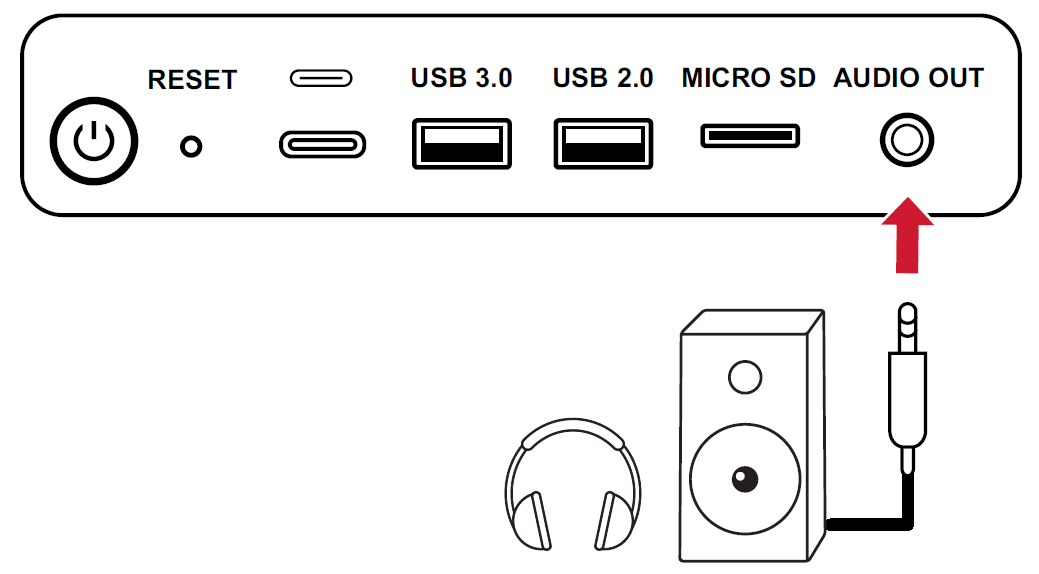
Connect an audio cable from your external audio device to the AUDIO OUT port on the VBS200-A.
Powering ON/OFF the VBS200-A
- Ensure the VBS200-A is connected either via AC Adaper or PoE.
- Press the Power button to turn on the VBS200-A.
- To turn the VBS200-A off, press and hold the Power button.
Initial Launch Setup
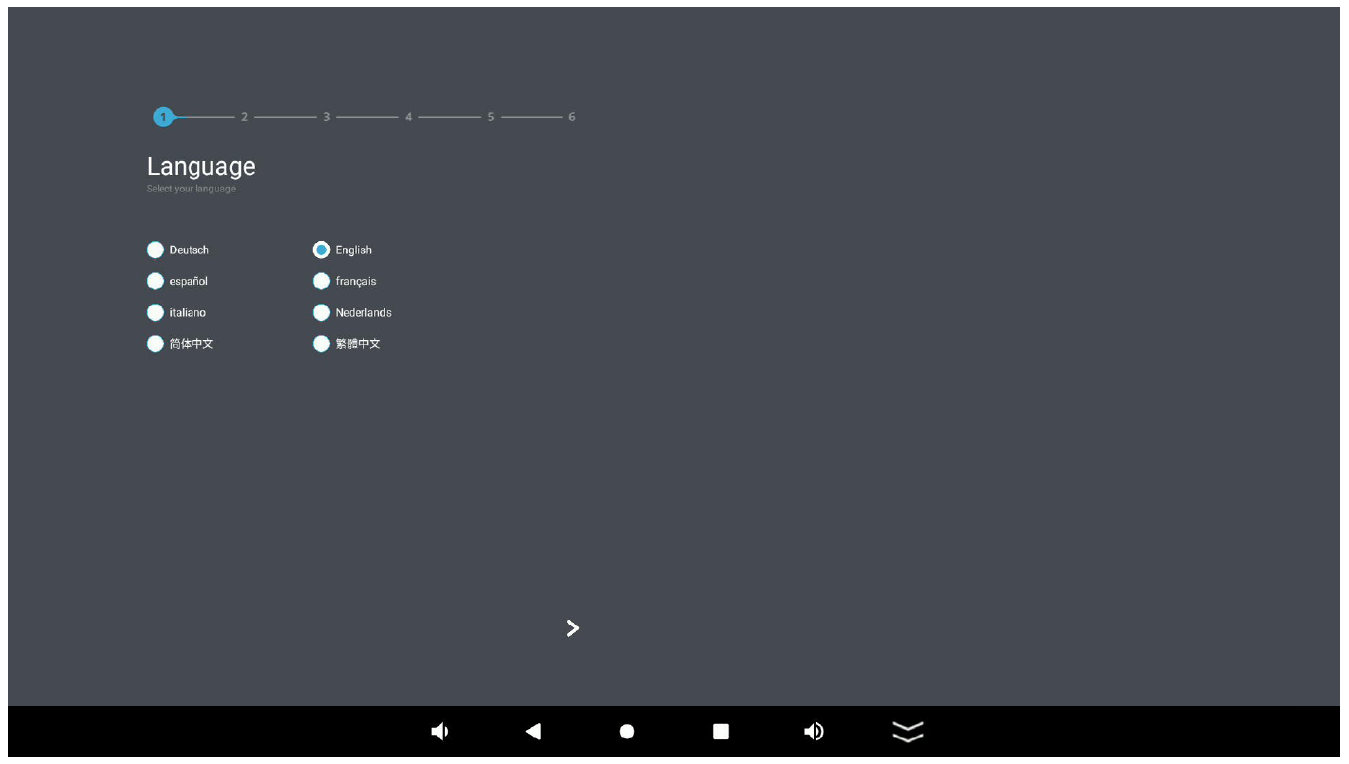
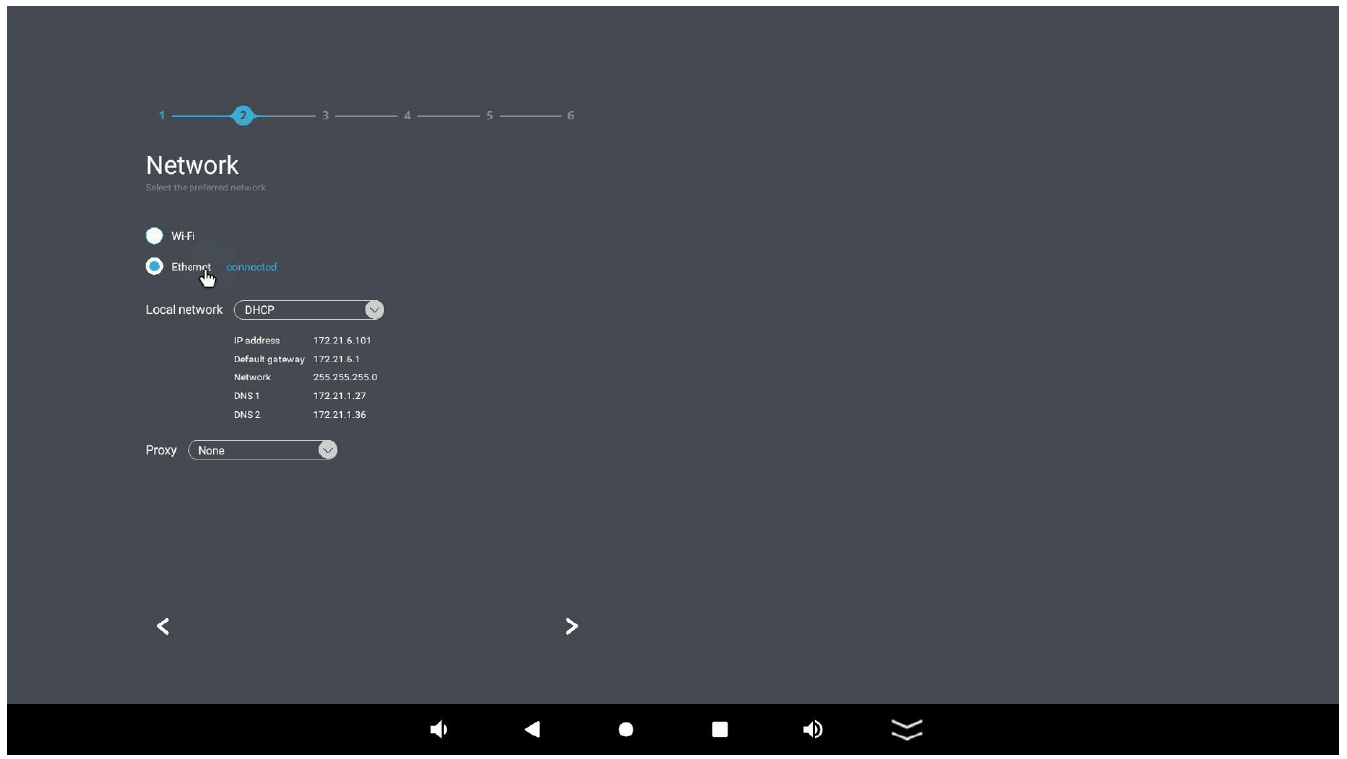
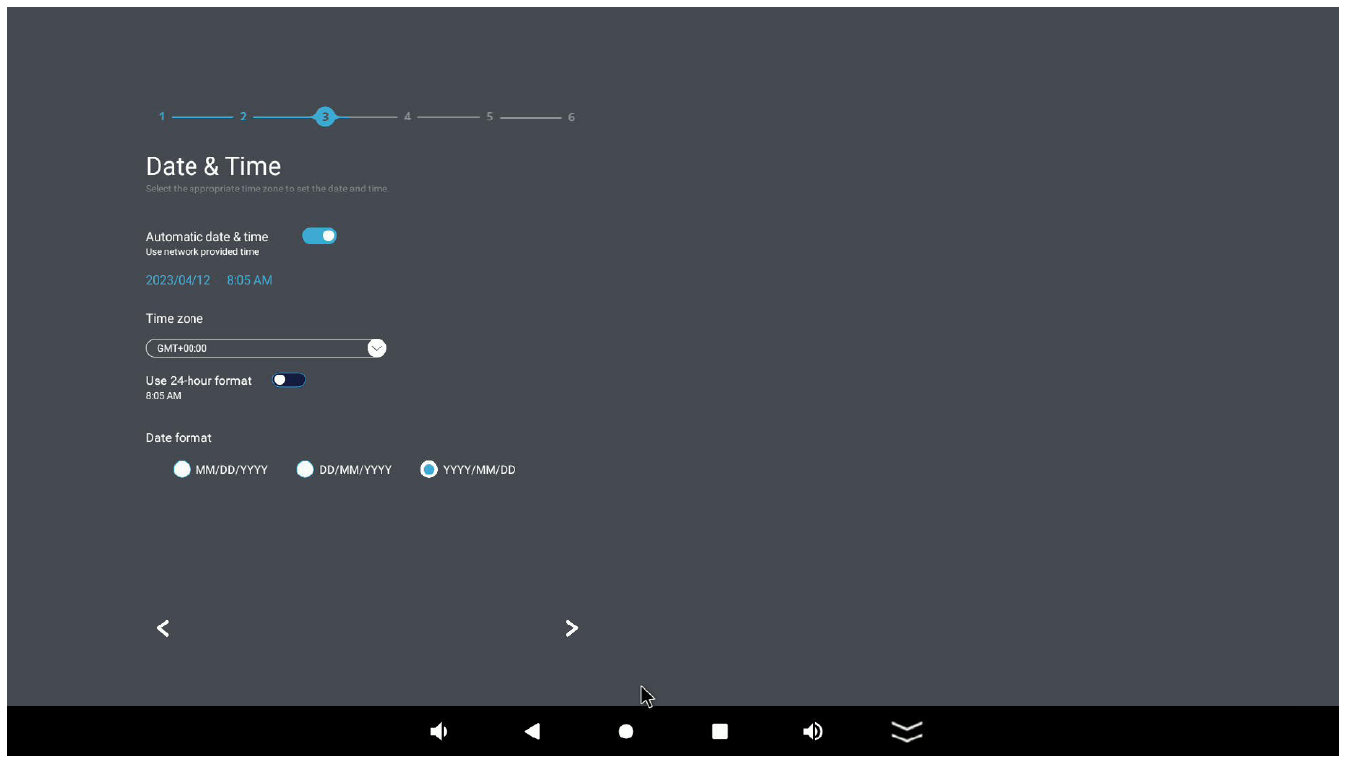
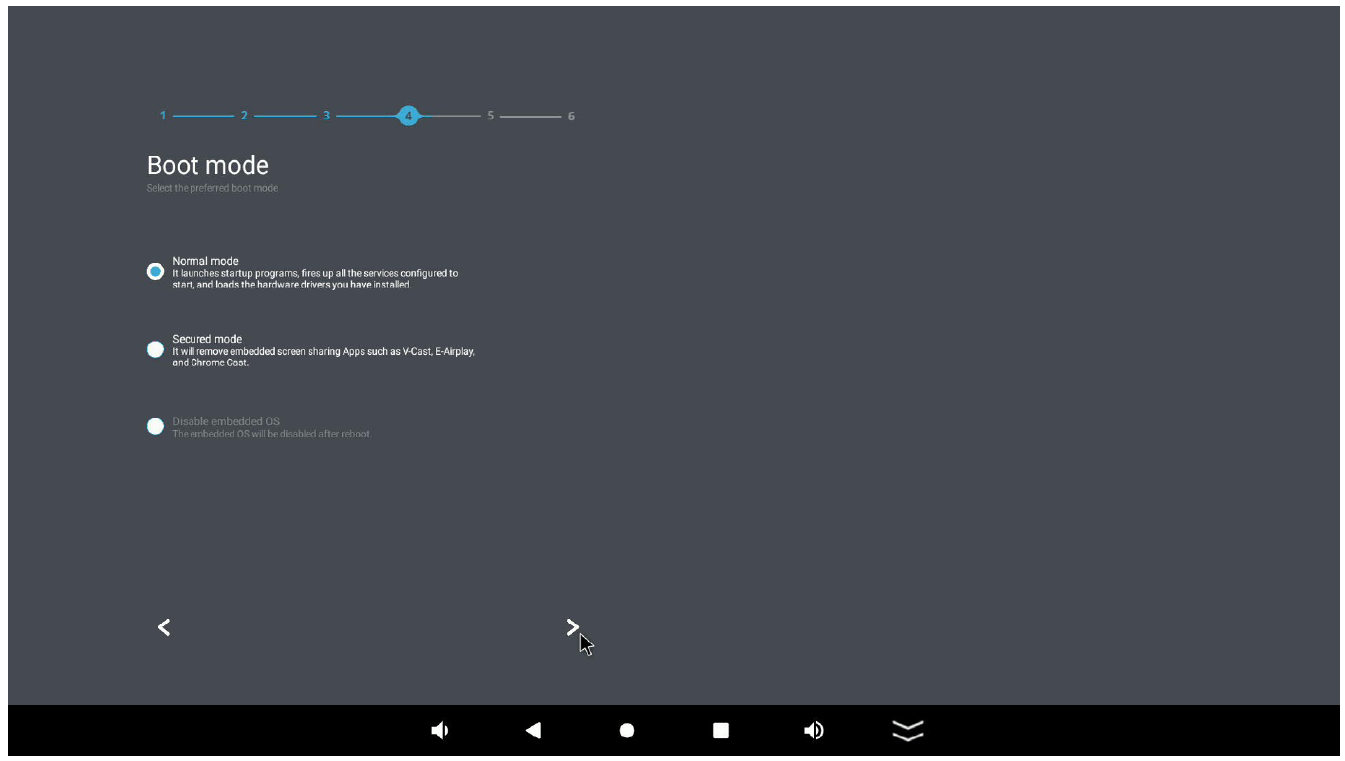
When you first turn on your VBS200-A, an initial setup wizard will launch. Please follow the on-screen instructions to set up the VBS200-A.
- Select your Language.
- Setup and verify your Network connection. Both Wi-Fi and Ethernet connections are supported.
- Set the Date & Time.
- Select your preferred System Mode. Choose between Normal and Secured Mode. In Secured Mode, preloaded applications with screen sharing capabilities will be hidden.
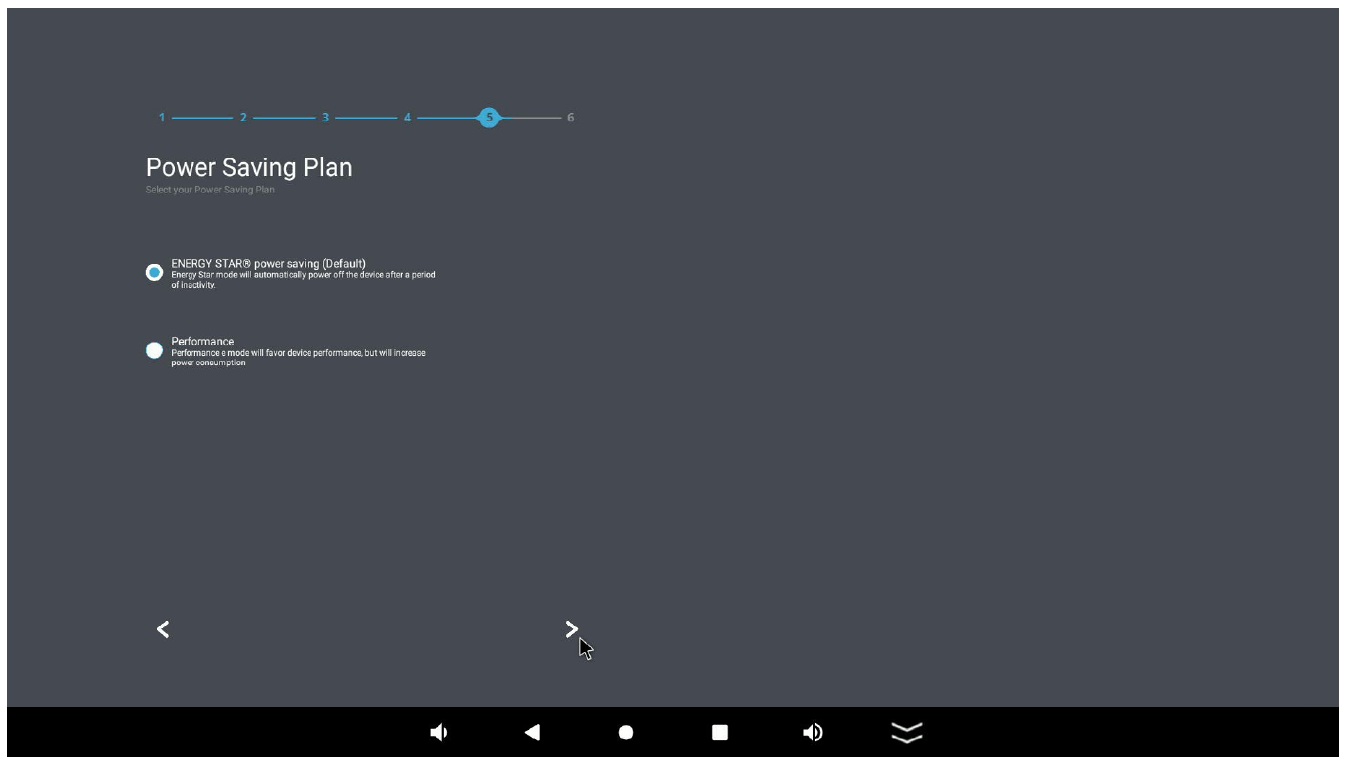
- Choose your Power Saving Plan. In the default setting, the VBS200-A will go into standby mode after an hour of inactivity.
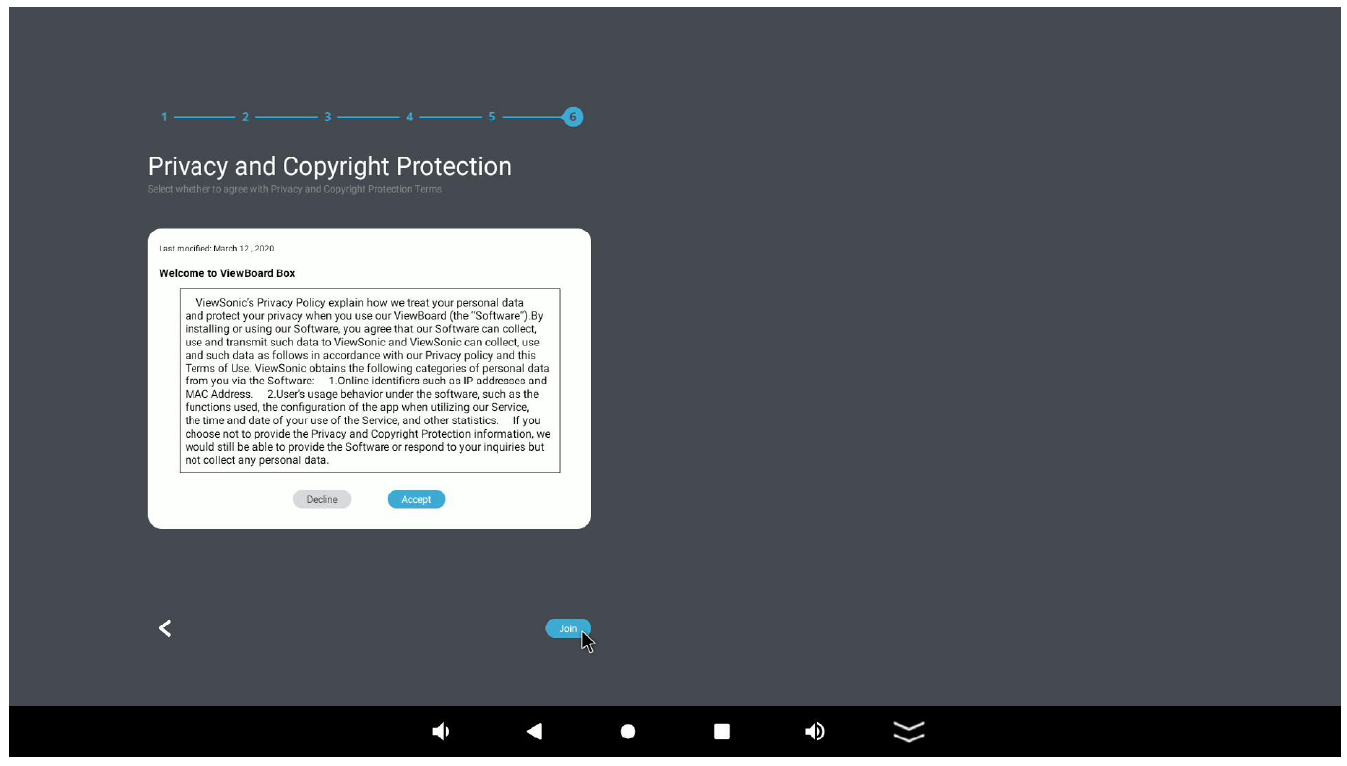
- Review and Accept/Decline the Privacy and Copyright Protection terms.
vLauncher - Home Screen
Action Bar
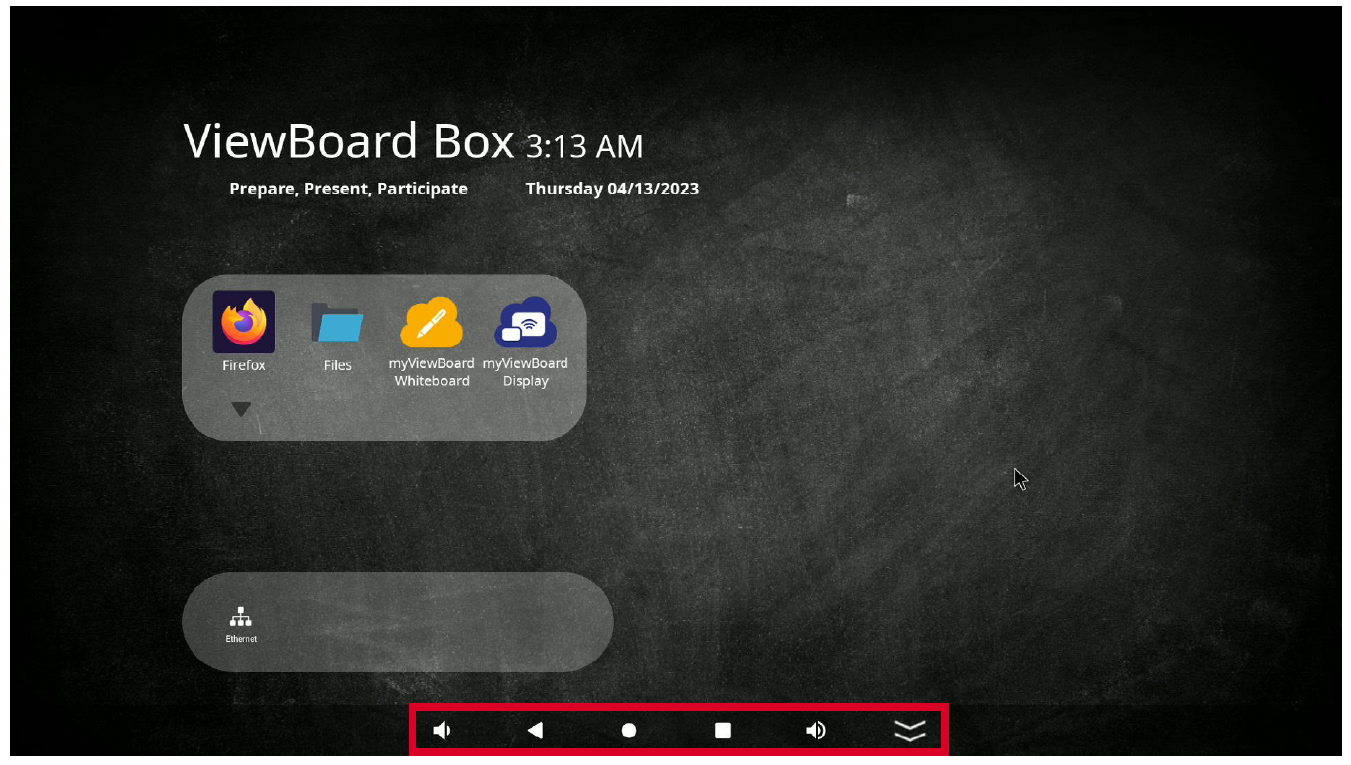
The Action Bar gives quick access to several controls.
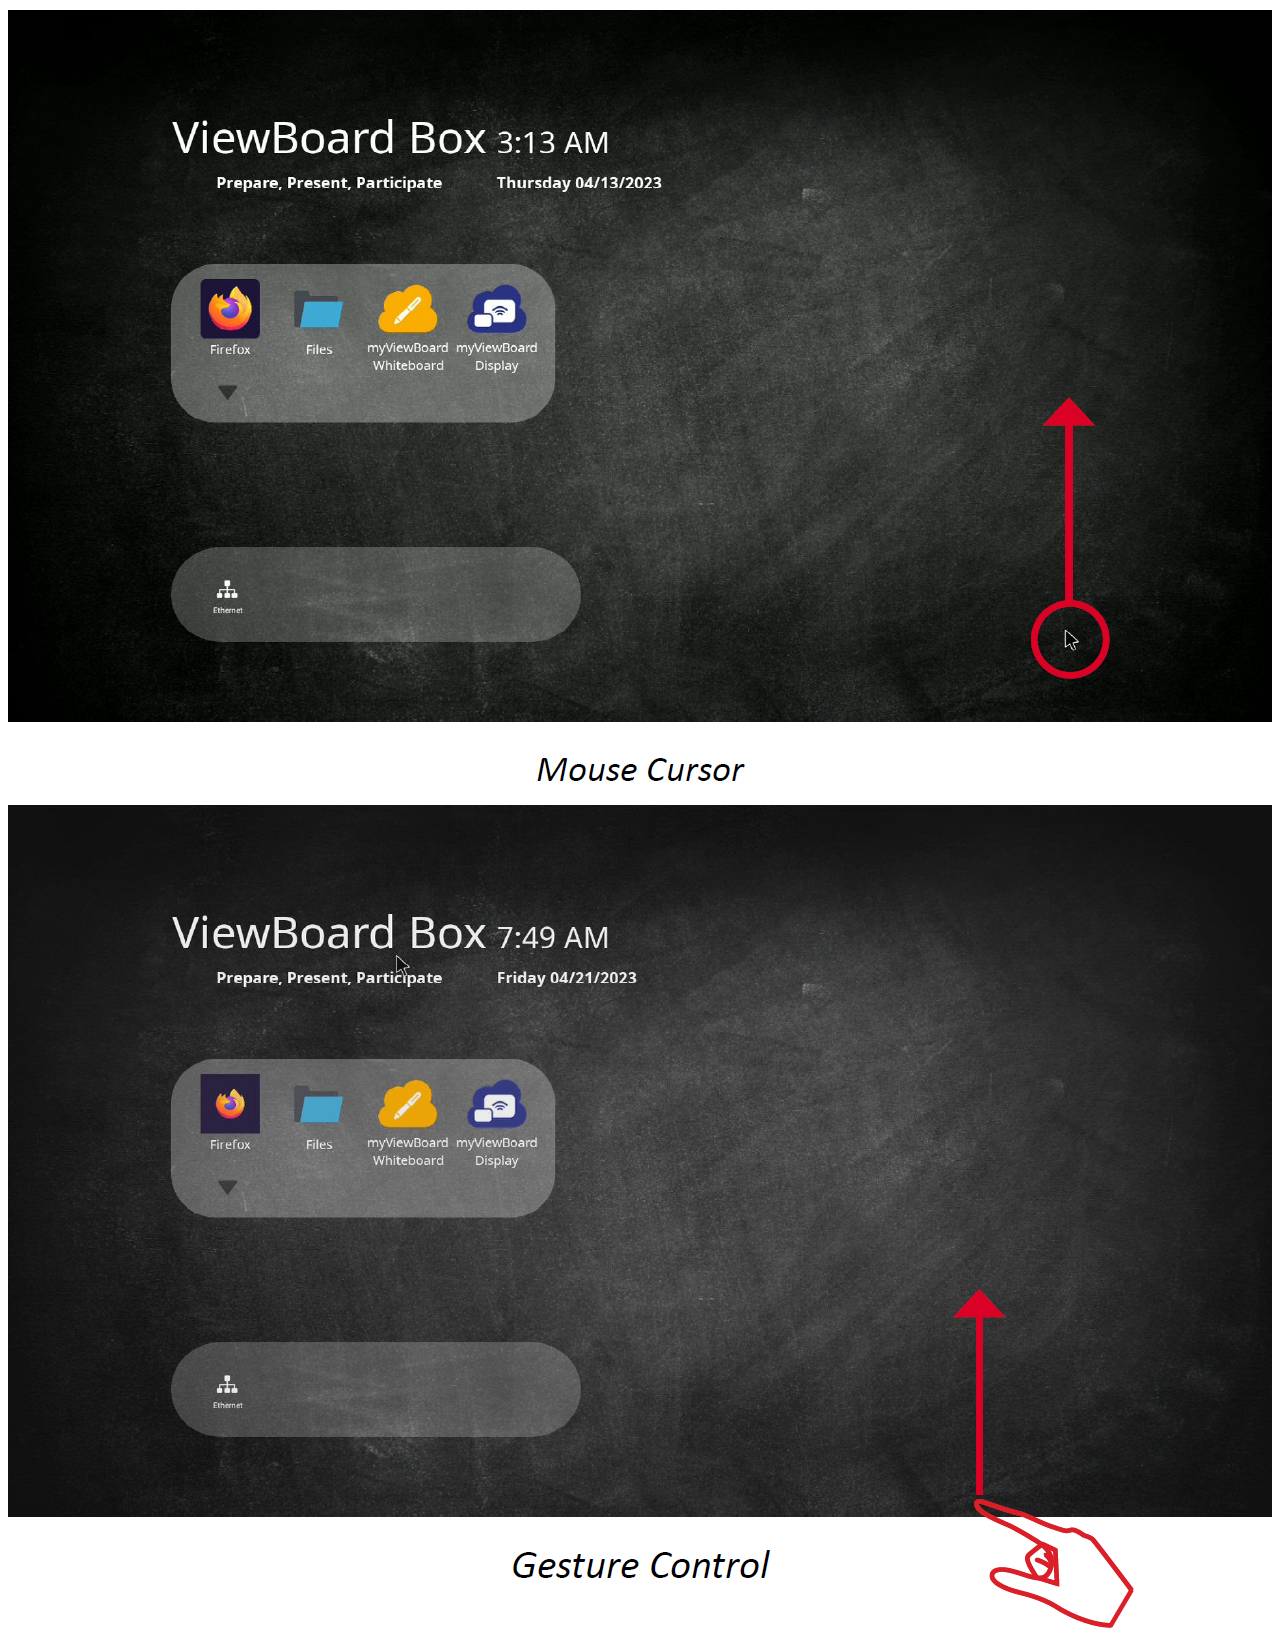
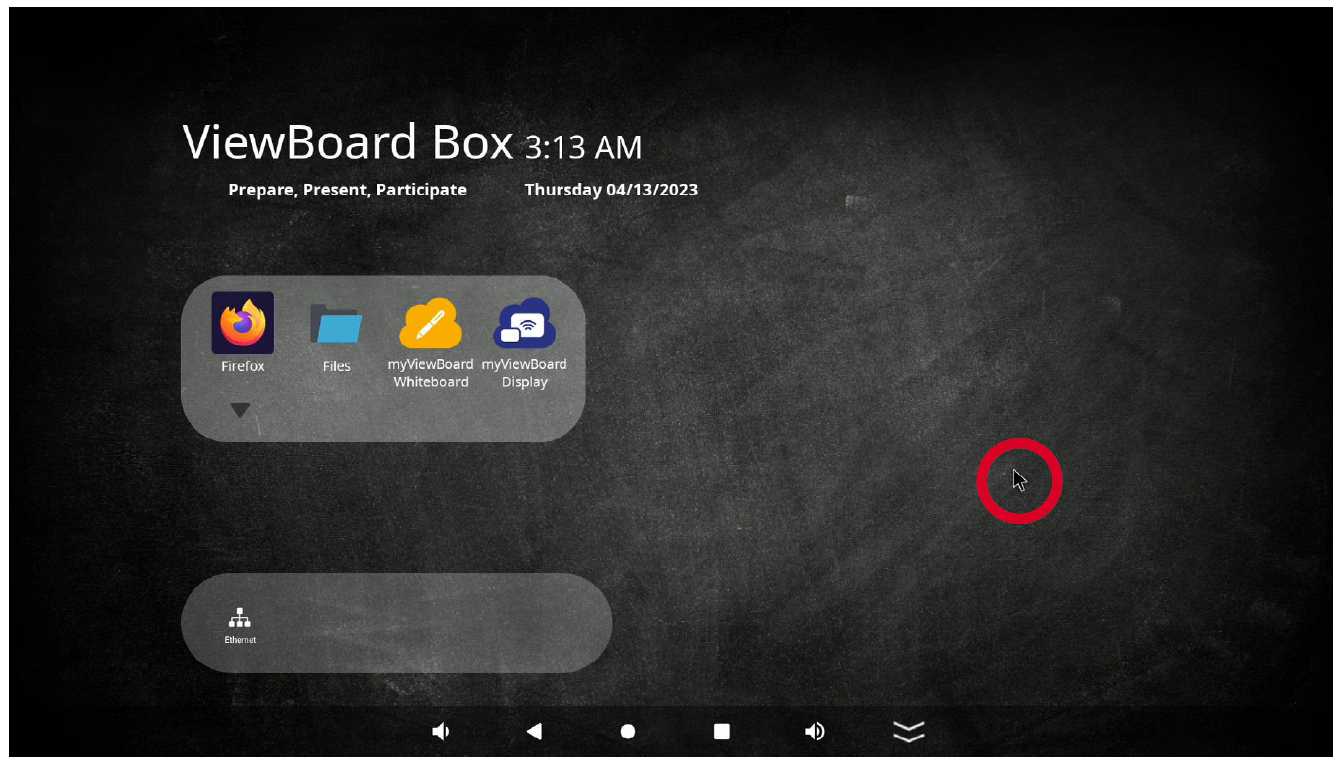
The Action Bar can be triggered by moving the mouse cursor or your finger (if your display device supports a touch back function) upwards from the bottom of the home screen.
Action Bar Icons
| Icon | Description | |
|---|---|---|
| Volume Down | Decrease the volume level. | |
| Return | Go back to the previous page. | |
| Home | Return to vLauncher (Home Screen). | |
| App Shortcut | Show the currently open applications. | |
| Volume Up | Increase the volume level. | |
| Hide | Hide the Action Bar. | |
vLauncher Message
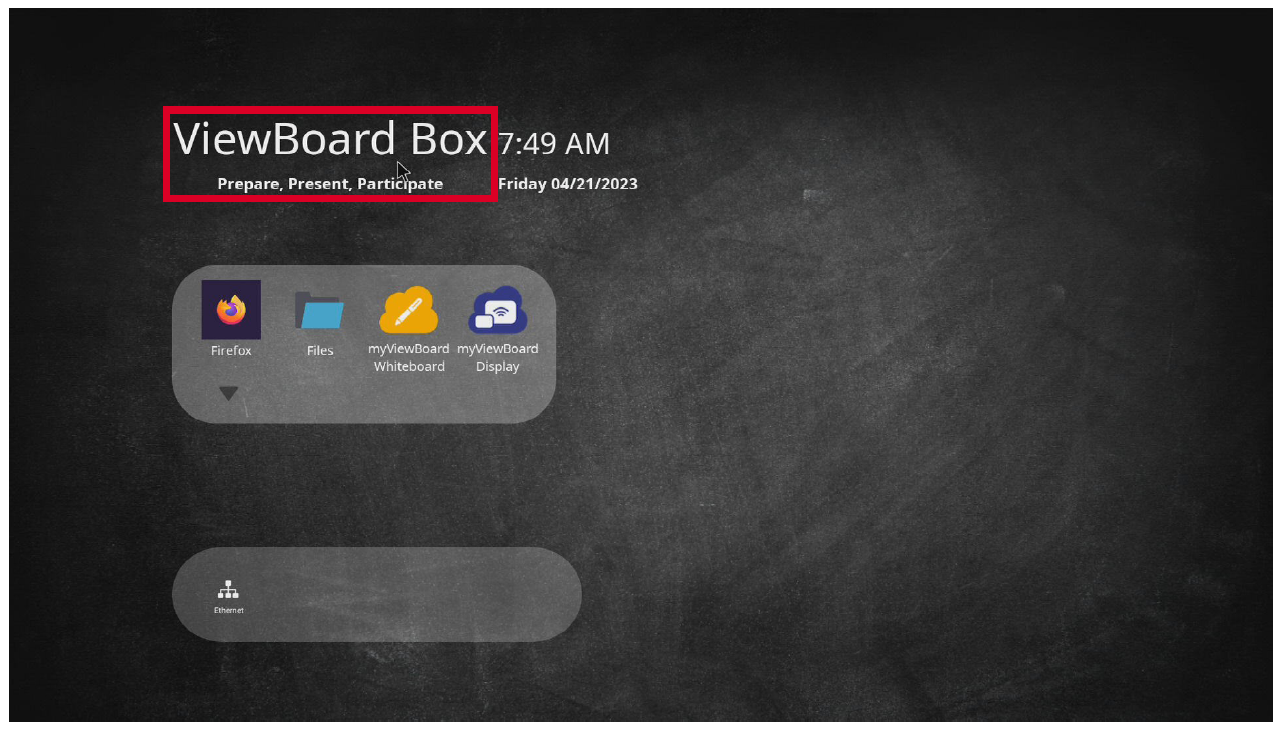
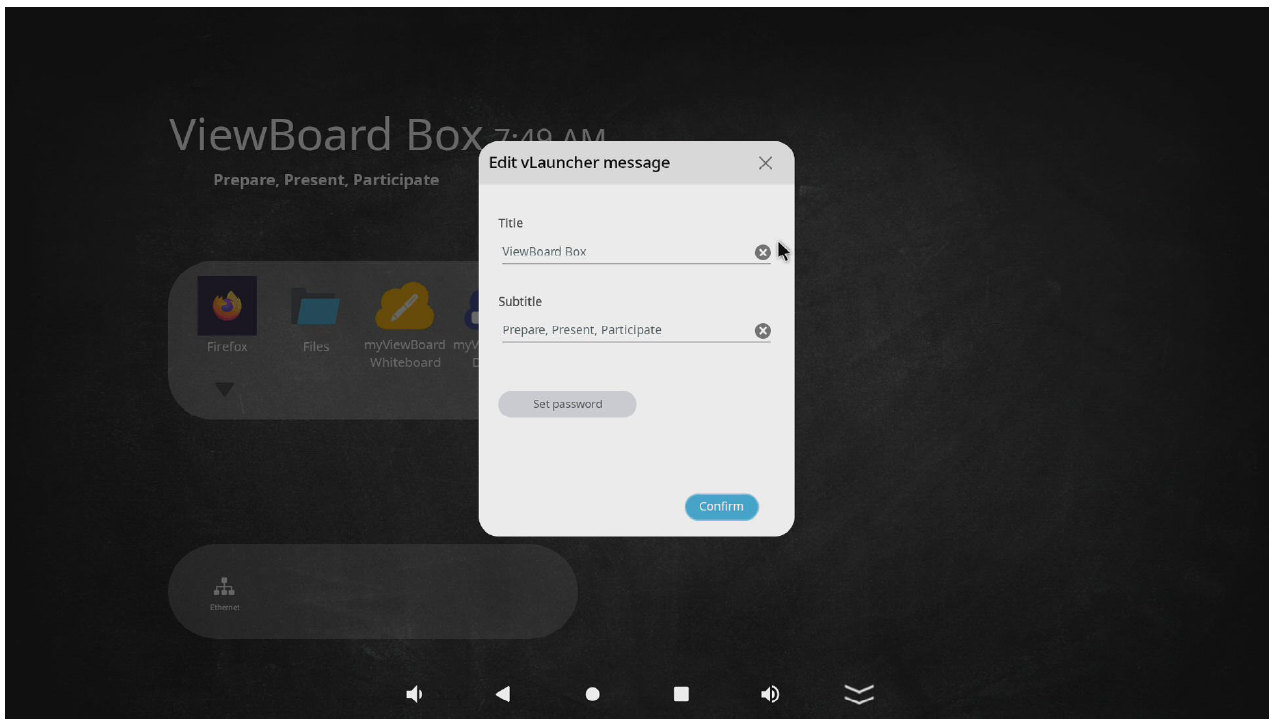
Both the vLauncher Title and Subtitle can be customized by selecting them.
Additionally, a password can be set by selecting Set Password.
Applications
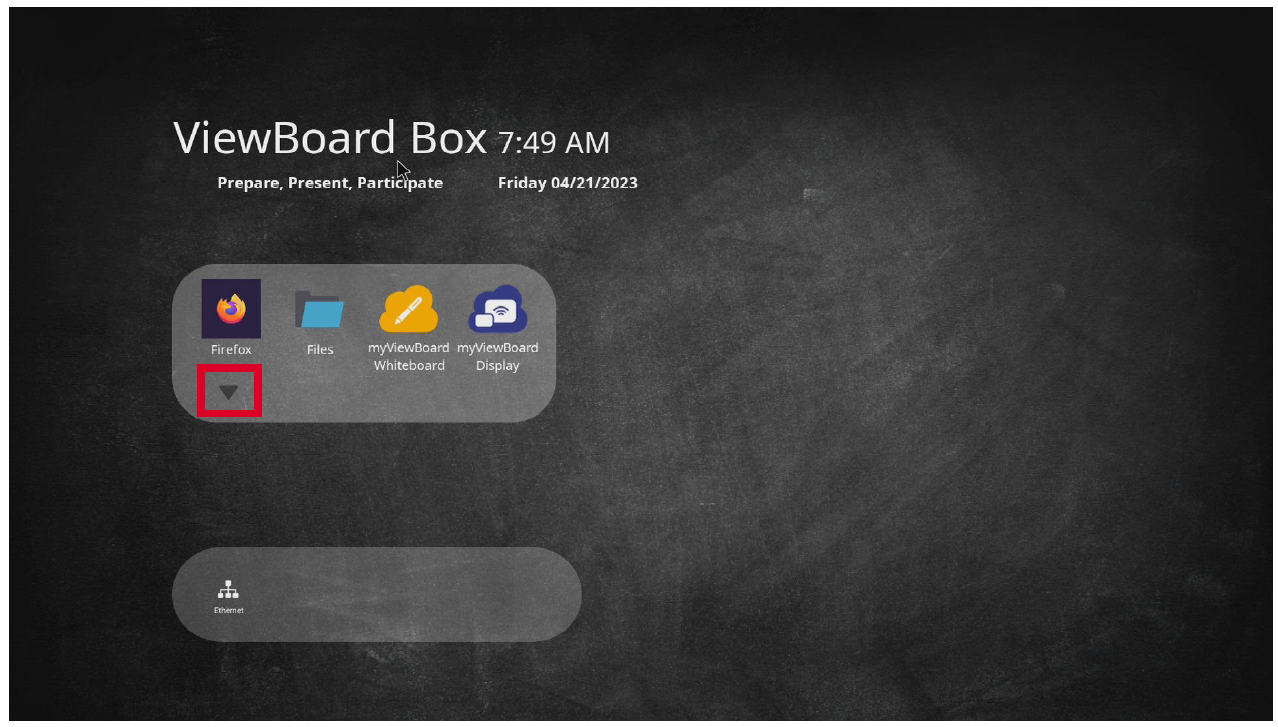
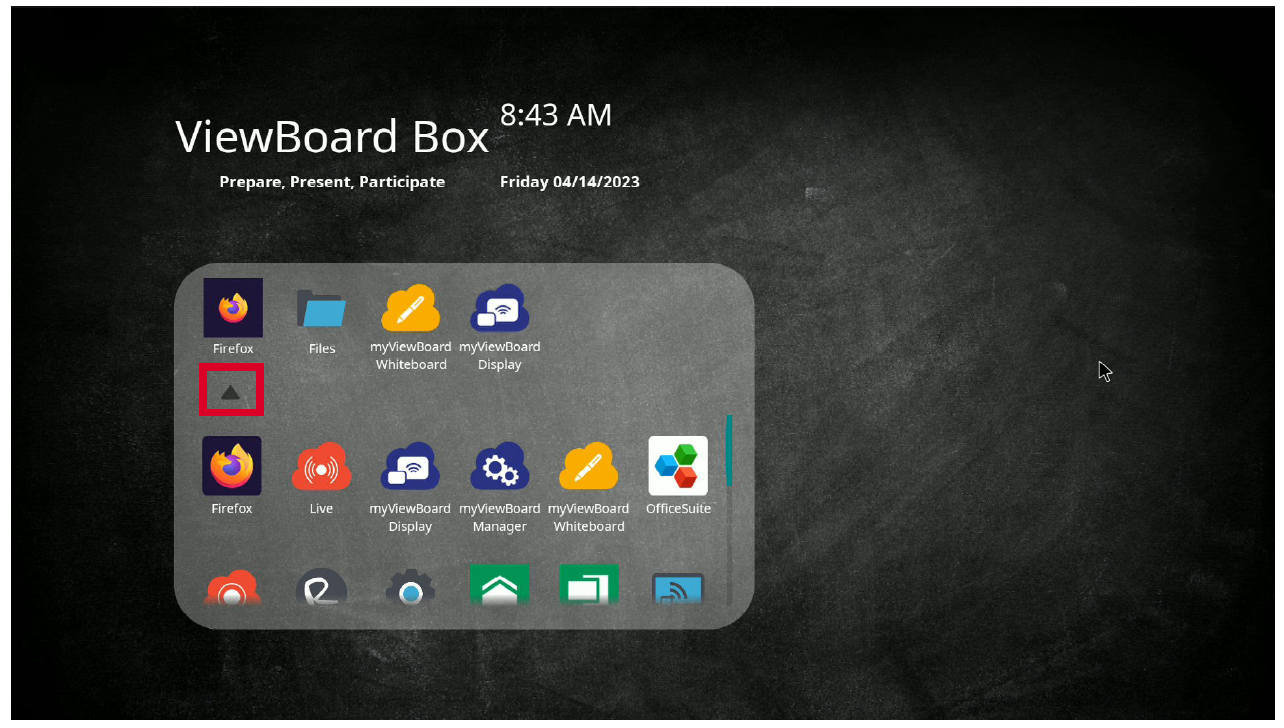
Installed applications can all be found on the welcome screen. To view all applications select the downwards arrow (▼).
To hide the application drawer, select the upwards arrow (▲).
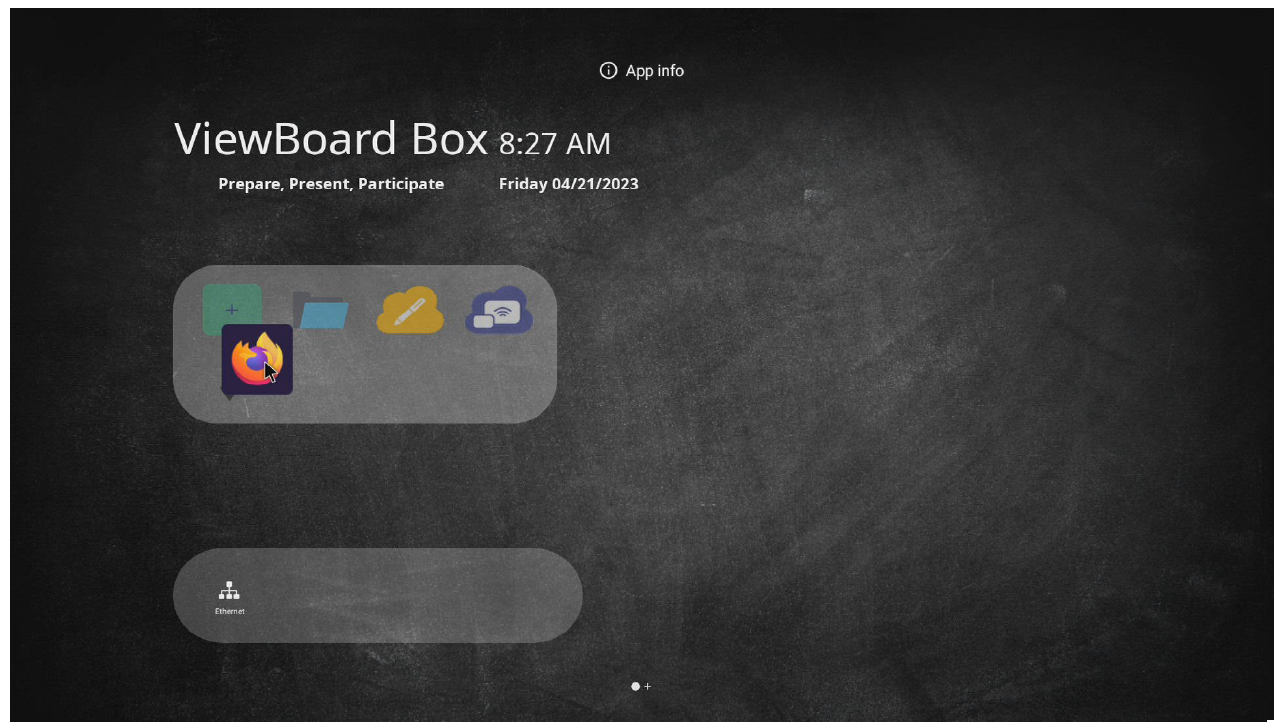
To add an application to the top applications list, select, hold, and drag the icon up.
- NOTE: Only four (4) application shortcuts can be added to the top applications list.
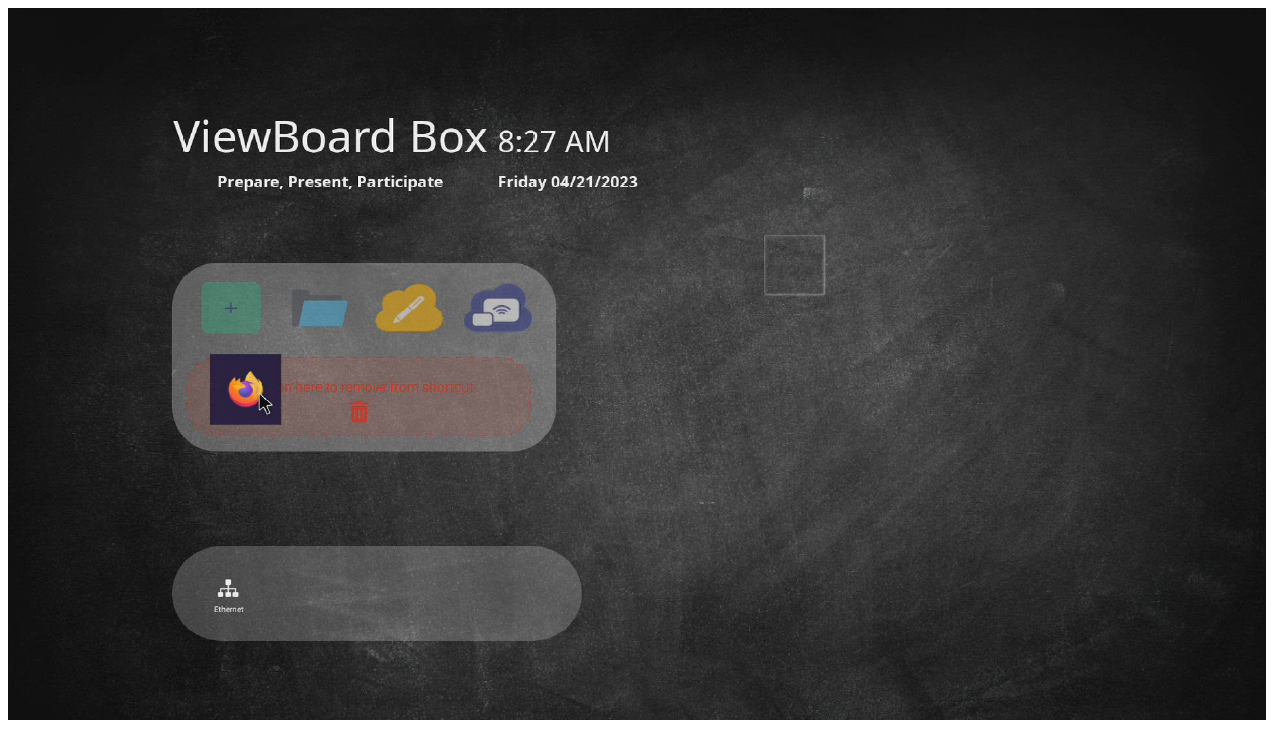
To remove an application from the top applications list, select, hold, and drag the icon down.
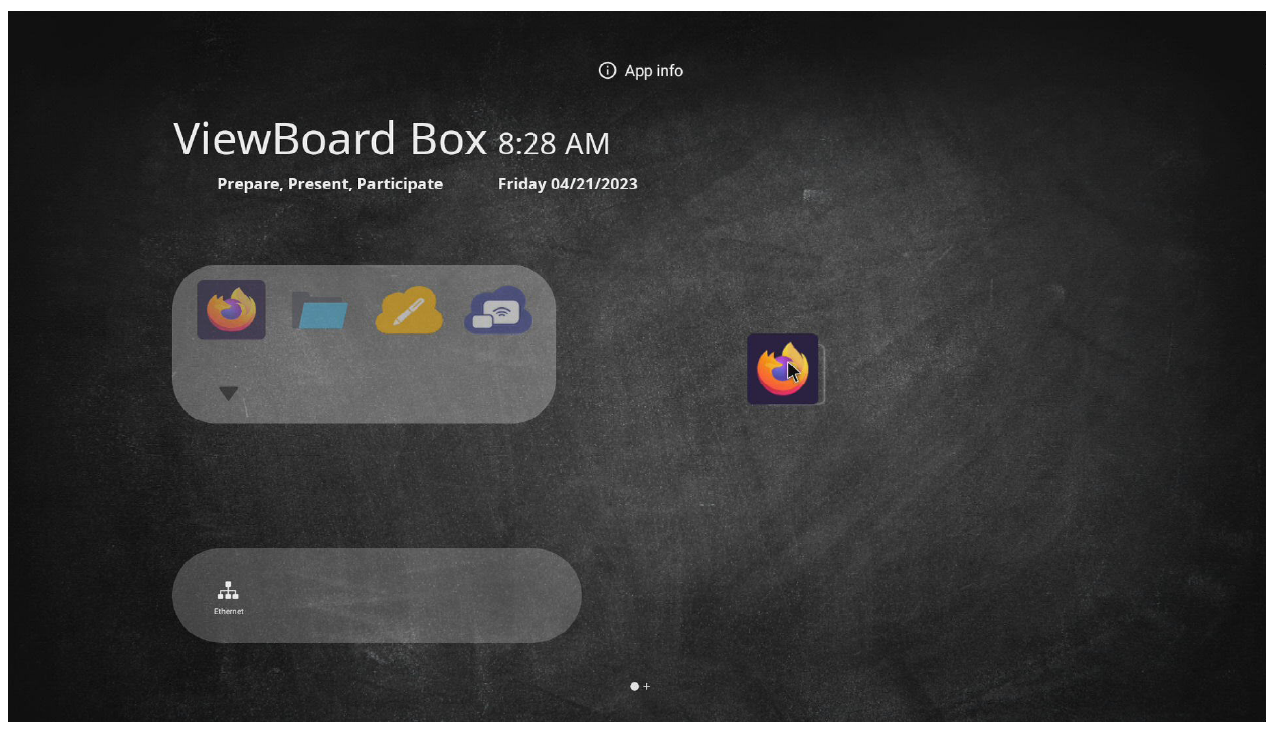
An application can also be added outside the application drawer. Simply select, hold, and drag the icon out.
Pre-installed Applications
| Icon | Description | |
|---|---|---|
 |
Files | Open, save, export, etc. files. |
| Firefox | Web browser for surfing the Internet. | |
| Live | Stream whiteboarding sessions. | |
| myViewBoard Display | Wirelessly mirror your screen to another display. | |
| myViewBoard Manager | IT management of installed ViewSonic hardware. | |
| myViewBoard Whiteboard | Digital whiteboarding software. | |
| Office Suite | Create, edit, and view Documents, Spreadsheets, Presentations, and PDFs. | |
| Record | Record, view, and save on-screen content. | |
| RevelDigital Player | Works with the RevelDigital management portal and provides the public-facing content for your own digital signage network. | |
| Settings | View and adjust system settings. | |
| Signage Launcher | Works with the ViewSonic Signage Manger portal and provides the public-facing content for your own digital signage network. | |
| Signage Player | Adjust what to allow the Signage application to access (Camera, Microphone, File and Media in your system). | |
| vCast | Wirelessly screen cast from your device. | |
| vSweeper | Clear unnecessary data and unwanted files. | |
On-Screen Display (OSD) Menu
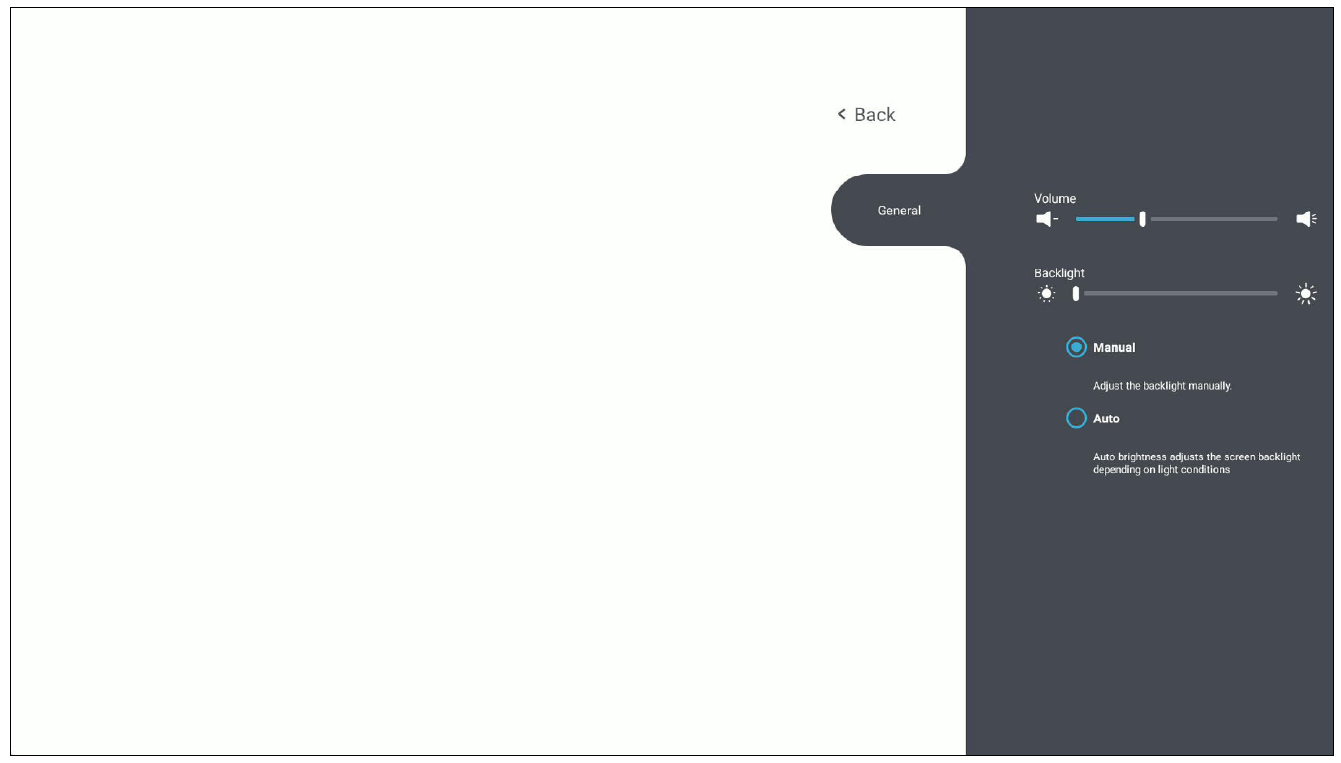
To access the General Settings, long press anywhere on the vLauncher (Home Screen) background.
General Settings
To adjust the Volume:
Drag the volume slider directly to increase or decrease the volume level.
- NOTE: The VBS200-A does not support backlight adjustment nor widgets like a standard ViewSonic IFP series display.
Settings - Embedded Player
To view and adjust the settings of the Embedded Player, select the Settings application from the application list on the vLauncher (Home Screen).
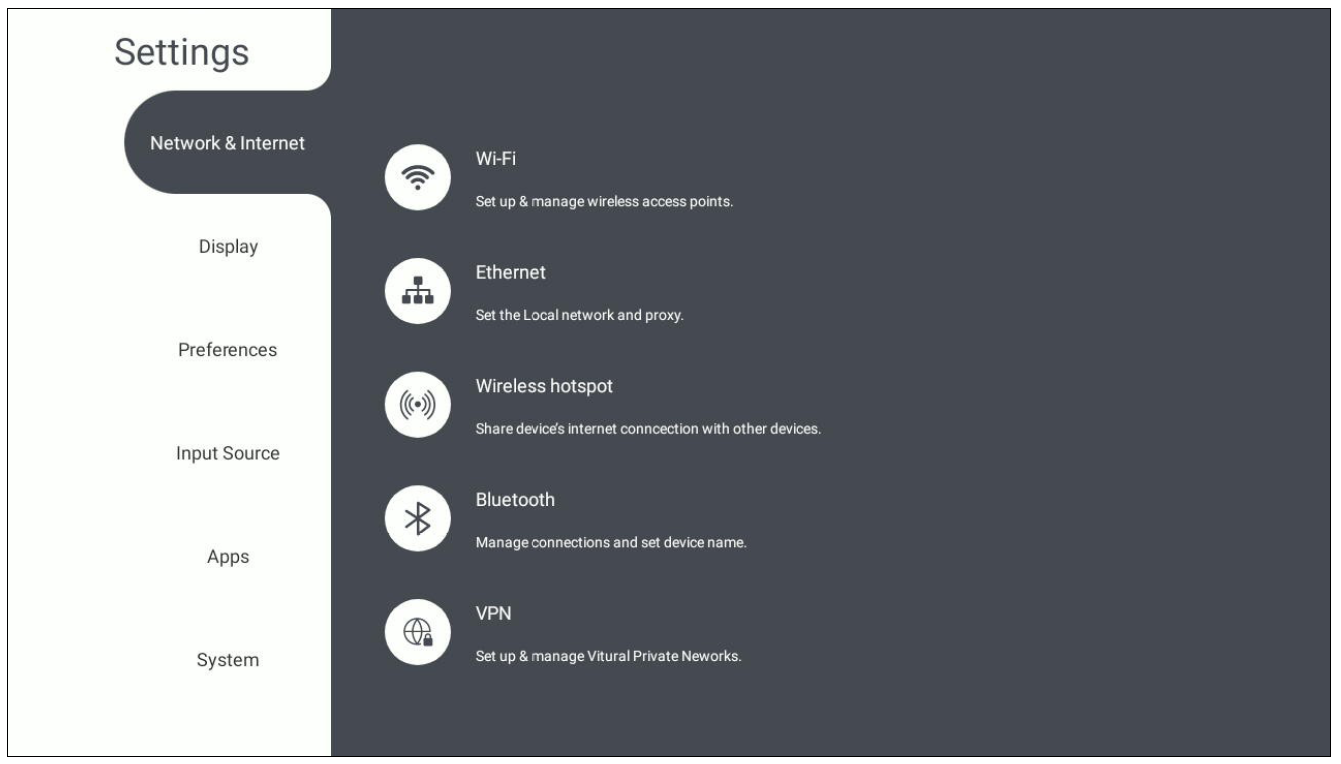
Network & Internet
Check current network connection status, set up and manage Wi-Fi, Ethernet, Bluetooth, and VPN, and establish a Wireless hotspot.
- NOTE: Both Wi-Fi and Ethernet can be used to connect to the Internet. However, Ethernet will take priority when both are connected and disable the Wi-Fi connection.
Wi-Fi
Setup and manage wireless access points.
- Select the toggle to turn Wi-Fi On or Off.
- Once On, you can: Add a Network, view Saved Networks, Refresh the network list, or view Advanced settings.
- In Advanced settings, you can toggle Network Notifications On or Off and view Network Card Info.
Ethernet
Set the local network and proxy.
- Select the drop-down list to connect/disconnect the Ethernet.
- You can adjust Local Network and Proxy settings as well.
Wireless Hotspot
Set and share my internet connection with other devices.
- Select the toggle to turn Wireless hotspot On or Off.
- Select Set up to set the Network name, Security, and Password.
Bluetooth
Manage connections, set the device name and discoverability.
- Select the toggle to turn Bluetooth On or Off. Once On, users can select a listed device to pair and connect to, rename their device, remove a device, or receive files.
- Select Received files to show all received files.
VPN
Setup and manage Virtual Private Networks (VPN). To create a VPN profile:
- Select Add VPN.
- Key in the Name.
- Select the VPN Type
- Choose to enable/disable PPP encryption (MPPE) and/or show Advanced options.
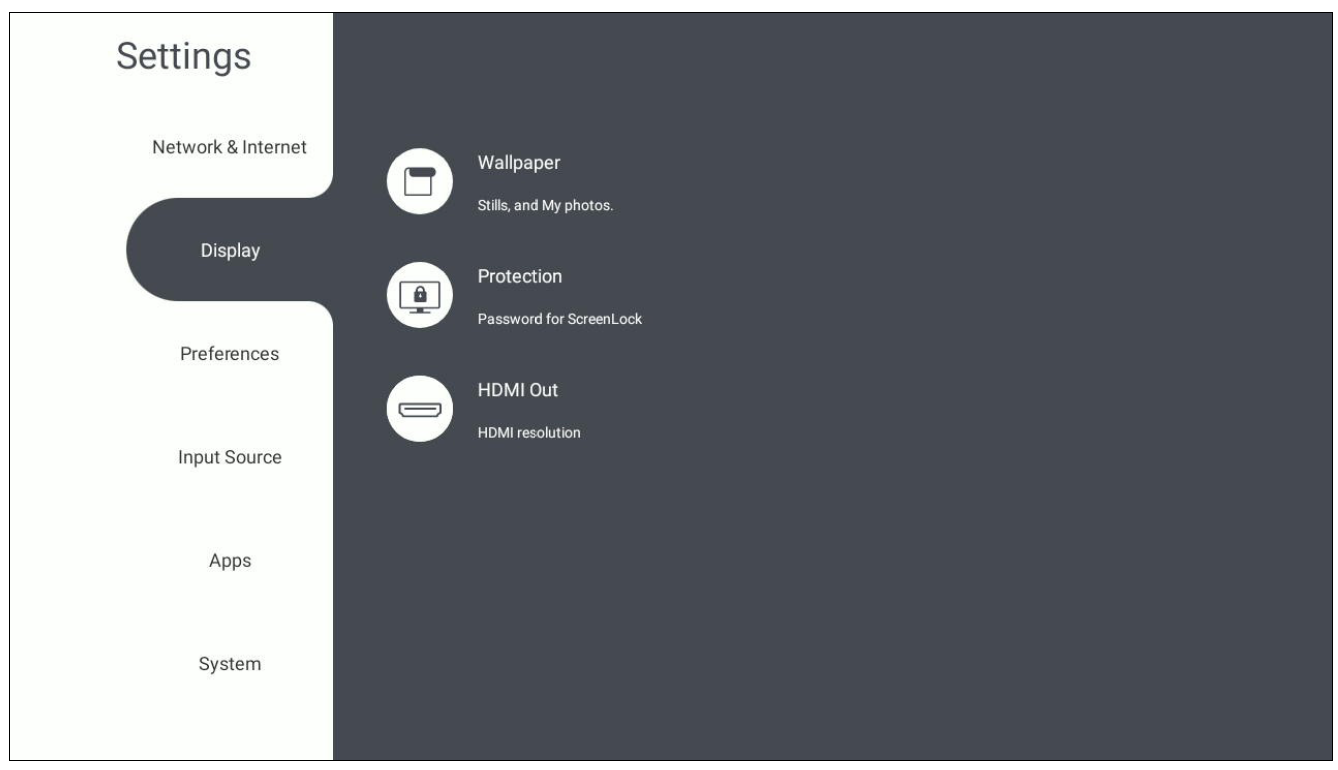
Display
Adjust the Wallpaper, Protection, and HDMI Out settings.
Wallpaper
Users can change their wallpaper with default images, or use their own by tapping My Photos and selecting the image file.
Protection
Toggle HDCP & Copyright On or Off. HDCP is a secure protocol to protect audio and video signal transmission.
- NOTE: Grayed out content is not available for use.
HDMI Out
Adjust the HDMI Out Resolution setting when connected via HDMI Out.
- NOTE: For 4K resolution output, please plug in the HDMI cable first before plugging in the AC Adapter or Ethernet cable (PoE) for power.
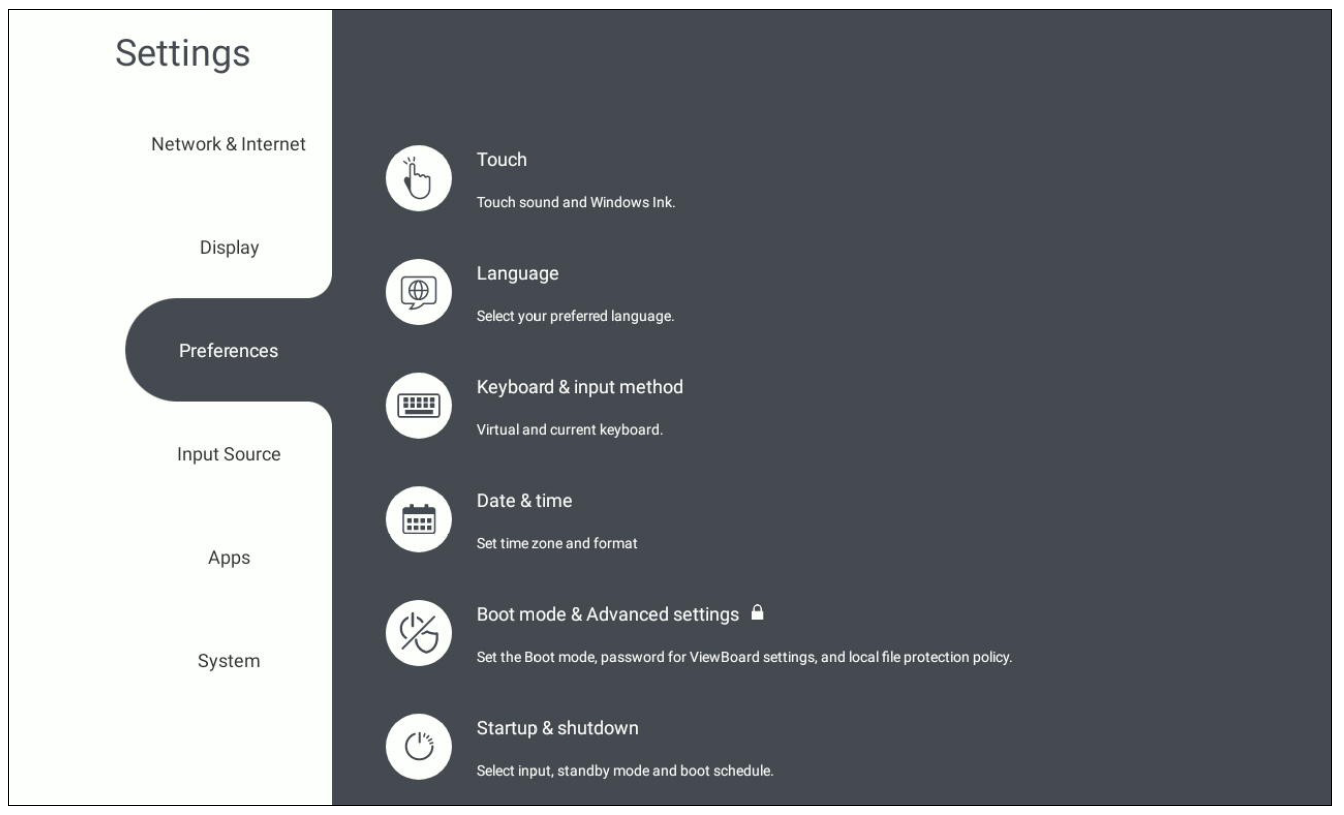
Preferences
View and adjust Touch, Language, Keyboard & Input Method, Date & Time, Boot Mode & Advanced, and Startup & Shut down settings.
Touch
Toggle Touch Sounds On or Off.
Language
Choose the preferred language from the available languages.
Keyboard & Input Method
Enable/disable the visual keyboard and/or change the default input method.
Date & Time
Set the system time and format.
| Item | Description |
|---|---|
| Automatic Date & Time | When enabled, the VBS200-A will automatically synchronize the date and time via the Internet. |
| Time Zone | Select the relevant time zone. |
| Use 24-hour Format | Choose from 12-hour or 24-hour time format. Simply toggle the setting On or Off. |
| Date Format | Select the relevant date (month, day, and year) format. |
Boot Mode & Advanced Settings
Adjust the preferred boot up mode and set/reset a password.
| Item | Description |
|---|---|
| Normal Mode | Screen sharing applications will be loaded and run normally. |
| Secure Mode | Screen sharing applications will not be loaded. |
| Disable ViewBoard OS | This feature is not available on the VBS200-A. |
| Enable Password for ViewBoard Settings | Lock or unlock access to the ViewBoard Settings. |
| Boot Mode and Advanced Settings Password | Modify the Boot mode and ViewBoard Settings entry password. |
| Local File Protection Policy | Choose how long to keep locally stored files in the Files application. |
| Color Correction | Color correct the VBS200-A connected display. |
| Reset ViewBoard | Reset to the factory default settings. |
Startup & Shutdown
Adjust the preferred boot up mode and set/reset a password.
| Item | Description | ||||||
|---|---|---|---|---|---|---|---|
| Startup Input | Choose the startup input source. | ||||||
| Display Settings when NO SIGNAL | This feature is not available on the VBS200-A. | ||||||
| Standby Mode | Decide what happens when the EnergyStar Mode function is On.
| ||||||
| EnergyStar Mode | When On, the Standby Mode function will enact when the system is idle for one hour. When Off, Standby Mode will be disabled. | ||||||
| Black Screen After Startup | This feature is not available on the VBS200-A. | ||||||
| Time Switch | When enabled, the VBS200-A will turn off without any reminder after the scheduled off time is reached. | ||||||
| Schedule | Schedule a Boot and Shut Off time. |
Toolbar Settings
- NOTE: This feature is not currently available on the VBS200-A.
Input Source
Adjust the input source settings.
Label Input Source
- NOTE: This feature is not currently available on the VBS200-A.
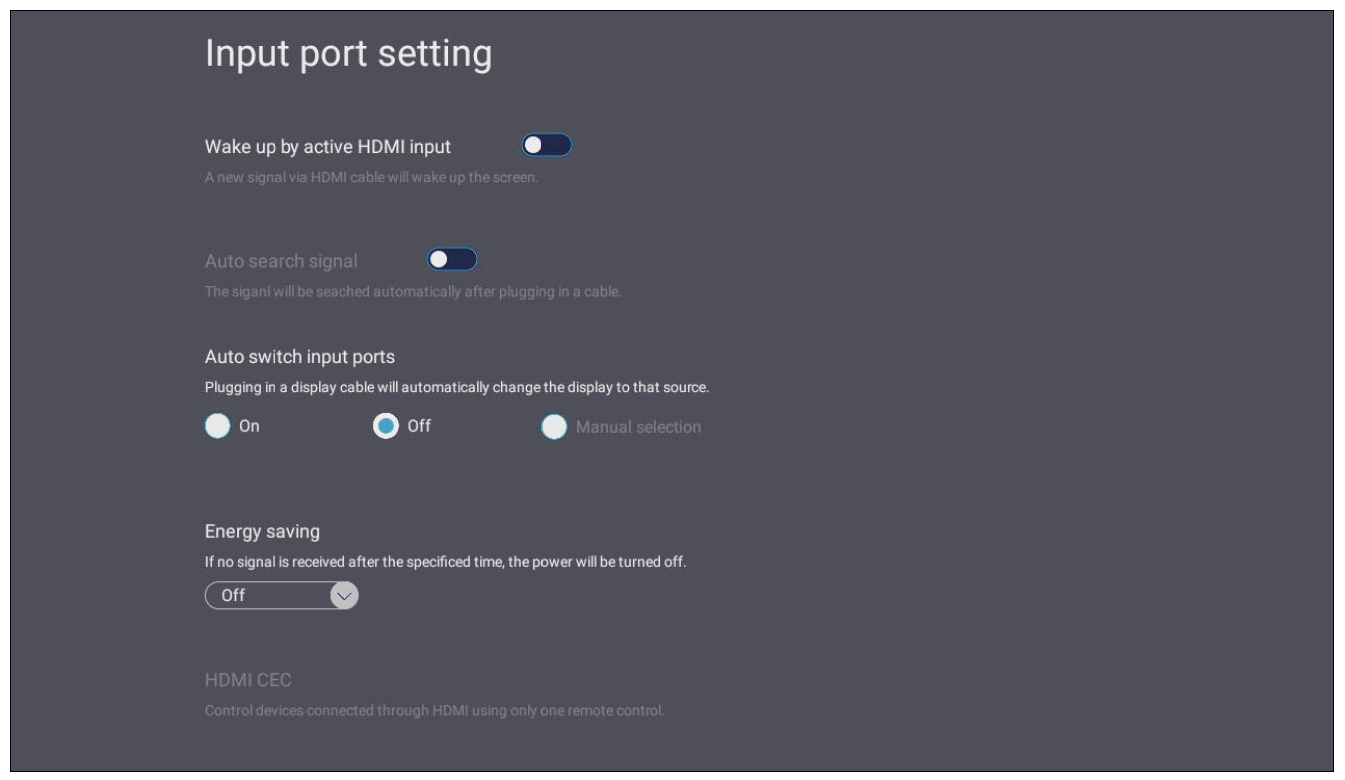
Source
Toggle Wake up by active source, Signal auto switch, and Energy Saving plan.
| Item | Description |
|---|---|
| Wake Up by Active HDMI Input | The system will turn on automatically after plugging in an HDMI cable when the VBS200-A is in Sleep Mode. |
| Auto Search Signl | This feature is not available on the VBS200-A. |
| Auto Switch Input Ports | The input source will automatically change to the source of the display cable after it’s plugged in. |
| Energy Saving | Set a time period to power off if no input signal is detected. |
| HDMI CEC | This feature is not available on the VBS200-A. |
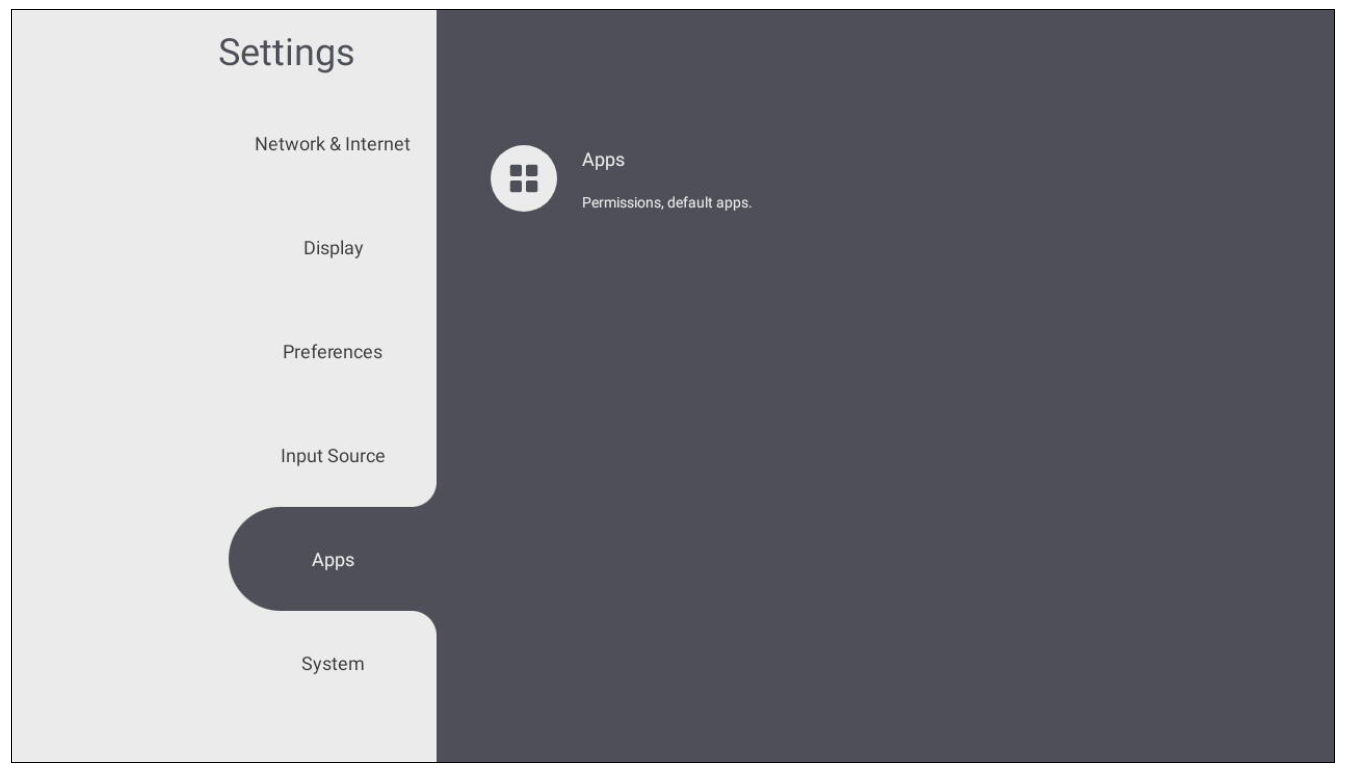
Apps
View application information and force stop, uninstall, move to USB storage, clear data, clear cache, and clear defaults.
- NOTE:
- Preloaded applications cannot be uninstalled.
- Not all applications support the Clear Data function.
System
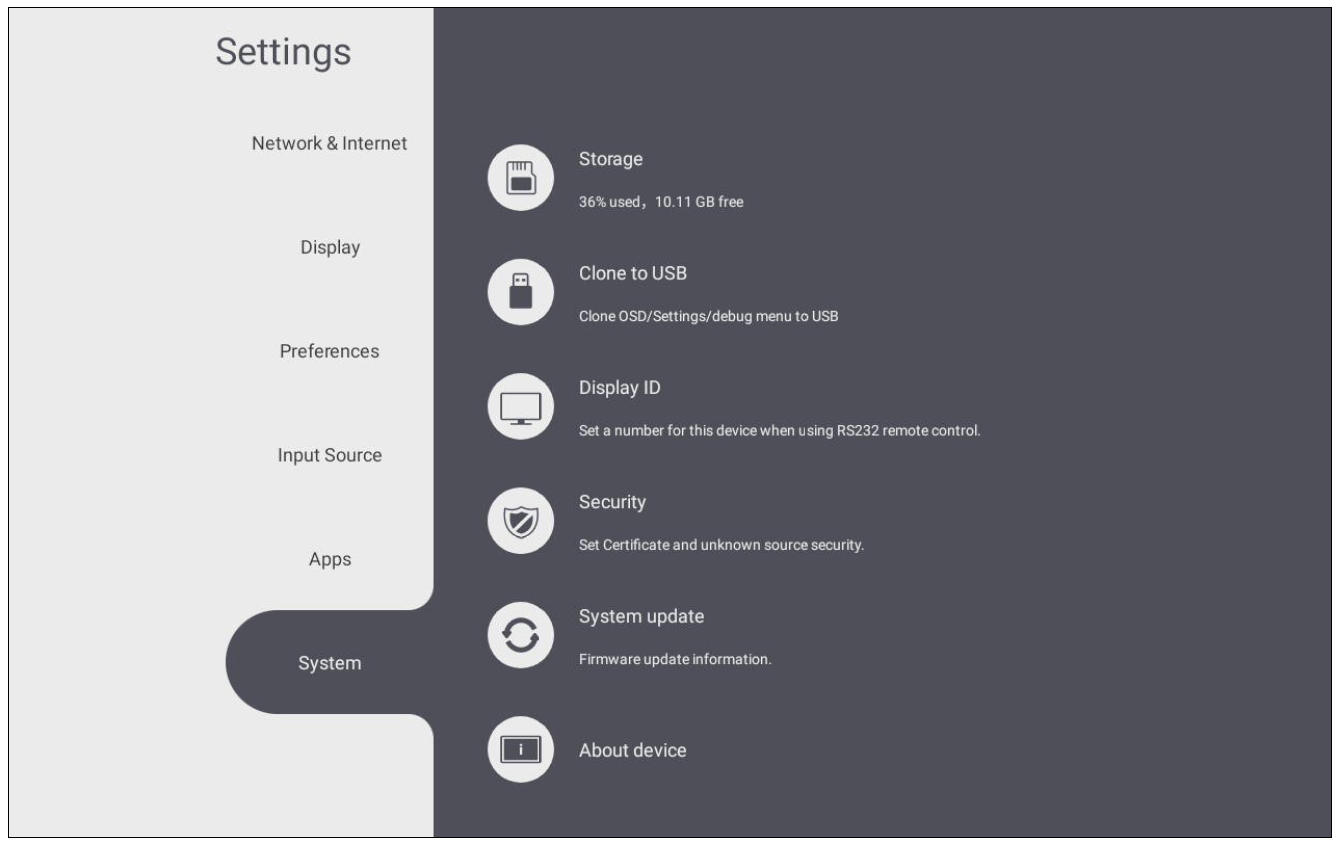
View and adjust Storage, Clone to USB, Display ID, Security, System Update, and About Device settings.
Storage
Check the remaining storage space and clear cached data for all applications.
Clone to USB
Copy settings to an external USB drive.
Display ID
Assign a number to remotely control the display by RS-232 or LAN. To assign or change the Display ID, select Edit ID and input a number.
- NOTE: The Display ID is for RS-232 users, and the range is 01~99.
Security
Review Certificates, Credentials, Unknown Source Security, and Privacy and Copyright Protection settings.
- Select Install Certificate from Storage to add additional certificates.
- Selecting Clear Credentials will remove all manually installed credentials.
- NOTE: Preloaded credentials cannot be cleared.
- Under Trusted Credentials view and edit all trusted and installed certificates. Selecting a credential will provide further detailed information.
- To allow the installation of applications from unknown sources, select the box under Unknown Source Security.
- NOTE: Applications from unknown sources may not be compatible or work properly
System Update
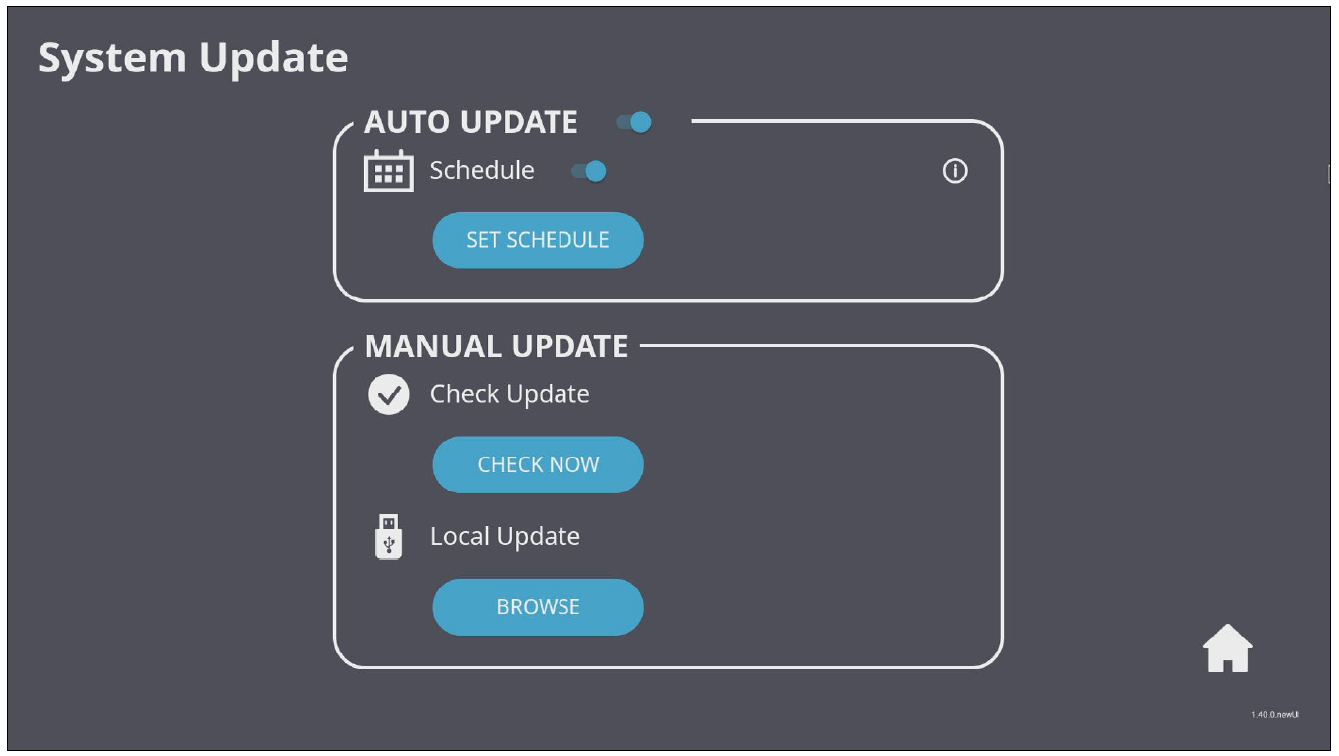
The VBS200-A automatically searches for software updates whenever connected to the Internet (OTA). With just one click, users can update their VBS200-A firmware version.
| Item | Description |
|---|---|
| Auto Update | The system will automatically check for a new version. If a new version is found, the system will automatically update. After the update is complete, the system will reboot. |
| Schedule | If ON, a specific update time can be set. |
| Manual Update | Update the firmware manually. |
About Device
Display Embedded Player information, Legal information, and Asset Tagging.
- The asset information can be adjusted by selecting Edit.
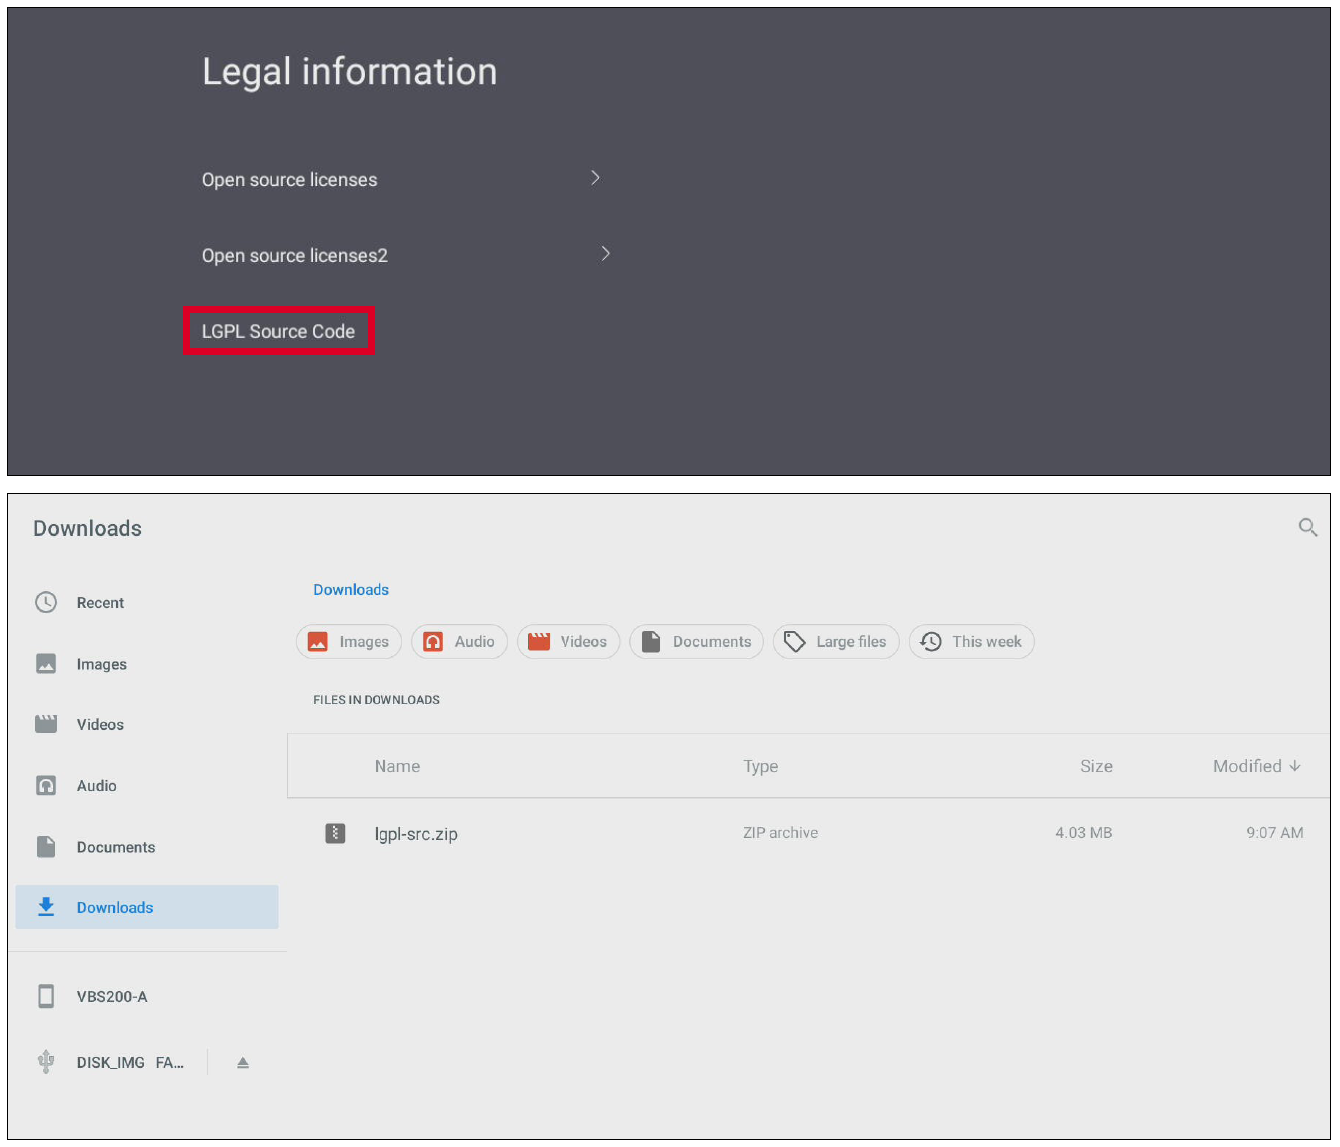
- Select Legal Information to check open source licenses. Also, by selecting the LGPL Source Code it will be downloaded to the Download folder of the system.
Technical Specifications
| Category | Item | Specifications |
|---|---|---|
| Processor | ARM base CPU | Quad-Core ARM Cortex-A55 |
| Graphic | GPU | ARM G52 2EE |
| OS | Android 11 | |
| Memory | RAM | DDR4 4 GB |
| ROM | eMMC 16 GB | |
| Wi-Fi Module | Model | AW-XB547NF
(IEEE 802.11a/b/g/n/ac/ax Wireless LAN 2T2R and Bluetooth 5.2 Combo Module (M.2 2230)) |
| Antenna | Model | K4DK-680712-00 Round Cable, WIFI, X7 RF |
| Frequency | 2400MHz ~2500MHz;
5150MHz~5850MHz | |
| Peak Gain | 2.4G: 4.46 dBi
5.8G: 5.52 dBi | |
| Input | Ports | 1 x DC IN
1 x HDMI IN (v. 1.4, 1920 x 1080@60Hz) 1 x LAN (RJ45) |
| Output | Ports | 1 x HDMI (v. 2.0, 4K@60Hz)
1 x MiniDP (v. 1.2, 2K@60Hz) 1 x RS-232 1 x USB 2.0 Type A (5V/0.5A) 1 x USB 3.0 Type A (5V/0.9A) 1 x USB 2.0 Type C (5V/0.5A) 1 x Audio Out (3.5 mm) |
| Mounting | Dimensions (mm) | 75 x 75 |
| Physical | Dimensions (mm) | 151.8 x 127.8 x 32.4 mm |
| Dimensions (in.) | 5.97” x 5.03” x 1.27” | |
| Weight (kg) | 0.8 kg | |
| Weight (lbs) | 1.76 lbs | |
| Operating Conditions | Altitude | < 5000 m |
| Humidity | 20% ~ 90% (non-condensing) | |
| Temperature | 0°C ~ 40°C (32°F ~ 104°F) | |
| Storage Conditions | Altitude | < 5000 m |
| Humidity | 20% ~ 90% (non-condensing) | |
| Temperature | -20°C ~ 60°C (-4°F ~ 140°F) | |
| Power | Consumption | AC: 17W (Max.)
PoE: 24W (Max.) |
Troubleshooting
This section describes some common problems that you may experience when using the VBS200-A. If a problem persists, please contact your local service center.
| Problem or Issue | Possible Solutions |
|---|---|
| The VBS200-A will not start. | If the LED does not light green during device boot up:
|
| The LAN connection is not working. |
|
| There is no screen image on the connected display. |
|
| The ViewBoard ecosystem is inaccessible. |
To properly access the ViewBoard ecosystem (including companion applications) on your network, request your IT department to open the following ports:
The WebRTC protocol is actively used in screen sharing. Verify that these ports are open on your network firewall. To check your connectivity status, visit: https://myviewboard.com/cast2/test/index.html. |
View Third Party Licenses
For Android Open Source Copyright Notice, refer to the Third-party licenses in legal information.
For LGPL source code, click on the LGPL source code in legal information. It will be automatically downloaded to Downloads > lgpl-src.zip.
Compliance Information
This section addresses all connected requirements and statements regarding regulations. Confirmed corresponding applications shall refer to nameplate labels and relevant markings on the unit.
FCC Compliance Statement
This device complies with part 15 of FCC Rules. Operation is subject to the following two conditions: (1) this device may not cause harmful interference, and (2) this device must accept any interference received, including interference that may cause undesired operation. This equipment has been tested and found to comply with the limits for a Class B digital device, pursuant to part 15 of the FCC Rules.
These limits are designed to provide reasonable protection against harmful interference in a residential installation. This equipment generates, uses, and can radiate radio frequency energy, and if not installed and used in accordance with the instructions, may cause harmful interference to radio communications. However, there is no guarantee that interference will not occur in a particular installation. If this equipment does cause harmful interference to radio or television reception, which can be determined by turning the equipment off and on, the user is encouraged to try to correct the interference by one or more of the following measures:
- Reorient or relocate the receiving antenna.
- Increase the separation between the equipment and receiver.
- Connect the equipment into an outlet on a circuit different from that to which the receiver is connected.
- Consult the dealer or an experienced radio/TV technician for help.
Warning: You are cautioned that changes or modifications not expressly approved by the party responsible for compliance could void your authority to operate the equipment.
Industry Canada Statement
CAN ICES-003(B) / NMB-003(B)
CE Conformity for European Countries
 |
The device complies with the EMC Directive 2014/30/EU and Low Voltage Directive 2014/35/EU. |
The following information is only for EU-member states:
| The mark shown to the right is in compliance with the Waste Electrical and Electronic Equipment Directive 2012/19/EU (WEEE). The mark indicates the requirement NOT to dispose of the equipment as unsorted municipal waste, but use the return and collection systems according to local law. |  |
Para su uso en México
“La operación de este equipo está sujeta a las siguientes dos condiciones: (1) es posible que este equipo dispositivo no cause interferencia perjudicial y (2) este equipo o dispositivo debe aceptar cualquier interferencia, incluyendo la que pueda causar su operación no deseada”.
“Este equipo ha sido diseñado para operar con antenas tipo monopolo con ganancia de 5 dBi para 2.4 GHz y 5 GHz WLAN. El uso con este equipo de antenas que tengan una ganancia mayor que 5 dBi quedan prohibidas. La antena es única y la impedancia requerida es de 50 ohms”.
Declaration of RoHS2 Compliance
This product has been designed and manufactured in compliance with Directive 2011/65/EU of the European Parliament and the Council on restriction of the use of certain hazardous substances in electrical and electronic equipment (RoHS2 Directive) and is deemed to comply with the maximum concentration values issued by the European Technical Adaptation Committee (TAC) as shown below:
| Substance | Proposed Maximum Concentration | Actual Concentration |
|---|---|---|
| Lead (Pb) | 0.1% | < 0.1% |
| Mercury (Hg) | 0.1% | < 0.1% |
| Cadmium (Cd) | 0.01% | < 0.01% |
| Hexavalent Chromium (Cr6⁺) | 0.1% | < 0.1% |
| Polybrominated biphenyls (PBB) | 0.1% | < 0.1% |
| Polybrominated diphenyl ethers (PBDE) | 0.1% | < 0.1% |
| Bis (2-ethylhexyl) phthalate (DEHP) | 0.1% | < 0.1% |
| Butyl benzyl phthalate (BBP) | 0.1% | < 0.1% |
| Dibutyl phthalate (DBP) | 0.1% | < 0.1% |
| Diisobutyl phthalate (DIBP) | 0.1% | < 0.1% |
Certain components of products as stated above are exempted under the Annex III of the RoHS2 Directives as noted below. Examples of exempted components are:
- Copper alloy containing up to 4% lead by weight.
- Lead in high melting temperature type solders (i.e. lead-based alloys containing 85% by weight or more lead).
- Electrical and electronic components containing lead in a glass or ceramic other than dielectric ceramic in capacitors, e.g. piezoelectronic devices, or in a glass or ceramic matrix compound.
- Lead in dielectric ceramic in capacitors for a rated voltage of 125V AC or 250V DC or higher.
Indian Restriction of Hazardous Substances
Restriction on Hazardous Substances statement (India). This product complies with the “India E-waste Rule 2011” and prohibits use of lead, mercury, hexavalent chromium, polybrominated biphenyls or polybrominated diphenyl ethers in concentrations exceeding 0.1 weight % and 0.01 weight % for cadmium, except for the exemptions set in Schedule 2 of the Rule.
Product Disposal at End of Product Life
ViewSonic® respects the environment and is committed to working and living green. Thank you for being part of Smarter, Greener Computing. Please visit the ViewSonic® website to learn more.
USA & Canada
https://www.viewsonic.com/us/go-green-with-viewsonic
Europe
https://www.viewsonic.com/eu/environmental-social-governance/recycle
Taiwan
https://recycle.moenv.gov.tw
For EU users, please contact us for any safety/accident issue experienced with this product:
| ViewSonic Europe Limited Haaksbergweg 75 1101 BR Amsterdam Netherlands | |
| +31 (0) 650608655 | |
| EPREL@viewsoniceurope.com | |
| https://www.viewsonic.com/eu/ |
Copyright Information
Copyright© ViewSonic® Corporation, 2023. All rights reserved.
Macintosh and Power Macintosh are registered trademarks of Apple Inc.
Microsoft, Windows, and the Windows logo are registered trademarks of Microsoft Corporation in the United States and other countries.
ViewSonic® and the three birds logo are registered trademarks of ViewSonic® Corporation.
VESA is a registered trademark of the Video Electronics Standards Association. DPMS, DisplayPort, and DDC are trademarks of VESA.
Disclaimer: ViewSonic® Corporation shall not be liable for technical or editorial errors or omissions contained herein; nor for incidental or consequential damages resulting from furnishing this material, or the performance or use of this product.
In the interest of continuing product improvement, ViewSonic® Corporation reserves the right to change product specifications without notice. Information in this document may change without notice.
No part of this document may be copied, reproduced, or transmitted by any means, for any purpose without prior written permission from ViewSonic® Corporation.
VBS200-A_UG_ENG_1a_20230614
Customer Service Contact Information
For technical support or product service, see the table below or contact your reseller.
- Note: You will need the product’s serial number, which is located on the rear of the monitor by the I/O ports.
Asia Pacific & Africa
| Country / Region | Website |
|---|---|
| Australia | https://viewsonic.com/au/ |
| Bangladesh | https://www.viewsonic.com/bd/ |
| 中囯(China) | https://www.viewsonic.com.cn |
| 香港 (繁體中文) | https://www.viewsonic.com/hk/ |
| Hong Kong (English) | https://www.viewsonic.com/hk-en/ |
| India | https://www.viewsonic.com/in/ |
| Indonesia | https://www.viewsonic.com/id/ |
| Israel | https://www.viewsonic.com/il/ |
| 日本 (Japan) | https://www.viewsonic.com/jp/ |
| Korea | https://www.viewsonic.com/kr/ |
| Malaysia | https://www.viewsonic.com/my/ |
| Middle East | https://www.viewsonic.com/me/ |
| Myanmar | https://www.viewsonic.com/mm/ |
| Nepal | https://www.viewsonic.com/np/ |
| New Zealand | https://www.viewsonic.com/nz/ |
| Pakistan | https://www.viewsonic.com/pk/ |
| Philippines | https://www.viewsonic.com/ph/ |
| Singapore | https://www.viewsonic.com/sg/ |
| 臺灣 (Taiwan) | https://www.viewsonic.com/tw/ |
| ประเทศไทย (Thailand) | https://www.viewsonic.com/th/ |
| Việt Nam | https://www.viewsonic.com/vn/ |
| South Africa & Mauritius | https://www.viewsonic.com/za/ |
Americas
| Country / Region | Website |
|---|---|
| United States | https://www.viewsonic.com/us/ |
| Canada | https://www.viewsonic.com/us/ |
| Latin America | https://www.viewsonic.com/la/ |
Europe
| Country / Region | Website |
|---|---|
| Europe | https://www.viewsonic.com/eu/ |
| France | https://www.viewsonic.com/fr/ |
| Deutschland | https://www.viewsonic.com/de/ |
| Қазақстан | https://www.viewsonic.com/kz/ |
| Россия | https://www.viewsonic.com/ru/ |
| España | https://www.viewsonic.com/es/ |
| Türkiye | https://www.viewsonic.com/tr/ |
| Україна | https://www.viewsonic.com/ua/ |
| United Kingdom | https://www.viewsonic.com/uk/ |

