VB-VIS-003 ViewSonic Document Camera
Overview
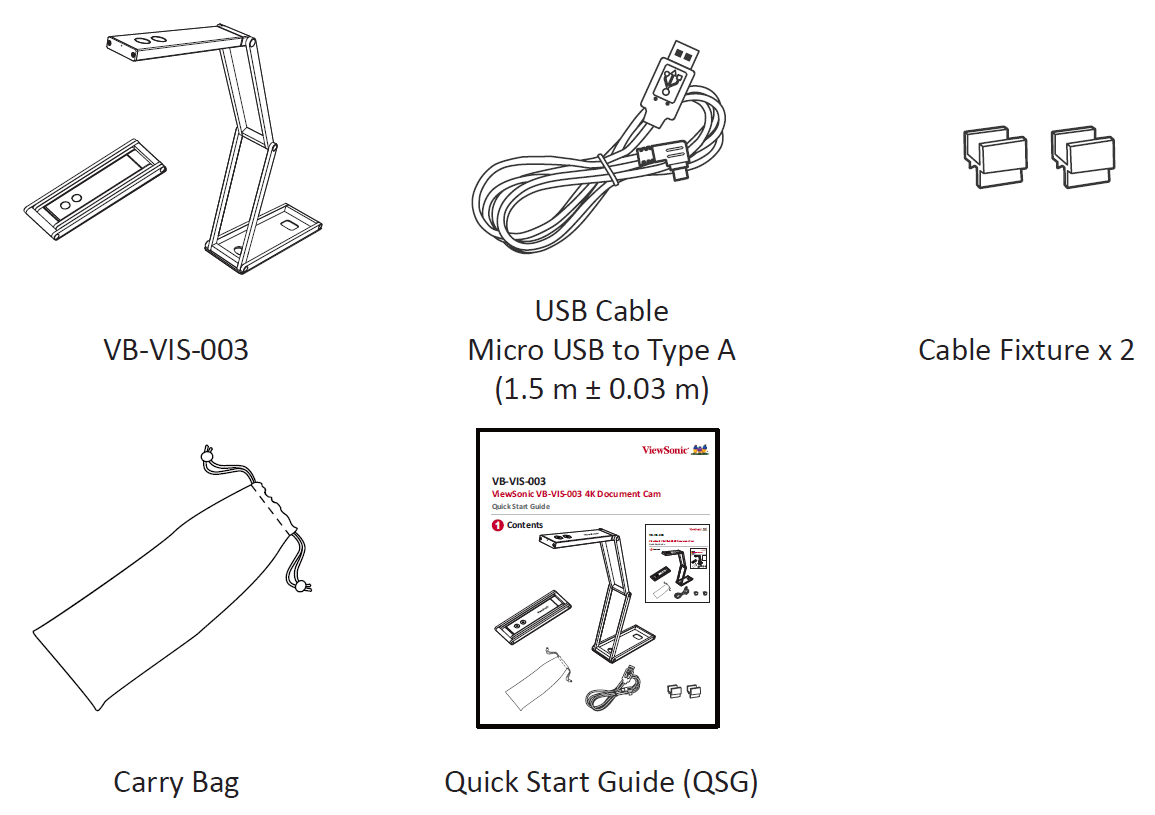
Package Contents
Please take a moment to check if all the necessary items are included in the package. If anything is missing or damaged, please contact your dealer immediately.
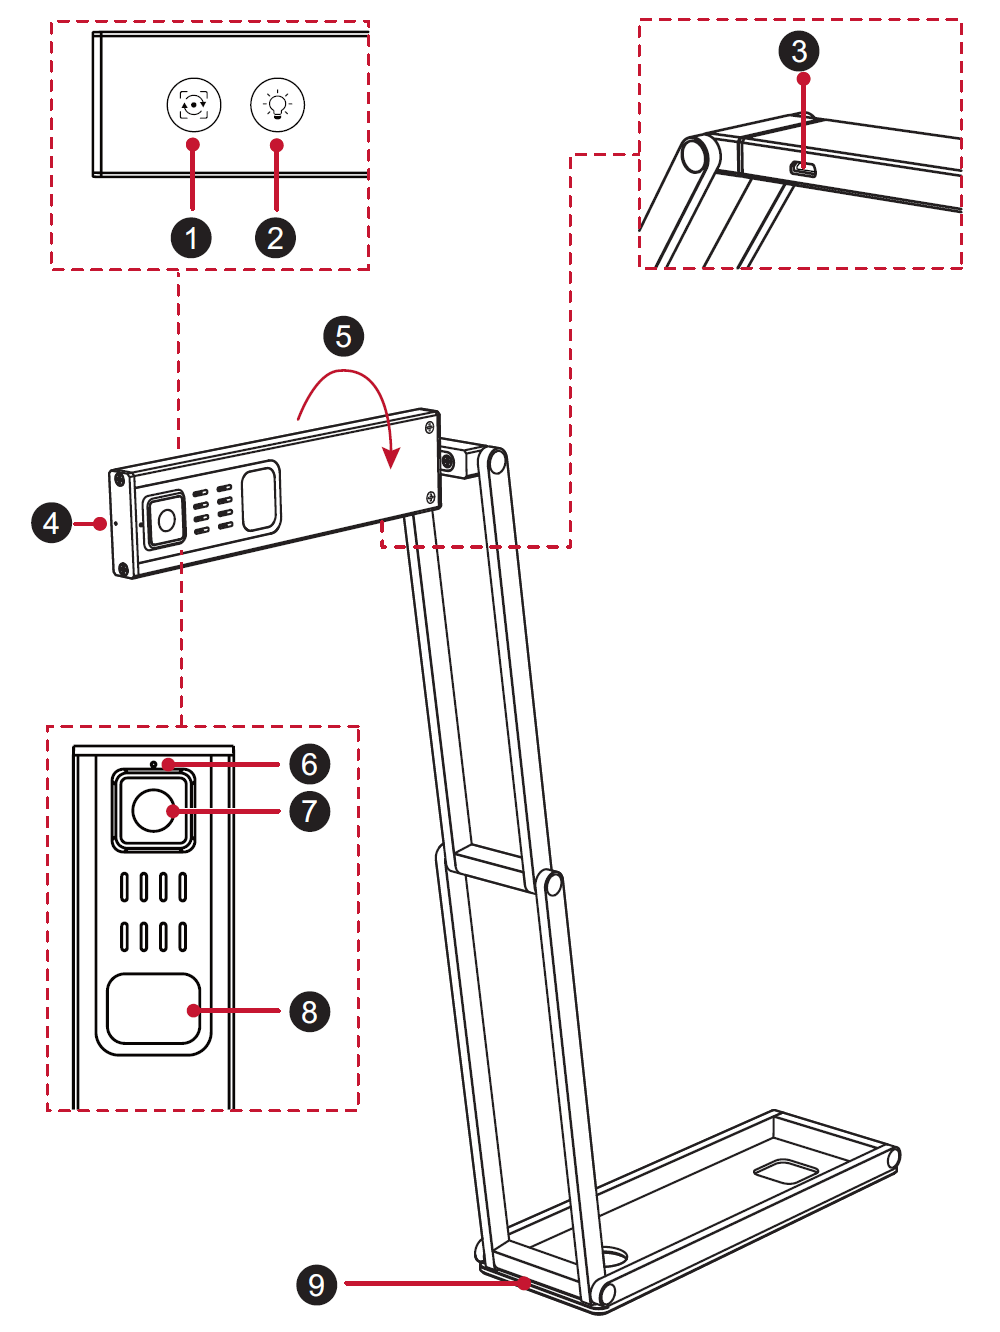
Product
| Number | Description | Note |
|---|---|---|
| 1 | Autofocus / Flip Button | Autofocus: Press once Flip Image 0°/180°: Press and hold |
| 2 | LED Light Button | Press to turn on; 3-level brightness control |
| 3 | Micro USB Port | |
| 4 | Power LED Indicator | A blue light will show when connected. |
| 5 | Flip Camera Head | 0°/180° |
| 6 | Microphone | |
| 7 | AF Lens | |
| 8 | LED Light | |
| 9 | Base Plate |
Setting Up the Document Camera
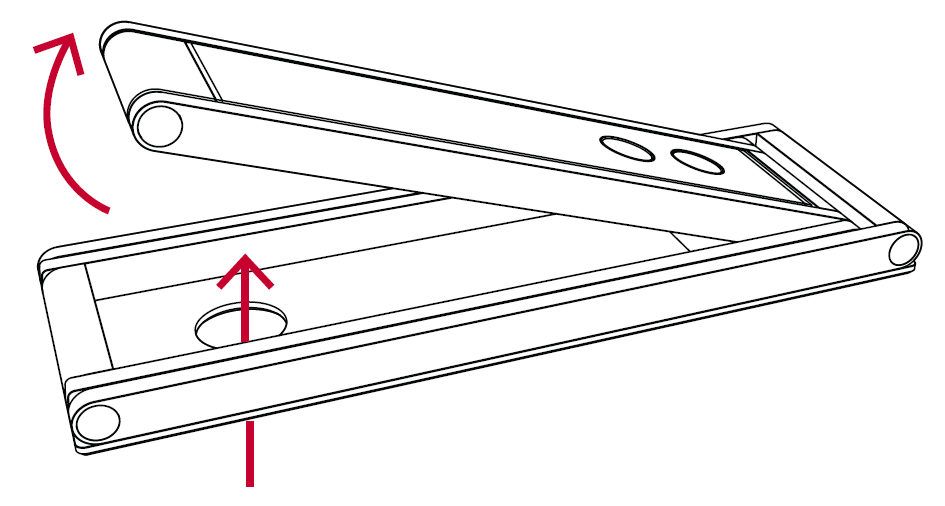
- Lift the device by pushing through the opening at the Base Plate.
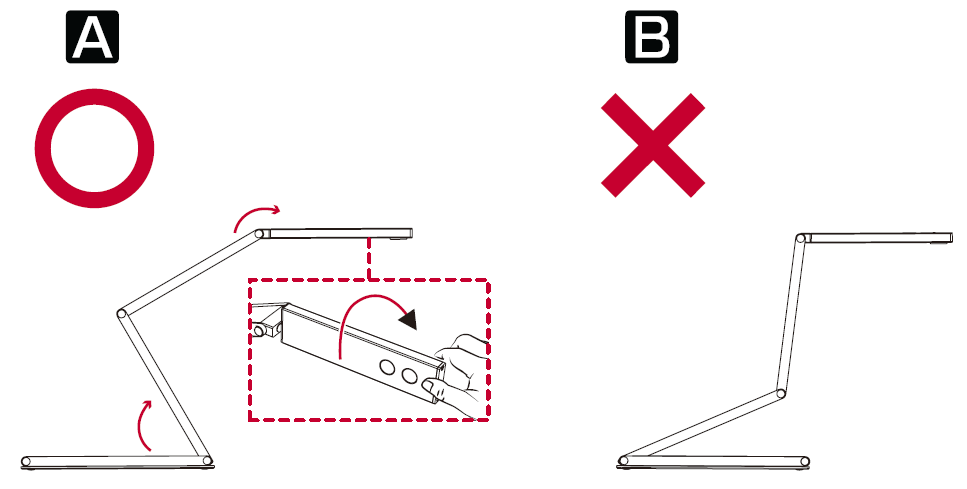
- Press against the Base Plate and pull up on the Camera Arm to extend it. Then, rotate the Camera Head.
- Note: Do not turn the Camera Head in the wrong direction.
- Adjust the Camera Arm to change the height and position of the camera. Fully extend the Camera Arm to capture the maximum shooting area of A3 at output, 2048 x 1536 4:3 mode.
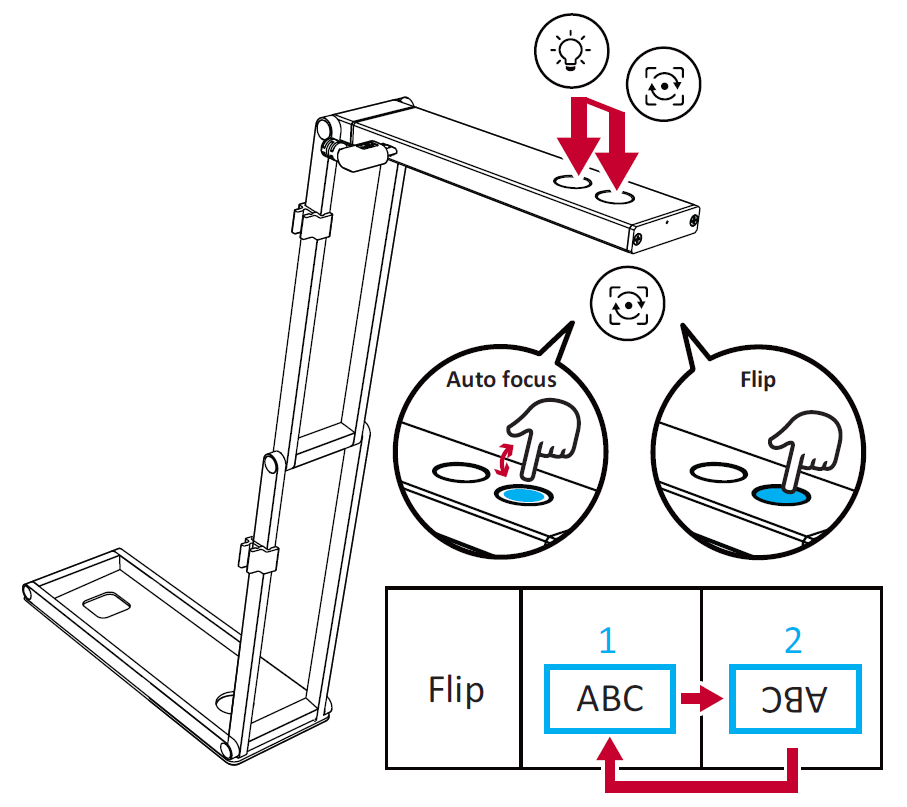
- Press the Autofocus Button once to focus the camera. Press and hold the Flip Button to adjust image orientation (if applicable).
- If the environment is dark, press the LED Light Button to turn on the LED light.
Connecting the Document Camera
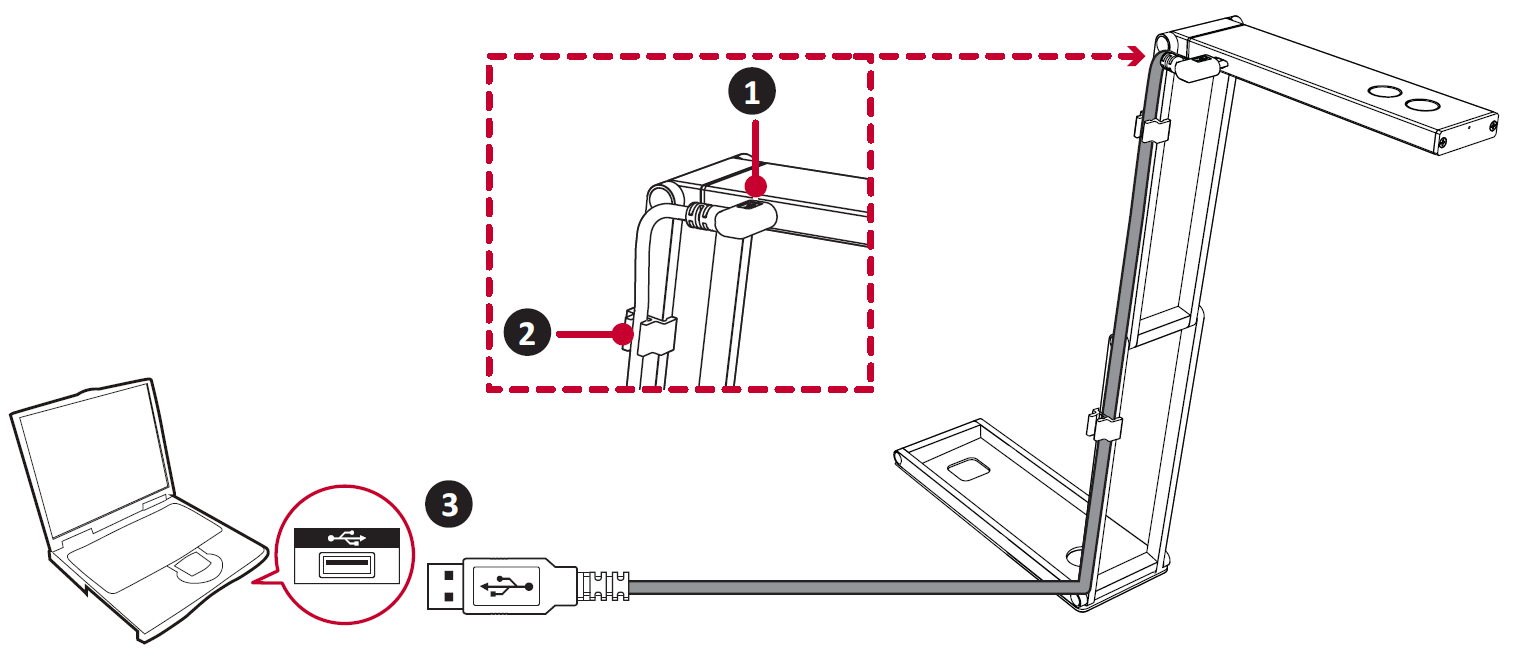
- Plug the Micro USB end of the USB Cable into the Document Camera.
- Add the Cable Fixtures to secure the USB Cable to the Camera Body.
- Connect the other end of the USB Cable, Type A, to a computer’s USB port (PC, Mac, Chromebook).
Using the Document Camera as a PC Camera
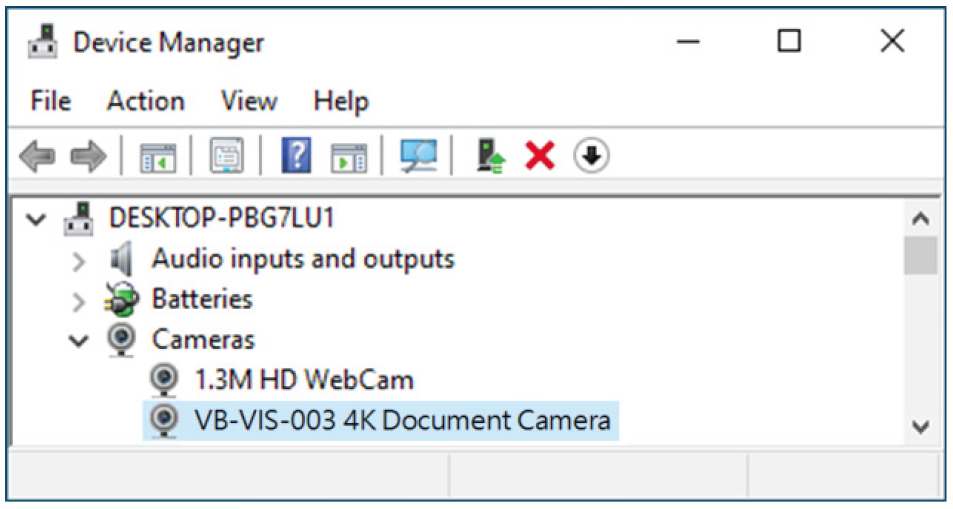
After the Document Camera is connected correctly and detected by your PC, the PC Camera function is ready to use.
vDocCam+
vDocCam+ is a complementary software to the VB-VIS-003 Document Camera.
Installing vDocCam+ Software
- Go to: https://www.viewsonicglobal.com/q/vb-vis-003#downloads
- Download the vDocCam+ software.
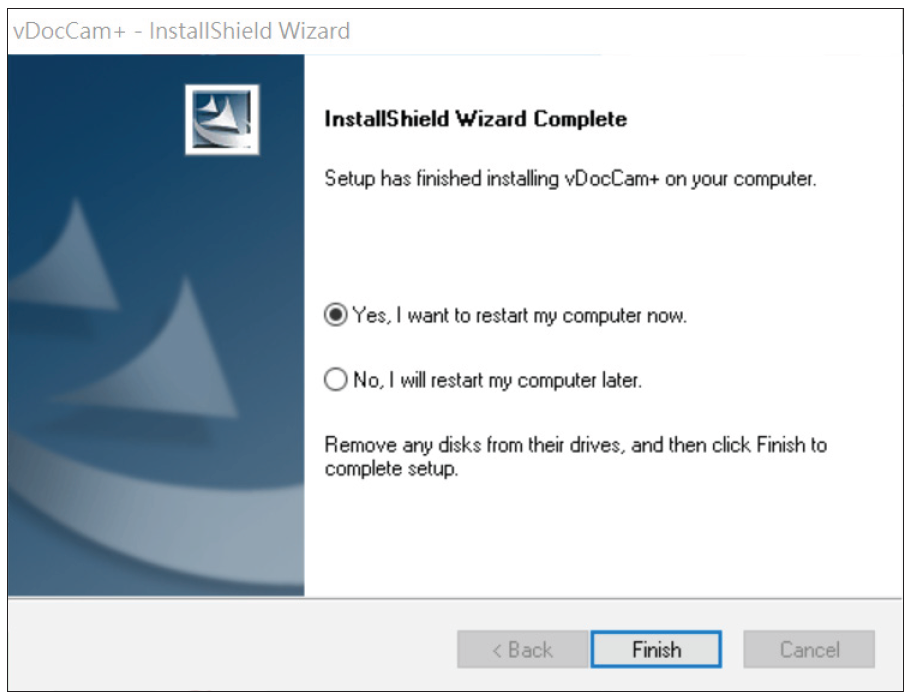
- Double click the vDocCam+ file to install the software.
- Follow the on-screen instructions to complete the installation.
Uninstalling vDocCam+ Software
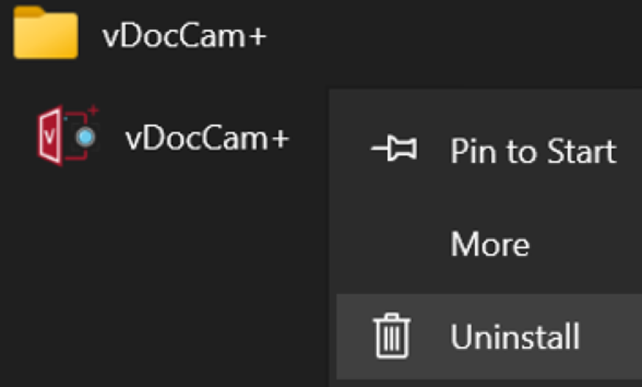
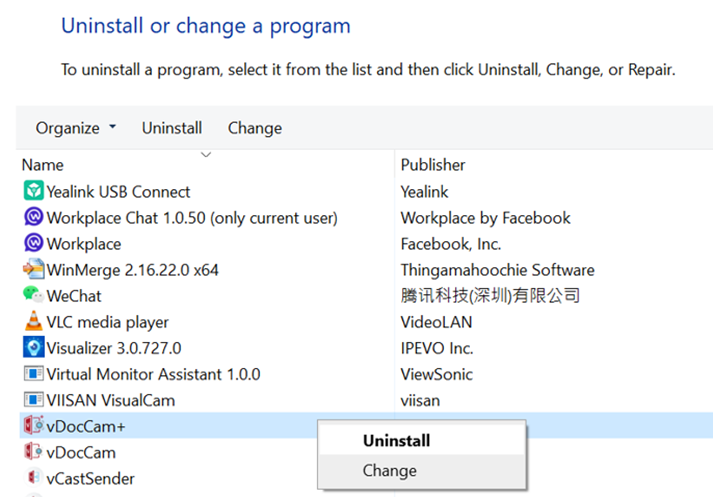
- To remove vDocCam+ from Windows, go to:
- Start Menu > All Programs > vDocCam+ folder > Right-click > Uninstall vDocCam+
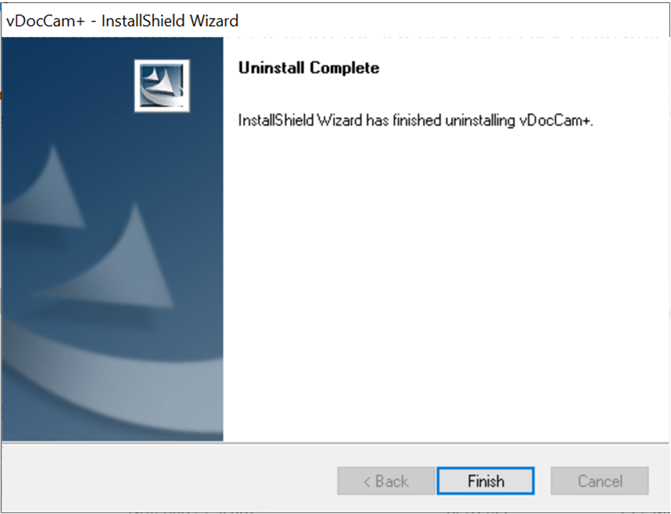
- Select vDocCam+ and follow the on-screen instructions to complete the process.
Overview
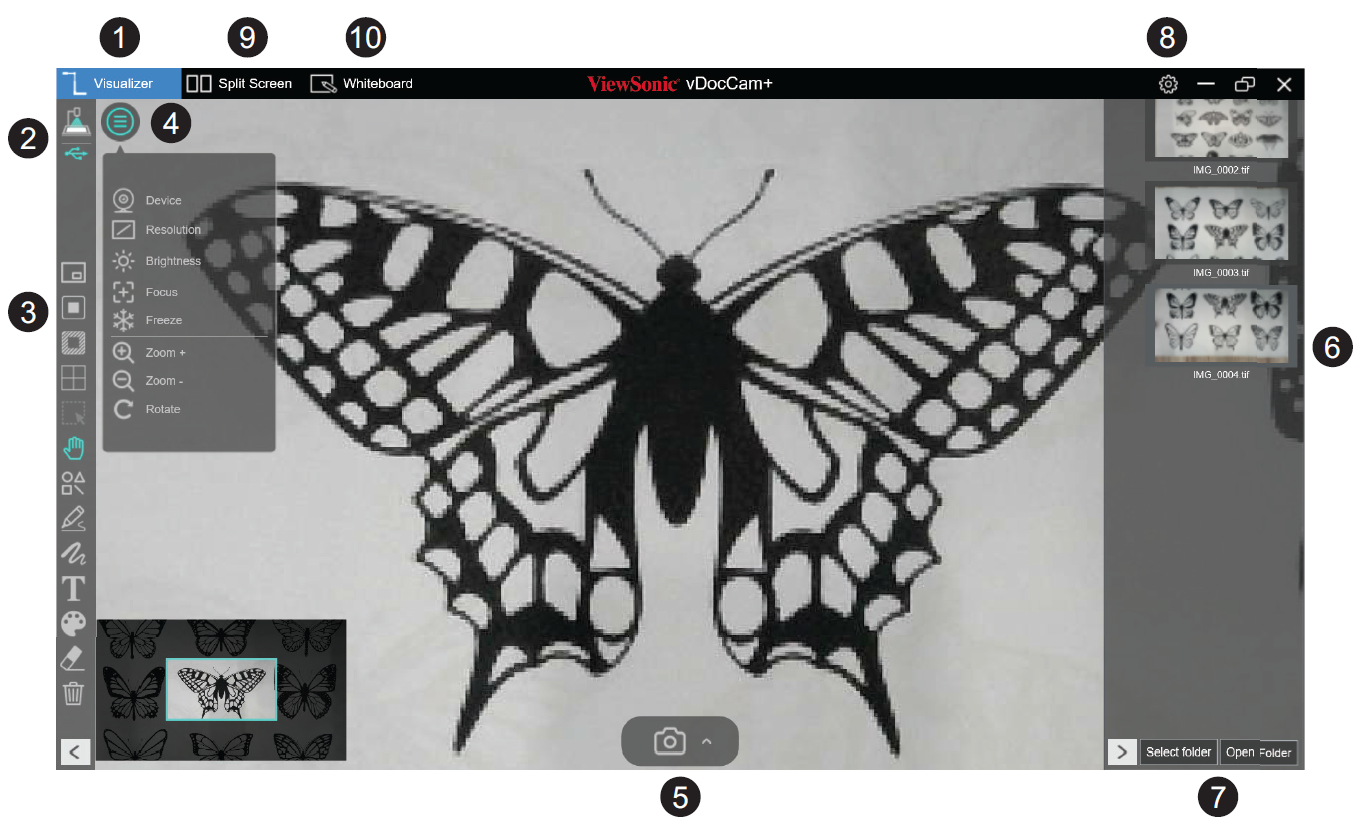
1.Function Tabs
vDocCam+ integrates three (3) major functions. Click on the tab to switch function.
| Mode | Description |
|---|---|
| Visualizer | Live video from the Document Camera. |
| Split-Screen | Connect two (2) Document Cameras to a computer and present them in split-screen. |
| Whiteboard | Draw and annotate on an interactive whiteboard. |
2.Select Connection
Click the icon to change the connection method.
| Icon Status | Description | Note |
|---|---|---|
| USB mode connection. (Default) This mode allows you to connect the Document Camera by USB wired connection. |
||
| Direct Wi-Fi (AP Mode) connection. This mode allows you to connect the Document Camera directly without an internet connection.
|
Reserved function; not supported by VB-VIS-003 | |
| Wi-Fi STA (Client Mode) connection. This mode allows you to connect the Document Camera through a router.
|
Reserved function; not supported by VB-VIS-003 |
3.Left Toolbar
| Icon | Description | |
|---|---|---|
| PIP (Picture-in-Picture) Enable Picture-in-Picture mode. | ||
| Mask Enable the mask mode in solid or translucent style. | ||
| Spotlight Show a spotlight by using the rectangle or ellipse style. | ||
| Gridlines Show gridlines on screen. | ||
| Select Select an annotation or object on screen. | ||
| Move Move the screen. | ||
| Shapes Add various shapes. | ||
| Rectangle Tool Draw a rectangle. | ||
| Rectangle Tool (solid) Draw a rectangle in a solid style. | ||
| Triangle Tool Draw a triangle. | ||
| Triangle Tool (solid) Draw a triangle in a solid style. | ||
| Ellipse Tool Draw an ellipse. | ||
| Ellipse Tool (solid) Draw an ellipse in a solid style. | ||
| Line Draw a line. | ||
| Dotted line Draw a dotted line. | ||
| Single arrow Draw a single arrow. | ||
| Double arrow Draw a double arrow. | ||
| Choose from several pen options for drawing and writing. | ||
| Smooth Pen Draw and write by using the Smooth Pen. | ||
| Highlighter Pen Draw and write by using the Highlighter Pen. | ||
| Disappearing Pen Draw and write by using the Disappearing Pen. NOTE: Set the disappearing time to 3, 5, 10, 20 seconds. | ||
| Line Option Set the line thickness of the annotation. | ||
| Color Option Choose the color of the annotation, shape, and text tools. | ||
| Text Tool Add text. | ||
| Eraser Remove specific annotations. | ||
| Clear All Clear all annotations on screen. | ||
| Show/Hide Show and hide toolbar. | ||
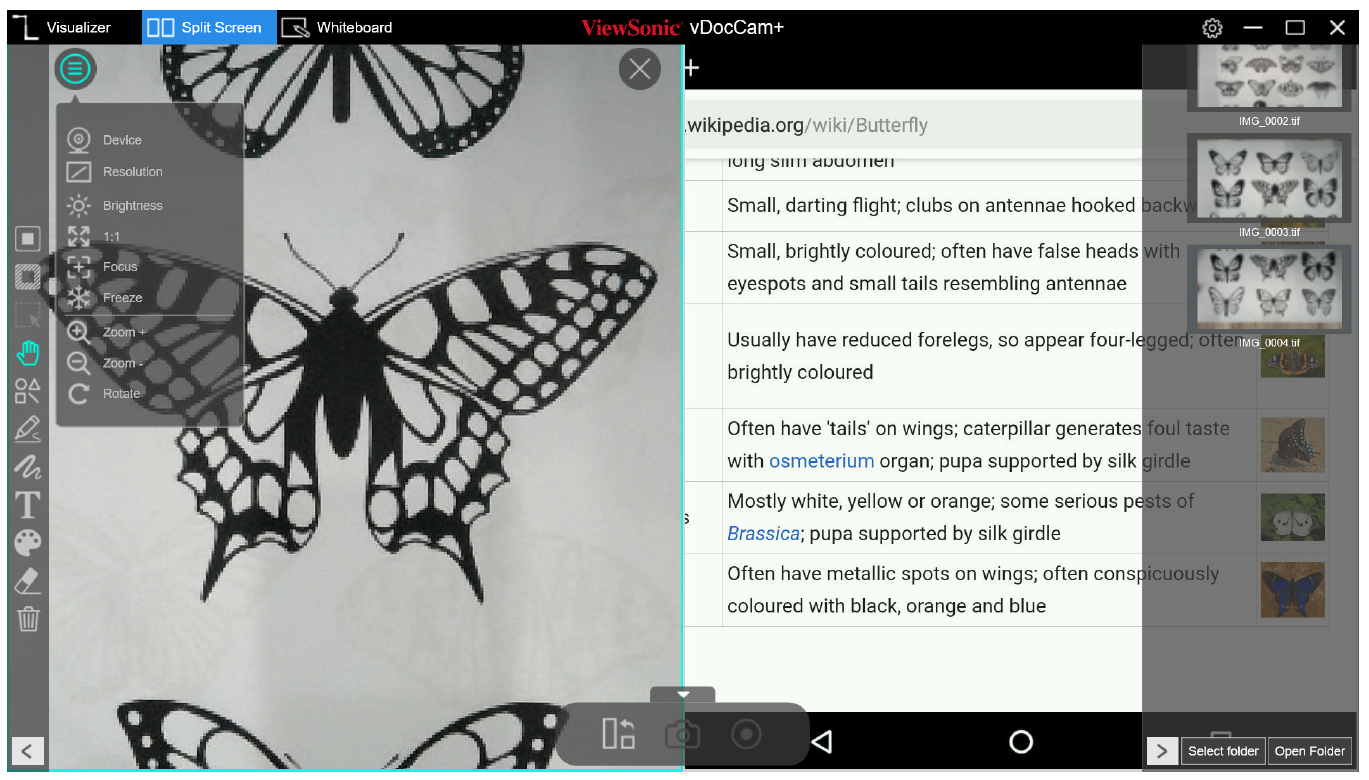
4.Image Adjustment
Click the icon to expand the Image Adjustment menu and adjust the live video.
| Icon | Description |
|---|---|
| Device Select the device and switch the power frequency (50/60 Hz). | |
| Resolution Set the resolution. | |
| Brightness Adjust the brightness level. | |
| 1:1 Show a 1:1 image; fit to screen. | |
| Focus Adjust the focus for the best focal length. | |
| Freeze Freeze the inputted image. | |
| Zoom + Zoom in on the image. | |
| Zoom - Zoom out from the image. | |
| Rotate Rotate the image: 0°, 90°, 180°, 270°, Flip, or Mirror. |
5.Capture Button Settings
Click on the arrow icon to select the capture mode.
| Icon | Description |
|---|---|
| Take a snapshot. (Default selection) | |
| Stop-Motion function can edit captured single photo and export adjustable frame rate preview motion video. | |
| Record video. |
6.Thumbnail List (Side Toolbar)
Right click on a thumbnail on the right-side and the following options will be available:
| Option | Description |
|---|---|
| Open | Open the file. |
| Copy | Duplicate the file. |
| Rename | Rename the file. |
| Delete | Delete the file. |
| Properties | Show the file’s information. |
7.File Save Path Settings
Set the directory for saving files.
| Button | Description |
|---|---|
| Select Folder | Select the save file destination. |
| Open Folder | Open the file location. |
8.Settings Menu
Click the icon to open the Settings menu.
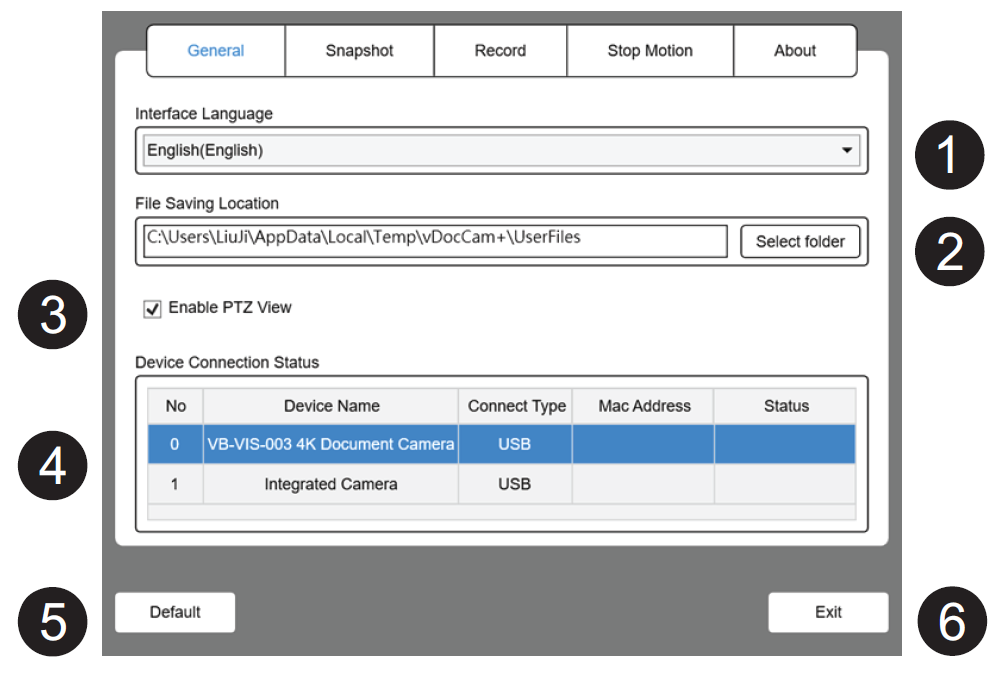
General
| Number | Description |
|---|---|
| 1 | Switch interface language. |
| 2 | Set the file saving location. |
| 3 | Enable PTZ (Point-Tilt-Zoom) view.
|
| 4 | Display current device connection status. |
| 5 | Restore the default settings. |
| 6 | Exit the Settings menu. |
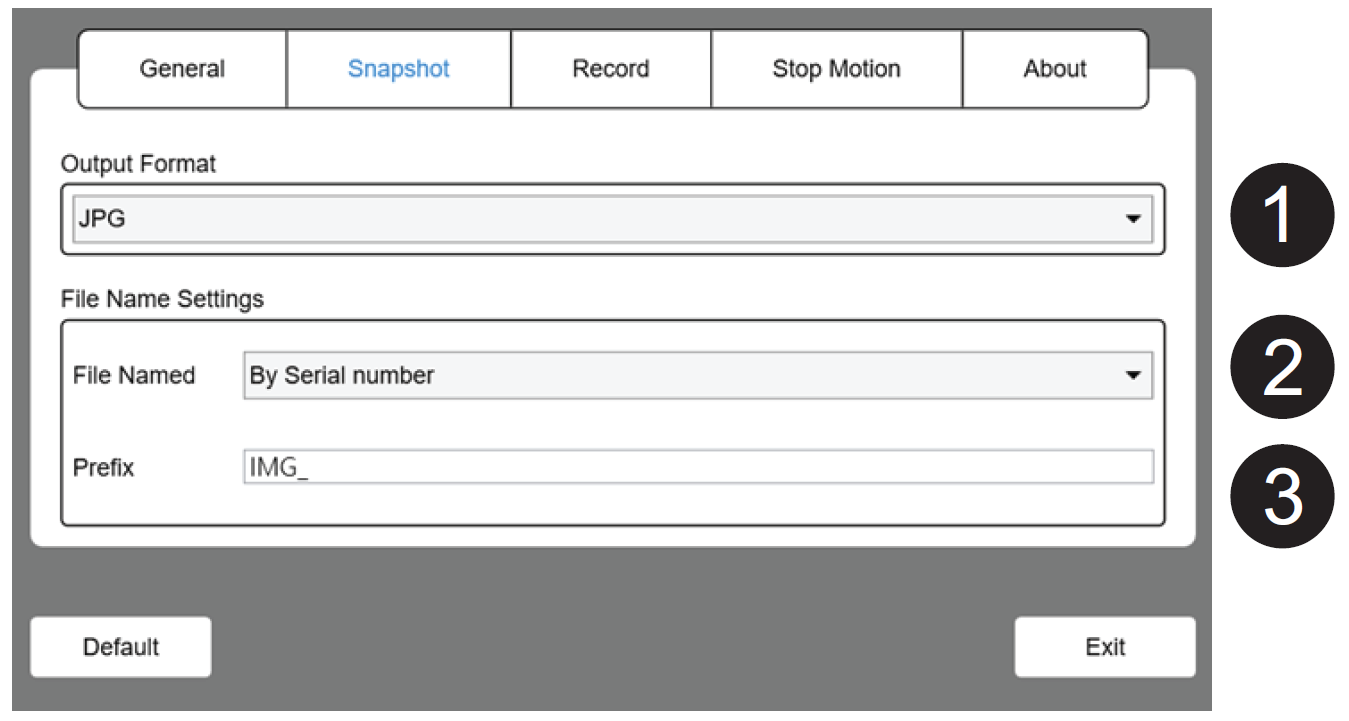
Snapshot
| Number | Description |
|---|---|
| 1 | Set the image file output format (JPG, BMP, PNG, TIF). |
| 2 | Set the file name format by serial number or by date and time. |
| 3 | Set the prefix file name. |
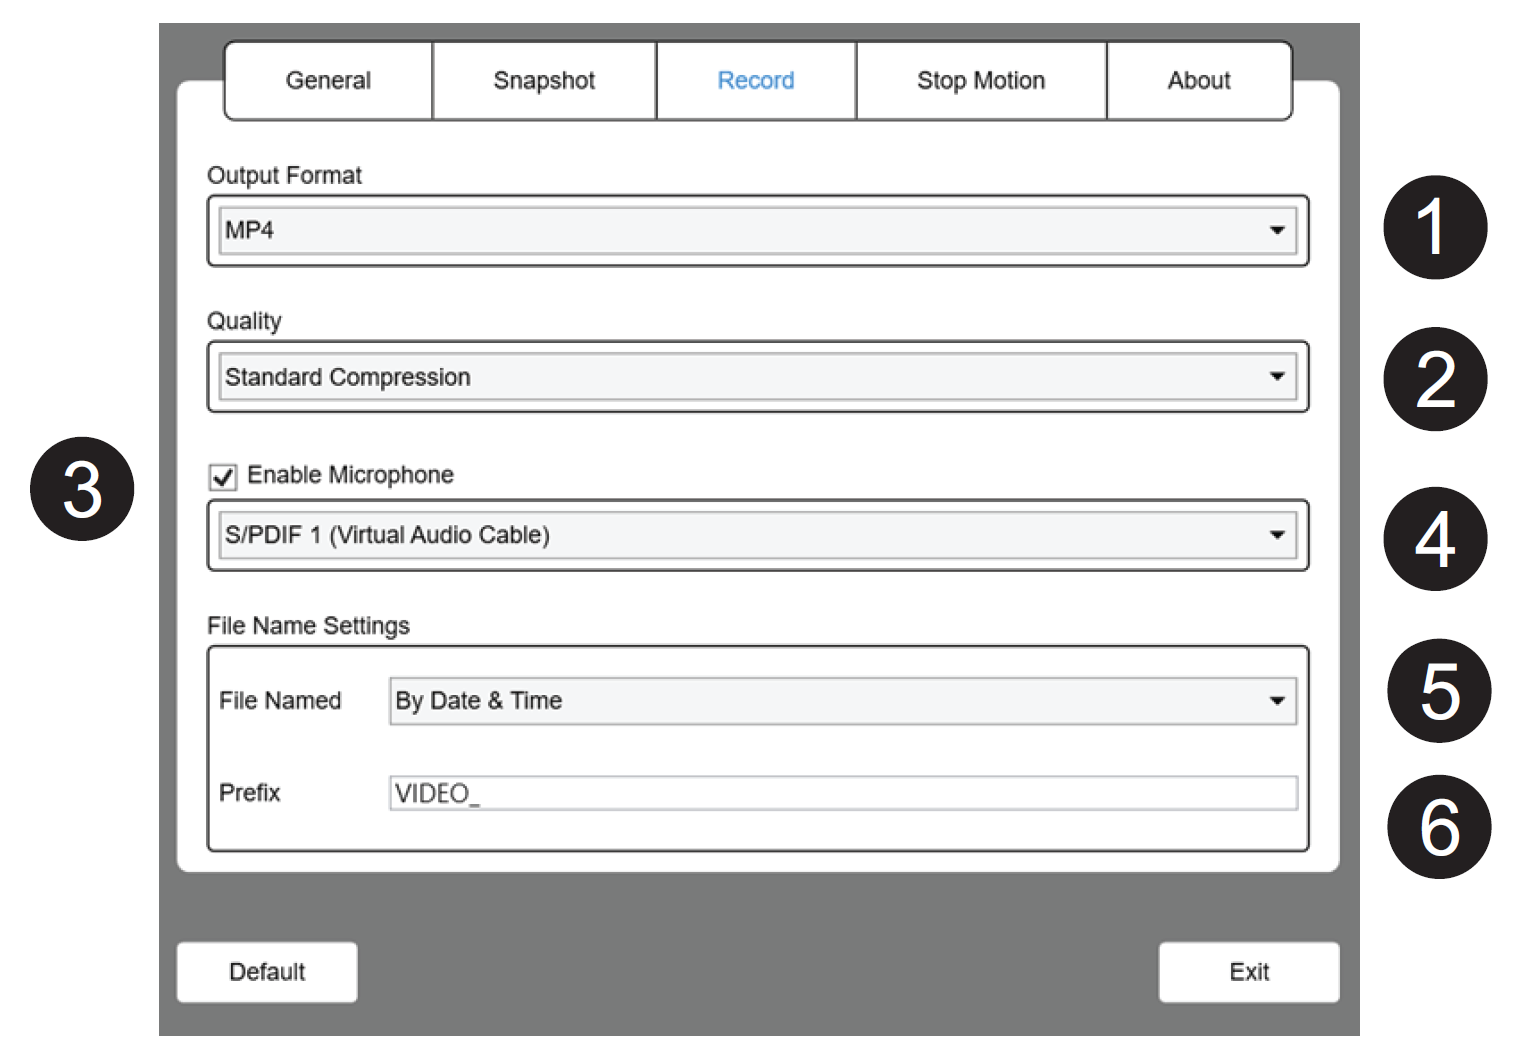
Record
| Number | Description |
|---|---|
| 1 | Set the video file output format (AVI, MP4, FLV). |
| 2 | Set the video compression quality:
|
| 3 | Enable the microphone. |
| 4 | Select the microphone. |
| 5 | Set the file name format by serial number or by date and time. |
| 6 | Set the prefix file name. |
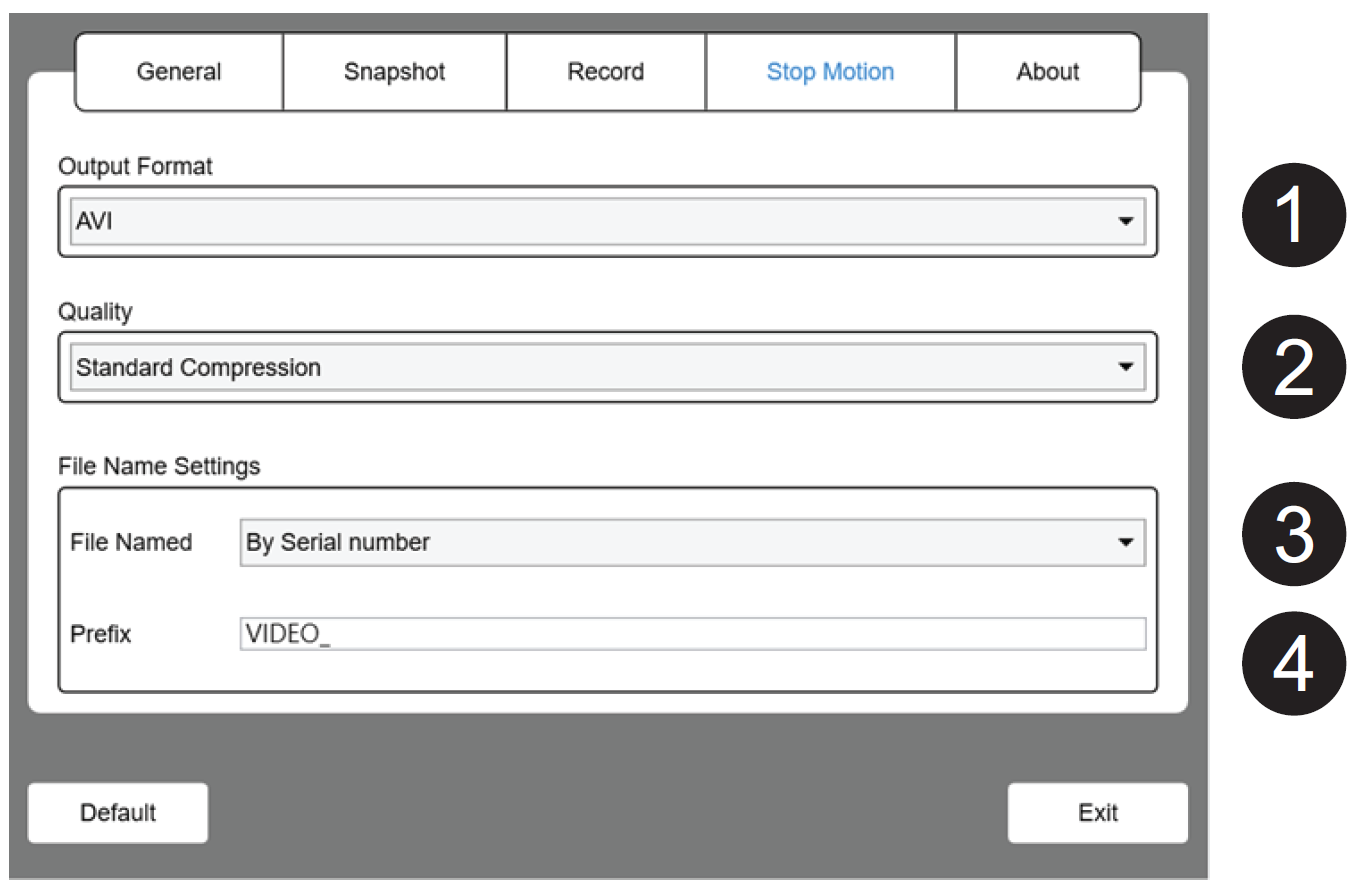
Stop Motion
| Number | Description |
|---|---|
| 1 | Set the video file output format (AVI, MP4, FLV). |
| 2 | Set the video compression quality:
|
| 3 | Set the file name format by serial number or by date and time. |
| 4 | Set the prefix file name. |
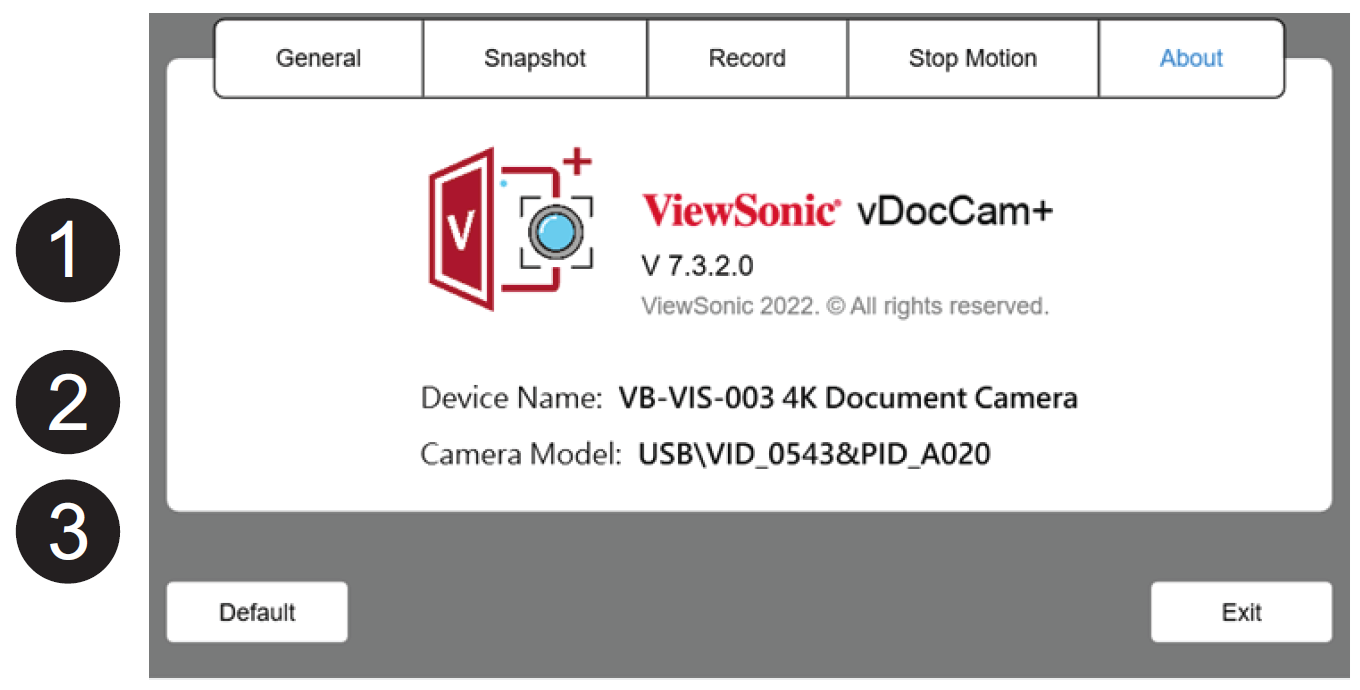
About
| Number | Description |
|---|---|
| 1 | Software version. |
| 2 | Current connected device name. |
| 3 | Current connected device’s VID/PID. |
9.Split-Screen
With the Split-Screen function, you can connect two Document Cameras to your computer and present them by splitting two live screens and you can even compare still image with live video.
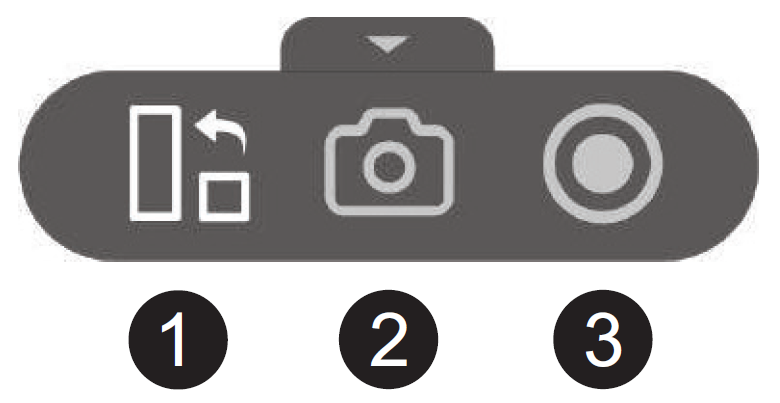
Split-Screen Action Buttons
| Number | Description |
|---|---|
| 1 | Shuffle Change the display layout. |
| 2 | Screen Capture Take a screenshot. |
| 3 | Screen Recording Take a screen recording. |
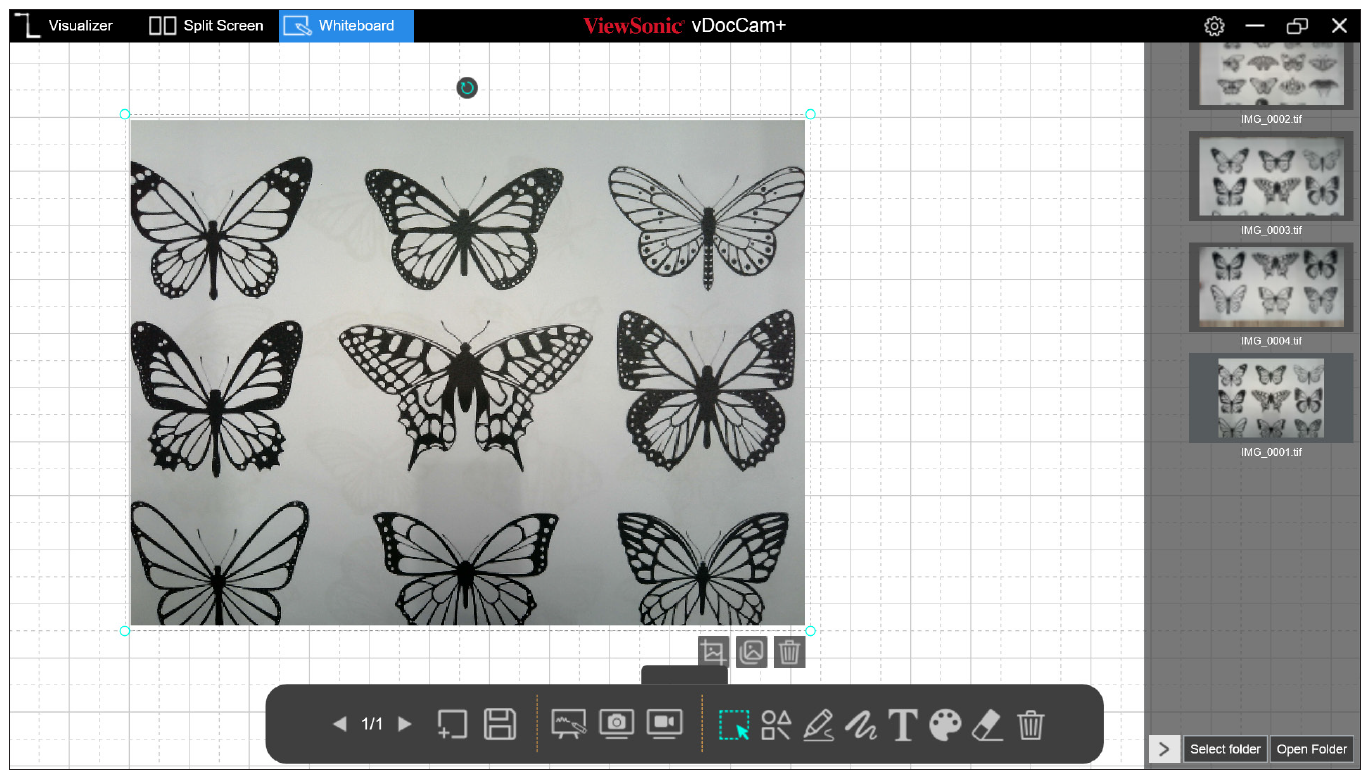
10.Whiteboard
The whiteboard mode allows you to draw and annotate anything on the interactive whiteboard, in this whiteboard function you can drag and drop selected images from the right-side file list to the whiteboard and add annotations.
Whiteboard Toolbar
| Icon | Description |
|---|---|
| Page Up and Down Switch between whiteboard pages. | |
| Add a Page Add a whiteboard page with a different color background. | |
| Save Save your current whiteboard pages in a PDF format. | |
| Switch the Background Switch between the whiteboard background, computer desktop, or mouse mode. | |
| Screenshot Take a screenshot of the whiteboard. | |
| Screen Recording Take a screen recording of the whiteboard. | |
| Select Select an annotation or object on the whiteboard. | |
| Shapes Add shapes. | |
| Freehand Tool Select a brush style and write on the whiteboard. | |
| Line Option Set the line thickness of the annotation. | |
| Text Tool Add text. | |
| Color Option Choose the color of the annotation, shape, and text tools. | |
| Eraser Remove specific annotations. | |
| Clear All Clear all annotations on screen. |
Technical Specifications
| Model No. | P/N |
|---|---|
| VS19273 | VB-VIS-003 |
| Item | Specifications | |
|---|---|---|
| Optical System | Working Surface | 440 x 330 mm (at 2048 x 1536 4:3 mode output) |
| Zoom | Digital zoom 10x by software | |
| Focus | Auto | |
| Illumination System | Upper | LED |
| Dark-room (0 Lux) testing condition Shooting height: 17 cm (Lamp Center 100 Lux) Shooting height: 34.5 cm (Lamp Center 25 Lux) | ||
| Camera | USB Live Streaming | MJPEG 3840 x 2880 @ 15 fps 3840 x 2160 @ 30 fps 2560 x 1440 @ 30 fps 2048 x 1536 @ 30 fps 1600 x 1200 @ 30 fps 1920 x 1080 @ 60 fps 1280 x 720 @ 60 fps 1024 x 768 @ 30 fps 960 x 540 @ 60 fps 640 x 480 @ 30 fps 640 x 360 @ 60 fps YUY2 1280 x 720 @ 10 fps 1024 x 768 @ 10 fps 960 x 540 @ 15 fps 640 x 480 @ 30 fps 640 x 360 @ 30 fps NOTE: 3840 x 2880 @ 15 fps = 11 Megapixel (ISP limitation) |
| Sensor | 13 Megapixel 1/3” CMOS (Sony IMX258 & SunplusIT SPCA2688A) | |
| White Balance | Auto | |
| Digital Zoom | Digital zoom 10x by software | |
| Lens Size | 1/3.06 inches | |
| Lens Construction | 5 plastics | |
| Focal Length | 3.37 mm ± 5% | |
| F/No. | F2.2 ± 5% | |
| View Angle | DFOV: 81.3 ± 3° | |
| Image Quality | Center ≥ 1100 LW/PH Corner ≥ 800 LW/PH | |
| Focus | Auto | |
| Focus Distance | 10 cm | |
| Audio | Microphone | Supported |
| Microphone Sensitivity | 94db SPL @ 1kHz Min-29 Type-26 Max-23 dBES | |
| USB | Connection Type | Micro USB to Type A 2.0 |
| Video Compression | MJPEG/YUY2 | |
| UVC | Compliant with UVC 1.0 | |
| UAC | Compliant with UAC 1.0 | |
| System Compatibility | Operating System | Windows® 7 (1080p and under only), Windows 8.1, Windows 10, Windows 11 macOS™ 10.15 or higher Google™ Chromebook™ |
| Hardware Platform | Intel® i5 processor or higher 8GB RAM or more Hard drive space for recorded videos USB Port | |
| Input/Output Interface | Input | N/A |
| Output | N/A | |
| Bidirectional | USB 2.0 Micro B x 1 | |
| General | Illumination | LED (switch on camera) |
| Mechanical Arm | Supported | |
| Working Surface | 440 x 330 mm (at 2048 x 1536 4:3 mode output) | |
| Button 1 | Focus/Rotate 0°~180° | |
| Button 2 | Lamp control | |
| Compliance | Certification | EMC: FCC-B, CE, ICES/Safety: LVD |
| Power | Power Source | 5V (USB power supply) |
| Power Consumption | ≤ 2.5W | |
| Operating Conditions | Temperature | 32°F to 104°F (0°C to 40°C) |
| Humidity | 20% to 90% (Non-Condensing) | |
| Storage Conditions | Temperature | -4°F to 140°F (-20°C to +60°C) |
| Humidity | 20% to 90% (Non-Condensing) | |
| Dimensions | Physical - Expanded (W x H x D) |
393 x 66 x 346 mm (15 ¹⁵/₃₂” × 2 ¹⁹/₃₂” × 13 ⁵/₈”) |
| Physical - Closed (W x H x D) |
195 x 66 x 13 mm (7 ⁴³/₆₄” × 2 ¹⁹/₃₂” × ³³/₆₄”) | |
| Weight | Physical | 0.43 kg (0.95 lbs.) |
Compliance Information
This section addresses all connected requirements and statements regarding regulations. Confirmed corresponding applications shall refer to nameplate labels and relevant markings on the unit.
FCC Compliance Statement
This device complies with part 15 of FCC Rules. Operation is subject to the following two conditions: (1) this device may not cause harmful interference, and (2) this device must accept any interference received, including interference that may cause undesired operation. This equipment has been tested and found to comply with the limits for a Class B digital device, pursuant to part 15 of the FCC Rules.
These limits are designed to provide reasonable protection against harmful interference in a residential installation. This equipment generates, uses, and can radiate radio frequency energy, and if not installed and used in accordance with the instructions, may cause harmful interference to radio communications. However, there is no guarantee that interference will not occur in a particular installation. If this equipment does cause harmful interference to radio or television reception, which can be determined by turning the equipment off and on, the user is encouraged to try to correct the interference by one or more of the following measures:
- Reorient or relocate the receiving antenna.
- Increase the separation between the equipment and receiver.
- Connect the equipment into an outlet on a circuit different from that to which the receiver is connected.
- Consult the dealer or an experienced radio/TV technician for help.
Warning: You are cautioned that changes or modifications not expressly approved by the party responsible for compliance could void your authority to operate the equipment.
AVERTISSEMENT: Utilisez uniquement les sources d’alimentation mentionnées dans les instructions d’utilisation.
For Canada
- This Class B digital apparatus complies with Canadian ICES-003(B).
- Cet appareil numérique de la classe B est conforme à la norme NMB-003 du Canada.
CE Conformity for European Countries
 |
The device complies with the EMC Directive 2014/30/EU and Low Voltage Directive 2014/35/EU. |
The following information is only for EU-member states:
| The mark shown to the right is in compliance with the Waste Electrical and Electronic Equipment Directive 2012/19/EU (WEEE). The mark indicates the requirement NOT to dispose of the equipment as unsorted municipal waste, but use the return and collection systems according to local law. |  |
Declaration of RoHS2 Compliance
This product has been designed and manufactured in compliance with Directive 2011/65/EU of the European Parliament and the Council on restriction of the use of certain hazardous substances in electrical and electronic equipment (RoHS2 Directive) and is deemed to comply with the maximum concentration values issued by the European Technical Adaptation Committee (TAC) as shown below:
| Substance | Proposed Maximum Concentration | Actual Concentration |
|---|---|---|
| Lead (Pb) | 0.1% | < 0.1% |
| Mercury (Hg) | 0.1% | < 0.1% |
| Cadmium (Cd) | 0.01% | < 0.01% |
| Hexavalent Chromium (Cr6⁺) | 0.1% | < 0.1% |
| Polybrominated biphenyls (PBB) | 0.1% | < 0.1% |
| Polybrominated diphenyl ethers (PBDE) | 0.1% | < 0.1% |
| Bis (2-ethylhexyl) phthalate (DEHP) | 0.1% | < 0.1% |
| Butyl benzyl phthalate (BBP) | 0.1% | < 0.1% |
| Dibutyl phthalate (DBP) | 0.1% | < 0.1% |
| Diisobutyl phthalate (DIBP) | 0.1% | < 0.1% |
Certain components of products as stated above are exempted under the Annex III of the RoHS2 Directives as noted below. Examples of exempted components are:
- Copper alloy containing up to 4% lead by weight.
- Lead in high melting temperature type solders (i.e. lead-based alloys containing 85% by weight or more lead).
- Electrical and electronic components containing lead in a glass or ceramic other than dielectric ceramic in capacitors, e.g. piezoelectronic devices, or in a glass or ceramic matrix compound.
- Lead in dielectric ceramic in capacitors for a rated voltage of 125V AC or 250V DC or higher.
Indian Restriction of Hazardous Substances
Restriction on Hazardous Substances statement (India). This product complies with the “India E-waste Rule 2011” and prohibits use of lead, mercury, hexavalent chromium, polybrominated biphenyls or polybrominated diphenyl ethers in concentrations exceeding 0.1 weight % and 0.01 weight % for cadmium, except for the exemptions set in Schedule 2 of the Rule.
Product Disposal at End of Product Life
ViewSonic® respects the environment and is committed to working and living green. Thank you for being part of Smarter, Greener Computing. Please visit the ViewSonic® website to learn more.
USA & Canada
https://www.viewsonic.com/us/go-green-with-viewsonic
Europe
https://www.viewsonic.com/eu/environmental-social-governance/recycle
Taiwan
https://recycle.moenv.gov.tw
For EU users, please contact us for any safety/accident issue experienced with this product:
| ViewSonic Europe Limited Haaksbergweg 75 1101 BR Amsterdam Netherlands | |
| +31 (0) 650608655 | |
| EPREL@viewsoniceurope.com | |
| https://www.viewsonic.com/eu/ |
Copyright Information
Copyright© ViewSonic® Corporation, 2022. All rights reserved.
Macintosh and Power Macintosh are registered trademarks of Apple Inc.
Microsoft, Windows, and the Windows logo are registered trademarks of Microsoft Corporation in the United States and other countries.
ViewSonic®, the three birds logo, OnView, ViewMatch, and ViewMeter are registered trademarks of ViewSonic® Corporation.
VESA is a registered trademark of the Video Electronics Standards Association. DPMS, DisplayPort, and DDC are trademarks of VESA.
Disclaimer: ViewSonic® Corporation shall not be liable for technical or editorial errors or omissions contained herein; nor for incidental or consequential damages resulting from furnishing this material, or the performance or use of this product.
In the interest of continuing product improvement, ViewSonic® Corporation reserves the right to change product specifications without notice. Information in this document may change without notice.
No part of this document may be copied, reproduced, or transmitted by any means, for any purpose without prior written permission from ViewSonic® Corporation.
VB-VIS-003_UG_ENG_1a_20220712
Customer Service Contact Information
For technical support or product service, see the table below or contact your reseller.
- Note: You will need the product’s serial number, which is located on the rear of the monitor by the I/O ports.
Asia Pacific & Africa
| Country / Region | Website |
|---|---|
| Australia | https://viewsonic.com/au/ |
| Bangladesh | https://www.viewsonic.com/bd/ |
| 中囯(China) | https://www.viewsonic.com.cn |
| 香港 (繁體中文) | https://www.viewsonic.com/hk/ |
| Hong Kong (English) | https://www.viewsonic.com/hk-en/ |
| India | https://www.viewsonic.com/in/ |
| Indonesia | https://www.viewsonic.com/id/ |
| Israel | https://www.viewsonic.com/il/ |
| 日本 (Japan) | https://www.viewsonic.com/jp/ |
| Korea | https://www.viewsonic.com/kr/ |
| Malaysia | https://www.viewsonic.com/my/ |
| Middle East | https://www.viewsonic.com/me/ |
| Myanmar | https://www.viewsonic.com/mm/ |
| Nepal | https://www.viewsonic.com/np/ |
| New Zealand | https://www.viewsonic.com/nz/ |
| Pakistan | https://www.viewsonic.com/pk/ |
| Philippines | https://www.viewsonic.com/ph/ |
| Singapore | https://www.viewsonic.com/sg/ |
| 臺灣 (Taiwan) | https://www.viewsonic.com/tw/ |
| ประเทศไทย (Thailand) | https://www.viewsonic.com/th/ |
| Việt Nam | https://www.viewsonic.com/vn/ |
| South Africa & Mauritius | https://www.viewsonic.com/za/ |
Americas
| Country / Region | Website |
|---|---|
| United States | https://www.viewsonic.com/us/ |
| Canada | https://www.viewsonic.com/us/ |
| Latin America | https://www.viewsonic.com/la/ |
Europe
| Country / Region | Website |
|---|---|
| Europe | https://www.viewsonic.com/eu/ |
| France | https://www.viewsonic.com/fr/ |
| Deutschland | https://www.viewsonic.com/de/ |
| Қазақстан | https://www.viewsonic.com/kz/ |
| Россия | https://www.viewsonic.com/ru/ |
| España | https://www.viewsonic.com/es/ |
| Türkiye | https://www.viewsonic.com/tr/ |
| Україна | https://www.viewsonic.com/ua/ |
| United Kingdom | https://www.viewsonic.com/uk/ |

