VB-VIS-003
Overview
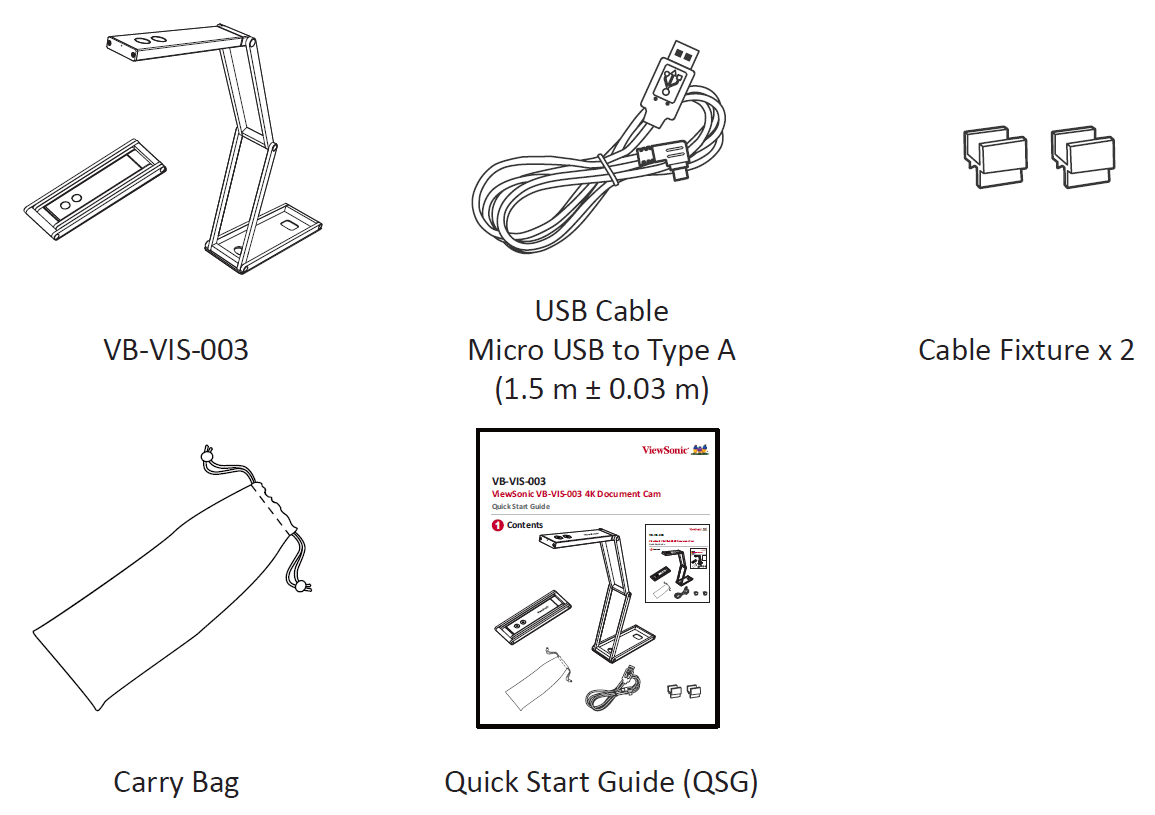
Package Contents
Please take a moment to check if all the necessary items are included in the package. If anything is missing or damaged, please contact your dealer immediately.
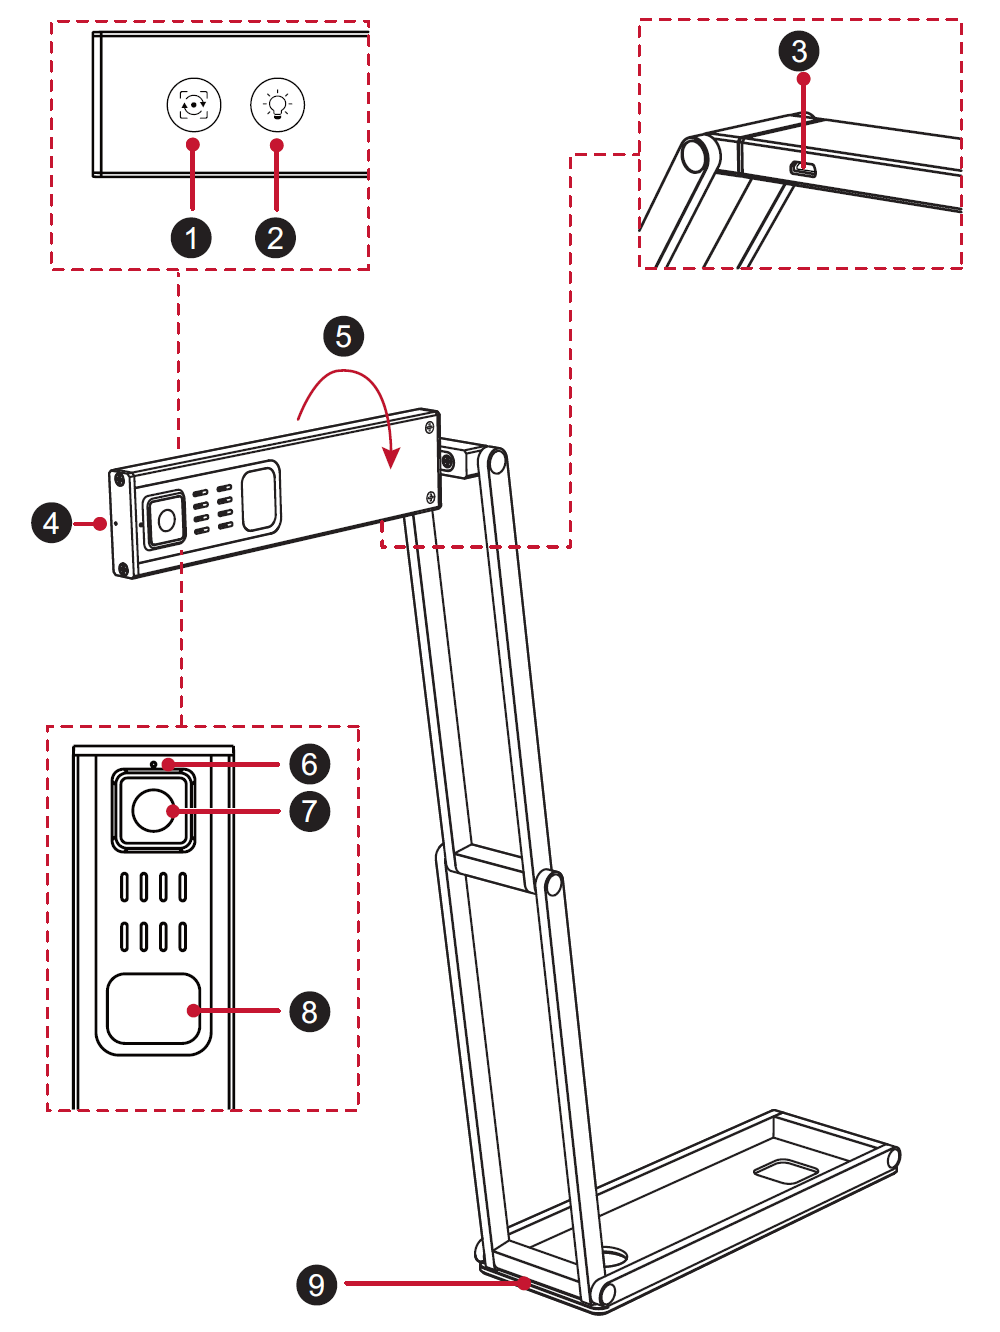
Product
| Number | Description | Note |
|---|---|---|
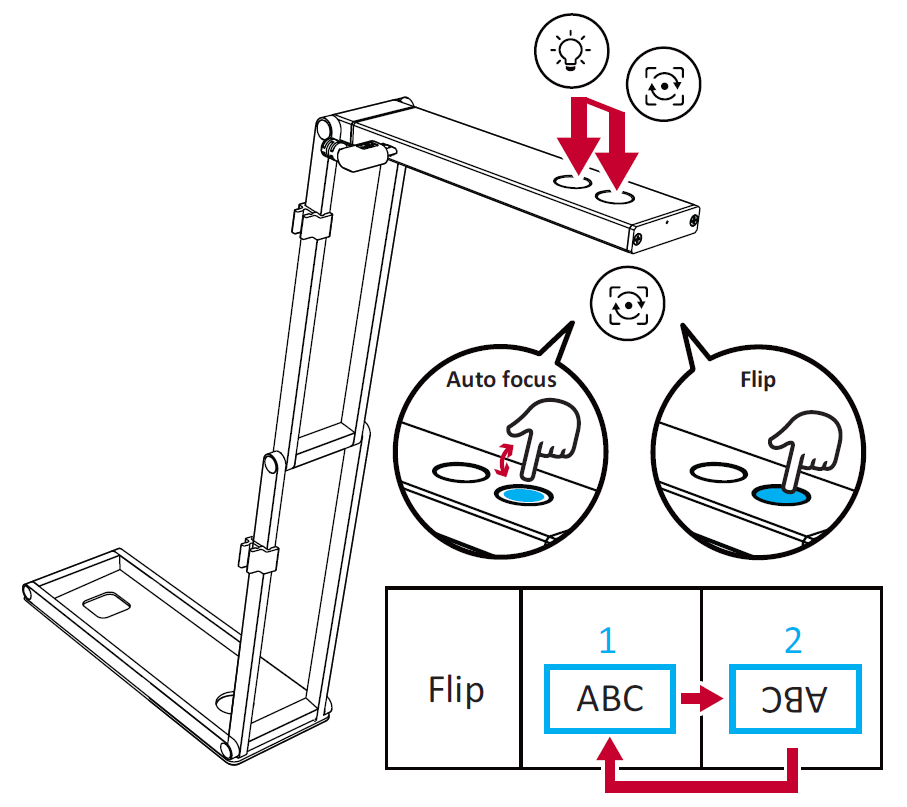
| 1 | Autofocus / Flip Button | Autofocus: Press once Flip Image 0°/180°: Press and hold |
| 2 | LED Light Button | Press to turn on; 3-level brightness control |
| 3 | Micro USB Port | |
| 4 | Power LED Indicator | A blue light will show when connected. |
| 5 | Flip Camera Head | 0°/180° |
| 6 | Microphone | |
| 7 | AF Lens | |
| 8 | LED Light | |
| 9 | Base Plate |
Setting Up the Document Camera
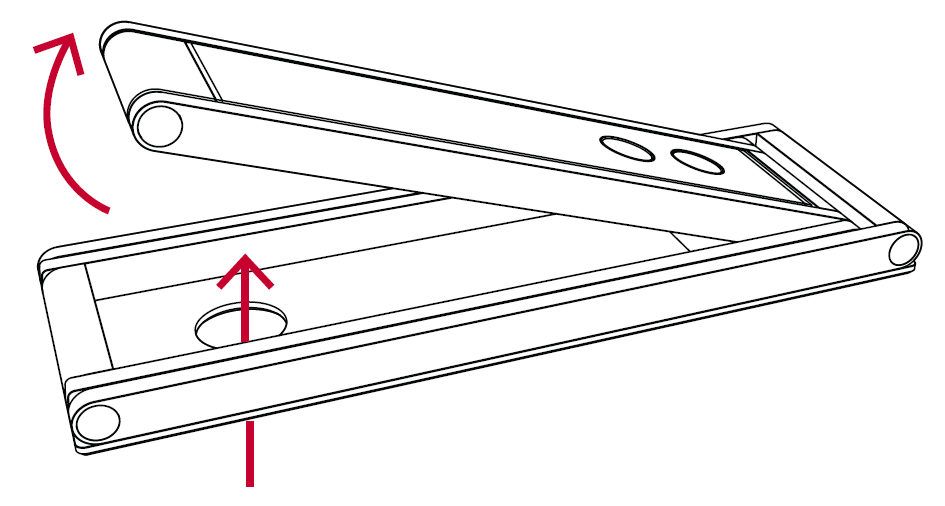
- Lift the device by pushing through the opening at the Base Plate.
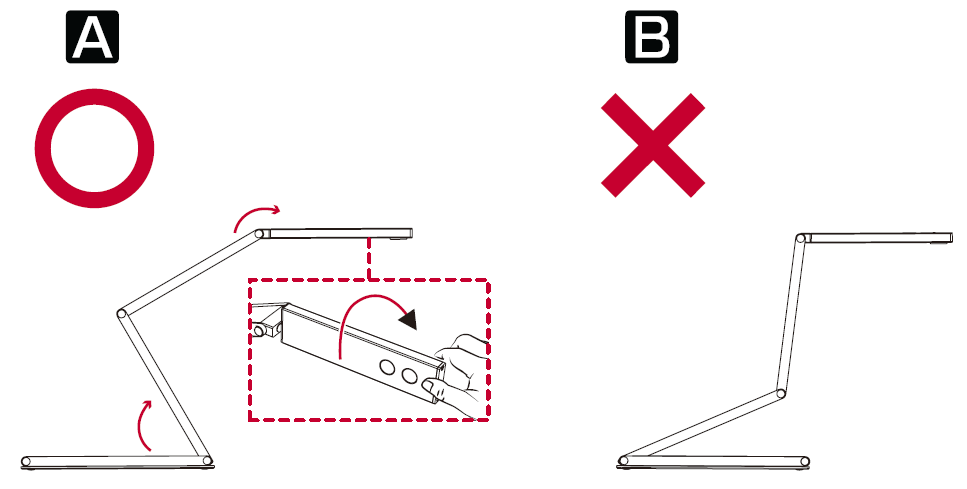
- Press against the Base Plate and pull up on the Camera Arm to extend it. Then, rotate the Camera Head.
- Note: Do not turn the Camera Head in the wrong direction.
- Adjust the Camera Arm to change the height and position of the camera. Fully extend the Camera Arm to capture the maximum shooting area of A3 at output, 2048 x 1536 4:3 mode.
- Press the Autofocus Button once to focus the camera. Press and hold the Flip Button to adjust image orientation (if applicable).
- If the environment is dark, press the LED Light Button to turn on the LED light.
Connecting the Document Camera
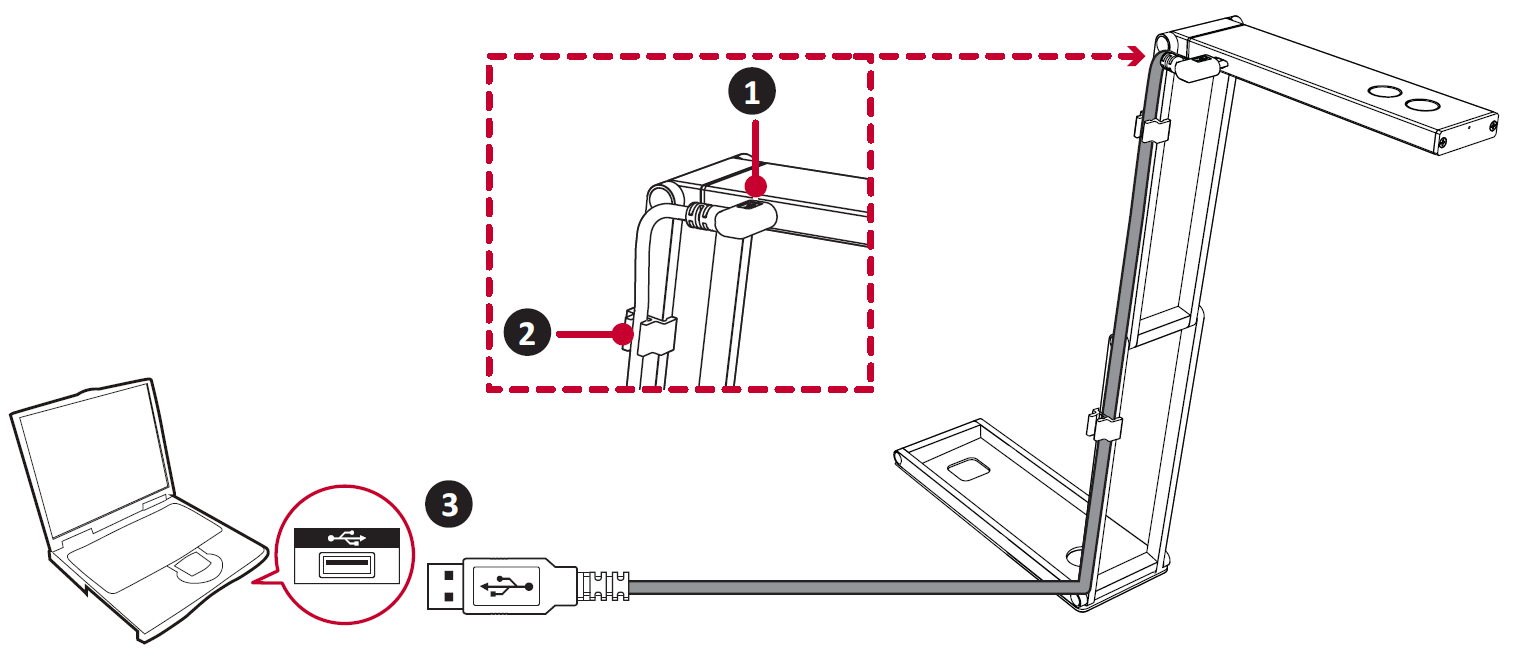
- Plug the Micro USB end of the USB Cable into the Document Camera.
- Add the Cable Fixtures to secure the USB Cable to the Camera Body.
- Connect the other end of the USB Cable, Type A, to a computer’s USB port (PC, Mac, Chromebook).
Using the Document Camera as a PC Camera
After the Document Camera is connected correctly and detected by your PC, the PC Camera function is ready to use.
vDocCam+
vDocCam+ is a complementary software to the VB-VIS-003 Document Camera.
Installing vDocCam+ Software
- Go to: https://www.viewsonicglobal.com/q/vb-vis-003#downloads
- Download the vDocCam+ software.
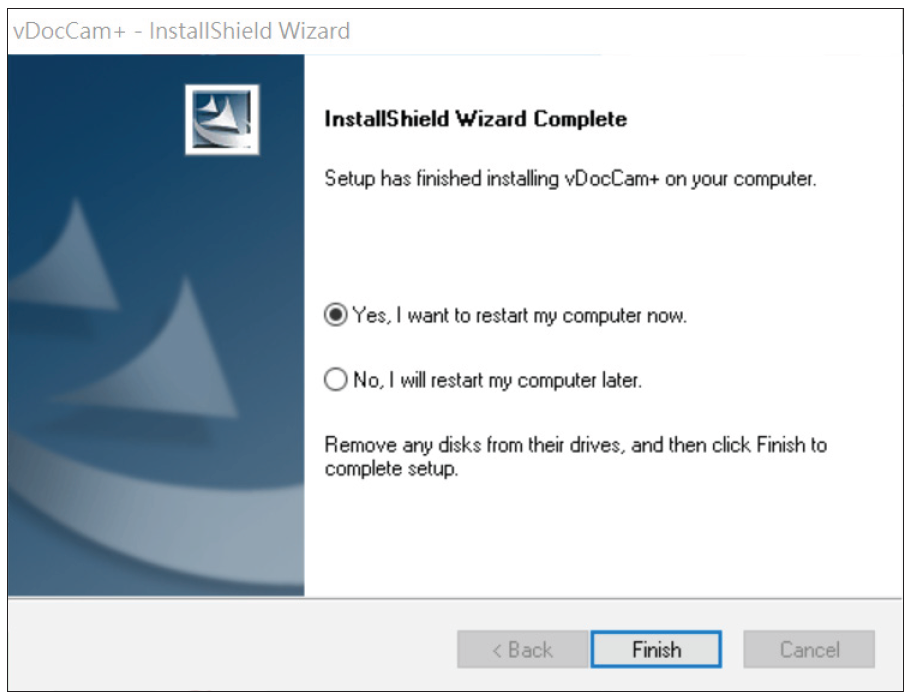
- Double click the vDocCam+ file to install the software.
- Follow the on-screen instructions to complete the installation.
Uninstalling vDocCam+ Software
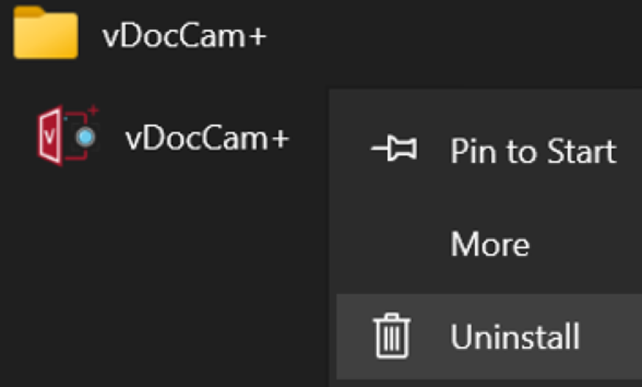
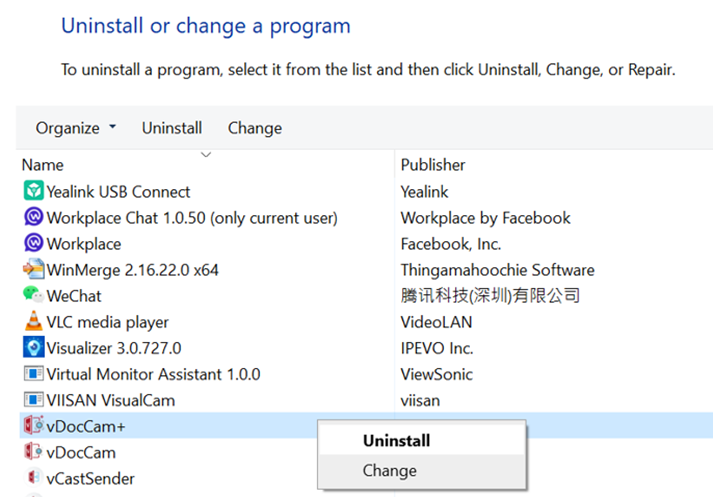
- To remove vDocCam+ from Windows, go to:
- Start Menu > All Programs > vDocCam+ folder > Right-click > Uninstall vDocCam+
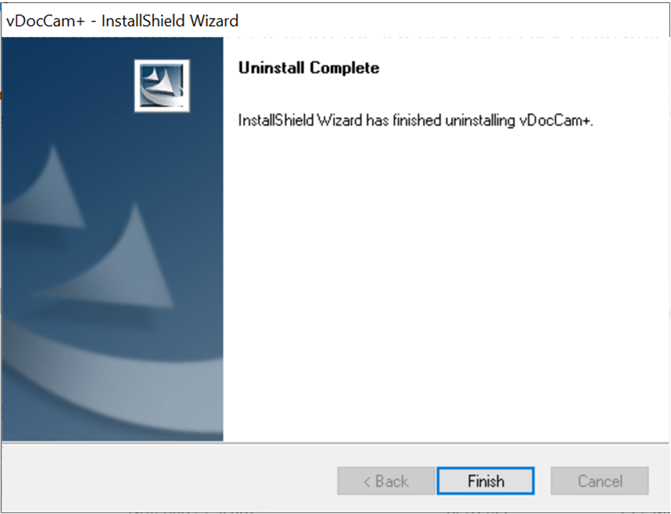
- Select vDocCam+ and follow the on-screen instructions to complete the process.
{{:VB-VIS-003_Using_vDocCam%2B}}
Technical Specifications
| Model No. | P/N |
|---|---|
| VS19273 | VB-VIS-003 |
| Item | Specifications | |
|---|---|---|
| Optical System | Working Surface | 440 x 330 mm (at 2048 x 1536 4:3 mode output) |
| Zoom | Digital zoom 10x by software | |
| Focus | Auto | |
| Illumination System | Upper | LED |
| Dark-room (0 Lux) testing condition Shooting height: 17 cm (Lamp Center 100 Lux) Shooting height: 34.5 cm (Lamp Center 25 Lux) | ||
| Camera | USB Live Streaming | MJPEG 3840 x 2880 @ 15 fps 3840 x 2160 @ 30 fps 2560 x 1440 @ 30 fps 2048 x 1536 @ 30 fps 1600 x 1200 @ 30 fps 1920 x 1080 @ 60 fps 1280 x 720 @ 60 fps 1024 x 768 @ 30 fps 960 x 540 @ 60 fps 640 x 480 @ 30 fps 640 x 360 @ 60 fps YUY2 1280 x 720 @ 10 fps 1024 x 768 @ 10 fps 960 x 540 @ 15 fps 640 x 480 @ 30 fps 640 x 360 @ 30 fps NOTE: 3840 x 2880 @ 15 fps = 11 Megapixel (ISP limitation) |
| Sensor | 13 Megapixel 1/3” CMOS (Sony IMX258 & SunplusIT SPCA2688A) | |
| White Balance | Auto | |
| Digital Zoom | Digital zoom 10x by software | |
| Lens Size | 1/3.06 inches | |
| Lens Construction | 5 plastics | |
| Focal Length | 3.37 mm ± 5% | |
| F/No. | F2.2 ± 5% | |
| View Angle | DFOV: 81.3 ± 3° | |
| Image Quality | Center ≥ 1100 LW/PH Corner ≥ 800 LW/PH | |
| Focus | Auto | |
| Focus Distance | 10 cm | |
| Audio | Microphone | Supported |
| Microphone Sensitivity | 94db SPL @ 1kHz Min-29 Type-26 Max-23 dBES | |
| USB | Connection Type | Micro USB to Type A 2.0 |
| Video Compression | MJPEG/YUY2 | |
| UVC | Compliant with UVC 1.0 | |
| UAC | Compliant with UAC 1.0 | |
| System Compatibility | Operating System | Windows® 7 (1080p and under only), Windows 8.1, Windows 10, Windows 11 macOS™ 10.15 or higher Google™ Chromebook™ |
| Hardware Platform | Intel® i5 processor or higher 8GB RAM or more Hard drive space for recorded videos USB Port | |
| Input/Output Interface | Input | N/A |
| Output | N/A | |
| Bidirectional | USB 2.0 Micro B x 1 | |
| General | Illumination | LED (switch on camera) |
| Mechanical Arm | Supported | |
| Working Surface | 440 x 330 mm (at 2048 x 1536 4:3 mode output) | |
| Button 1 | Focus/Rotate 0°~180° | |
| Button 2 | Lamp control | |
| Compliance | Certification | EMC: FCC-B, CE, ICES/Safety: LVD |
| Power | Power Source | 5V (USB power supply) |
| Power Consumption | ≤ 2.5W | |
| Operating Conditions | Temperature | 32°F to 104°F (0°C to 40°C) |
| Humidity | 20% to 90% (Non-Condensing) | |
| Storage Conditions | Temperature | -4°F to 140°F (-20°C to +60°C) |
| Humidity | 20% to 90% (Non-Condensing) | |
| Dimensions | Physical - Expanded (W x H x D) |
393 x 66 x 346 mm (15 ¹⁵/₃₂” × 2 ¹⁹/₃₂” × 13 ⁵/₈”) |
| Physical - Closed (W x H x D) |
195 x 66 x 13 mm (7 ⁴³/₆₄” × 2 ¹⁹/₃₂” × ³³/₆₄”) | |
| Weight | Physical | 0.43 kg (0.95 lbs.) |
Compliance Information
This section addresses all connected requirements and statements regarding regulations. Confirmed corresponding applications shall refer to nameplate labels and relevant markings on the unit.
FCC Compliance Statement
This device complies with part 15 of FCC Rules. Operation is subject to the following two conditions: (1) this device may not cause harmful interference, and (2) this device must accept any interference received, including interference that may cause undesired operation. This equipment has been tested and found to comply with the limits for a Class B digital device, pursuant to part 15 of the FCC Rules.
These limits are designed to provide reasonable protection against harmful interference in a residential installation. This equipment generates, uses, and can radiate radio frequency energy, and if not installed and used in accordance with the instructions, may cause harmful interference to radio communications. However, there is no guarantee that interference will not occur in a particular installation. If this equipment does cause harmful interference to radio or television reception, which can be determined by turning the equipment off and on, the user is encouraged to try to correct the interference by one or more of the following measures:
- Reorient or relocate the receiving antenna.
- Increase the separation between the equipment and receiver.
- Connect the equipment into an outlet on a circuit different from that to which the receiver is connected.
- Consult the dealer or an experienced radio/TV technician for help.
Warning: You are cautioned that changes or modifications not expressly approved by the party responsible for compliance could void your authority to operate the equipment.
AVERTISSEMENT: Utilisez uniquement les sources d’alimentation mentionnées dans les instructions d’utilisation.
For Canada
- This Class B digital apparatus complies with Canadian ICES-003(B).
- Cet appareil numérique de la classe B est conforme à la norme NMB-003 du Canada.
CE Conformity for European Countries
 |
The device complies with the EMC Directive 2014/30/EU and Low Voltage Directive 2014/35/EU. |
The following information is only for EU-member states:
| The mark shown to the right is in compliance with the Waste Electrical and Electronic Equipment Directive 2012/19/EU (WEEE). The mark indicates the requirement NOT to dispose of the equipment as unsorted municipal waste, but use the return and collection systems according to local law. |  |
Declaration of RoHS2 Compliance
This product has been designed and manufactured in compliance with Directive 2011/65/EU of the European Parliament and the Council on restriction of the use of certain hazardous substances in electrical and electronic equipment (RoHS2 Directive) and is deemed to comply with the maximum concentration values issued by the European Technical Adaptation Committee (TAC) as shown below:
| Substance | Proposed Maximum Concentration | Actual Concentration |
|---|---|---|
| Lead (Pb) | 0.1% | < 0.1% |
| Mercury (Hg) | 0.1% | < 0.1% |
| Cadmium (Cd) | 0.01% | < 0.01% |
| Hexavalent Chromium (Cr6⁺) | 0.1% | < 0.1% |
| Polybrominated biphenyls (PBB) | 0.1% | < 0.1% |
| Polybrominated diphenyl ethers (PBDE) | 0.1% | < 0.1% |
| Bis (2-ethylhexyl) phthalate (DEHP) | 0.1% | < 0.1% |
| Butyl benzyl phthalate (BBP) | 0.1% | < 0.1% |
| Dibutyl phthalate (DBP) | 0.1% | < 0.1% |
| Diisobutyl phthalate (DIBP) | 0.1% | < 0.1% |
Certain components of products as stated above are exempted under the Annex III of the RoHS2 Directives as noted below. Examples of exempted components are:
- Copper alloy containing up to 4% lead by weight.
- Lead in high melting temperature type solders (i.e. lead-based alloys containing 85% by weight or more lead).
- Electrical and electronic components containing lead in a glass or ceramic other than dielectric ceramic in capacitors, e.g. piezoelectronic devices, or in a glass or ceramic matrix compound.
- Lead in dielectric ceramic in capacitors for a rated voltage of 125V AC or 250V DC or higher.
Indian Restriction of Hazardous Substances
Restriction on Hazardous Substances statement (India). This product complies with the “India E-waste Rule 2011” and prohibits use of lead, mercury, hexavalent chromium, polybrominated biphenyls or polybrominated diphenyl ethers in concentrations exceeding 0.1 weight % and 0.01 weight % for cadmium, except for the exemptions set in Schedule 2 of the Rule.
Product Disposal at End of Product Life
ViewSonic® respects the environment and is committed to working and living green. Thank you for being part of Smarter, Greener Computing. Please visit the ViewSonic® website to learn more.
USA & Canada
https://www.viewsonic.com/us/go-green-with-viewsonic
Europe
https://www.viewsonic.com/eu/environmental-social-governance/recycle
Taiwan
https://recycle.moenv.gov.tw
For EU users, please contact us for any safety/accident issue experienced with this product:
| ViewSonic Europe Limited Haaksbergweg 75 1101 BR Amsterdam Netherlands | |
| +31 (0) 650608655 | |
| EPREL@viewsoniceurope.com | |
| https://www.viewsonic.com/eu/ |
Copyright Information
Copyright© ViewSonic® Corporation, 2022. All rights reserved.
Macintosh and Power Macintosh are registered trademarks of Apple Inc.
Microsoft, Windows, and the Windows logo are registered trademarks of Microsoft Corporation in the United States and other countries.
ViewSonic®, the three birds logo, OnView, ViewMatch, and ViewMeter are registered trademarks of ViewSonic® Corporation.
VESA is a registered trademark of the Video Electronics Standards Association. DPMS, DisplayPort, and DDC are trademarks of VESA.
Disclaimer: ViewSonic® Corporation shall not be liable for technical or editorial errors or omissions contained herein; nor for incidental or consequential damages resulting from furnishing this material, or the performance or use of this product.
In the interest of continuing product improvement, ViewSonic® Corporation reserves the right to change product specifications without notice. Information in this document may change without notice.
No part of this document may be copied, reproduced, or transmitted by any means, for any purpose without prior written permission from ViewSonic® Corporation.
VB-VIS-003_UG_ENG_1a_20220712
Troubleshooting Common Problems
| Problem or Issue | Potential Cause | Possible Solutions |
|---|---|---|
| Cannot be powered on | The USB cable is not correctly connected to the computer or the computer may have crashed. | Re-connect the USB cable with the Document Camera. |
| Restart the computer. | ||
| No image output after connecting | The document camera is not correctly connected to the computer. | Re-connect the USB cable with the Document Camera. |
| Software is not installed on the computer. | Install the bundled software on the computer. | |
| Application software is incompatible with the document camera. | Use the bundled software to operate the Document Camera. | |
| The device is not being detected | Make sure you are using a supported VB-VIS-003 model camera device. | vDocCam+ application only supports the VB-VIS-003 model camera device. If you are using a 3rd party document camera some of the functions in this software may NOT work. |
| Check if the camera is opened by other applications. | Check the Windows/macOS program, if the camera has been occupied by other applications, please exit the application and try again. | |
| Turn off the virtual machine (macOs). | If your Mac has an installed Windows virtual machine such as “Parallels Desktop”, please turn it off and connect the device again. | |
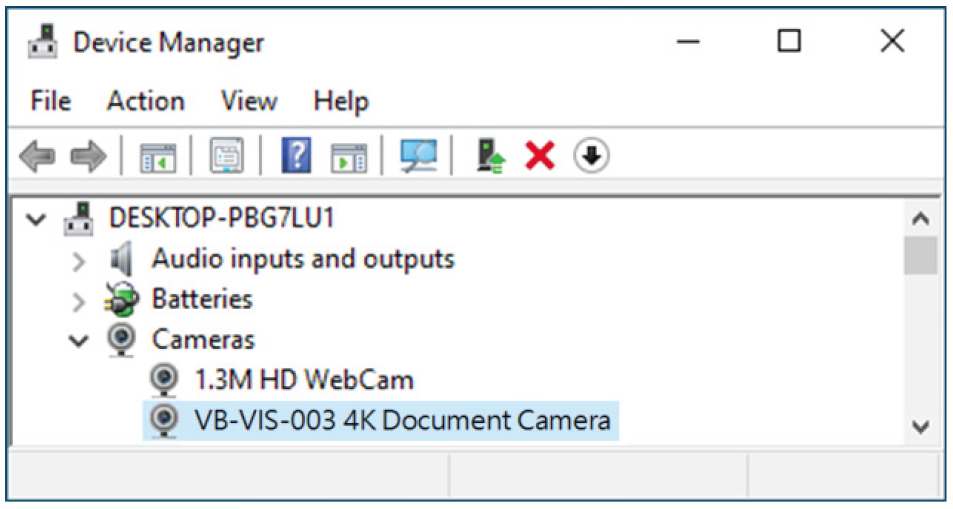
| Check the USB connection (Windows). | Ensure Windows has recognized the device under the Cameras in Windows Device Manager menu. If the device is not detected, please try to connect with another USB port. | |
| For Windows 10 / 11 system | Go to: Settings > Privacy > Camera to check whether the permission is allowed. | |
| The image is fuzzy | The distance of the object is possibly too close to the lens. | Press the AF button to auto focus. |
| The image does not move | The computer or application software may have crashed. | Restart the computer or application software. |
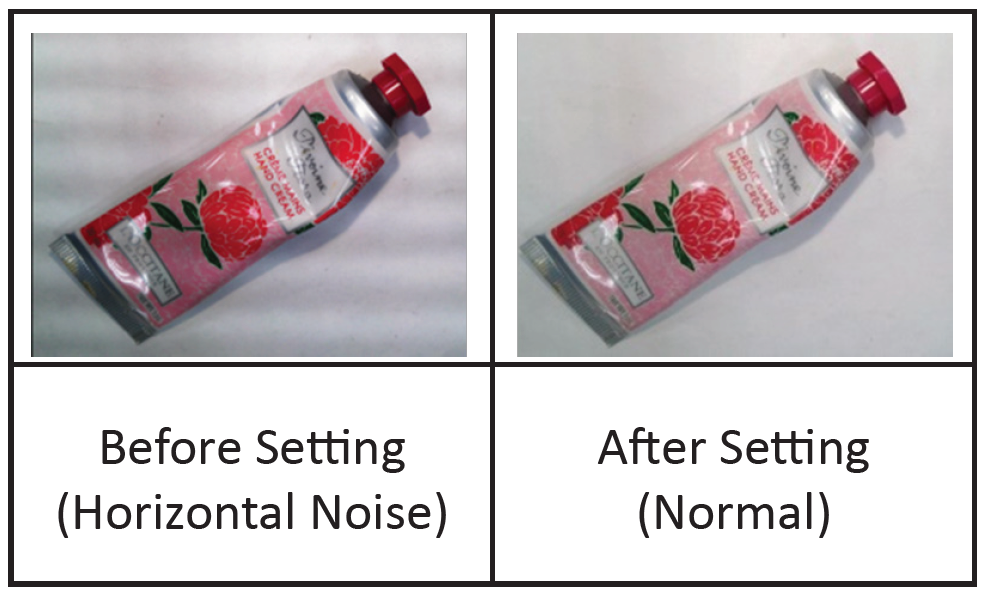
| There is camera flickering | Camera flickering problems usually occur when there is a difference between the camera refresh rate setting and the artificial lighting refresh rate of the environment.
|
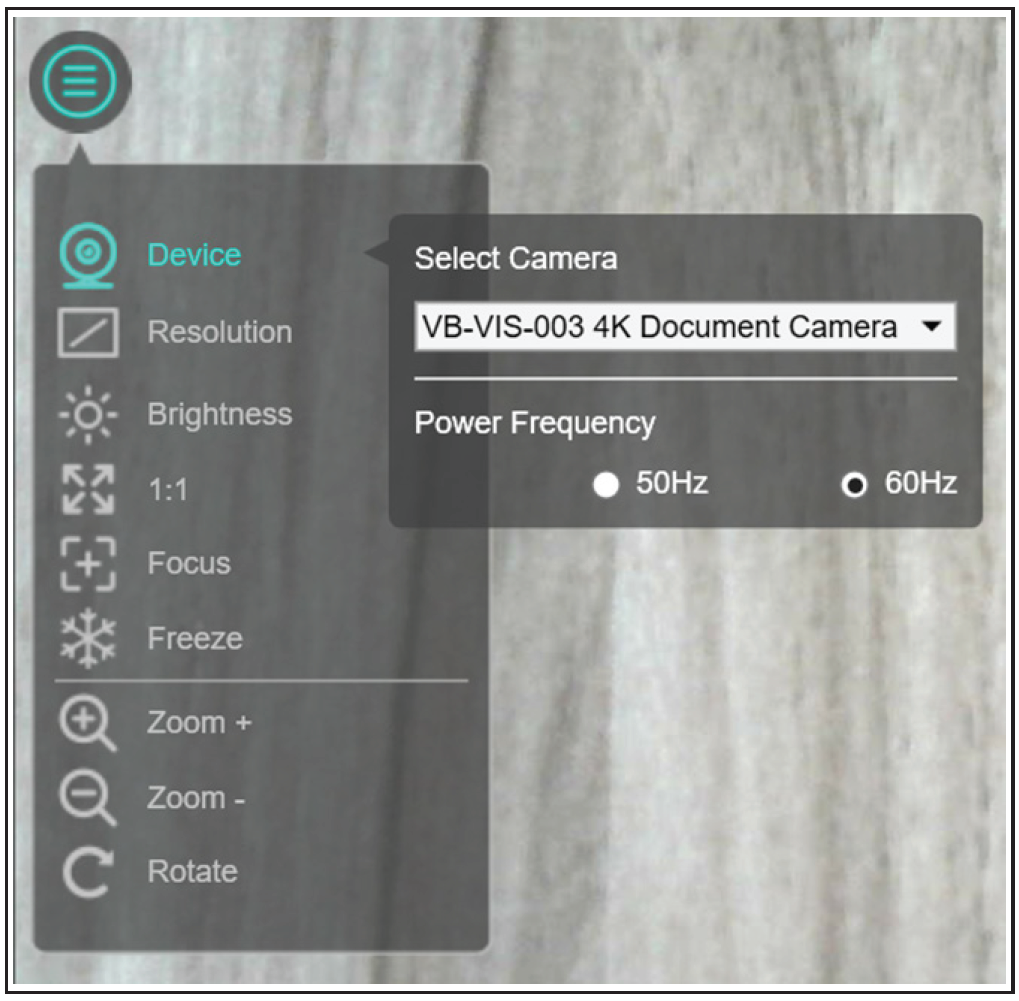
Use the vDocCam+ software “Device setup” to change the camera’s Power Frequency (refresh rate). |
Maintaining the Document Camera
General Precautions
- Make sure the camera is turned off and the USB cable is unplugged if it will not be used for an extended period of time.
- Avoid lens should avoid bright objects (e.g., sunlight), and unstable light conditions.
- Do not use the camera around facilities that can transmit high-power radio waves (e.g., television station).
Cleaning the Camera Lens
- Wipe the camera lens with a clean, soft, lint-free cloth. This removes dust and other particles.
Cleaning the Case
Use a soft, dry cloth to clean.
Disclaimer
- ViewSonic® does not recommend the use of any ammonia or alcohol-based cleaners on the device or case. Some chemical cleaners have been reported to damage the device and/or case.
- ViewSonic® will not be liable for damage resulting from use of any ammonia or alcohol-based cleaners.
Using the Document Camera Safely
Please read the following Safety Precautions before you start using the device.
- Keep this user guide in a safe place for later reference.
- Read all warnings and follow all instructions.
- To prevent damage, avoid any physical pressure, vibration, or immersion during transportation, possession, or installation of the product.
- Always place the product on a flat, stable surface.
- Avoid contacting any liquids, gas, or corrosive materials with the shell of the product.
- This product has no parts which can be repaired by the user. Any damage caused by the user's own disassembly is not covered by warranty.
- Electromagnetic fields at specific frequencies may affect the image of machine.

