


| Sub-menu | Menu Option | |||
|---|---|---|---|---|
| Image Settings | Color Mode | TV (BT.2020) | ||
| Brightness | ||||
| HDR | ||||
| HLG | ||||
| Movie | ||||
| Gaming | ||||
| Low Blue Light | ||||
| Rec.709 | ||||
| User | ||||
| 3D | ||||
| Brightness | (-/+, -50~50) | |||
| Contrast | (-/+, -50~50) | |||
| Sharpness | (-/+, 1~15) | |||
| Color | (-/+, -50~50) | |||
| Tint | (-/+, -50~50) | |||
| Gamma | 1.8 | |||
| 2.0 | ||||
| 2.2 | ||||
| 2.35 | ||||
| 2.5 | ||||
| Cube | ||||
| sRGB | ||||
| Color Settings | Color Temperature | 6500K | ||
| 7500K | ||||
| 8500K | ||||
| 9300K | ||||
| Color Management | Color | Red | ||
| Green | ||||
| Blue | ||||
| Cyan | ||||
| Yellow | ||||
| Magenta | ||||
| White | ||||
| Hue / R (*) | (-/+, -50~50) | |||
| Saturation / G (*) | (-/+, -50~50) | |||
| Gain / B (*) | (-/+, -50~50) | |||
| Reset | ||||
| Exit | ||||
| Color Space | Auto | |||
| RGB (0~255) | ||||
| RGB (16~255) | ||||
| YUV | ||||
| Light Source Mode | Dynamic Black | |||
| Eco | ||||
| Light Source Power | 100%~50% | |||
| Reset | ||||
| Ultra Fast Input | Active | |||
| Inactive | ||||
| 3D | 3D Mode | Off | ||
| On | ||||
| 3D Format | Auto | |||
| SBS | ||||
| Top and Bottom | ||||
| Frame Sequential | ||||
| 3D Sync Invert | Off | |||
| On | ||||
| Aspect Ratio | 4:3 | |||
| 16:9 | ||||
| Native | ||||
| Auto | ||||
| Keystone | H. Keystone | (-/+, -30~30) | ||
| V. Keystone | (-/+, -30~30) | |||
| Four Corners | Top-Left | |||
| Top-Right | ||||
| Bottom-Left | ||||
| Bottom-Right | ||||
| Warping | ||||
| Reset | ||||
| Zoom | (-/+, -5~25) | |||
Laser Caution
From ViewSonic Documentation
Redirect page
Redirect to:
This page has been archived and is no longer maintained.
Package Contents

| Number | Description |
|---|---|
| ① | Projector |
| ② | Remote Control |
| ③ | Batteries |
| ④ | Quick Start Guide |
| ⑤ | Power Cord |
| ⑥ | Power Adapter |
Note: The power cord and remote control included in your package may vary depending on your country. Please contact your local reseller for more information.
Projector Overview

| Number | Description |
|---|---|
| ① | Keypad |
| ② | Focus Ring |
| ③ | Zoom Ring |
| ④ | Front IR |
| ⑤ | Top IR |
| ⑥ | DC IN |
| ⑦ | Lens |
| ⑧ | I/O Ports |
| ⑨ | Vent (inlet) |
| ⑩ | Vent (outlet) |
| ⑪ | Lens Shift |
Note: Do not block projector intake and exhaust vents.
I/O Ports

| Number | Port | Description |
|---|---|---|
| ① | HDMI 1[1] | HDIM port. |
| ② | HDMI 2[1] | HDMI port[2]. |
| ③ | USB (5V/1.5A Out)
(Service) |
USB Type A port for power and service. |
| ④ | 12V Trigger | 12V DC output terminal (500mA Out). |
| ⑤ | AUDIO OUT | Audio signal output socket. |
| ⑥ | RS-232 | RS-232 control port. |
| ⑦ | USB A 5V/0.5A | USB Type A port for power. |
| ⑧ | DC IN | DC IN socket. |
Keypad

| Icon | Button | Description |
|---|---|---|
| Power | Toggles the projector between standby mode and Power On. | |
| Keystone | Manually corrects distorted images resulting from an angled projection. | |
| Navigation | Selects the desired menu items and makes adjustments when the On-Screen Display (OSD) Menu is activated. | |
| Menu/Exit | Opens/exits the On-Screen Display (OSD) Menu. | |
| Source | Displays the input source selection bar. | |
| Information | Displays the INFORMATION menu. | |
| Enter | Enacts the selected On-Screen Display (OSD) Menu item when the OSD Menu is activated. | |
| Auto | Automatically determines the best picture timings for the displayed image. |
Indicator Lights
| Indicator Light | Description |
|---|---|
| Power indicator light | |

|
Light Source indicator light |

|
Temperature indicator light |
Overview

| Number | Button | Description | |
|---|---|---|---|
| ① | Power ON | Turns the projector ON | |
| ② | Power OFF | Turns the projector OFF | |
| ③ | AV Mute | Hides the screen picture and volume mute. | |
| ④ | Zoom In | Increases the projected image size. | |
| ⑤ | Zoom Out | Reduces the projected image size. | |
| ⑥ | Contrast | Displays the contrast selection bar. | |
| ⑦ | Display Mode | Displays the display mode selection bar. | |
| ⑧ | Brightness | Displays the brightness selection bar. | |
| ⑨ | Aspect | Displays the aspect ratio selection bar. | |
| ⑩ | Keystone | Manually correct distorted images. | |
| ⑪ | Light Source Mode | Displays the Light Source Mode selection bar. | |
| ⑫ | Freeze | Freezes the projected image. | |
| ⑬ | Mute | Mute/unmute. | |
| ⑭ | ▲/Volume Increase |
| |
| ⑮ | Enter | Confirms the selection. | |
| ⑯ | ◄/Source |
| |
| ⑰ | ►/Auto Sync |
| |
| ⑱ | ▼/Volume Decrease |
| |
| ⑲ | Menu/Exit |
| |
| ⑳ | HDMI 1 | Select the HDMI 1 input source. | |
| ㉑ | HDMI 2 | Select the HDMI 2 input source. | |
Remote Control - Receiver Range

To ensure proper function of the remote control follow the steps below:
- The remote control must be held at an angle within 30° perpendicular to the projector’s IR remote control sensor(s).
- The distance between the remote control and the sensor(s) should not exceed 8 m (26 ft.).
Note: Refer to the illustration for the location of the infrared (IR) remote control sensor(s).
Replacing the Batteries
- Remove the battery cover from the bottom of the remote control by pressing the finger grip and sliding it across.
- Remove any existing batteries (if necessary) and install two AAA batteries.
- Replace the battery cover by aligning it with the base and pushing it back into position.
- Avoid leaving the remote control and batteries in excessive heat or a humid environment.
- Replace only with the same or equivalent type recommended by the battery manufacturer.
- If the battery is drained or if you will not be using the remote control for an extended period of time, remove the battery to avoid damage to the remote control.
- Dispose of used batteries according to the manufacturer’s instructions and local environment regulations for your region.
Note: Observe the battery’s polarities as indicated.

Note:
Choosing a Location - Projector Orientation
Personal preference and room layout will decide the installation location. Consider the following:
- Size and position of your screen.
- Location of a suitable power outlet.
- Location and distance between the projector and other equipment.
The projector is designed to be installed in one of the following locations:
-
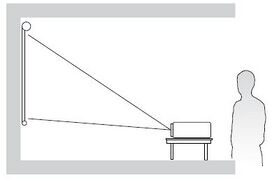 Desk Front
 -
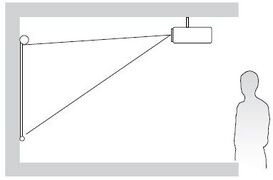 Ceiling Front
 -
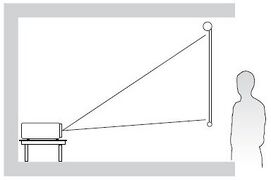 Desk Rear
 -
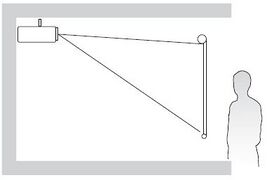 Ceiling Rear
| Location | Description |
|---|---|
| Desk Front | The projector is placed near the floor in front of the screen. |
| Ceiling Front | The projector is suspended upside-down from the ceiling in front of the screen. |
| Desk Rear[1] | The projector is placed near the floor behind the screen. |
| Ceiling Rear[1] | The projector is suspended upside-down from the ceiling behind the screen. |
Projection Dimensions
16:9 Image on a 16:9 Screen

Note: (e) = Screen / (f) = Center of Lens
| (a) Screen Size | (b) Projection Distance | (c) Image Height | (d) Vertical Offset | ||||||||
|---|---|---|---|---|---|---|---|---|---|---|---|
| min. | max. | Minimum | Maximum | ||||||||
| in. | mm | in. | mm | in. | mm | in. | mm | in. | mm | in. | mm |
| 30 | 762 | 36.61 | 930 | 58.57 | 1488 | 14.71 | 374 | 0.51 | 13 | 2.74 | 69 |
| 40 | 1016 | 48.81 | 1240 | 78.09 | 1984 | 19.61 | 498 | 0.69 | 17 | 3.65 | 93 |
| 50 | 1270 | 61.01 | 1550 | 97.62 | 2479 | 24.51 | 623 | 0.86 | 22 | 4.56 | 116 |
| 60 | 1524 | 73.21 | 1860 | 117.14 | 2975 | 29.42 | 747 | 1.03 | 26 | 5.47 | 139 |
| 70 | 1778 | 85.41 | 2170 | 136.66 | 3471 | 34.32 | 872 | 1.20 | 31 | 6.38 | 162 |
| 80 | 2032 | 97.62 | 2479 | 156.19 | 3967 | 39.22 | 996 | 1.37 | 35 | 7.30 | 185 |
| 90 | 2286 | 109.82 | 2789 | 175.71 | 4463 | 44.12 | 1121 | 1.54 | 39 | 8.21 | 208 |
| 100 | 2540 | 122.02 | 3099 | 195.23 | 4959 | 49.03 | 1245 | 1.72 | 44 | 9.12 | 232 |
| 110 | 2794 | 134.22 | 3409 | 214.76 | 5455 | 53.93 | 1370 | 1.89 | 48 | 10.03 | 255 |
| 120 | 3048 | 146.22 | 3719 | 234.28 | 5951 | 58.83 | 1494 | 2.06 | 52 | 10.94 | 278 |
| 130 | 3302 | 158.63 | 4029 | 253.80 | 6447 | 63.73 | 1619 | 2.23 | 57 | 11.85 | 301 |
| 140 | 3556 | 170.83 | 4339 | 273.33 | 6942 | 68.64 | 1743 | 2.40 | 61 | 12.77 | 324 |
| 150 | 3810 | 183.03 | 4649 | 292.85 | 7438 | 73.54 | 1868 | 2.57 | 65 | 13.68 | 347 |
| 200 | 5080 | 244.04 | 6199 | 390.47 | 9918 | 98.05 | 2491 | 3.43 | 87 | 18.24 | 463 |
| 250 | 6350 | 305.05 | 7748 | 488.08 | 12397 | 122.57 | 3113 | 4.29 | 109 | 22.80 | 579 |
| 300 | 7620 | 366.06 | 9298 | 585.70 | 14877 | 147.08 | 3736 | 5.15 | 131 | 27.36 | 695 |
Note:
- These figures are for reference purposes only. Please refer to the actual projector for the precise dimensions.
- It is recommended that if you intend to permanently install the projector to physically test the projection size and distance using the actual projector before you permanently install it.
Mounting the Projector
Note: If you buy a third party mount, please use the correct screw size. Screw size can vary depending on the thickness of the mounting plate.
- To ensure the most secure installation, please use a ViewSonic® wall or ceiling mount.
- Ensure the screws used to attach the mount to the projector meet the following specifications:
- Screw type: M4 x 8
- Maximum Screw Length: 8 mm
- Place the power adapter within the designated area and secure it with a cable strap.

CAUTION
- Avoid installing the projector near a heat source or air conditioner.
- Keep at least a 10 cm (3.9 in.) gap between the ceiling and the bottom of the projector.
Using the Security Bar
To help prevent the projector from being stolen, use a security slot locking device to secure the projector to a fixed object. The security slot can also be used as a safety anchor if the projector is mounted to the ceiling.
Connecting to Power
|
 |
Note: When installing the projector, incorporate a readily accessible disconnect device in the fixed wiring, or connect the power plug to an easily accessible outlet near the unit. If a fault should occur during operation of the projector, use the disconnect device to switch off the power supply, or disconnect the power plug.
Connecting to External Devices
HDMI Connection
Connect one end of an HDMI cable to the HDMI port of your video device. Then connect the other end of the cable to the HDMI 1/2 port (each support HDMI 2.0/HDCP 2.2) of your projector.
Note: The HDMI 2 port supports eARC.

Audio Connection
You can connect to various external sound delivery devices via the AUDIO OUT and HDMI 2 ports.
Note: The HDMI 2 port supports eARC. It can deliver sound to external devices when connected.

USB Connection
USB Type A Connection
The USB port is for supplying power (e.g., dongles) and service needs.
Note: The USB port does not supply power when the projector is in standby mode.

RS-232 Connection
When you use a RS-232 serial port cable to connect the projector to an external computer certain functions can be controlled remotely by the PC, including Power On/Off, Volume adjustment, Input select, Brightness, and more.

Turnin the Projector On

- Make sure the projector’s power cord is properly connected to a power outlet.
- Press the Power button on the projector or remote control to turn on the projector.
- The Power Indicator Light will be flashing blue during startup.
- The first time the projector is turned on, you will be prompted to select the preferred language and projection orientation.
Note:
Selecting an Input Source
The projector can be connected to multiple devices at the same time. However, it can only display one full screen at a time.

When Auto Source is on, the projector will automatically search for input sources. If multiple sources are connected, press the Source button on the projector or remote control to select the desired input.
Note: Ensure the connected sources are also turned on.
Adjusting the Projected Image
Adjusting the Projector’s Height and Projection Angle
The projector is equipped with three adjustment feet. Adjusting the feet will change the projector’s height and the vertical projection angle.

Adjusting the Focus, Keystone, Lens Shift, and Zoom
You can improve and adjust the clarity and position of the image by adjusting the Focus Ring, Keystone Keys, Lens Shift dial or Zoom Ring.

Shutting Down the Projector
- Press the Power button on the projector or remote control and a “power off message” will appear.
- Press the Power button again to confirm and shut down the projector.
- The Power Indicator Light will turn solid red, and the projector enters standby mode.
On-Screen Display (OSD) Menu
The projector has multilingual on-screen display menus that allow you to make image adjustments and change a variety of settings.

| Menu | Description | |
|---|---|---|
| Display | Adjusts Image, Ultra Fast Input, 3D, Aspect Ratio, Zoom, and Keystone settings. | |
| Audio | Adjusts the volume level, audio mode, or mute. | |
| Setup | Adjusts Projection, Power, Security, Language, Input Source, etc. settings. | |
| Information |  |
Views projector information. |
The projector has multilingual on-screen display menus that allow for image and settings adjustment.
- To open the On-Screen Display (OSD) Menu, press the Menu/Exit button on the projector or the remote control.
- When the OSD is displayed, use the Navigation ( Up ▲ / Down ▼ ) buttons to select any item in the main menu. While making a selection on a particular page, press the Enter button on the projector or the remote control to enter a sub-menu.
- Use the Navigation ( Up ▲ / Down ▼ / Left ◀ / Right ▶ ) buttons to select the desired item in the sub-menu and then press Enter to view further settings. Adjust the settings by using the Navigation ( Up ▲ / Down ▼ / Left ◀ / Right ▶ ) buttons.
- Select the next item to be adjusted in the sub-menu and adjust as described above.
- Press Enter to confirm, and the screen will return to the main menu.
- To exit, press the Menu/Exit button again. The OSD menu will close and the projector will automatically save the new settings.
On-Screen Display (OSD) Menu Tree
| Sub-menu | Menu Option |
|---|---|
| Volume | (-/+, 0~10) |
| Mute | Off |
| On | |
| HDMI eARC | Off |
| On |
| Sub-menu | Menu Option | |
|---|---|---|
| Projection | Desk Front | |
| Desk Rear | ||
| Ceiling Front | ||
| Ceiling Rear | ||
| Power Settings | Direct Power On | Off |
| On | ||
| Signal Power On | Off | |
| On | ||
| Auto Power Off | (-/+, 0~180) minutes | |
| Security | Security | Off |
| On | ||
| Change Password | ||
| HDMI CEC | HDMI Link | Off |
| On | ||
| XBOX Mode | Off | |
| On | ||
| Test Pattern | Test Pattern | Off |
| Green Grid | ||
| Magenta Grid | ||
| White Grid | ||
| White | ||
| Test Card | ||
| Options | Language | English |
| Deutsch | ||
| Français | ||
| Italiano | ||
| Español | ||
| Português | ||
| Polski | ||
| Nederlands | ||
| Svenska | ||
| Norsk/Dansk | ||
| Suomi | ||
| ελληνικά | ||
| 繁體中文 | ||
| 簡体中文 | ||
| 日本語 | ||
| 한국어 | ||
| Русский | ||
| Čeština | ||
| يبرع | ||
| ไทย | ||
| Türkçe | ||
| Tiếng Việt | ||
| Bahasa Indonesia | ||
| High Altitude | Off | |
| On | ||
| Auto Source | Off | |
| On | ||
| Keypad Lock | Off | |
| On | ||
| Splash Screen | Default | |
| Neutal | ||
| Reset | Reset to Default | |
| Sub-menu | Menu Option |
|---|---|
| Serial Number | |
| Source | |
| Resolution | |
| Refresh Rate | |
| Light Source Hours | |
| Color Mode | |
| Light Source Mode | |
| Firmware Version | System |
| MCU |
Display Menu

| Menu | Description | ||||||||||||||||||||||
|---|---|---|---|---|---|---|---|---|---|---|---|---|---|---|---|---|---|---|---|---|---|---|---|
| Image Settings | Color Mode
| ||||||||||||||||||||||
Brightness
| |||||||||||||||||||||||
Contrast
| |||||||||||||||||||||||
Sharpness
| |||||||||||||||||||||||
Color
| |||||||||||||||||||||||
Tint
| |||||||||||||||||||||||
Gamma
| |||||||||||||||||||||||
Color Settings
| |||||||||||||||||||||||
Light Source Mode
| |||||||||||||||||||||||
Reset
| |||||||||||||||||||||||
| Ultra Fast Input | This function is favorable to frame rate reducing. Quick response time in native timing can be achieved. When enabled, the following settings (if applicable) will return to factory preset values and disabled: Warping, Keystone, Four corners., Aspect Ratio, Zoom.
| ||||||||||||||||||||||
| 3D[1] | 3D Mode
| ||||||||||||||||||||||
3D Format
| |||||||||||||||||||||||
3D Sync Invert
| |||||||||||||||||||||||
| Aspect Ratio | Select the aspect ratio of the projected image.
| ||||||||||||||||||||||
| Zoom | Reduce or magnify the projected image. | ||||||||||||||||||||||
| Keystone |
|
- ↑ This projector is a 3D ready projector with DLP-Link 3D solution. Please make sure your 3D glasses are for DLP-Link 3D. This projector supports frame sequential (page-flip) 3D via the HDMI 1/HDMI 2 ports. For the best performance, 1920 x 1080 resolution is recommended. Please note that 4K (3840 x 2160) resolution is not supported in 3D mode.
Audio Menu

| Menu | Description | ||||||
|---|---|---|---|---|---|---|---|
| Volume | Adjust the volume level. | ||||||
| Mute | Temporarily turn off the sound. | ||||||
| Audio Mode | Select the preferred audio mode.
|
Setup Menu

| Menu | Description | |||||
|---|---|---|---|---|---|---|
| Projection | Select the preferred projection: Front, Rear, Ceiling-Top, and Rear-Top. | |||||
| Power Settings | Direct Power On Automatically power on the projector when AC power is supplied, without pressing the Power button on the projector or the remote control. | |||||
| Signal Power On Automatically power on the projector when a signal is detected, without pressing the Power button on the projector or on the remote control. | ||||||
| Auto Power Off A countdown timer will start when there is no signal being sent to the projector. The projector will automatically power off when the countdown has finished (in minutes). | ||||||
| Security | Power On Lock Enable or disable a password prompt before using the projector.
| |||||
| Change Password Set or modify the password. NOTE: Please follow the OSD message to input the current password first, then enter a new password (security code). Confirm the new password by entering the new password again. | ||||||
| HDMI CEC | HDMI Link When you connect HDMI CEC-compatible devices to the projector with HDMI cables, you can control them on the same power on or power off status using the HDMI CEC control feature in the projector’s OSD. This lets one device or multiple devices in a group power on or power off via HDMI CEC in a typical configuration.
XBOX Mode
| |||||
| Test Pattern | Select the test pattern from green grid, magenta grid, white grid, white, or disable this function (off).
| |||||
| Options | Language Select the On-Screen Display (OSD) Menu language. | |||||
| High Altitude When On, the fans will spin faster for better cooling and performance. This is useful for high altitude environments where the air is thin. | ||||||
| Auto Source Automatically find an available input source.
| ||||||
| Keypad Lock Lock all keypad buttons, except for the Power key.
| ||||||
| Splash Screen Set the “startup screen”. If changes are made, they will take effect the next time the projector is powered on. NOTE: Neutral is a black screen. | ||||||
| Reset | Return the settings to default.
|
Information Menu
View Serial Number, Source, Resolution, Refresh Rate, Light Source Hours, Color Mode, Light Source Mode, and Firmware Version information.

Technical Specifications
| Item | Category | Specifications |
|---|---|---|
| Model | P/N. | LX700-4K RGB |
| No. | VS19895 | |
| Projector | Type | RGB Laser |
| Display Size | 30”~300” | |
| Throw Ratio | 1.4~2.24 (100”@ 3.10 m) | |
| Lens | F=2.5~3.26, f=20.911~32.62 mm | |
| Display System | 1-CHIP DMD | |
| Input Signal | HDMI (v. 2.0) | fh: 15~255 kHz, fv:23~240 Hz, Pixel rate: 600 MHz |
| Resolution | Native | 3840 x 2160 |
| Power | Input Voltage | DC IN 100-240V, 50/60 Hz (auto switch) |
| Operating Conditions | Temperature | 0°C to 40°C
(32°F to 104°F) |
| Humidity | 10% to 80% (non-condensing) | |
| Altitude | 0 to 760 m (0 to 2,500 ft.) at 0°C to 40°C (32°F to 104°F) 760 to 1,520 m (2,500 to 5,000 ft.) at 0°C to 35°C (32°F to 95°F) 1,520 to 3,048 m (5,000 to 10,000 ft.) at 0°C to 30°C (32°F to 86°F) | |
| Storage Conditions | Temperature | -20°C to 60°C
(-4°F to 140°F) |
| Humidity | 5% to 90% (non-condensing) | |
| Altitude | 0 to 12,100 m
(0 to 39,698 ft.) | |
| Dimensions | Physical (W x H x D) |
286 x 129 x 228 mm (11.26” x 5.08” x 8.98”) |
| Weight | Physical | 2.70 kg (5.95 lbs) |
| Power Consumption | On[1] | 145W (Typical) |
| Off | < 0.5W (Standby) |
- ↑ The test condition follows EEI standards.
Projector Dimensions
286 mm (W) x 129 mm (H) x 228 mm (D)

Timing Chart
HDMI Video Timing
| Timing | Resolution | Refresh Rate (Hz) |
|---|---|---|
| SDTV (480i) | 720 x 480 | 60 |
| SDTV (480p) | 720 x 480 | 60 |
| SDTV (576i) | 720 x 576 | 50 |
| SDTV (576p) | 720 x 576 | 50 |
| HDTV (720p) | 1280 x 720 | 50 / 60 |
| HDTV (1080i) | 1920 x 1080 | 50 / 60 |
| HDTV (1080p) | 1920 x 1080 | 24 / 50 / 60 |
| 4K | 3840 x 2160 | 24 / 25 / 30 / 50 / 60 |
HDMI PC Timing
| Timing | Resolution | Refresh Rate (Hz) |
|---|---|---|
| VGA | 640 x 480 | 60 / 67 / 72 / 75 |
| 720 x 400 | 70 | |
| SVGA | 800 x 600 | 56 / 60 / 72 / 75 |
| 832 x 624 | 75 | |
| XGA | 1024 x 768 | 60 / 70 / 75 |
| 1152 x 864 | 70 / 75 / 85 | |
| SXGA | 1280 x 1024 | 75 |
| PowerBook G4 | 1152 x 870 | 75 |
HDMI Extended Wide Timing
| Timing | Resolution | Refresh Rate (Hz) |
|---|---|---|
| XGA | 1152 x 864 | 75 |
| Quad VGA | 1280 x 960 | 60 |
| WXGA | 1280 x 720 | 120 |
| 1440 x 900 | 60 | |
| WSXGA+ | 1680 x 1050 | 60 |
| 1920 x 1080 | 60 / 240 | |
| WUXGA | 1920 x 1200-RB | 60 |
| 2K | 2560 x 1440 | 120 |
3D Support Timing
| HDMI 3D | ||
|---|---|---|
| Frame Packing Format | ||
| Timing | Resolution | Refresh Rate (Hz) |
| 1080p | 1920 x 1080 | 24 |
| 720p | 1280 x 720 | 50 / 60 |
| Side by Side Format | ||
| Timing | Resolution | Refresh Rate (Hz) |
| 1080i | 1920 x 1080 | 50 / 60 |
| Top and Bottom Format | ||
| Timing | Resolution | Refresh Rate (Hz) |
| 1080p | 1920 x 1080 | 24 |
| 720p | 1280 x 720 | 50 / 60 |
LED Indicators
| Status and Description | Power Indicator Light | Temperature Indicator Light | Light Source Indicator Light | |
|---|---|---|---|---|
| Red | Blue | Red | Red | |
| Standby State (Power cord input) |
Steady Light | |||
| Power On (Warming) |
Flashing Light (0.5 sec off/0.5 sec on) | |||
| Power On and Lamp Lighting | Steady Light | |||
| Power Off (Cooling) |
Flashing Light (0.5 sec off/0.5 sec on) Back to red steady light when the cooling fan turns off. | |||
| Error (Lamp Failure) |
Flashing Light | Steady Light | ||
| Error (Fan Failure) |
Flashing Light | |||
| Error (Overheat) |
Steady Light | |||
Compliance Information
This section addresses all connected requirements and statements regarding regulations. Confirmed corresponding applications shall refer to nameplate labels and relevant markings on the unit.
FCC Compliant Statement
This device complies with part 15 of FCC Rules. Operation is subject to the following two conditions: (1) this device may not cause harmful interference, and (2) this device must accept any interference received, including interference that may cause undesired operation. This equipment has been tested and found to comply with the limits for a Class B digital device, pursuant to part 15 of the FCC Rules.
These limits are designed to provide reasonable protection against harmful interference in a residential installation. This equipment generates, uses, and can radiate radio frequency energy, and if not installed and used in accordance with the instructions, may cause harmful interference to radio communications. However, there is no guarantee that interference will not occur in a particular installation. If this equipment does cause harmful interference to radio or television reception, which can be determined by turning the equipment off and on, the user is encouraged to try to correct the interference by one or more of the following measures:
- Reorient or relocate the receiving antenna.
- Increase the separation between the equipment and receiver.
- Connect the equipment into an outlet on a circuit different from that to which the receiver is connected.
- Consult the dealer or an experienced radio/TV technician for help.
Warning: You are cautioned that changes or modifications not expressly approved by the party responsible for compliance could void your authority to operate the equipment.
Industry Canada Statement
This Class B digital apparatus complies with Canadian ICES-003.
Cet appareil numérique de classe B est conforme à la norme NMB-003 du Canada.
CAN ICES(B)/NMB(B)
CE Conformity for European Countries

The device complies with the EMC Directive 2014/30/EU and Low Voltage Directive 2014/35/EU. Ecodesign Directive 2009/125/EC and Radio Equipment Directive 2014/53/EU. (Frequency Range:2400~2483.5 MHz, 5150~5250 MHz) (Max Output Power: under 20 dBm)
The following information is only for EU-member states:
The mark shown to the right is in compliance with the Waste Electrical and Electronic Equipment Directive 2012/19/EU (WEEE). The mark indicates the requirement NOT to dispose of the equipment as unsorted municipal waste, but use the return and collection systems according to local law.
Declaration of RoHS2 Compliance
This product has been designed and manufactured in compliance with Directive 2011/65/EU of the European Parliament and the Council on restriction of the use of certain hazardous substances in electrical and electronic equipment (RoHS2 Directive) and is deemed to comply with the maximum concentration values issued by the European Technical Adaptation Committee (TAC) as shown below.
| Substance | Proposed Maximum Concentration | Actual Concentration |
|---|---|---|
| Lead (Pb) | 0.1% | < 0.1% |
| Mercury (Hg) | 0.1% | < 0.1% |
| Cadmium (Cd) | 0.01% | < 0.01% |
| Hexavalent Chromium (Cr6⁺) | 0.1% | < 0.1% |
| Polybrominated biphenyls (PBB) | 0.1% | < 0.1% |
| Polybrominated diphenyl ethers (PBDE) | 0.1% | < 0.1% |
| Bis (2-ethylhexyl) phthalate (DEHP) | 0.1% | < 0.1% |
| Butyl benzyl phthalate (BBP) | 0.1% | < 0.1% |
| Dibutyl phthalate (DBP) | 0.1% | < 0.1% |
| Diisobutyl phthalate (DIBP) | 0.1% | < 0.1% |
Certain components of products as stated above are exempted under the Annex III of the RoHS2 Directives as noted below. Examples of exempted components are:
- Copper alloy containing up to 4% lead by weight.
- Lead in high melting temperature type solders (i.e. lead-based alloys containing 85% by weight or more lead).
- Electrical and electronic components containing lead in a glass or ceramic other than dielectric ceramic in capacitors, e.g. piezoelectronic devices, or in a glass or ceramic matrix compound.
- Lead in dielectric ceramic in capacitors for a rated voltage of 125 V AC or 250 V DC or higher.
Indian Restriction of Hazardous Substances
Restriction on Hazardous Substances statement (India). This product complies with the “India E-waste Rule 2011” and prohibits use of lead, mercury, hexavalent chromium, polybrominated biphenyls or polybrominated diphenyl ethers in concentrations exceeding 0.1 weight % and 0.01 weight % for cadmium, except for the exemptions set in Schedule 2 of the Rule.
Product Disposal at End of Product Life
ViewSonic® respects the environment and is committed to working and living green. Thank you for being part of Smarter, Greener Computing. Please visit the ViewSonic® website to learn more.
USA & Canada:
https://www.viewsonic.com/us/go-green-with-viewsonic
Europe:
https://www.viewsonic.com/eu/environmental-social-governance/recycle
Taiwan:
https://recycle.moenv.gov.tw/
For EU users, please contact us for any safety/accident issue experienced with this product:
| ViewSonic Europe Limited Flevolaan 38, 1382JZ, Weesp the Netherlands | |
| +31 08000232999 | |
| EPREL@viewsoniceurope.com | |
| https://www.viewsonic.com/eu/ |
Copyright Information
Copyright© ViewSonic® Corporation, 2024. All rights reserved.
Macintosh and Power Macintosh are registered trademarks of Apple Inc.
Microsoft, Windows, and the Windows logo are registered trademarks of Microsoft Corporation in the United States and other countries.
ViewSonic® and the three birds logo are registered trademarks of ViewSonic® Corporation.
VESA is a registered trademark of the Video Electronics Standards Association. DPMS, DisplayPort, and DDC are trademarks of VESA.
ENERGY STAR® is a registered trademark of the U.S. Environmental Protection Agency (EPA).
As an ENERGY STAR® partner, ViewSonic® Corporation has determined that this product meets the ENERGY STAR® guidelines for energy efficiency.
Disclaimer: ViewSonic® Corporation shall not be liable for technical or editorial errors or omissions contained herein; nor for incidental or consequential damages resulting from furnishing this material, or the performance or use of this product.
In the interest of continuing product improvement, ViewSonic® Corporation reserves the right to change product specifications without notice. Information in this document may change without notice.
No part of this document may be copied, reproduced, or transmitted by any means, for any purpose without prior written permission from ViewSonic® Corporation.
LX700-4K_RGB_UG_ENG_1a_20240530
Important: Please visit: ViewSonic Support & Service
This page has been archived and is no longer maintained.
For technical support or product service, see the table below or contact your reseller.
Important: You will need the product’s serial number
Americas
| Country/Region | Website |
|---|---|
| Canada | https://www.viewsonic.com/us |
| Latin America | https://www.viewsonic.com/la |
| United States | https://www.viewsonic.com/us |
Asia Pacific & Africa
| Country/Region | Website |
|---|---|
| Australia | https://viewsonic.com/au/ |
| Bangladesh | https://www.viewsonic.com/bd/ |
| 中国 (China) | https://www.viewsonic.com.cn |
| 香港 (繁體中文) | https://www.viewsonic.com/hk/ |
| Hong Kong (English) | https://www.viewsonic.com/hk-en/ |
| India | https://www.viewsonic.com/in/ |
| Indonesia | https://www.viewsonic.com/id/ |
| Israel | https://www.viewsonic.com/il/ |
| 日本 (Japan) | https://www.viewsonic.com/jp/ |
| Korea | https://www.viewsonic.com/kr/ |
| Malaysia | https://www.viewsonic.com/my/ |
| Middle East | https://www.viewsonic.com/me/ |
| Myanmar | https://www.viewsonic.com/mm/ |
| Nepal | https://www.viewsonic.com/np/ |
| New Zealand | https://www.viewsonic.com/nz/ |
| Pakistan | https://www.viewsonic.com/pk/ |
| Philippines | https://www.viewsonic.com/ph/ |
| Singapore | https://www.viewsonic.com/sg/ |
| 臺灣 (Taiwan) | https://www.viewsonic.com/tw/ |
| ประเทศไทย | https://www.viewsonic.com/th/ |
| Việt Nam | https://www.viewsonic.com/vn/ |
| South Africa & Mauritius | https://www.viewsonic.com/za/ |
Europe
| Country/Region | Website |
|---|---|
| Europe | https://www.viewsonic.com/eu/ |
| France | https://www.viewsonic.com/fr/ |
| Deutschland | https://www.viewsonic.com/de/ |
| Қазақстан | https://www.viewsonic.com/kz/ |
| Россия | https://www.viewsonic.com/ru/ |
| España | https://www.viewsonic.com/es/ |
| Türkiye | https://www.viewsonic.com/tr/ |
| Україна | https://www.viewsonic.com/ua/ |
| United Kingdom | https://www.viewsonic.com/uk/ |
Limited Warranty
ViewSonic® Projector
What the warranty covers:
ViewSonic® warrants its products to be free from defects in material and workmanship, under normal use, during the warranty period. If a product proves to be defective in material or workmanship during the warranty period, ViewSonic® will, at its sole option, repair or replace the product with a like product. Replacement product or parts may include remanufactured or refurbished parts or components.
Limited Three (3) year General Warranty:
Subject to the more limited one (1) year warranty set out below, North and South America: Three (3) years warranty for all parts excluding the lamp, three (3) years for labor, and one (1) year for the original lamp from the date of the first consumer purchase.
Other regions or countries: Please check with your local dealer or local ViewSonic® office for the warranty information.
Limited One (1) year Heavy Usage Warranty:
Under heavy usage settings, where a projector’s use includes more than fourteen (14) hours average daily usage, North and South America: One (1) year warranty for all parts excluding the lamp, one (1) year for labor, and ninety (90) days for the original lamp from the date of the first consumer purchase; Europe: One (1) year warranty for all parts excluding the lamp, one (1) year for labor, and ninety (90) days for the original lamp from the date of the first consumer purchase. Other regions or countries: Please check with your local dealer or local ViewSonic® office for the warranty information. Lamp warranty subject to terms and conditions, verification and approval. Applies to manufacturer’s installed lamp only. All accessory lamps purchased separately are warranted for 90 days.
Who the warranty protects:
This warranty is valid only for the first consumer purchaser.
What the warranty does not cover:
- Any product on which the serial number has been defaced, modified, or removed.
- Damage, deterioration, or malfunction resulting from:
- Accident, misuse, neglect, fire, water, lightning, or other acts of nature, unauthorized product modification, or failure to follow instructions supplied with the product.
- Operation outside of product specifications.
- Operation of the product for other than the normal intended use or not under normal conditions.
- Repair or attempted repair by anyone not authorized by ViewSonic®.
- Any damage of the product due to shipment.
- Removal or installation of the product.
- Causes external to the product, such as electric power fluctuations or failure.
- Use of supplies or parts not meeting ViewSonic’s specifications.
- Normal wear and tear.
- Any other cause which does not relate to a product defect.
- Removal, installation, and set-up service charges.
How to get service:
- For information about receiving service under warranty, contact ViewSonic® Customer Support (Please refer to the “Customer Support” page). You will need to provide your product’s serial number.
- To obtain warranted service, you will be required to provide: (a) the original dated sales slip, (b) your name, (c) your address, (d) a description of the problem, and (e) the serial number of the product.
- Take or ship the product, freight prepaid, in the original container to an authorized ViewSonic® service center or ViewSonic®.
- For additional information or the name of the nearest ViewSonic® service center, contact ViewSonic®.
Limitation of implied warranties:
There are no warranties, express or implied, which extend beyond the description contained herein including the implied warranty of merchantability and fitness for a particular purpose.
Exclusion of damages:
ViewSonic’s liability is limited to the cost of repair or replacement of the product. ViewSonic® shall not be liable for:
- Damage to other property caused by any defects in the product, damages based upon inconvenience, loss of use of the product, loss of time, loss of profits, loss of business opportunity, loss of goodwill, interference with business relationships, or other commercial loss, even if advised of the possibility of such damages.
- Any other damages, whether incidental, consequential or otherwise.
- Any claim against the customer by any other party.
Effect of state law:
This warranty gives you specific legal rights, and you may also have other rights which vary from local authority. Some local governments do not allow limitations on implied warranties and/or do not allow the exclusion of incidental or consequential damages, so the above limitations and exclusions may not apply to you.
Sales outside the U.S.A. and Canada:
For warranty information and service on ViewSonic® products sold outside of the U.S.A. and Canada, contact ViewSonic® or your local ViewSonic® dealer. The warranty period for this product in mainland China (Hong Kong, Macao, and Taiwan Excluded) is subject to the terms and conditions of the Maintenance Guarantee Card. For users in Europe and Russia, full details of warranty provided can be found at: ViewSonic EU under “Support/Warranty Information”.
Mexico Limited Warranty
ViewSonic® Projector
What the warranty covers:
ViewSonic® warrants its products to be free from defects in material and workmanship, under normal use, during the warranty period. If a product proves to be defective in material or workmanship during the warranty period, ViewSonic® will, at its sole option, repair or replace the product with a like product. Replacement product or parts may include remanufactured or refurbished parts or components & accessories.
How long the warranty is effective:
3 years for all parts excluding the lamp, 3 years for labor, 1 year for the original lamp from the date of the first consumer purchase.
Lamp warranty subject to terms and conditions, verification and approval. Applies to manufacturer’s installed lamp only.
All accessory lamps purchased separately are warranted for 90 days.
Who the warranty protects:
This warranty is valid only for the first consumer purchaser.
What the warranty excludes and does not cover:
- Any product on which the serial number has been defaced, modified or removed.
- Damage, deterioration, or malfunction resulting from:
- Accident, misuse, neglect, fire, water, lightning, or other acts of nature, unauthorized product modification, unauthorized attempted repair, or failure to follow instructions supplied with the product.
- Any damage of the product due to shipment.
- Causes external to the product, such as electrical power fluctuations or failure.
- Use of supplies or parts not meeting ViewSonic®’s specifications.
- Normal wear and tear.
- Any other cause which does not relate to a product defect.
- Any product exhibiting a condition commonly known as “image burn-in” which results when a static image is displayed on the product for an extended period of time.
- Removal, installation, insurance, and set-up service charges.
How to get service:
For information about receiving service under warranty, contact ViewSonic® Customer Support (Please refer to the attached “Customer Service” page). You will need to provide your product’s serial number, so please record the product information in the space provided below on your purchase for your future use. Please retain your receipt of proof of purchase to support your warranty claim.
- For information about receiving service under warranty, contact ViewSonic® Customer Support (Please refer to the “Customer Service” page). You will need to provide your product’s serial number, so please record the product information in the space provided below on your purchase for your future use. Please retain your receipt of proof of purchase to support your warranty claim.
- To obtain warranty service, you will be required to provide: (a) the original dated sales slip, (b) your name, (c) your address, (d) a description of the problem, and (e) the serial number of the product.
- Take or ship the product, freight prepaid, in the original container to an authorized ViewSonic® service center.
- Round trip transportation costs for in-warranty products will be paid by ViewSonic®.
Limitation of implied warranties:
There are no warranties, express or implied, which extend beyond the description contained herein including the implied warranty of merchantability and fitness for a particular purpose.
Exclusion of damages:
ViewSonic®’s liability is limited to the cost of repair or replacement of the product. ViewSonic® shall not be liable for:
- Damage to other property caused by any defects in the product, damages based upon inconvenience, loss of use of the product, loss of time, loss of profits, loss of business opportunity, loss of goodwill, interference with business relationships, or other commercial loss, even if advised of the possibility of such damages.
- Any other damages, whether incidental, consequential or otherwise.
- Any claim against the customer by any other party.
- Repair or attempted repair by anyone not authorized by ViewSonic®.
| Contact Information for Sales & Authorized Service (Centro Autorizado de Servicio) within Mexico: | |
|---|---|
|
Name, address, of manufacturer and importers:
| |
| NÚMERO GRATIS DE ASISTENCIA TÉCNICA PARA TODO MÉXICO: 001.866.823.2004 | |
|
Hermosillo:
|
Villahermosa:
|
|
Puebla, Pue. (Matriz):
|
Veracruz, Ver.:
|
|
Chihuahua:
|
Cuernavaca:
|
|
Distrito Federal:
|
Guadalajara, Jal.:
|
|
Guerrero Acapulco:
|
Monterrey:
|
|
MERIDA:
|
Oaxaca, Oax.:
|
|
Tijuana:
|
FOR USA SUPPORT:
|
Read these instructions carefully, keep them in a safe place, and follow all warnings and instructions.
General Safety Precautions
- During normal operation, warm air and a slight odor may come from the ventilation.
- When using the projector, avoid direct exposure to the projector’s exhaust vent.
- Keep the remote control or loose batteries away from children or pets.
Installation
- Follow the manufacturer's recommended installation guidelines to ensure safe and optimal operation.
- Leave at least 50 cm (20 in.) of open space around the projector to ensure proper ventilation.
- Place the projector in a well-ventilated area. Do not place anything on the projector that prevents heat dissipation.
- Do not place any heavy objects on the projector or cables.
- Do not place the projector in an unstable location. The projector may fall, resulting in injury or damage.
- Do not stand the projector upright. The projector may fall, resulting in injury or damage.
- Do not use the projector near open flames, sparks, or hot surfaces.
- Do not use the projector near water or in humid conditions and avoid exposing it to rain or moisture.
- Do not expose the projector to direct sunlight or other sources of sustained heat.
- Always route and manage cables connected to your projector to prevent tripping, pulling, or grabbing.
- The projector is designed to operate at 120/240V AC. Unstable voltages can harm the projector. Use a power stabilizer, surge protector, or UPS in areas with frequent power cuts or surges.
Power Cord Safety
- Do not compress the power cord, particularly at the plug and at the point where it connects to the projector.
- Do not use the projector if the power cord or plug is damaged.
- The power cord is designed with a grounding prong to ensure safe operation. Do not remove or damage the grounding prong.
- Only use the original power cord and do not use damaged or modified cords.
- Unplug the projector when it will be unused for long periods of time.
Handling
- When moving the projector, handle it with care to avoid damage or injury.
- Only use attachments and accessories specifically designed and approved by the manufacturer to ensure compatibility and safety.
Troubleshooting
- If smoke appears, an abnormal noise, or a strange odor is present, immediately turn the projector off and contact your reseller or ViewSonic. It is dangerous to continue using the projector.
- Refer all servicing to qualified service personnel.
- Do not disassemble the projector. It contains electrical components that can cause shock.
Lens Safety
- When using the projector, avoid looking directly at the projector lens.
- Avoid blocking the projection lens when using the projector, as this can cause objects to overheat and potentially ignite.
- When using the projector, make sure the lens shutter is open and the lens cap is removed.
Lamp Safety
- Unplug the projector before replacing the lamp assembly or component.
- Allow the projector to cool for approximately 45 minutes before replacing the lamp or performing basic maintenance.
- Lamps should be replaced at the recommended lifespan to avoid unexpected failure.
Caution

Possibly hazardous optical radiation is emitted from this product. As with any bright light source, do not stare into the beam, RG2 IEC 62471-5:2015. Additional warning against eye exposure for close exposures less than 1 m (3.28 ft).
Before Mounting the Projector to the Ceiling
- Use a compatible ceiling mount kit and ensure secure installation for safe operation.
- Improper ceiling mount kits can lead to projector falls due to incorrect screw size or length.
- Ceiling mounting is recommended to place the projector above the eyes of children.
Warning: Display title "Laser Caution" overrides earlier display title "LX700-4K RGB".
Laser Safety Information
This product belongs to CLASS I laser product and complies with IEC 60825-1:2014, EN 60825-1:2014/A11:2021, EN 50689:2021. CLASS 1 CONSUMER LASER PRODUCT EN50689:2021.

Note: The above laser cautions are located on the bottom of this projector.
- Notice is given to supervise children and to never allow them to stare into the projector beam at any distance from the projector.
- Notice is given to use caution when using the remote control for starting the projector while in front of the projection lens.
- Notice is given to the user to avoid the use of optical aids such as binoculars or telescopes inside the beam.
- Complies with 21 CFR 1040.10 and 1040.11 except for conformance as a Risk Group 2 LIP as defined in IEC 62471-5:Ed. 1.0. For more information see Laser Notice No. 57, dated May 8, 2019.
- IEC 62471-5:2015 RISK GROUP 2.
Glossary of Terms
Note: Some terms may not be applicable to your device.
Aspect Ratio
- Refers to the ratio of the image width to the image height.
Brightest Mode
Brightness
- Adjusts background black levels of the screen image.
CEC (Consumer Electronics Control)
Color
- Adjusts the color saturation.
Color Temperature
- Allows users to select specific color temperature settings to further customize their viewing experience.
Contrast
- Adjusts the difference between the image background (black level) and the foreground (white level).
Focus
Gamma
HDMI
HDMI Range
- Allows the user to select HDMI greyscale range between 0~255 (full range) , 16~240 (limited range) or Auto by the signal type detected.
HDR (High-Dynamic Range)
- Keeps the brightness level and enhances details on the dark level.
High Altitude Mode
- Optional mode for users who live in an environment between 1,500 m and 3,000 m above sea level, and the temperature is between 5° C and 25° C. Activating it will improve projector cooling and performance.
Information
Input Select
- Toggles between the various input options that are available for the projector.
Keystone
Light Source Level
Movie Mode
Sharpness
Projector does not turn on
| Troubleshooting Checks | Yes/No | Possible Solutions |
|---|---|---|
| Is the power indicator lit? | Yes | Turn the projector off, then turn it back on. |
| No | Check the power connection between the projector and the power outlet. | |
| Is the power cord plugged into a power outlet? | Yes | Try another power outlet or use some other electrical device to confirm the same power outlet is working. |
| No | Plug the power cord into a power outlet and press the Power button on the projector's keypad or remote control. |
No image appears
| Troubleshooting Checks | Yes/No | Possible Solutions |
|---|---|---|
| Is your PC/video device turned on or in sleep mode? | Yes | Check the cable connection between your PC/video device and the projector. |
| No | Turn your PC/video device on or wake it up from sleep mode. If in any doubts, consult your PC/video device's documentation. | |
| Is the image input selected correctly? | Yes | Turn the projector off, then turn it back on. |
| No | Select the correct input source. If multiple devices are connected, manually adjust the input source by pressing the Source Input button on the projector's keypad or remote control. |
Image is flipped upside down or mirrored left to right
| Troubleshooting Checks | Yes/No | Possible Solutions |
|---|---|---|
| Is the projector hung from the ceiling? | Yes | Check the Ceiling-Top/Rear-Top option. |
| No | Turn the projector off, then turn it back on. | |
| Is the projector placed on a desk/floor? | Yes | Check the Front/Rear option. |
| No | Turn the projector off, then turn it back on. |
Image is blurred
| Troubleshooting Checks | Yes/No | Possible Solutions |
|---|---|---|
| Is the lens dirty? | Yes | Follow the procedure in the Maintenance section to clean the lens. |
| No | Adjust the Focus Ring until the image is clear. |
Image is not displayed correctly
| Troubleshooting Checks | Yes/No | Possible Solutions |
|---|---|---|
| Is the image cut off, or not fitting on the screen? | Yes | Press the Zoom In/Zoom Out button on the remote control to return to the original image size. If the image is still not displayed correctly, reset the Image Settings. |
| No | Reset the Image Settings. |
Remote control does not work
| Troubleshooting Checks | Yes/No | Possible Solutions |
|---|---|---|
| Are there any obstacles between the remote control and projector? | Yes | Remove the obstacle(s). |
| No | Aim the remote control at the projector's IR receiver within the effective distance and angles when performing an operation. | |
| Are the batteries installed correctly? | Yes | If the remote control still does not work, try another set of new batteries to confirm the current batteries have power. |
| No | Install the batteries again. |
General Precautions
- Before performing any maintenance, turn off the projector and unplug the power cord from the outlet.
- Do not spray or pour liquid directly onto the projector.
- Handle the projector with care, as scratches may be more visible on dark-colored models.
Cleaning the Lens
- Use an air blower to remove dust.
- Use lens-cleaning paper or a soft, moist cloth with lens cleaner to gently wipe away smudges from the lenses.
Important: Do not use abrasive materials or glass cleaner to clean the lens.
Cleaning the Case
- Use a soft, dry cloth.
- If the case is still not clean, apply a small amount of non-ammonia, non-alcohol based, mild non-abrasive detergent onto a clean, soft, lint-free cloth, then wipe the surface.
Important: Do not use wax, alcohol, benzene, thinner, or other chemical detergents for cleaning.
Storing the Projector
If the projector will not be used for an extended period of time, observe the following:
- Retract the adjustable foot completely.
- Remove the batteries from the remote control.
- Pack the projector in its original packaging.
- Store the projector in a location that falls within the projector’s storage conditions.
Disclaimer
- ViewSonic® does not recommend the use of any ammonia or alcohol-based cleaners on the display screen or case. Some chemical cleaners have been reported to damage the screen and/or case of the monitor.
- ViewSonic® will not be liable for damage resulting from use of any ammonia or alcohol-based cleaners.