LS901HD LS901-4K Mounting the Projector: Difference between revisions
From ViewSonic Documentation
// via Wikitext Extension for VSCode |
// via Wikitext Extension for VSCode |
||
| Line 16: | Line 16: | ||
</ol> | </ol> | ||
{{Note-yellow| | {{Note-yellow|'''<translate>CAUTION</translate>''' | ||
'''<translate>CAUTION</translate>''' | |||
:* <translate>Avoid installing the projector near a heat source or air conditioner.</translate> | :* <translate>Avoid installing the projector near a heat source or air conditioner.</translate> | ||
:* <translate>Keep at least a 10 cm (3.9 in.) gap between the ceiling and the bottom of the projector.</translate> | :* <translate>Keep at least a 10 cm (3.9 in.) gap between the ceiling and the bottom of the projector.</translate> | ||
}} | }} | ||
Latest revision as of 05:55, 8 November 2024
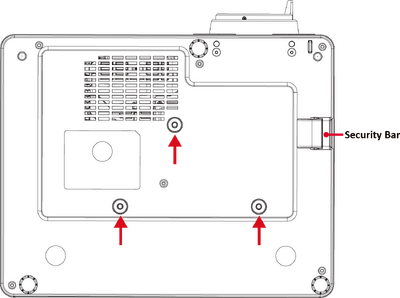
Mounting the Projector
Note: If you buy a third party mount, please use the correct screw size. Screw size can vary depending on the thickness of the mounting plate.
- To make sure the most secure installation, please use a ViewSonic® wall or ceiling mount.
- Make sure the screws used to attach the mount to the projector meet the following specifications:
- Screw type: M4 x 10
- Maximum Screw Length: 10 mm

CAUTION
- Avoid installing the projector near a heat source or air conditioner.
- Keep at least a 10 cm (3.9 in.) gap between the ceiling and the bottom of the projector.